Hello my crafty friends! I hope you are having a fabulous week so far. I’m back today for Xyron and I have a cute project to show you, using the Creative Station Lite, with a double-sided laminate cartridge.
I have always loved to decorate my planner. If my planner looks organized and beautiful, I get inspired to use it more. Write my thoughts down and update my schedule.
As soon as I open my planner, I would like to see something inspiring, something beautiful. Most of the times the cover that you get when you purchase your planner is plain and boring ~ so I decided to create my own planner insert.
I started out by cutting a Bristol Smooth white card stock measuring 4 ¼ by 6 ¾. I am using my favorite combination of distress oxide inks for galaxy backgrounds (i.e., fossilized amber, picked raspberry, wilted violet, broken china and black soot). Using my mini-ink blending tools, I started to sponge the fossilized amber in the middle, then blended the rest of the distress oxide colors onto my card stock.
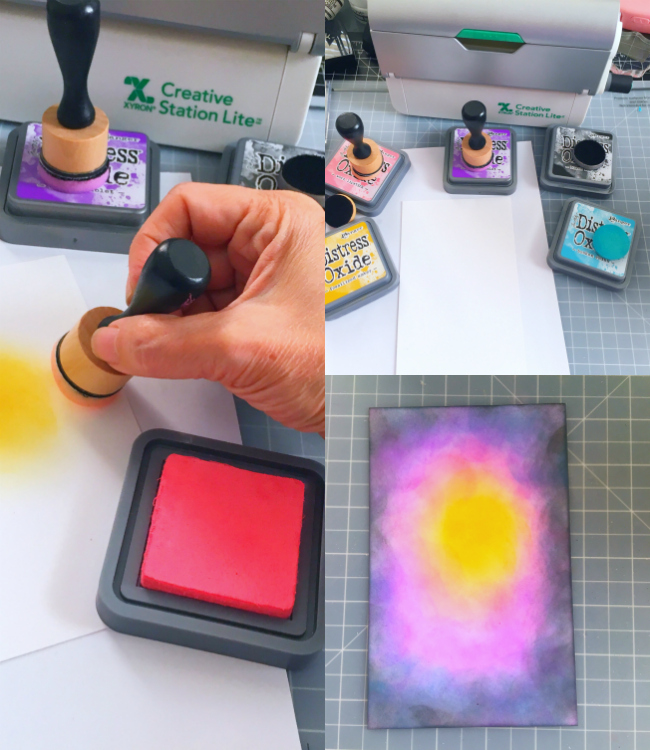
I used my distress sprayer to spray some water on my colored background to achieve the distress look, dabbing the excess water droplets with a paper towel. They look like stars in the sky!

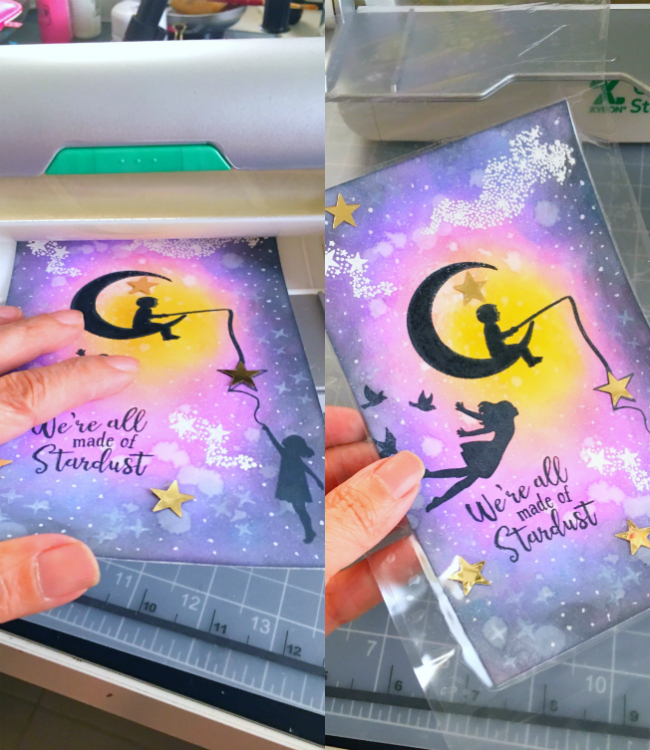
I stamped by images using a stamp set by Hero Arts onto my colored card stock with memento tuxedo black ink. To add the stars, I stamped them with versa mark ink and heat set it with white embossing powder. I also added the sentiment “We’re All Made of Stardust”. To finish the design, I added some gold star confetti.
Using my Creative Station Lite with a double-sided laminate cartridge, I inserted my decorated planner insert through the machine, cranked the handle, and cut it through using the trimmer on the other side. Here’s what it looks like once it’s fully laminated. I really love that you can use laminate projects using this machine without having to use heat or electricity. I trimmed the excess with my scissors.
I used my We R Memory Keepers Crop-A-Dile to punch the holes on my planner insert. Here’s what it looks like inside my travel planner.


Isn’t it beautiful? I absolutely love creating my own planner inserts to decorate my planner. What do you guys think? I hope you like my project today. For more project inspiration using Xyron products, please visit the Xyron Facebook Group here (https://www.facebook.com/xyroninc/) or the website at www.xyron.com. I have also listed and linked the supplies I used below. Have an amazing day!
————-SUPPLIES————
Click on the link to go directly to the product. Where available, I used compensated affiliate links which means if you make a purchase I receive a small commission at no extra cost to you. Thanks for your support.