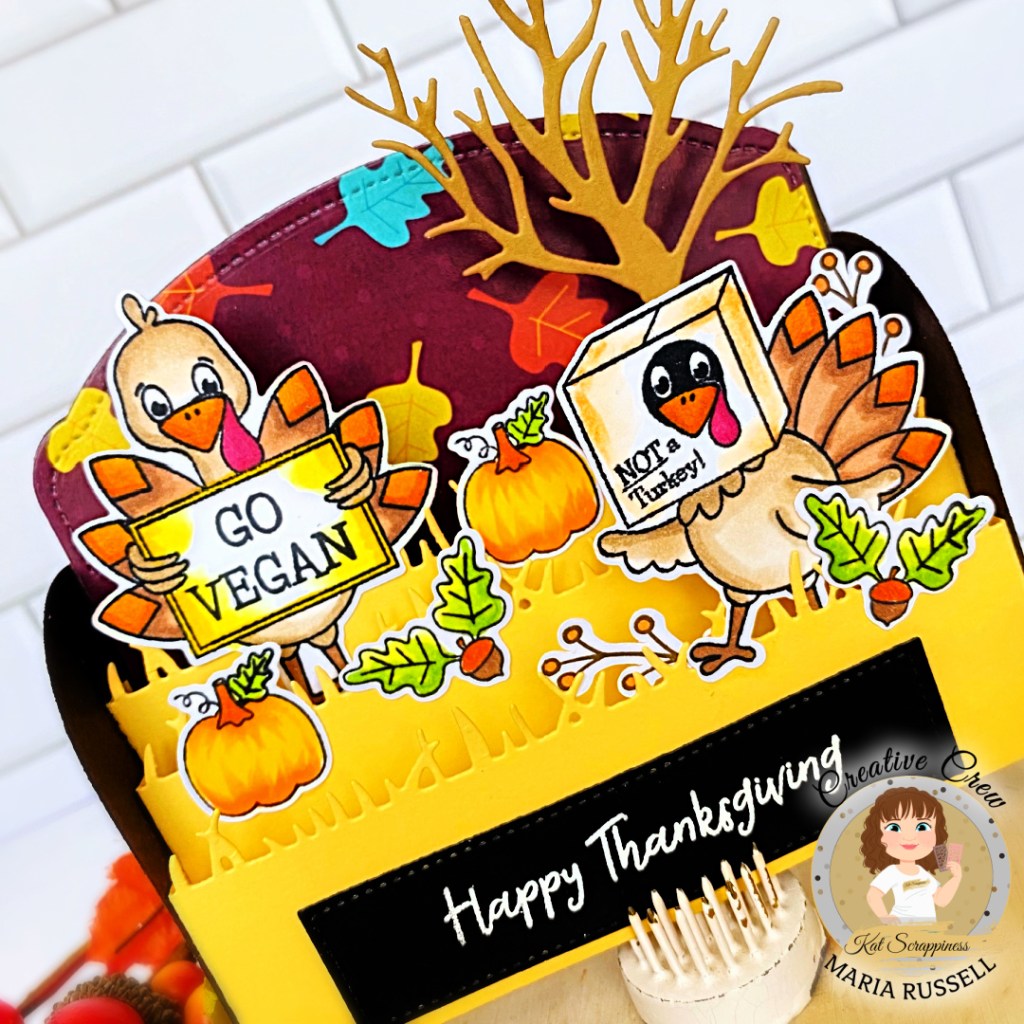
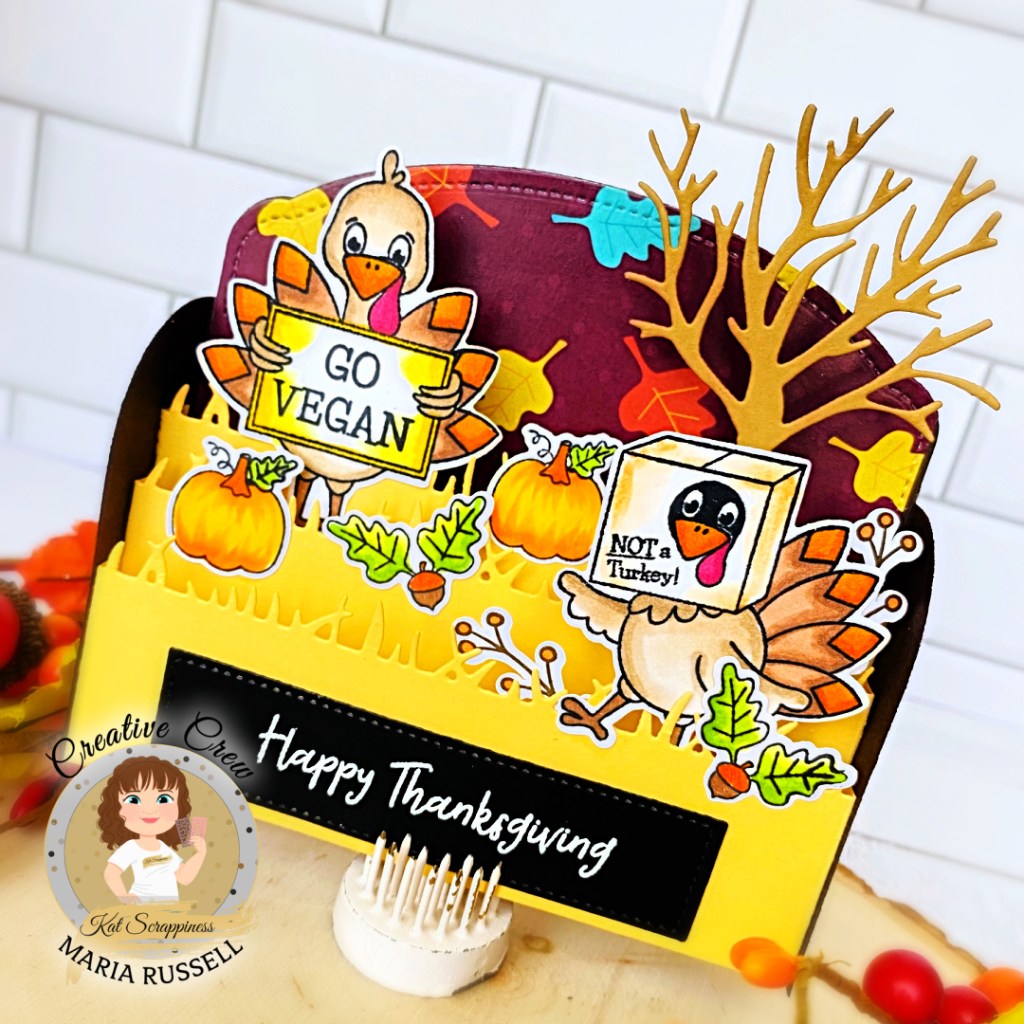
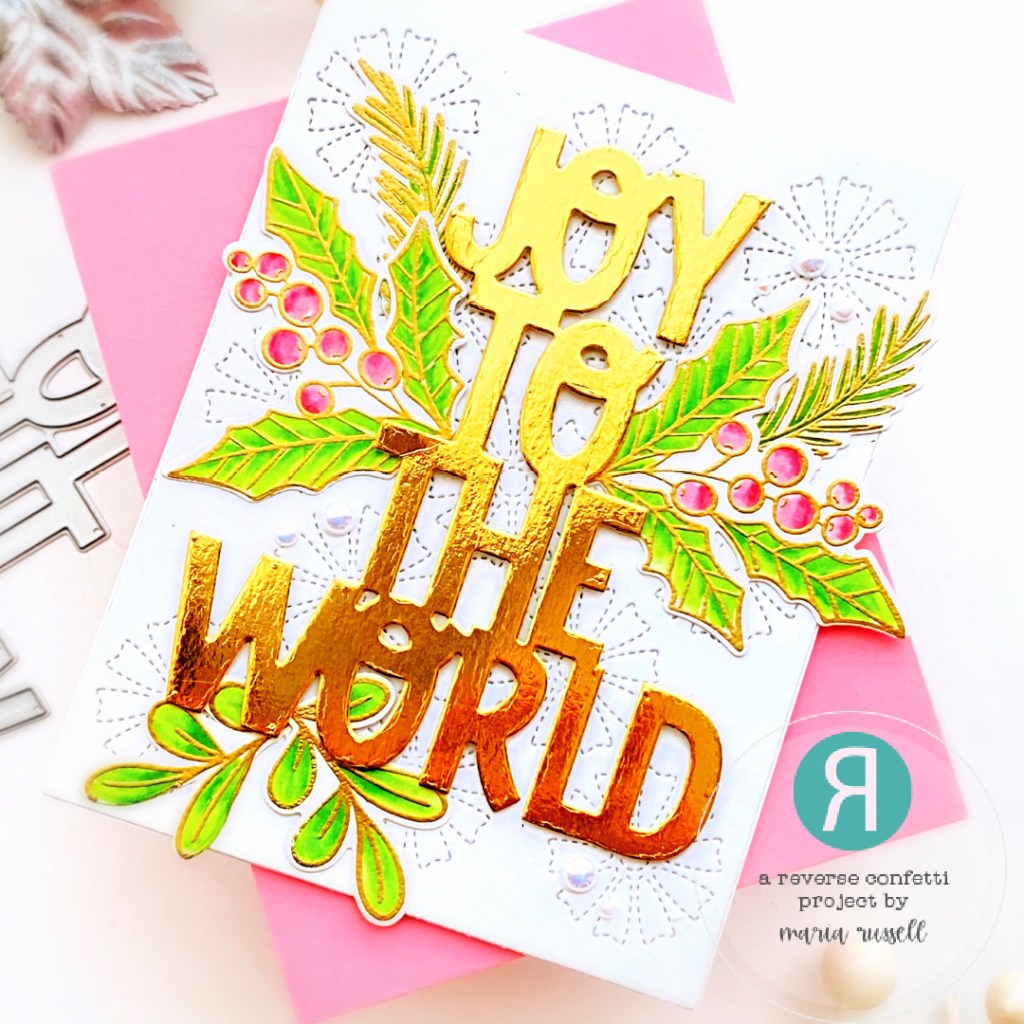
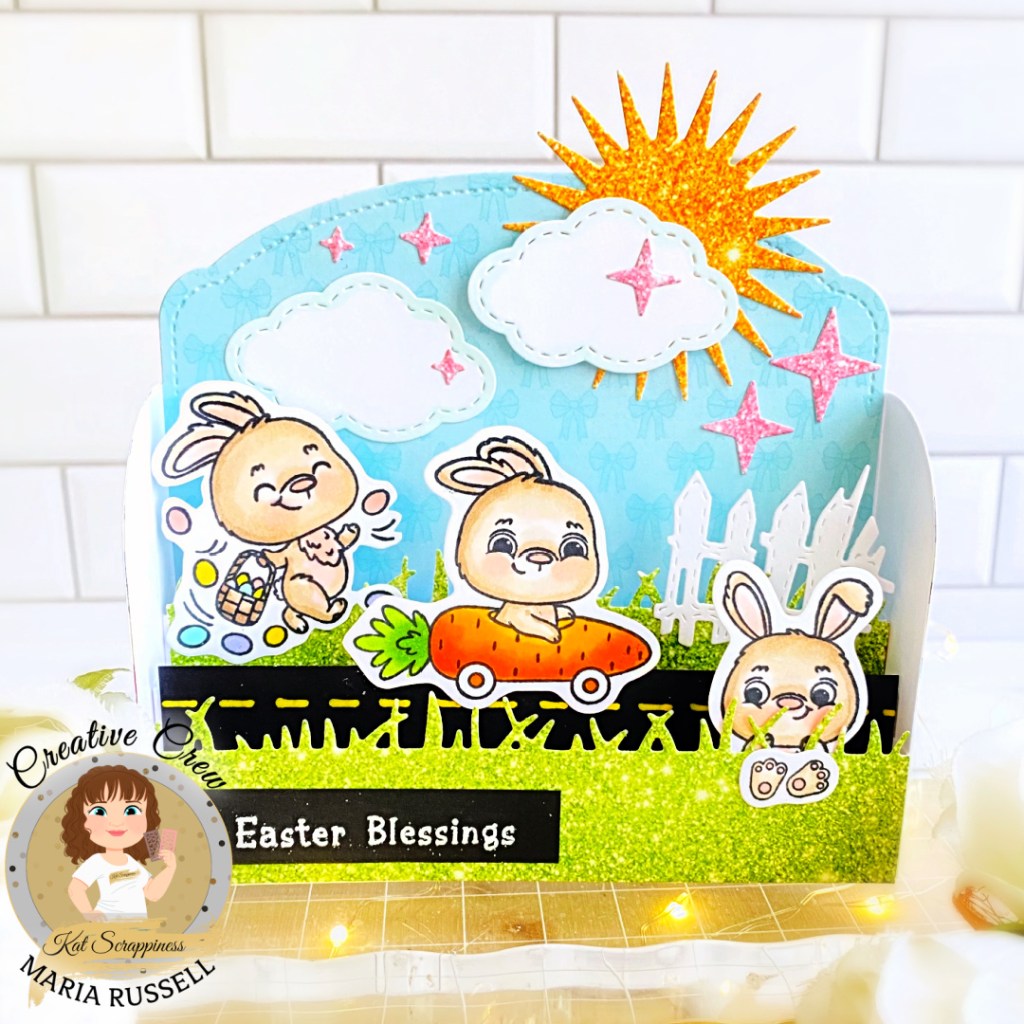
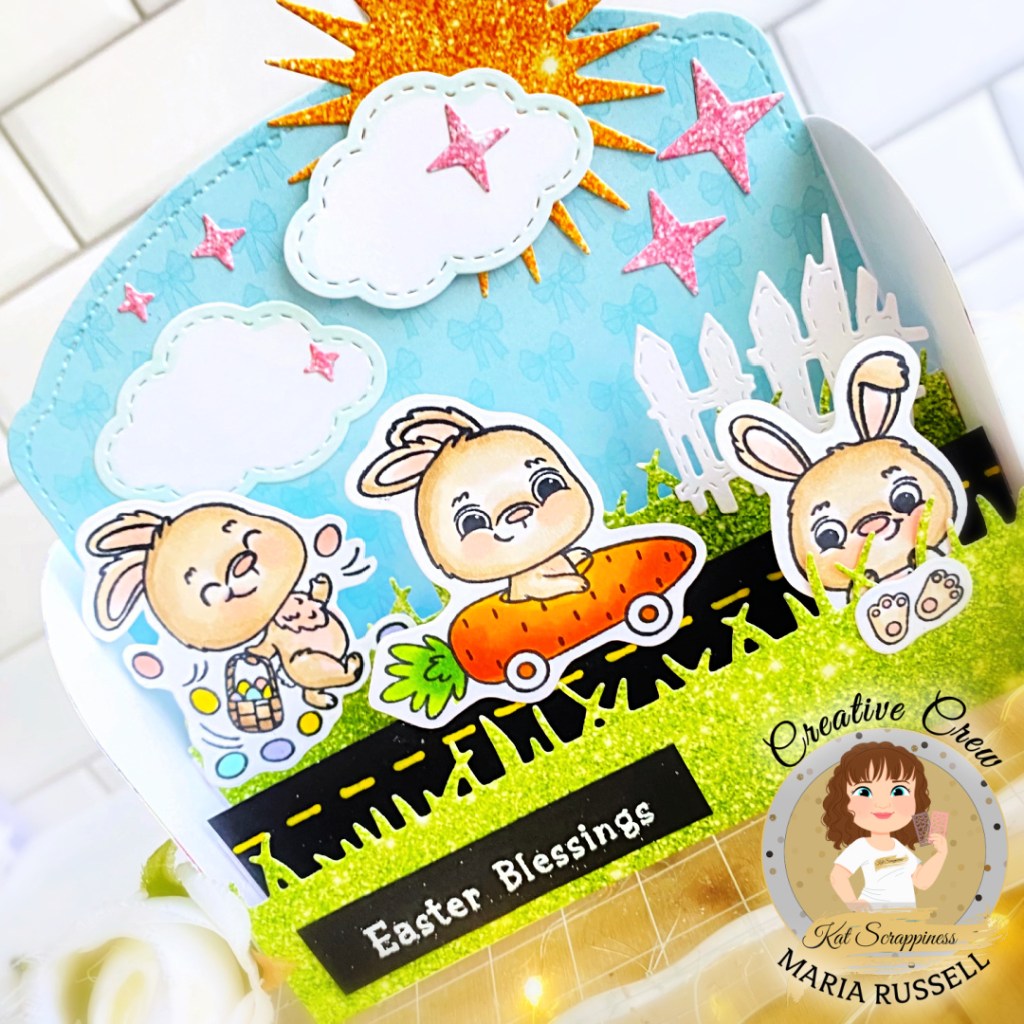
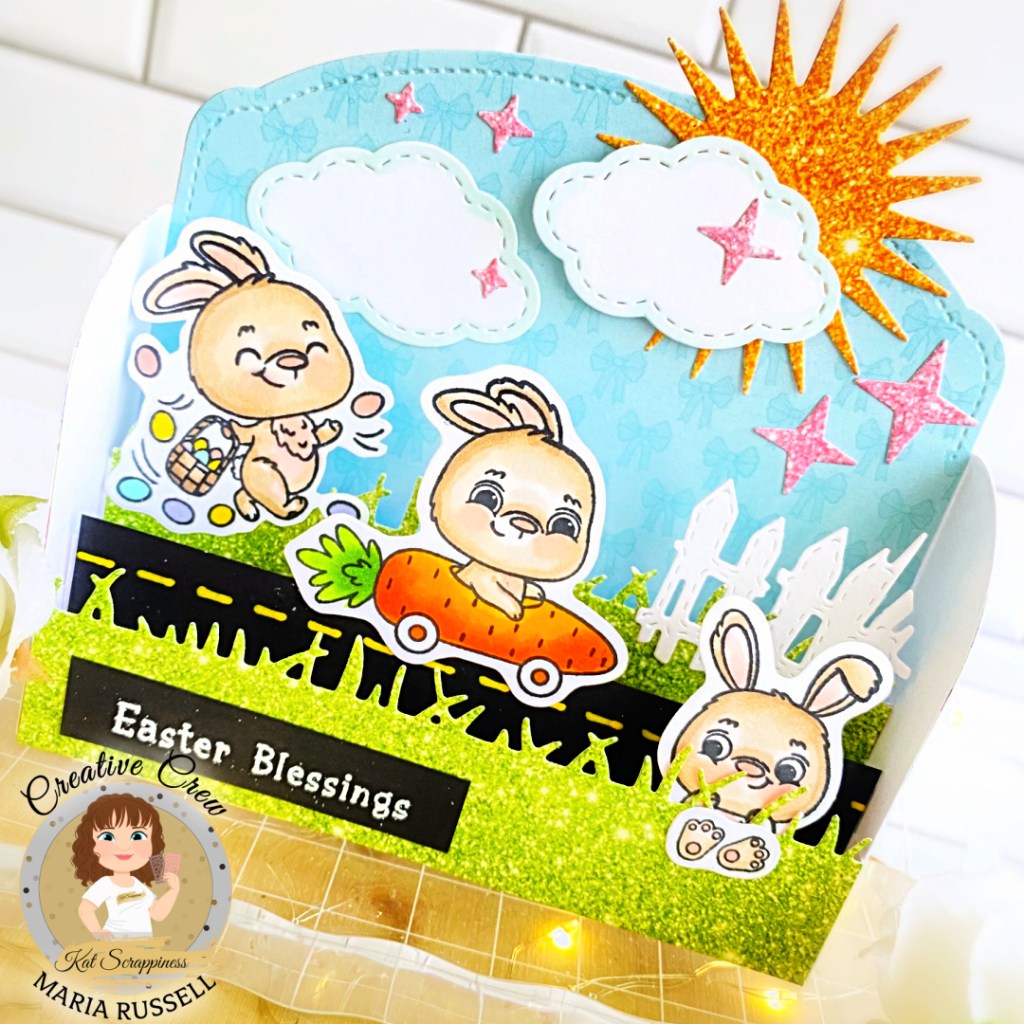
D.I.Y valentine Banner with Kat Scrappiness

Do you have a HUGE stash of 12×12 patterned paper that you got from a Michael’s sale and running out of ideas to use them all up? How about making a DIY Valentine’s Banner? With a few dies from Kat Scrappiness, Inc. you can make a collection of cute banners to display for any occasion and season.

I always LOVE decorating for Valentine’s Day but sometimes I just don’t have the time to go out and get a few decor. Since I have a lot of craft supplies, I figured I’d make my own banner today.

Here’s how I made this project:

  • measure the counter and cut the twine.
  • prepare your hot-glue gun and sticks and line them all up together with your twine.
  • I have a few vase fillers that I purchased from Daiso a few years ago so I figured I’d add them to my project. I adhered the foam hearts first and added the die-cut hearts.
  • make sure to use a silicone mat underneath so your project doesn’t stick on your table.
  • adhere the letters “XO” on the pink heart.
  • use some stickers to adhere on the other die-cuts. As I mentioned we are using our stash so go ahead and add them to your project.
  • I placed my banner on the kitchen counter and added a few of my favorite decor and candles from Home Goods.
  • light up the candles and enjoy your work!

Before I go, take advantage of this Valentine’s deal by Kat Scrappiness, Inc. Sale starts today and ends on the 7th. See graphic below for your coupon code:

I hope you like this project today and got inspired. Below, you will find links to the supplies used to create this project. Where available, I use compensated affiliate links at no extra cost to you. Your support helps me to keep bringing you new projects and inspiration. Thank you for stopping by, and have an amazing day!

———-SUPPLIES———-

Winter Mugs Card with Pretty Pink Posh

Hello my crafty friends! Happy Friday! As I wait for my household effects to be shipped to the new house and dream about crafting again, I want to share this card that I made a few weeks ago mixing some new and old products by Pretty Pink Posh. This is also my entry for the Winter Coffee Lovers Blog Hop.

For my project today, I am showcasing the Winter Mug Dies, along with the Winter Foliage Dies, Pine Wreath Stamp Set (sentiment) Layered Winter Foliage Stencils, Scallop Frames Dies and one of my favorite older dies called Twine and Bows.

Here’s how I made this card:

  • die-cut the blue frame on some light blue card stock using the Scallop Frames Dies. Adhere this panel on the card with foam adhesive for added dimension.
  • assemble the mug, candy canes, pinecones etc.
  • use some light pink alcohol marker to color the marshmallows.
  • adhere the die-cuts together and foam-mount on the card using two layers of foam adhesive. This will make sure that the mug stands out a bit from the background.
  • stamp the sentiment on some red card stock using the word “joy” from the Pine Wreath Stamp Set.
  • sprinkle some white embossing powder and heat set with the heating tool.
  • adhere the sentiment with foam adhesive to finish the design.

I just love to mix and match some old and new stamps and dies to create this card. Here’s another look:

I hope you like this Christmas card today and got inspired. Below, you will find links to the supplies used to create this project(s). Where available, I use compensated affiliate links at no extra cost to you. Your support helps me to keep bringing you new projects and inspiration. Thank you for stopping by, and have an amazing day!

———-SUPPLIES———-

KS – Halloween & Thanksgiving Release

Scrappiness

It’s finally here! The Kat Scrappiness, Inc. September release is AMAZING! You will find A LOT of new dies, stamp sets, paper pads and more!

For my first project today, I am showcasing the 3D Box Pop-Up Die and Waves Add-On Die Set, along with the Witches Brew Die Set, Creepy Crawly Die, A2 Reverse Scallop Frame (Stars) Creepy & Kooky Paper Pad, Toil & Trouble Stamp Set plus a lot more.

Here’s how I made this card:

  • adhere stars to the cauldron with liquid glue.
  • adhere the cauldron on the 3D Box card with liquid glue.
  • die-cut the witch’s legs from the Witches Brew Die Set from different colors of card stock and adhere them together. Add the witch’s legs to the
  • adhere the cauldron on the 3D Box card with liquid glue.
  • die-cut the witch’s legs from the Witches Brew Die Set from different colors of card stock and adhere them together. Add the witch’s legs to the 3D Box card also with strong double-sided tape.
  • adhere the spiderweb that was die-cut from the Creepy Crawly Die on the 3D Box card.
  • cut a few strips of acetate sheets and adhere some stars that were die-cut using the A2 Reverse Scallop Frame (Stars) for added texture and interest. I love that they look like they are floating!
  • finish the card design by adding the sentiment from the Toil & Trouble Stamp Set.

Here’s another look:

For my next 3D Box Card, I am showcasing the same 3D Box Pop Up Die, Grass Add-On Dies, along with the Gobble, Gobble Stamp Set, Gobble, Gobble coordinating dies, Gobble, Gobble Paper Pad, Crafter’s Essentials Halloween Dies and Stitched Sentiment Strip Dies.

I pretty much did the same steps above. The only difference is I stamped and die-cut the images from the Gobble, Gobble Stamp Set and cut using the Gobble, Gobble coordinating dies. I also used the Gobble, Gobble Paper 6×6 Paper Pad.

The “spooky” tree was die-cut using the Crafter’s Essentials Halloween Dies and adhered with double-sided tape and finishing the card design by adding the sentiment.

In a couple of hours, we are also having an Instagram hop where you can find more projects by the entire Design Team. We also have a GIVEAWAY! Hop on over to my Instagram handle @RPRMLR77 to join and WIN.

I hope you like this card today and got inspired. Below, you will find links to the supplies used to create this project(s). Where available, I use compensated affiliate links at no extra cost to you. Your support helps me to keep bringing you new projects and inspiration. Thank you for stopping by, and have an amazing day!

——-SUPPLIES——

September Release and Instagram Hop Info with Reverse Confetti

t’s finally here! It’s the September release by Reverse Confetti and we are having an Instagram Hop! My Instagram Handle is–> @RPRMLR77 but I will be linking all of our Instagram info at the end of the post. It will be great if you can hop along with us and see the projects created by the design team and our special “Fetti” Friends!

For my project today, I am showcasing the Poinsettia Stamp Set and Poinsettia Confetti Cuts along with the Joy to the World Confetti Cuts and the previously-released Stitched Daisies Cover Panel.

I decided to use the images that I stamped and heat-embossed from yesterday’s reveal. If you haven’t seen that project, I am going to tell you how I made them again.

Here’s how I made this project:

  • stamp the images a few times on some Bristol smooth white card stock with Versamark ink. Sprinkle some gold embossing powder and heat-set with the heating tool.
  • color the images in with Zig Clean Color Real Brush Markers (or any watercolor of your choice.
  • use the coordinating dies to cut them out.
  • die-cut the background panel using the Stitched Daisies Cover Panel on some pearlescent white card stock. Adhere this panel on some A2-size white notecard.
  • die-cut the Joy to the World Confetti Cuts on some gold card stock. Foam-mount the same to the card-front for added dimension.
  • adhere the images on the card with liquid glue.
  • finish the card design by adding some half-pearls for added texture and interest.

Here’s another look:

I hope you like this card today and got inspired. Below, you will find links to the supplies used to create this project(s). Where available, I use compensated affiliate links at no extra cost to you. Your support helps me to keep bringing you new projects and inspiration. Thank you for stopping by, and have an amazing day!

——SUPPLIES—–

Here’s the Instagram Hop Listing

Reverse Confetti

Audrey Tokach

Rachel Alvarado

Andrea Shell

Susan Wymer 

Emelie Hessler

Jenny Colacicco 

Maria Russell (that’s me!)

Heather Ruwe

Lisa Henke

Cheiron Brandon

Lien Leysen

Becky Roberts

Meg Brooks

Amy Kolling

Amy Rohl

Jennifer Kotas

Tricia Barber

Kelly Lunceford

Dana Kirby

Joy Baldwin

Michelle Short

Jeanne Jachna

April Antonio

Amy Tsuruta

Colleen Beamish

Countdown to Confetti September Release Day 3 – Poinsettia & Christmas Card Greetings + Giveaway Info

It’s the last day of the Countdown to Confetti Day by Reverse Confetti and we have some beautiful Christmas inspiration for you all today! TOMORROW IS RELEASE DAY and you can purchase everything you saw here on the countdown! There is also a GIVEAWAY so please read through the end of this post to find out how you can WIN!

For today’s reveal, the design team is showcasing the Poinsettia Stamp Set and Poinsettia Confetti Cuts along with the Christmas Card Greetings Stamp Set. I also used the Bag & Tags Creator Confetti Cuts.

I already started Christmas shopping and I thought the stamp set and dies will go perfectly well to decorate this present for a friend. The images are so beautiful and using these to accessorize the present will definitely give it a special personal touch.

Here’s how I made this project:

  • stamp the images a few times on some Bristol smooth white card stock with Versamark ink. Sprinkle some gold embossing powder and heat-set with the heating tool.
  • color the images in with Zig Clean Color Real Brush Markers (or any watercolor of your choice.
  • use the coordinating dies to cut them out.
  • die-cut the tags on some gold and pink card stock and stamp the sentiment from the Christmas Card Greetings Stamp Set with Versamark ink. Sprinkle some gold embossing powder and heat-set with the heating tool.
  • use some gold twine and loop through the tags.
  • wrap the present using some white wrapper.
  • use some gingham red & white ribbon first, then loop through the gold ribbon to finish wrapping the present.
  • add the pink and gold tags.
  • finish the present by adhering the stamped images on the box.

Here’s another closer look:

Hop along with us and see what the other team members have created! Leave a comment by noon central on September 15th for a chance to win. There are two $15 Gift Certificates up for grabs; one for a blog commenter and also one for a FaceBook commenter. Winners will be announced on the Reverse Confetti Blog and FB Group at 5 PM CST on September 15th (that is TODAY!). Make sure you pop over to the Reverse Confetti Blog for all the details!

Hop Listing

Reverse Confetti

Emelie Hessler

Maria Russell  (that’s me!)

Lisa Henke  

Meg Brooks  

Amy Kolling  

Jennifer Kotas   

Dana Kirby  

Jeanne Jachna  

Amy Tsuruta  

Colleen Beamish

Hope Candle with Matching Card

Hello everyone! I’m sharing two projects today, showcasing the #Ukraine Strong Stamp Set and Coordinating Dies, along with the Condensed Lowercase Alpha Die Set, Layered Bubbles Stencil Set and Transparent Heart Droplets.

I know that #Ukraine Strong Stamp Set was originally made to support Ukraine (and all profits will be donated to the  Ukraine Crisis Relief Fund. )  However, I am here to show you that you can stretch your stamps and use it for a different purpose.

I made these projects to support my sister who was diagnosed with Stage 4 Lymphoma in March this year. She went through chemo treatments (I cannot even tell you how hard it really was to see her go through it) and after her PETScan this month, the doctors told us that the chemo worked successfully. Even though she is not out of the woods yet and will still go through a few radiation treatments, we are so happy with this news.

The purple ribbon represents all types of cancer so this blog post is dedicated not only to my sister (Maria Pilar), but to all people who are either going through treatments or have survived this nasty disease.

For my first project, I decided to make this “Hope” candle. In my sister’s case, it just goes to show you that there is always HOPE at the end of the tunnel, and the power of prayer is really STRONG! You just need to believe that you can do it, and have faith in God to work his mysterious ways!

Here’s how I made this project:

My next project is the matching card to go with this candle.

I hope you like these projects and got inspired. Below, you will find links to the supplies used to create these projects. Where available, I use compensated affiliate links at no extra cost to you. Your support helps me to keep bringing you new projects and inspiration. Thank you for stopping by, and have an amazing day!

——–SUPPLIES——

Newton’s Nook Designs Halloween Inspiration Week

Hello and welcome back! I hope everyone’s doing well today! As we bid summer farewell, what could be more fitting than to start your week and get excited for Halloween!

This week, Newton’s Nook Designs is getting ready for Halloween with a fun Inspiration week! All week long, the NND Design Team will be sharing inspiration using some of our favorite Halloween products to get you in the mood for tricks and treats! Check out what I created today and don’t forget to check the NND Blog each day this week for more fun inspiration!

Last week, I shared this cute “Candy Corn” Halloween tag on my blog and my friend liked it so much that I had to re-create it this week. I am featuring the Fancy Edges Tag Die Set with the Trick or Treat Kittens stamp set and coordinating dies.

Before I start with the tag, I wanted to create this cute Witch’s Broom Pen to go with the treat! If you look closer, you will see the red glowing eyes that gives it a spooky effect! I thought this is really cute and will be a nice addition to the treat.

I cut a strip of baking paper. I used my specialty scissors to create the fringe and wrapped it around the bottom of the pen. I adhered the fringe with hot glue so it wouldn’t come off. I added a black bow at the bottom to finish the look. This pen can actually stand up on it’s own!

Next, I filled a small bag with some of my friend’s favorite candy bars and closed the top with some black curling ribbons. Last thing to do is to add a tag!

Step-by-Step Instructions for the Tag:

  • Stamp the image using the Trick or Treat Kitten Stamp set on Bristol smooth white card stock and color the images in with Zig Clean Color real Brush Markers.
  • Use coordinating die to die-cut the image.
  • Create the Candy Corn Tag by die-cutting white, orange, yellow and black card stock using the Fancy Edges Tag Die Set. Adhere all pieces together with liquid glue.
  • Stamp the sentiment on the tag with Black Onyx ink.
  • Adhere the image on the tag with foam adhesive for added dimension.
  • Attach the tag to the treat bag with some baker’s twine.

My friend and I love Halloween so much! Not only will she love the treats inside this treat bag but I’m sure she is also going to love the Witch’s Broom Pen. It can stand up and the eyes glow in the dark! Check out the photo below!

I hope you like my project today and got inspired! The supplies I used are listed and linked below. Don’t forget to visit the Halloween Products Category at Newton’s Nook Designs and get your favorites for creating some cute and spooky Halloween crafts!

——-SUPPLIES——

Seasonal Maple Bag Tags with Artesprix Sublimation Markers & Ink Pad

Create cute seasonal maple bag tags with the Art of Sublimation!

Learn how to create one-of-a-kind seasonal bag tags with Artesprix Sublimation Markers and Ink Pad!

Hello! Maria Russell here again and I am super excited to share with you today’s project! Since I’ve already created some summer-themed bag tags a few months ago, I thought I’d share more projects today celebrating Halloween, Winter and Spring seasons.

This image has an empty alt attribute; its file name is Art_MapleBagTags1A.jpg


Here’s what you’ll need to create the project.

This image has an empty alt attribute; its file name is IMG_8362-1024x768.jpeg


Materials:

Tools:

This image has an empty alt attribute; its file name is IMG_8378-768x1024.jpeg


Step-by-Step Tutorial:

Step 1.

Trace your maple tag on plain typing paper with a pencil.

This image has an empty alt attribute; its file name is IMG_8363-768x1024.jpeg


Step 2.

Before I stamped the images, I refilled my Artesprix Sublimation Stamp Pad with the (new) Sublimation Stamp Ink Refill. Since I was creating 3 designs, I wanted to make sure that my stamp pad is juicy so that my images will look crisp when stamped on the paper.

This image has an empty alt attribute; its file name is IMG_8364-768x1024.jpeg
Add a few drops of the ink and use a plastic card to spread them evenly on the pad.


Step 3.

Place your design inside the stamping tool and position the stamp. I free-handed the hill using the Black Sublimation Marker in fine-point.

This image has an empty alt attribute; its file name is IMG_8365-768x1024.jpeg


Use the Artesprix Sublimation Stamp Pad to stamp the images and color with the Sublimation Markers. I repeated these steps for the three tags, assembly-line style.

This image has an empty alt attribute; its file name is IMG_8367-768x1024.jpeg


Step 4.

Secure your design on your Maple Bag Tag by using Artesprix Heat Tape. If you are going to sublimate using the Artesprix Heat Press, you only need one on each side to hold it down. If you are using an iron, you will need a few more. Sometimes the iron will cause the image to slip and you will get a ghost image. [Only use Artesprix Heat Tape on the outer edge of the design (not over it).]

Step 5.

Turn your Artesprix Heat Press on and set the temperature to 400 degrees Fahrenheit and the timer for 45 seconds. Create your sublimation sandwich. Cut two pieces of Protective Paper to cover your Artesprix Halloween Decorative Metal Panel on the top and bottom. [Designer tip: Make sure that your design is facing the heat source before you heat press.] Place it inside the Heat Press and close the machine. The Heat Press will beep indicating that your project is finished!

This image has an empty alt attribute; its file name is IMG_8373-768x1024.jpeg


Step 6.

I sublimated the tags one after another (“assembly-line style“). This made it easier for me to get them all done while the machine is on!

This image has an empty alt attribute; its file name is IMG_8378-1-768x1024.jpeg


Step 7

While wearing protective gloves, lift the handle and take your Sublimated Maple Bag tags out of the machine and sublimate the others. Place them all on top of the Protective Project Mat and give it about half an hour to cool it down.

Step 7.

Gently remove the paper to reveal the Sublimated Maple Bag Tag.

This image has an empty alt attribute; its file name is IMG_8379-1024x768.jpeg


Step 8

I created a double-sided Halloween Tag. Here’s the design:

This image has an empty alt attribute; its file name is IMG_8372-1024x768.jpeg


Here’s what it looks like after sublimation:

This image has an empty alt attribute; its file name is Art_MapleBagTags1D.jpg


I didn’t add any sentiments on this design. Since I LOVE Halloween images so much, I can use this bag tag all-year round!

Here are the three Maple Bag Tags –> Halloween/Fall, Woodland/Winter theme and a floral one for Spring:

This image has an empty alt attribute; its file name is Art_MapleBagTags1C.jpg


Join in the Iron-on-Ink Fun!

Love this All-seasons Maple bag tags project? Join the Iron on Ink Community on Facebook for more project ideas and to share your own creative iron-on ink projects.

If you like this project, you need to check out Nicole Martel’s Picture Frame Design.

You will find all the blanks and other supplies available for purchase on the Artespix website. Thank you for stopping by and happy crafting!

**The links below are affiliate links. If you decide to make a purchase, you are supporting today’s post writer at no extra cost to you, thank you! These products are endorsed by the author and we hope you’ll love them, too.

———-SUPPLIES————

D.I.Y. Halloween Decorative Metal Panel with Artesprix

Too cute to Spook? Get Ready for Halloween and Create this Cute Home Decor with the art of sublimation!

Learn how to create one-of-a-kind Halloween decor with Sublimation Markers and Ink Pad!

Hello, Artesprix fans! I am super excited to share with you today’s project!  Halloween is my favorite holiday and I go all-out decorating my home! I wanted to do a little bit of mixed-media on this metal panel and I love how this one turned out!

This image has an empty alt attribute; its file name is Art_MetalPanel1C.jpg


Here’s what you’ll need to create the project.

Materials you'll need.


Materials:

Tools:

Heat Press


Step-by-Step Tutorial:

Step 1.

Type and print out the sentiment on a plain piece of typing paper. Trace your blank, making sure your design is centered.

This image has an empty alt attribute; its file name is IMG_8168-768x1024.jpeg


Step 2.

Flip your design and trace the sentiment using Artesprix Black Sublimation Marker in Fine Point [Designer tip: use a light box so that you can easily trace the sentiment].

This image has an empty alt attribute; its file name is IMG_8172-768x1024.jpeg


Step 3.

Place your design inside the stamping tool and position the stamp. Use the Artesprix Sublimation Stamp Pad to stamp the images.

Using a stamping tool will enable you to stamp the images a couple of times on the exact position.


Step 4.

Color the images using Artesprix Sublimation markers.

it looks muted on paper at first. It will look so much vibrant after you heat press.


Step 5.

Secure your design on your blank by using Artesprix Heat Tape [Designer tip: I used my light box once again to make sure that my design is straight and perfectly centered]. If you are using the Artesprix Heat Press, you only need one on each side to hold it down. If you are using an iron, you will need more. Sometimes the iron will cause the image to slip and you will get a ghost image. [Only use Artesprix Heat Tape on the outer edge of the design (not over it).]

Using a light box will help you position the design perfectly.


Step 6.

Turn your heat press on and set the temperature to 400 degrees Fahrenheit and the timer for 90 seconds. Create your sublimation sandwich. Cut two pieces of Protective Paper to cover your project on the top and bottom. [Designer tip: Make sure that your design is facing the heat source before you heat press.] Place it inside the Heat Press and close the machine. The Heat Press will beep indicating that your project is finished!

Ensure to cover your design with Artesprix Protective Paper.


Step 7.

While wearing protective gloves, lift the handle and take your Sublimated Metal Panel out of the machine. Place the metal panel on top of the Protective Project Mat and give it about half an hour to cool it down.

It is important to wear heat-protective gloves while doing this process.


Step 8

Gently remove the paper to reveal the design!

Make sure to wait about half an hour before touching the metal panel.


Step 9

Use a die from your collection to add the cute ghost. I’ve die-cut the ghost four times on some 110 lb. card stock for added dimension. I also added the cute bow and some sparkling jewel to create more texture. Use your glue gun to adhere this piece onto the panel.

Die-cut the piece 4 times and adhere with liquid glue.


Here’s a closer look at the decorative panel:

Mixed Media Halloween Decor


Isn’t this too cute to spook? I had so much fun creating this cute Halloween Metal Panel. I can’t wait to create one as a fall decor and one for Christmas!

This image has an empty alt attribute; its file name is Art_MetalPanel1A.jpg


Join in the Iron-on-Ink Fun!

Love this D.I.Y Halloween Decorative Metal Panel project? Join the Iron on Ink community on Facebook for more project ideas and to share your own creative iron-on ink projects.

Don’t forget to save this to Pinterest and share with all your friends!

If you like this project, you need to check out Gina Knuppenberg’s Sublimation Vinyl Project.

You will find all the blanks and other supplies available for purchase on the Artespix website**. Thank you for stopping by and happy crafting!

**The links below are affiliate links. If you decide to make a purchase, you are supporting today’s post writer at no extra cost to you, thank you! These products are endorsed by the author and we hope you’ll love them, too.

——–SUPPLIES——–