

Hello crafters and stampers! Today the Xyron design team is teaming up with the amazing Maya Road design team. If you haven’t checked the past posts by my fellow DT members, they have made some wonderful projects that I was “ooh-ing” and “ahh-ing” the last few days.
I am also happy to share that everyday during the blog hop Xyron will be giving away a “sparkly” X sticker maker. Who doesn’t love a sticker maker, right? And best of all it’s sparkly!!!! All you have to do is leave a comment on the Maya Road projects that Xyron had shared on the Facebook page https://www.facebook.com/xyroninc during the hop and Xyron will announce the winner the following morning.

Maya Road is also giving away a $15 gift certificate to their shop. Here’s a link to the Maya Road’s blog for full details: http://www.mayaroad.typepad.com
For my projects, I am showcasing the Enjoy Coffee Die bundle and I made I gift tag and two cards. The tag and the first card did not have any stamping since the die bundle is full of cute dies. I die-cut them all with my Neenah 100 lb. card stock and my patterned paper.
For the gift tag, I wanted to create a shaker tag and decided to use my exacto-knife to cut out the middle portion of the die-cut, adhered the acetate with my Xyron mega runner adhesive, added the foam and used my espresso mix sequins for my shaker elements from Kat Scrappiness. It turned out really cute!

For my first card, I wanted it to look like the coffee is sitting on top of the table with the little spoon. I used a die from my stash to die-cut the white piece twice. I then used my embossing folder to emboss the first piece, making it look like a lacy, tablecloth. I also used my Xyron creative station to make my own foam adhesive with fun foam. I wanted to give the “tablecloth” a little dimension. I then used my Xyron mega tape runner to adhere everything to my front panel. Here are the step-by-step photos:


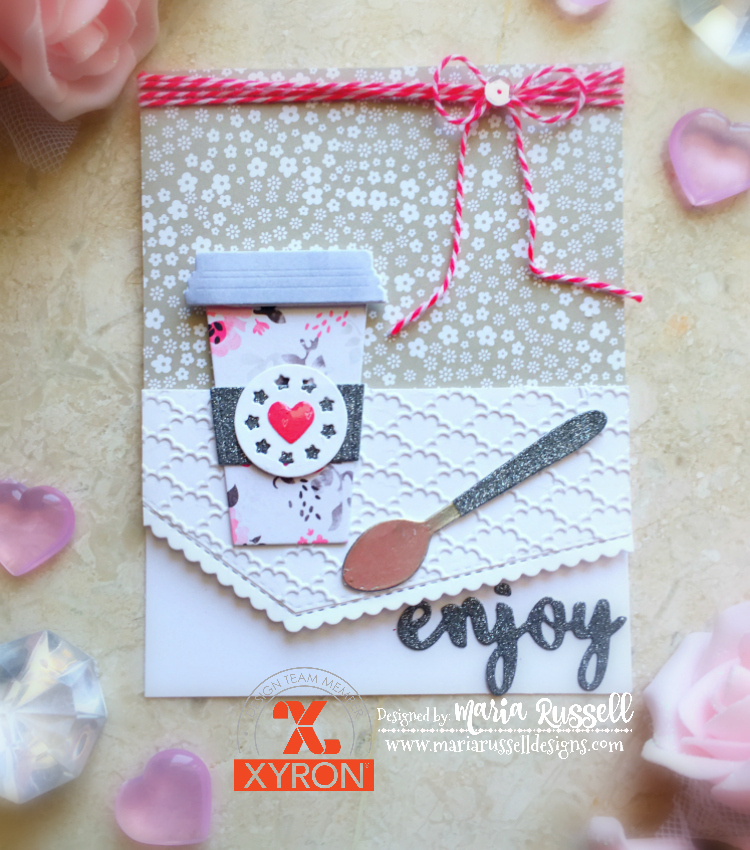
For my second card, I used some cute patterned paper and a stamp from my stash. To finish off the design, I used some vellum to die-cut my leafy swirls. I also used my X sticker maker to adhere a vellum bow to the spoon. The sticker maker is the best tool to have when adhering vellum on your projects. This card will have a Starbuck’s gift card inside.


Here is the second card:

I hope you like my projects! I have also listed and linked the supplies I have used. Have an amazing day!
————SUPPLIES———–
(Some affiliate links may have been used AT NO ADDITIONAL COST TO YOU)


Great tag and who doesnt love coffee
LikeLike
Love this , great idea
LikeLike