
Hello Newton’s Nook fans! Were you able to check out last week’s March release? Which one was your favorite? I am back today for Newton’s Nook Designs sharing some simple, “back-to-basic” card-making designs using some cute embossing folders.
For my projects today, I am showcasing the Newton’s Birthday Trio stamp set and coordinating dies, Garden Mice stamp set and coordinating dies, Balloons Stencil and the Grass Border die with the Cats Border Embossing Folder and the Leafy Tree Trunk Embossing folder.
If you are a beginner in card-making and you don’t have a lot of dies to create scenes, you can always check out your local paper crafting stores and purchase some embossing folders. They are pretty inexpensive and will add some great dimension to your card.
Here’s my first card:

HOW I MADE THE CARD:
- Stamp the images on smooth white card stock and color the images in with Copic markers (or any coloring medium of your choice).
- die-cut the image using the coordinating die
- cut a piece of some 110 lb. card stock and use the Cats Border Embossing folder to dry-emboss the card stock.
- use BG-0000 and R-00 Copic markers to lightly color the embossed images.
- use the balloons stencil to ink up the background with distress oxide inks.
- adhere the colored image using foam adhesive.
Here’s a closer look:

I think adding some color to the embossed images made them pop a little. I simply ADORE this Newton’s Birthday Trio stamp set! This card is perfect for any cat-lovers out there! Here’s another look:

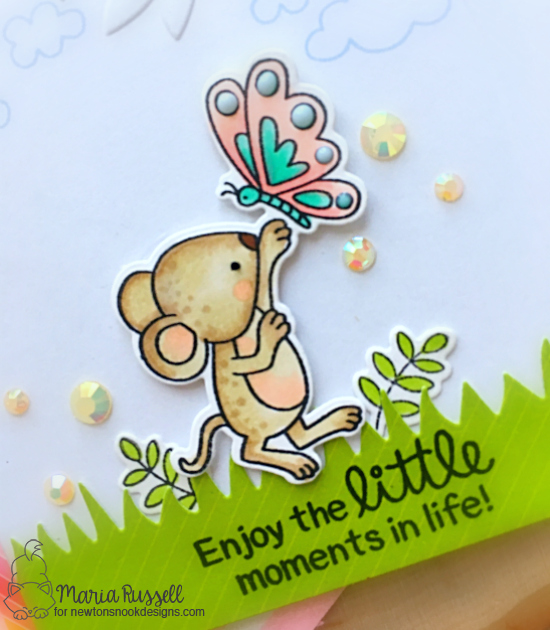
For my second card, I used the Garden Mice stamp set and coordinating die, with the grass border die and the Leafy Tree Trunk Embossing folder. The clouds are from the Newton Scoots By stamp set.

HOW I MADE THE CARD:
- Stamp the image on smooth white card stock and color the image in with Copic markers (or any coloring medium of your choice).
- die-cut the image using the coordinating die
- cut a piece of some 110 lb. card stock and use the Leafy Tree Trunk Embossing Folder to dry-emboss the card stock. Cut about a 1/4 inch using your paper trimmer.
- cut a 1/4 inch piece of patterned paper and adhere to an A2 size card base.
- Adhered the embossed card stock onto the card base.
- using the grass border die, cut a piece of patterned paper to create the grass.
- using the clouds from the Newton Scoots By stamp set, stamp a couple of clouds on the foreground.
I finished my design by adding some Champagne jewels on the card and Nuvo crystal drops on the butterfly.
It’s been awhile since I used my embossing folders and I really love both cards. Here’s another look:

I hope I have given you some inspiration today. Please visit Newton’s Nook Designs to purchase the stamps, dies and stencil that I used today. The supplies I used are listed and linked below. Have a wonderful day!
 ———SUPPLIES———

Oh my, how cute are these cards??!! LOVE their sweetness and the fabulous designs with the embossing !!
LikeLike
Hi Maria , how are you doing? I wish to have a business deal with you.
LikeLike