Newton’s Nook Designs April Release – Day 4 – Newton’s Birdhouse with Happy Mother’s and Father’s Day Mini Stamp Sets

NND_April19

I am always a bit bummed when it’s the last day of the month’s reveals by Newton’s Nook Designs.   Were you able to check out the first three days of the reveal?   Which one is your favorite so far?  You have a chance to win each stamp set during release week so check out the details I have indicated at the end of this blog post.  [Just a little important note:  I know some of you had difficulties finding the comments section.  If you would like to leave a comment to participate in the giveaway, the “comments section” will only be ever visible when a single post on Word Press is being viewed. Please click on this particular blog post and you will be able to leave a comment below.  Thank you!]  

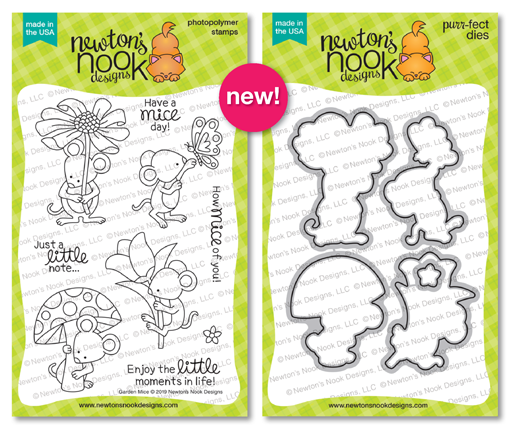
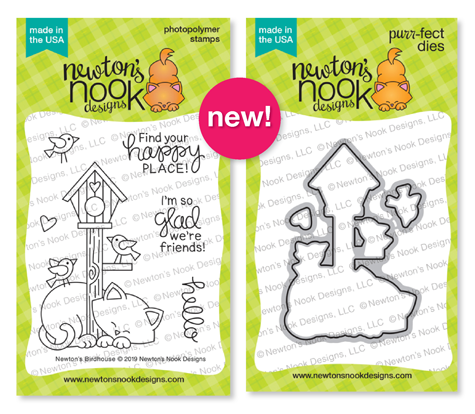
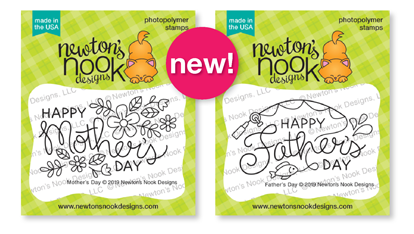
For the last day of the reveals, the design team is showcasing the Newton’s Birdhouse stamp set and coordinating dies, with the Mother’s Day and Father’s Day minis tamp sets.  Here’s what they look like:

NND_APR19_NewtonsBirdhouse

NNDAPR19_MiniStamps

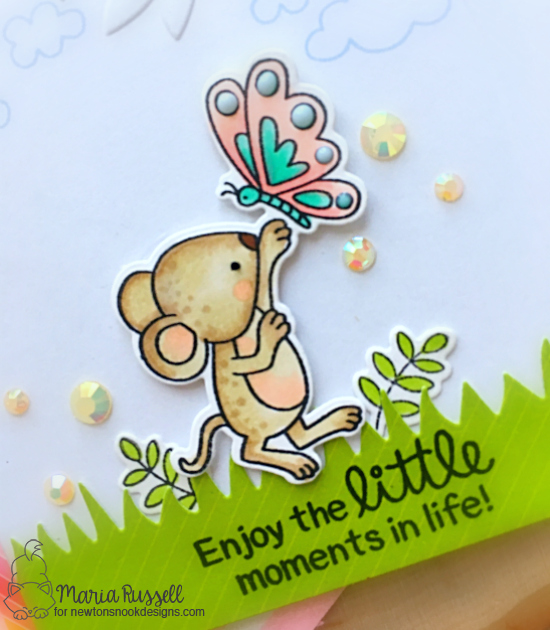
Here’s my first card with the Newton’s Birdhouse stamp set:

NNDNewtonsBirdhouse1A

Here’s how I made my card:

  • stamp and color the image with Copic markers (or any coloring medium of your choice)
  • die-cut the image using the coordinating dies.
  • cut an A2 size of Bristol smooth white card stock and ink up the background with different distress oxide inks.
  • die-cut the picket fence with some white card stock.  Cut the picket fence to create two small ones.
  • ink up another piece of some Bristol smooth white card stock using mowed lawn distress oxide inks.
  • use the grass border die to die-cut this piece.
  • use a stitched die to create the flying pattern for the bird.
  • use the little dots from the Tranquil Tides stamp set to stamp onto the background.
  • assembled the card.

Here’s a closer look:

NNDNewtonsBirdhouse1B

I finished my design by adding some white dots on the birdhouse using my Sakura white gel pen.

NNDNewtonsBirdhouse1C

For my second project, I created a one-layer card using the Mother’s Day mini stamp set and some images from the Cottage Garden stamp set, with some pastel-color inks.

NNDMothersDay1A

I added glossy accents to the flower to give it a little shine and dimension.  I love creating backgrounds using small stamp sets.

NNDMothersDay1B

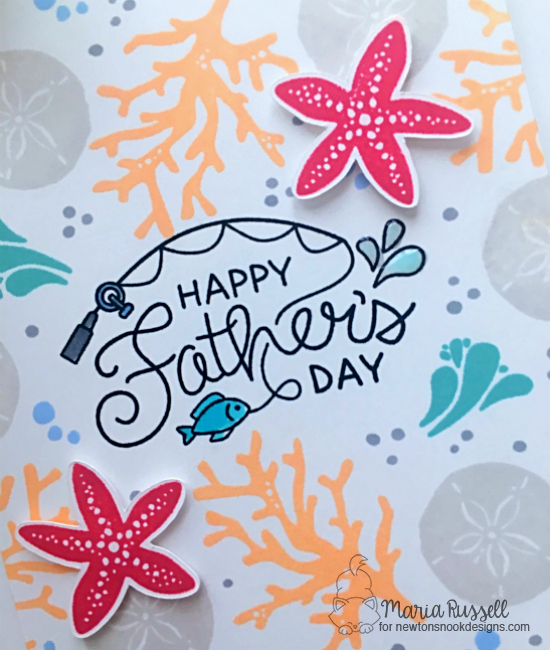
For my third project, I created another one-layer card using the Father’s Day stamp set and some images from the Tranquil Tides stamp set.

NNDFathersDay1A

I really think the images on the Tranquil Tides stamp set went perfectly well with the Father’s Day mini stamp.  I finished my design by adhering starfishes with some foam adhesive and adding glossy accents to the card.

NNDFathersDay1B

That is all for this week!  I hope you guys LOVE the projects that we’ve made for you using the new stamps, dies and stencils by Newton’s Nook Designs.

Would you like to win the “Newton’s Birdhouse” Stamp Set? This stamp set will be given away to ONE lucky winner!

Here’s how to win:

Comment on the NND blog and Design Team blogs (see list below)! The winner will be chosen at random from the collective reveal posts. Make sure to check out each of their blogs and comment for your chance to win. You will not know which blog has been chosen so the more you comment on the better your chances are of winning! You have until Thursday April 11th at 9pm EST to comment  — winners will be announced on the blog post on Friday, April 12th.

Check out all the awesome Design Team Blogs below to enter:

Newton’s Nook Designs

Amanda Bodine

Holly Endress

Larissa Heskett

Samantha Mann

Zsofia Molnar

Naki Rager

Maria Russell

Andrea Shell

Tatiana Trafimovich

————SUPPLIES—————

Newton’s Nook Designs – Back to Basic Card-making with Embossing Folders

Hello Newton’s Nook fans!  Were you able to check out last week’s March release?  Which one was your favorite?  I am back today for Newton’s Nook Designs sharing some simple, “back-to-basic” card-making designs using some cute embossing folders.

For my projects today, I am showcasing the Newton’s Birthday Trio stamp set and coordinating dies, Garden Mice stamp set and coordinating dies, Balloons Stencil and the Grass Border die with the Cats Border Embossing Folder and the Leafy Tree Trunk Embossing folder.

If you are a beginner in card-making and you don’t have a lot of dies to create scenes, you can always check out your local paper crafting stores and purchase some embossing folders.  They are pretty inexpensive and will add some great dimension to your card.

Here’s my first card:

NNDNewtonsBirthdayTrio2A

HOW I MADE THE CARD:

  • Stamp the images on smooth white card stock and color the images in with Copic markers (or any coloring medium of your choice).
  • die-cut the image using the coordinating die
  • cut a piece of some 110 lb. card stock and use the Cats Border Embossing folder to dry-emboss the card stock.
  • use BG-0000 and R-00 Copic markers to lightly color the embossed images.
  • use the balloons stencil to ink up the background with distress oxide inks.
  • adhere the colored image using foam adhesive.

Here’s a closer look:

NNDNewtonsBirthdayTrio2B

I think adding some color to the embossed images made them pop a little.  I simply ADORE this Newton’s Birthday Trio stamp set!  This card is perfect for any cat-lovers out there!  Here’s another look:

NNDNewtonsBirthdayTrio2C

For my second card, I used the Garden Mice stamp set and coordinating die, with the grass border die and the Leafy Tree Trunk Embossing folder.  The clouds are from the Newton Scoots By stamp set.

NNDGardenMice2A

HOW I MADE THE CARD:

  • Stamp the image on smooth white card stock and color the image in with Copic markers (or any coloring medium of your choice).
  • die-cut the image using the coordinating die
  • cut a piece of some 110 lb. card stock and use the Leafy Tree Trunk Embossing Folder to dry-emboss the card stock.  Cut about a 1/4 inch using your paper trimmer.
  • cut a 1/4 inch piece of patterned paper and adhere to an A2 size card base.
  • Adhered the embossed card stock onto the card base.
  • using the grass border die, cut a piece of patterned paper to create the grass.
  • using the clouds from the Newton Scoots By stamp set, stamp a couple of clouds on the foreground.

I finished my design by adding some Champagne jewels on the card and Nuvo crystal drops on the butterfly.

NNDGardenMice2B

It’s been awhile since I used my embossing folders and I really love both cards.  Here’s another look:

NNDGardenMice2C

I hope I have given you some inspiration today.  Please visit Newton’s Nook Designs to purchase the stamps, dies and stencil that I used today.  The supplies I used are listed and linked below.  Have a wonderful day!

———SUPPLIES———

Newton’s Nook Designs March Release – Day 4 – Garden Mice

NNDReleaseIcon_March19

I am a bit bummed because it is the last day of the March reveals by Newton’s Nook Designs.   Were you able to check out the first three days of the reveal?   Which one is your favorite so far?  You have a chance to win each stamp set during release week so check out the details I have indicated at the end of this blog post.  [Just a little important note:  I know some of you had difficulties finding the comments section.  If you would like to leave a comment to participate in the giveaway, the “comments section” will only be ever visible when a single post on Word Press is being viewed. Please click on this particular blog post and you will be able to leave a comment below.  Thank you!]  

For the last day of the reveals, the design team is showcasing the Garden Mice stamp set and coordinating dies. I think this is my favorite!  Here’s what they look like:

NNDMAR19_GardenMice

For my card below, I also used the Bokeh stencil set.  This card is really simple but I LOVE how this one turned out.

NNDGardenMice1A

Here’s how I made my card:

  • stamp and color the image with Copic markers (or any coloring medium of your choice)
  • die-cut the image using the coordinating dies.
  • cover a piece of some Bristol smooth white card stock with some painter’s tape.  (This card stock measured 3 1/4 x 5 1/2).
  • use the Bokeh Stencil Set to ink up the card stock.  I used Fossilized Amber distress oxide ink with my mini-ink blending tool.
  • use some stitched and arrow border dies to create the impression on the colored background.
  • adhere this piece on some A2 size side-folding card base.
  • adhere some black and white patterned paper on the side.
  • adhere the mouse on the card using some foam adhesive.
  • stamp the sentiment with Versafine onyx black ink.

Here’s a closer look:

NNDGardenMice1B

I finished my design by adding some white dots using my Sakura white gel pen.  Here’s one last look:

NNDGardenMice1C

That is all for this week!  I hope you guys LOVE the projects that we’ve made for you using the new stamps, dies and stencils by Newton’s Nook Designs.

Would you like to win the “Garden Mice” Stamp Set?  This stamp set will be given away to ONE lucky winner!

Here’s how to win:

Comment on the NND blog and Design Team blogs (see list below)!  The winner will be chosen at random from the collective reveal posts.  Make sure to check out each of their blogs and comment for your chance to win.  You will not know which blog has been chosen so the more you comment on the better your chances are of winning!  You have until Thursday March 14th at 9pm EST to comment  — winners will be announced on the blog post on Friday, March 15th.

Check out all the awesome Design Team Blogs below to enter:

Newton’s Nook Designs

Amanda Bodine

Holly Endress

Ellen Haxelmans

Larissa Heskett

Samantha Mann

Zsofia Molnar

Naki Rager

Maria Russell

Andrea Shell

Tatiana Trafimovich

————SUPPLIES—————