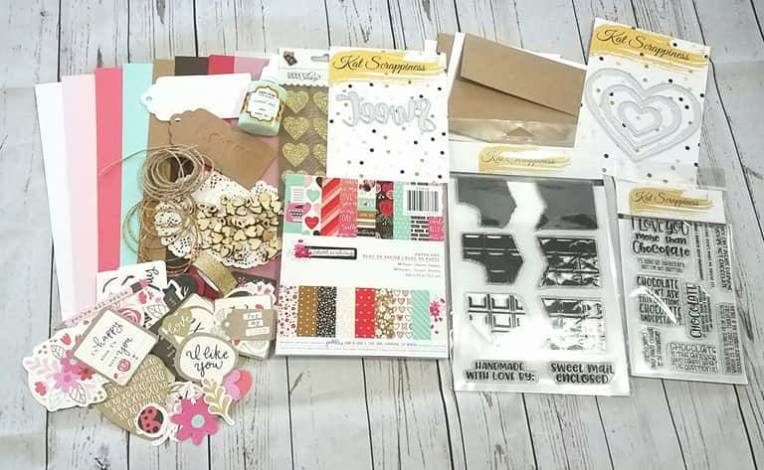
Hello, hello my crafty peeps! I hope you are all having a wonderful day! I am back to share with you my projects, showcasing the limited-edition Chocolate Lover’s card kit by Kat Scrappiness. I ABSOLUTELY LOVE THIS KIT! There are so many possibilities using the supplies included in this kit. Here’s what’s inside, plus the two add-ons, which is the Chocolate Lover’s sentiment stamp set and the Wonky Wavy Stitched Heart Dies.
For my first project, I wanted to create a fun shaker card using the 6 X 6 paper pad by Pebbles and the Mint Sprinkles Sequin mix as my shaker material. I love this color combo. I also included a short video showing you how to stamp the layered chocolate stamp set. It looks so realistic. Here’s the first card:
Here’s the close-up:

Here’s the YouTube video showing you how I stamped the chocolate:
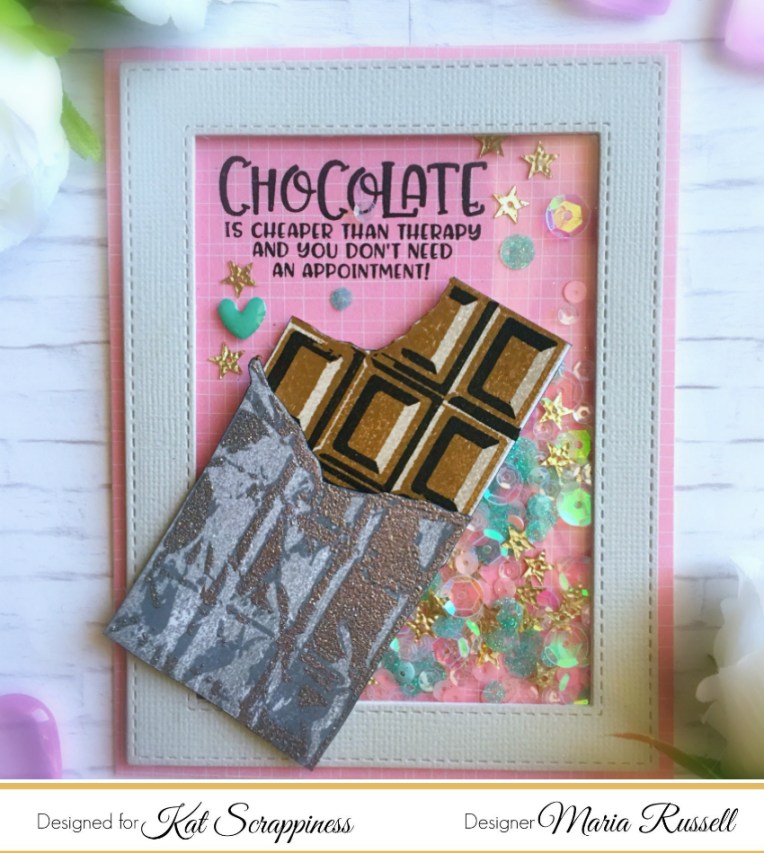
For my second project, I wanted to create a simple, one-layer card, with the chocolate layering stamp set and the Chocolate Lover’s sentiment stamp set. I added the pink and blue dots and finished my design with glossy accents. The card is very simple but I love how it turned out. Here’s the second card:

For my third project, I used the chocolate image again with the “Sweet” script sentiment die included in the kit, as well as the Fancy Scalloped Stitched Border dies. I finished my design by adding the gold twine. Here’s the third card:

For my fourth project, I used the chocolate candy bar stamp set again but this time, I added a wreath die-cut using the Avery Elle Star Frames Elle-Ments Dies and also created a wavy card-front using the Fancy Scalloped Stitched Border Dies. I finished my design by adding the wooden heart embellishments from the kit, coloring it with my Copic marker. Here’s the fourth card:

For my last project today, I wanted to use the stamp set to decorate a giant Hershey’s chocolate candy bar to give as a gift either for Christmas or Valentine’s Day.
I wrapped the candy bar with a plain white typing paper. I used a stamp from my stash to stamp the snowman’s face on the paper, and colored it with my Copic markers. I cut a square and a rectangle black card stock to create the snowman’s hat. I then stamped my sentiment on the hat with versa mark ink, and heat-embossed it with my white embossing powder. I adhered the hat to the snowman. I used my 1/2 inch circle punch to create the buttons for the snowman, and adhered it onto the wrapped candy with my Xyron Mega Tape Runner. To finish my design, I added the red seam binding for the snowman’s scarf, and added the heart embellishment by pebbles, included in the kit. It turned out so cute. You can easily mass-produce this project to give as gifts to teachers, your friendly neighborhood mailman/mailwoman, or anyone else. Here’s my fifth project. Isn’t he cute?

I hope you like all of the projects that I created today and got inspired. The supplies I used are listed and linked below if you are interested. Have a wonderful day!
————SUPPLIES———-