Winter Foliage Cards with Pretty Pink Posh

It’s been a very hectic week for me but I managed to make these two Christmas Cards today from the latest holiday release by Pretty Pink Posh.


For today’s projects, I am showcasing the Winter Foliage Dies along with the Happy Santa Stamp Set (sentiment) and Ruby Red Pearls.

Here’s how I made this first card:

  • ink-blend some Bristol Smooth white card stock with Evergreen Boughs Distress Oxide ink.
  • die-cut the holly leaves and pine boughs using the Winter Foliage Dies.
  • die-cut the Poinsettia a few times with some dark pink card stock.
  • layer the die-cuts inside a used box. Water-down some white paint on an acrylic block and use a brush to sprinkle the paint on the die-cuts. This added texture and interest to the die-cuts.
  • foam-mount the poinsettia on the card panel for more dimension and adhere the greenery with liquid glue.
  • finish the card design by stamping the sentiment from the Happy Santa Stamp Set.

Since I already die-cut a few of the winter foliage and have another card panel prepared, I created another card. This time, I only used the Holly Leaves, another type of greenery and the Pine Boughs.

I foam-mounted the Holly Leaves onto the card for more dimension and used the Ruby Red Pearls for my berries, adhering the pearls and the greenery on the card with liquid glue.

I finished my card design by stamping the sentiment with some Versafine Onyx Black ink. Here’s another look at the second card:

I hope you like these cards today and got inspired. Below, you will find links to the supplies used to create these projects. Where available, I use compensated affiliate links at no extra cost to you. Your support helps me to keep bringing you new projects and inspiration. Thank you for stopping by, and have an amazing day!

———-SUPPLIES———-

Deck the Halls With Inky Paws 2022


Screenshot 2022-12-05 at 5.45.54 PM

Hello my crafty friends!   It is Newton’s Nook Designs’ Annual Deck the Halls with Inky Paws blog hop.  We have some very talented guest designers with us today so please hop along and check out their amazing projects.  Celebrate with us and save $5 off every $30 you spend (up to $25 off) at newtonsnookdesigns.com

Newton’s Nook will also be picking TWO lucky winners to receive a $25 store credit so check out the details I have indicated at the end of this blog post.   [Just a little important note:  I know some of you had difficulties finding the comments section.  If you would like to leave a comment to participate in the giveaway, the “comments section” will only be ever visible when a single post on Word Press is being viewed. Please click on this particular blog post and you will be able to leave a comment below.  Thank you for understanding and I apologize for the confusion.]

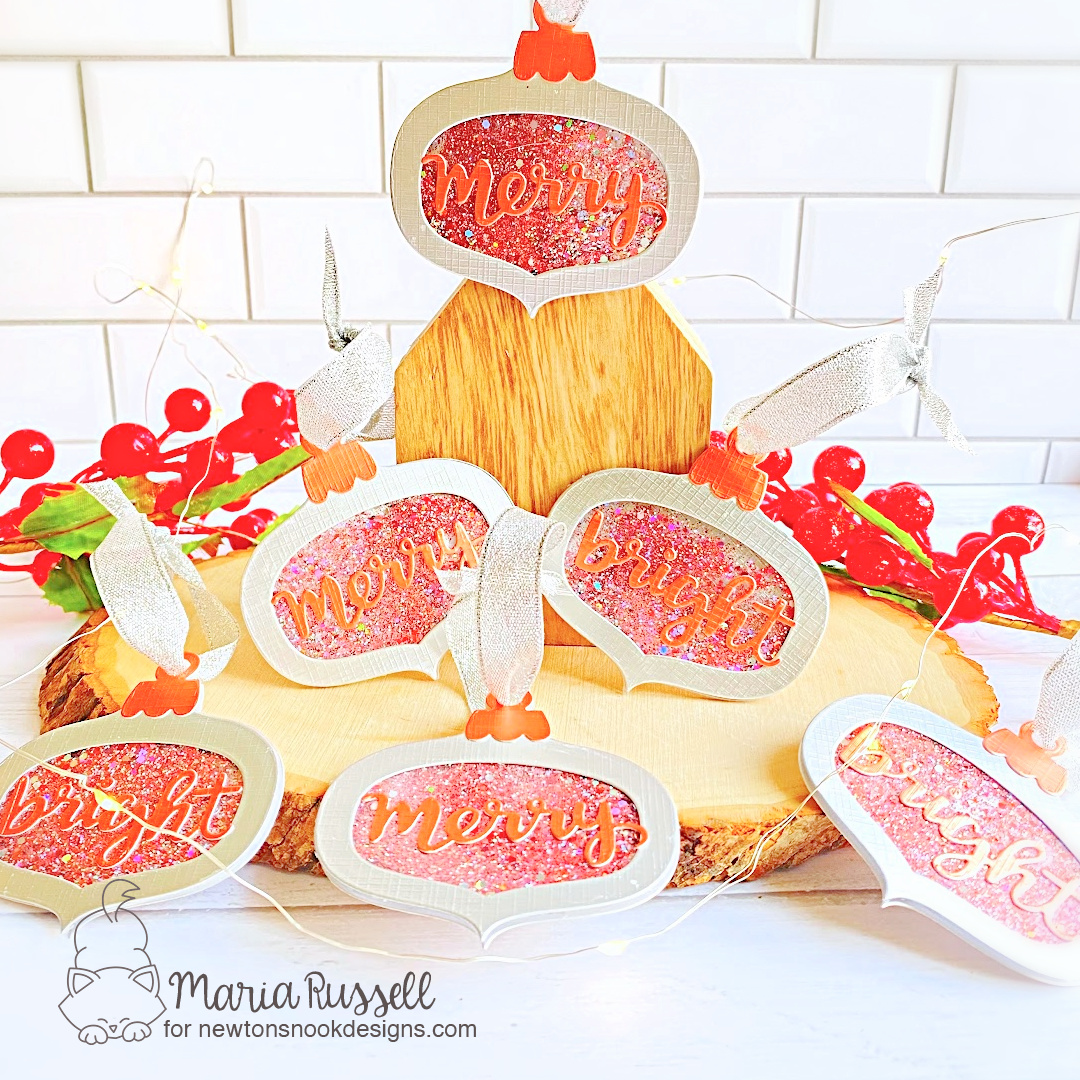
I have a small Christmas tree in my studio and since Christmas ornaments are not available here (overseas), I figured I’ll make my own.  For my projects today, I am showcasing the Ornament Shaker Die Set with the Holiday Greetings Die Set.

NND_DecktheHallsInkyPaws1C_Dec9

Here’s how I made these ornaments:

  • die-cut the ornaments and ornament tops with some silver and rose gold card stock.  Since I needed 6 ornaments, I had to die-cut it a few times.
  • die-cut the acetate sheets using the outer ornament die.  Adhere the same with liquid glue.
  • add foam adhesive to create the shaker well.
  • use some chunky glitter as the shaker element.  Adhere the other piece to close the shaker.
NND_DecktheHallsInkyPaws1A_Dec9
  • die-cut the words “merry” and “bright” with some rose gold card stock.  Adhere these words on the ornaments with liquid glue.
  • adhere the ornament tops using liquid glue.  Don’t forget to also adhere the ornament tops on the back side.
  • use some silver ribbon to the ornament to hang them on the tree.
  • decorate the Christmas tree!
NND_DecktheHallsInkyPaws1B_Dec9
Enter to Win! Deck the Halls with Inky Paws Hop Prizes!

We will be choosing two (2) lucky winners to win a $25 store credit for Newton’s Nook Designs online shop!  To enter, just leave comments on the Design Team Member and Guest blogs (see list below)!   Two winners will be chosen at random from the collective blogs in the blog hop.  Make sure to check out each of their blogs and comment for your chance to win.  You will not know which blog has been chosen so the more you comment on the better your chances are of winning!  You have until Sunday, December 11th at 9 pm EST to comment — winners will be announced on the NND blog on Monday, December 12th.
 

——SUPPLIES——

Birch Tree with Cardinal Backdrop Die & Reindeer Games Stamp with Kat Scrappiness

Hello my crafty friends! I am on full “Christmas Card” production mode and this card today is probably one of my favorites so far!

For today’s project, I am showcasing the Reindeer Games Stamp Set and coordinating dies, along with the Santa’s Helper Stamp Set (sentiment) and Birch Tree With Cardinal Backdrop Die.

Here’s how I made this card:

I hope you like this card today and got inspired. Below, you will find links to the supplies used to create this project. Where available, I use compensated affiliate links at no extra cost to you. Your support helps me to keep bringing you new projects and inspiration. Thank you for stopping by, and have an amazing day!

———-SUPPLIES———-

2 Christmas Cards with Pretty Pink Posh

I am slowly unpacking the boxes at my new location and it has been overwhelming to say the least. Creating a project is very challenging right now because I can’t seem to find a lot of my stuff. Luckily, these items from Pretty Pink Posh’s October release was one of the first box I’ve found!


For today’s projects, I am showcasing the Mitten Shaker Dies, along with the Layered Mitten Stencils, Layered Winter Foliage Stencils, Winter Wishes Script Die, Winter Foliage Dies, Pine Green Pearls and Peppermints Clay Confetti.

Here’s how I made this first card:

  • adhere the silver mittens on the card using tape runner.
  • create a shaker well on the pink mitten by adding some foam adhesive. Adhere the pink negative piece on the card on top of the silver mitten and use Peppermints Clay Confetti as your shaker element. Adhere the mitten to close the shaker.
  • use the Mitten Shaker Die again to die-cut just the end of the mitten piece. Stamp the sentiment on this piece with Versamark ink and heat-set with the heating tool. Adhere the same on the mitten with liquid glue.
  • finish the design by adhering the Snowflake, the pine boughs that were die-cut using the Winter Foliage Dies and add texture by adhering some Pine Green Pearls.

Since I already die-cut a few of the mittens, I decided to create an extra project. This time I ink-blended the panel using the Layered Winter Foliage Stencils and some distress oxide inks. I followed the steps above to adhere the panel on some A2-size notecard and added the mittens.

I finished the card design by adhering the Winter Wishes Script Die-cut with liquid glue. Here’s another look:

I hope you like these cards today and got inspired. Below, you will find links to the supplies used to create these projects. Where available, I use compensated affiliate links at no extra cost to you. Your support helps me to keep bringing you new projects and inspiration. Thank you for stopping by, and have an amazing day!

———-SUPPLIES———-

Slimline Christmas Card with Newton’s Nook

Hello my crafty friends! I finally received my household effects and was able to start creating Christmas cards for friends. For today’s project, I am showcasing one of my all-time favorite stamp set by Newton’s Nook Designs called Naughty or Mice with its coordinating dies along with Slimline Frames & Portholes Die Set, Slimline Frames & Windows Die Set and the cute little bow is from the Pines & Holly Die Set.

Here’s how I made this card:

  • adhere the colored images with foam adhesive for dimension.
  • stamp the sentiment on some black card stock with Versamark ink. Sprinkle some white embossing powder and heat-set with the Heating Tool/Gun. Adhere the sentiment with liquid glue.
  • die-cut the red bow using the bow die from the Pines & Holly Die Set and adhere on the card.
  • finish the card design by using some white gel pen to add some dots and stars for more interest and texture.

I hope you like this card today and got inspired. Below, you will find links to the supplies used to create this project. Where available, I use compensated affiliate links at no extra cost to you. Your support helps me to keep bringing you new projects and inspiration. Thank you for stopping by, and have an amazing day!

———-SUPPLIES———-

Winter Release by Kat Scrappiness

Happy weekend! There’s a new release by Kat Scrappiness, Inc. and it is full of holiday cheer! I honestly cannot even choose a favorite! For my samples today, I am featuring the Wreath Die, Build A Bow Dies, Snowflake Trio Dies, Pink Sapphire Rhinestone Mix along with the Joy Word Die with Shadow, Nativity Scene Backdrop Die and Noel Word Die with Shadow.

Here’s how I made this card:

  • create the background panel by die-cutting some Snowflakes using the Snowflake Trio Dies, and adhering on some A2-size panel. Adhere the snowflakes randomly and add this panel on some A2-size notecard. [Designer’s tip: adhering the snowflakes on the background added some subtle texture and interest to the card without overwhelming the whole design].
  • die-cut the Wreath Die twice using some rose gold card stock. Adhere on the card panel with foam-adhesive for added dimension.
  • die-cut the Joy Word Die with Shadow also with the rose gold card stock and some Neenah solar white card stock. Adhere on the card with foam adhesive.
  • add some Pink Sapphire Rhinestone Mix with liquid glue.
  • finish the card design by die-cutting the Build A Bow Dies on some white glitter card stock and adhere on the card with foam adhesive to make everything look cohesive.

The next card is quite simple as well but I really LOVE the way this one turned out!

Here’s how to make this:

I hope you like these cards today and got inspired. Below, you will find links to the supplies used to create these projects. Where available, I use compensated affiliate links at no extra cost to you. Your support helps me to keep bringing you new projects and inspiration. Thank you for stopping by, and have an amazing day!

———-SUPPLIES———-

Winter Mugs Card with Pretty Pink Posh

Hello my crafty friends! Happy Friday! As I wait for my household effects to be shipped to the new house and dream about crafting again, I want to share this card that I made a few weeks ago mixing some new and old products by Pretty Pink Posh. This is also my entry for the Winter Coffee Lovers Blog Hop.

For my project today, I am showcasing the Winter Mug Dies, along with the Winter Foliage Dies, Pine Wreath Stamp Set (sentiment) Layered Winter Foliage Stencils, Scallop Frames Dies and one of my favorite older dies called Twine and Bows.

Here’s how I made this card:

  • die-cut the blue frame on some light blue card stock using the Scallop Frames Dies. Adhere this panel on the card with foam adhesive for added dimension.
  • assemble the mug, candy canes, pinecones etc.
  • use some light pink alcohol marker to color the marshmallows.
  • adhere the die-cuts together and foam-mount on the card using two layers of foam adhesive. This will make sure that the mug stands out a bit from the background.
  • stamp the sentiment on some red card stock using the word “joy” from the Pine Wreath Stamp Set.
  • sprinkle some white embossing powder and heat set with the heating tool.
  • adhere the sentiment with foam adhesive to finish the design.

I just love to mix and match some old and new stamps and dies to create this card. Here’s another look:

I hope you like this Christmas card today and got inspired. Below, you will find links to the supplies used to create this project(s). Where available, I use compensated affiliate links at no extra cost to you. Your support helps me to keep bringing you new projects and inspiration. Thank you for stopping by, and have an amazing day!

———-SUPPLIES———-

Happy Holidays with Pretty Pink Posh

Hello my crafty friends! I’m super excited to announce that I am guest-designing for Pretty Pink Posh for the months of November and December! This amazing bundle from the October Release was sent to me a few weeks back, but I had to keep my excitement on hold and announce it this month.

Incidentally, this bundle below is discounted at 15% off so you will save quite a bit of money if you purchase it now. It is packed full of goodies that you wouldn’t want to miss to create your holiday projects!

For my project today, I am showcasing the Pine Trees Die Set, along with the Happy Santa Stamp and Coordinating Dies, Layered Snowflakes Stencil, Christmas Friends Stamp and Coordinating Dies.

Here’s how I made this card:

  • foam-mount the ink-blended panel on some red slimline card base.
  • die-cut the trees using the Pine Trees Die Set on some white glitter card stock. Adhere them on the card with glue.
  • add a snowbank die-cut to the card and start adhering the colored images. Using a Reverse Grip Tweezers to grab your images and adding glue and adhering them to your card make things a lot easier.
  • Finish the card design by stamping the sentiment on some red card stock with Versamark ink. Sprinkle some white embossing powder and heat-set with the Heating Tool/Gun.
  • adhere the sentiment onto the card.

Here’s another look:

I hope you like this card today and got inspired. Below, you will find links to the supplies used to create this project(s). Where available, I use compensated affiliate links at no extra cost to you. Your support helps me to keep bringing you new projects and inspiration. Thank you for stopping by, and have an amazing day!

———-SUPPLIES———-
NND October Release Day 4 – Snowflake Oval + Giveaway

I am a bit bummed because it’s the last day of the Newton’s Nook October Release. I hope you were able to check out the reveals since Monday.  You also have a chance to win the stamp set being revealed each day so please read through til the end of the blog post to find out more info.  [Just a little important note:  I know some of you had difficulties finding the comments section.  If you would like to leave a comment to participate in the giveaway, the “comments section” will only be ever visible when a single post on Word Press is being viewed. Please click on this particular blog post and you will be able to leave a comment below.  Thank you!]  

For Day 4, we are showcasing the Snowflake Oval Stamp Set that coordinates with the Oval Frames Die Set.

I started by prepping the pink card stock with the anti-static powder tool. I stamped the image with Versamark ink and sprinkled some gold embossing powder, then heat-set with the heating tool.

I stamped the sentiment also with Versamark ink and used the same gold embossing powder.

Next, I die-cut the focal panel using the Oval Frames Die Set and foam-mounted on a gold oval frames notecard for added dimension. This card is really simple but I love how it turned out.

Would you like to win the “Snowflake Oval” Stamp Set? We will choose one lucky winner for each stamp set!

Here’s how to win: Comment on the NND blog and Design Team blogs (see list below)!  The winner will be chosen at random from the collective reveal posts. Make sure to check out each of their blogs and comment for your chance to win. You will not know which blog has been chosen so the more you comment on the better your chances are of winning! You have until Thursday October 13th at 9pm ET to comment  — winners will be announced on the blog post on Friday October 14th. 

Check out all the awesome Design Team Blogs below to enter:

Newton’s Nook Designs

Donna Idlet

Ellen Haxelmans

Tina Herbeck

Larissa Heskett

Samantha Mann

Zsofia Molnar

Maria Russell

Farhana Sarker

Tatiana Trafimovich

Amanda Wilcox