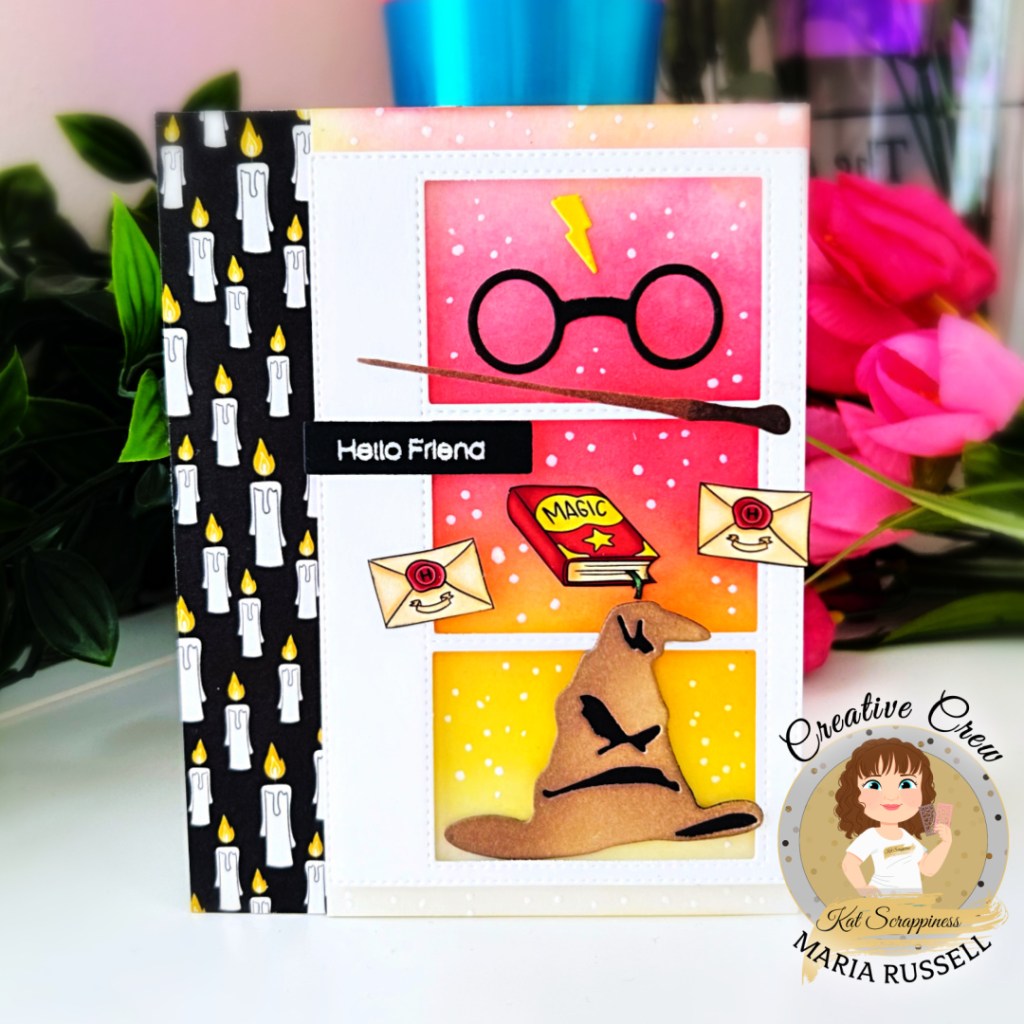
Starting by inking up a panel of some Bristol smooth white card stock with Distress oxide inks and adhering the same to some A2-size top-folding card base. I cut a strip of patterned paper from the Magical Quokka 6×6 paper pad to add a little contrast to the colorful background.
To showcase the new products, I die-cut the white frame with the Crafter’s Essentials 1 die set with the Wizarding Provisions Craft Dies. I ink-blended the sorting hat with distress oxide ink and adhered the frame with foam-adhesive for added dimension.
Next, I adhered the Magical Quokka Ephemera to the frame and finished the design with the sentiment from the Simple Sentiment Stamp and die set.
I cannot get over how super cute this new release is! I hope you like this project as much as I do. The supplies I used are listed and linked within the context of this blog post. Thanks for stopping by!
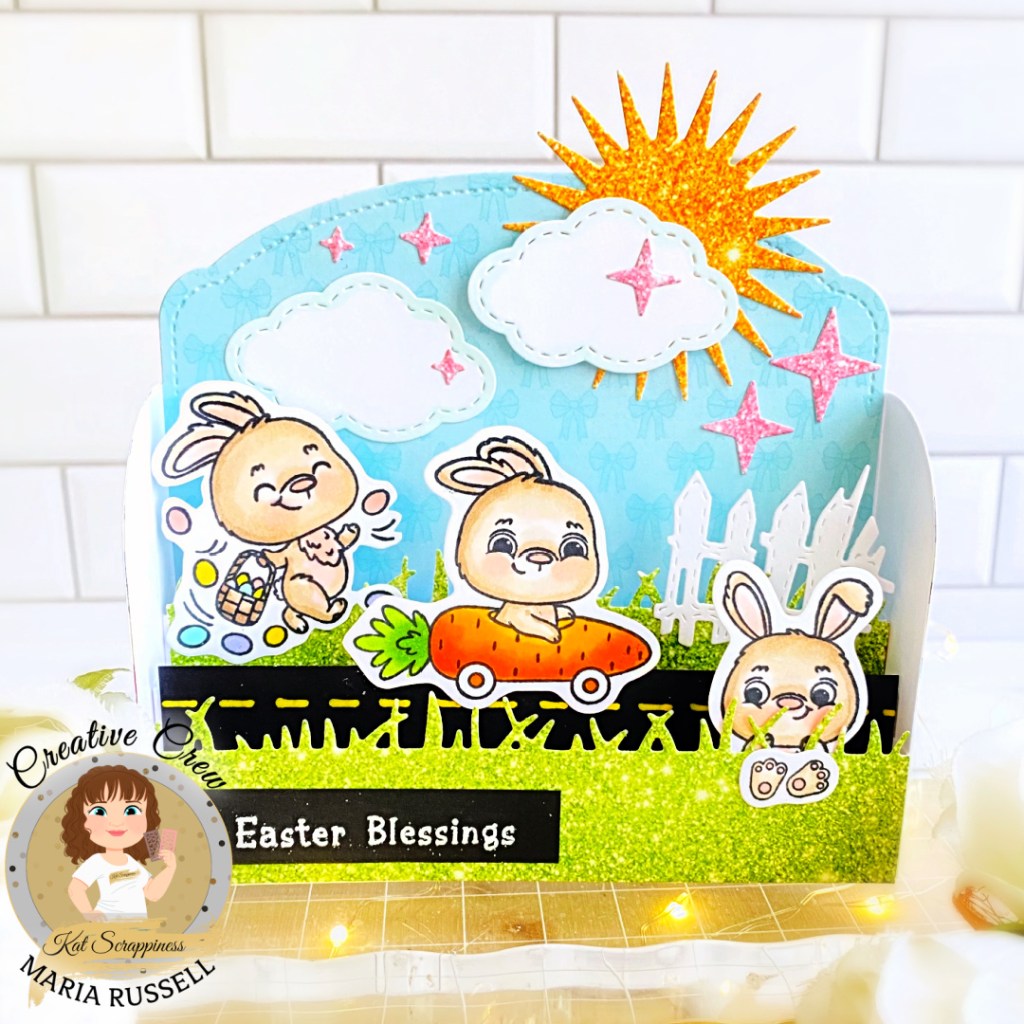
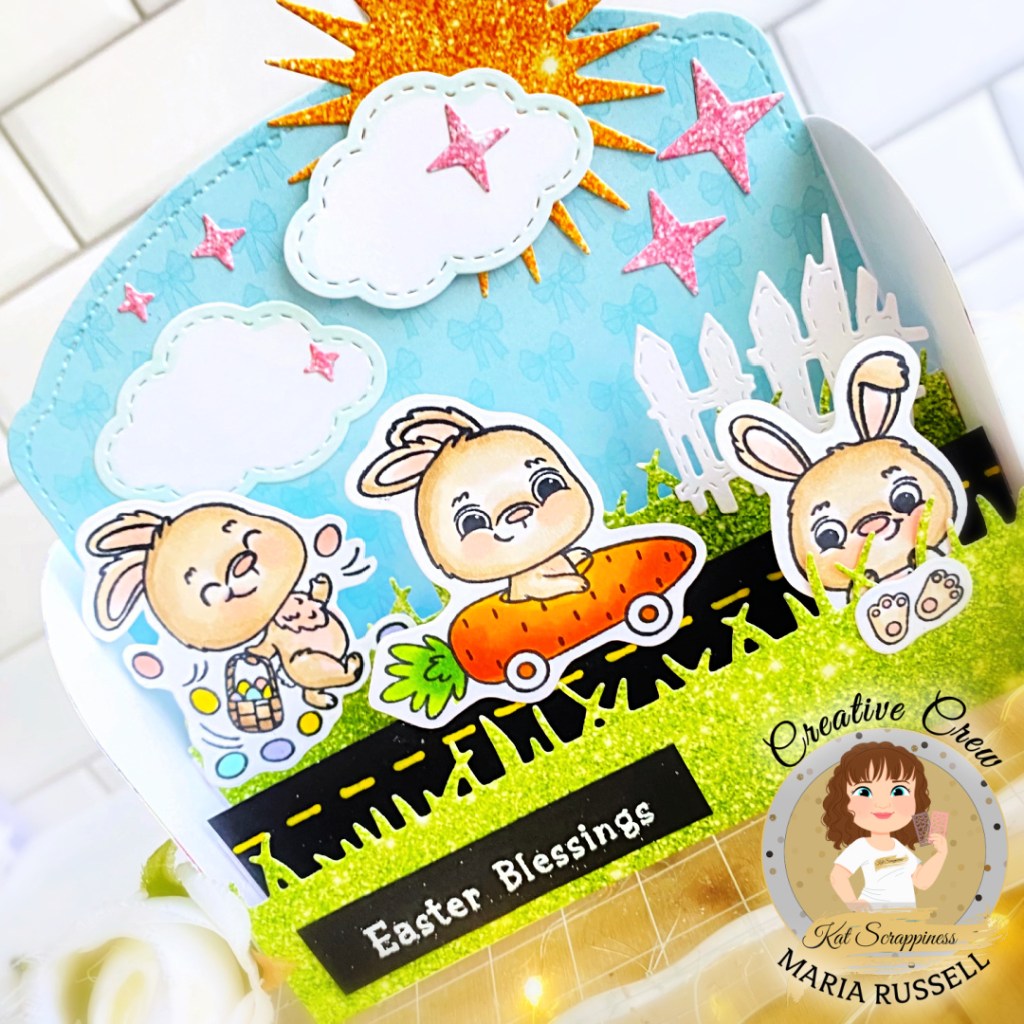
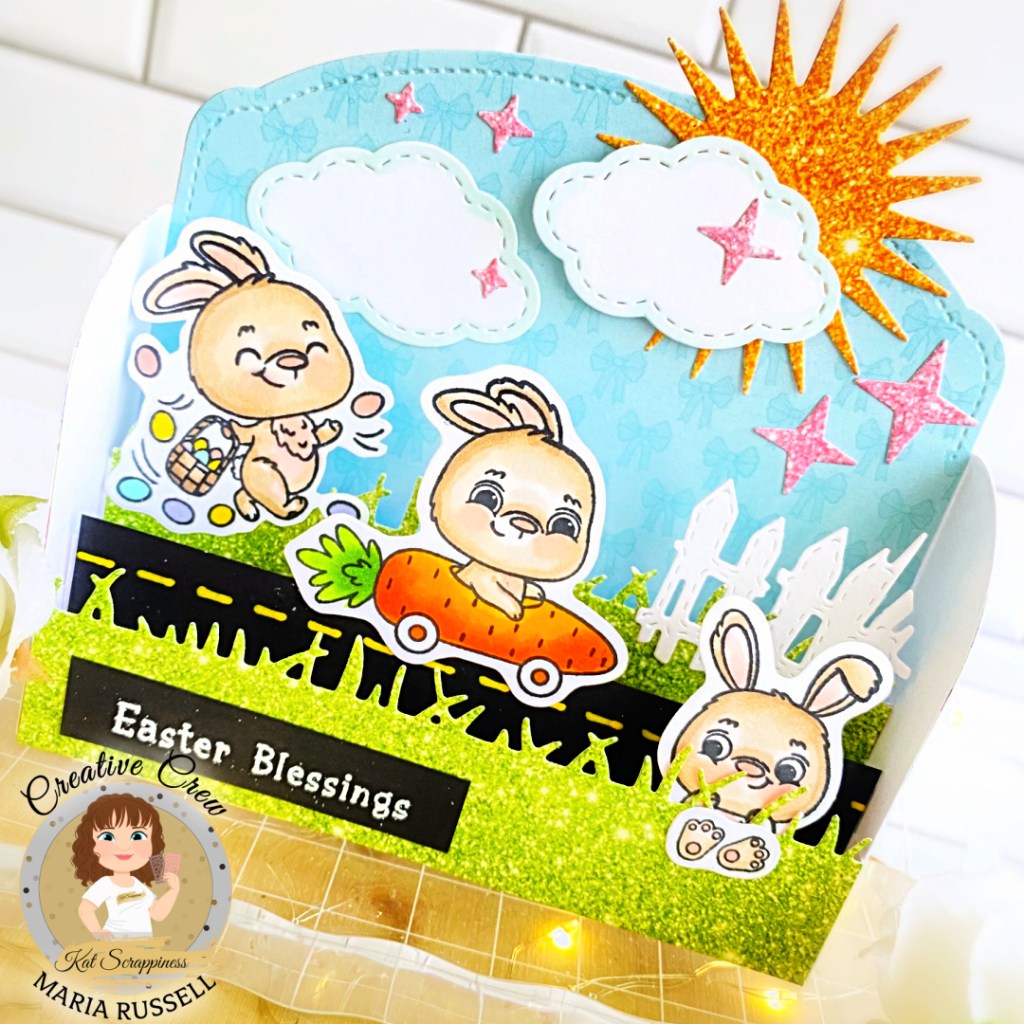
Easter is fast-approaching and I have the cutest 3d pop-up card for you today featuring products from Kat Scrappiness. I LOVE mixing and matching old and new products so here’s what I used for today’s card:
trim some black card stock that will fit the card and draw some yellow lines to create the “road” for the bunny. Adhere this piece in the middle of the pop-up card.
die-cut the clouds using the smallest cloud die from the Slimline Rainbow Die. Adhere to the card with liquid and foam adhesive to create dimension.
adhere the focal images onto the card with liquid glue. In case you’re wondering my favorite glue is the Bearly Art Precision Craft Glue.
finish the card design by stamping the sentiment from the Easter Quokkas Stamp Set with Versamark ink. Sprinkle some white embossing powder and heat set with heating tool. Adhere the sentiment and add some stars for added texture and interest.
I hope you like this card today and got inspired. The supplies I used are highlighted and linked within the context of this blog post. Where available, I use compensated affiliate links at no extra cost to you. Your support helps me to keep bringing you new projects and inspiration. Thank you for stopping by, and have an amazing day!
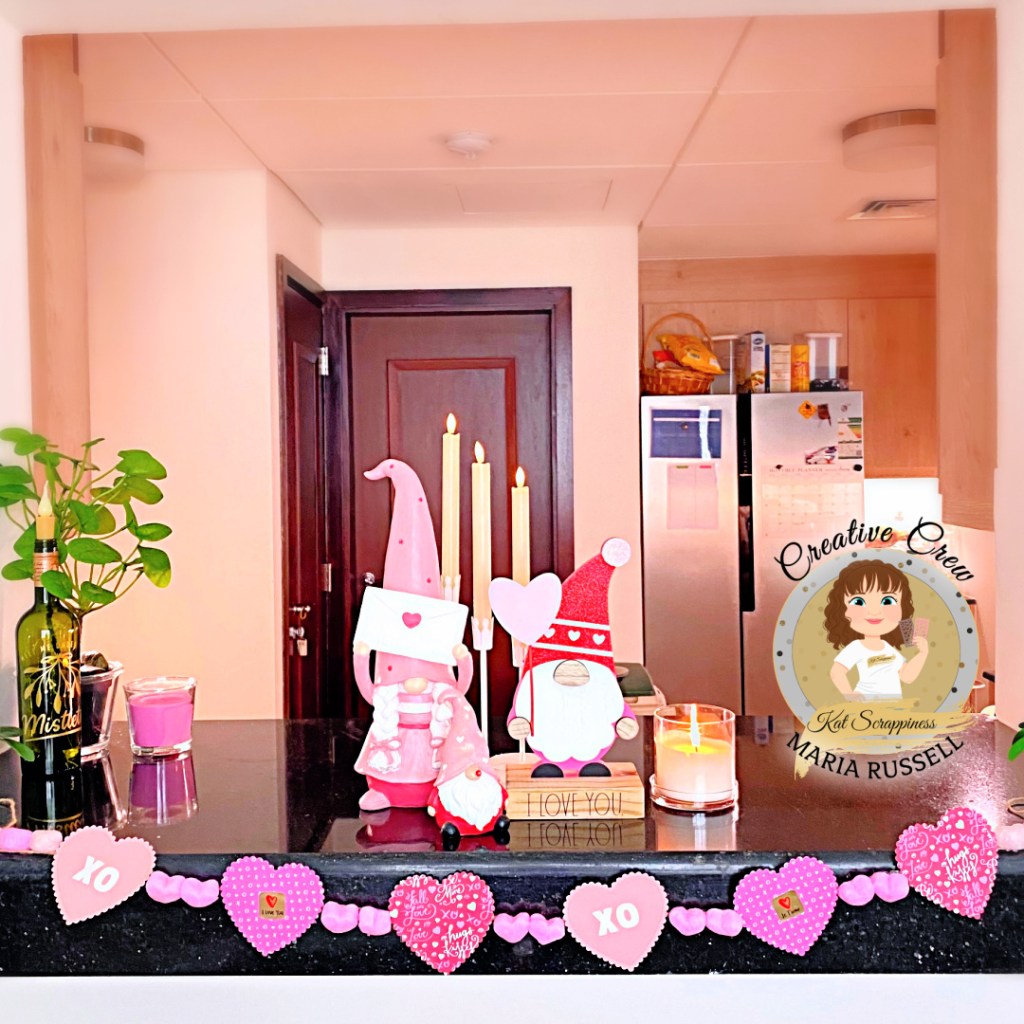
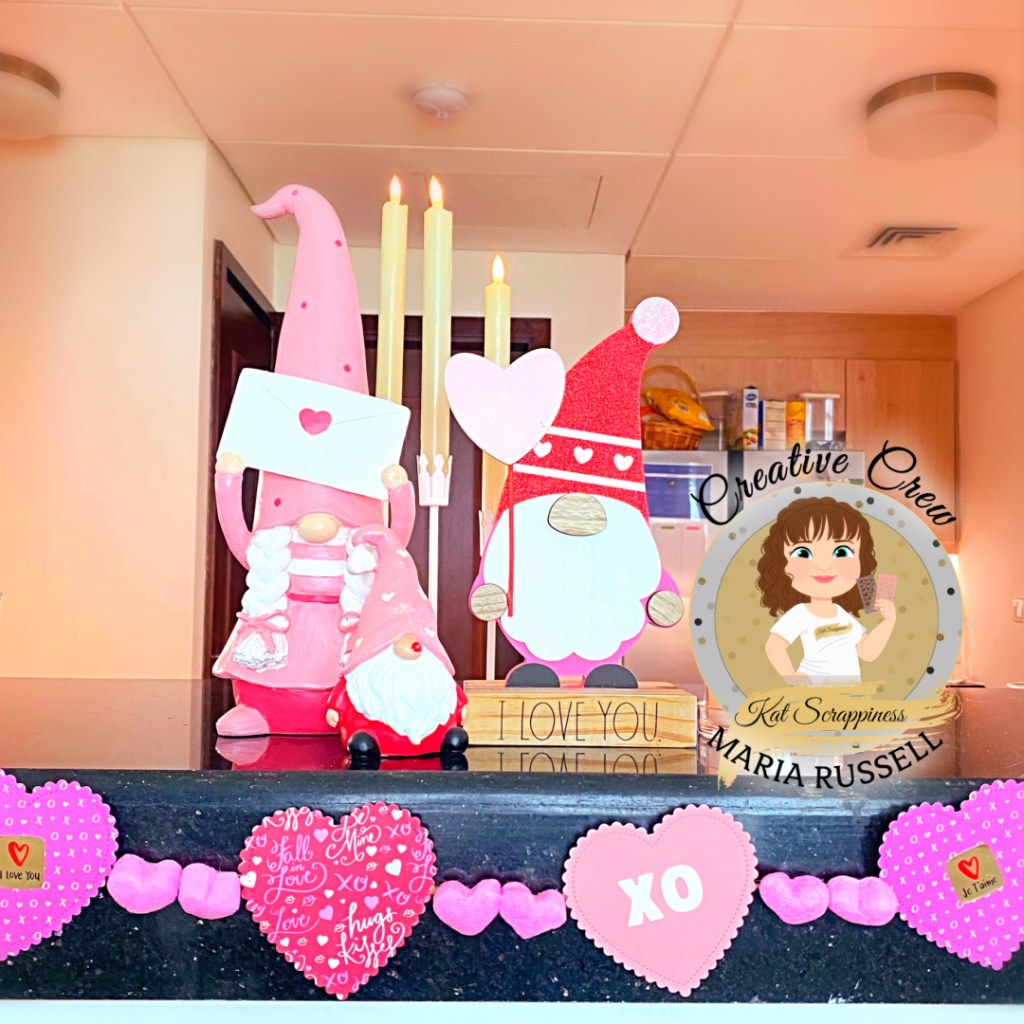
Do you have a HUGE stash of 12×12 patterned paper that you got from a Michael’s sale and running out of ideas to use them all up? How about making a DIY Valentine’s Banner? With a few dies from Kat Scrappiness, Inc. you can make a collection of cute banners to display for any occasion and season.
I always LOVE decorating for Valentine’s Day but sometimes I just don’t have the time to go out and get a few decor. Since I have a lot of craft supplies, I figured I’d make my own banner today.
Here’s how I made this project:
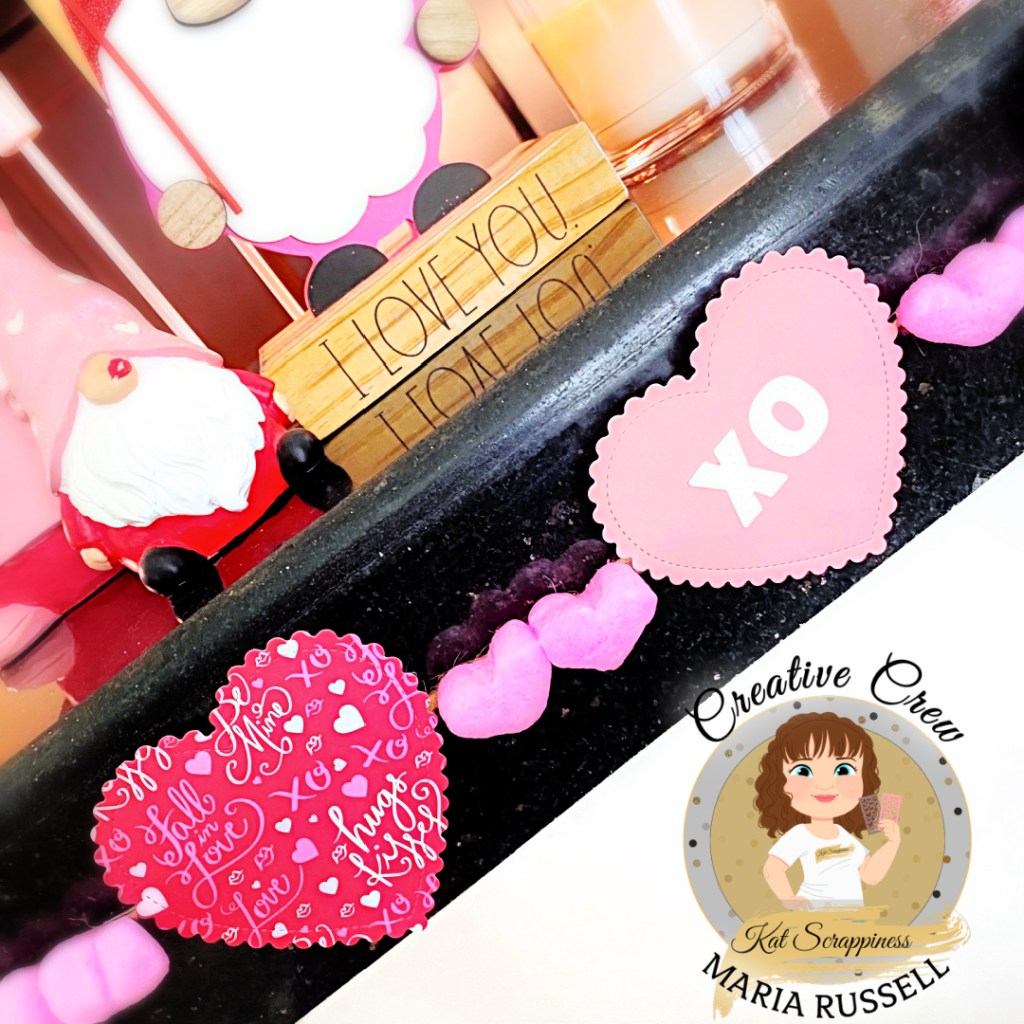
die-cut some patterned paper and plain pink card stock from your stash using the Stitched Scalloped Heart Dies. I did this 6 times. Kat Scrappiness has a lot of Valentine-themed dies so you can choose what you like.
prepare your hot-glue gun and sticks and line them all up together with your twine.
I have a few vase fillers that I purchased from Daiso a few years ago so I figured I’d add them to my project. I adhered the foam hearts first and added the die-cut hearts.
make sure to use a silicone mat underneath so your project doesn’t stick on your table.
adhere the letters “XO” on the pink heart.
use some stickers to adhere on the other die-cuts. As I mentioned we are using our stash so go ahead and add them to your project.
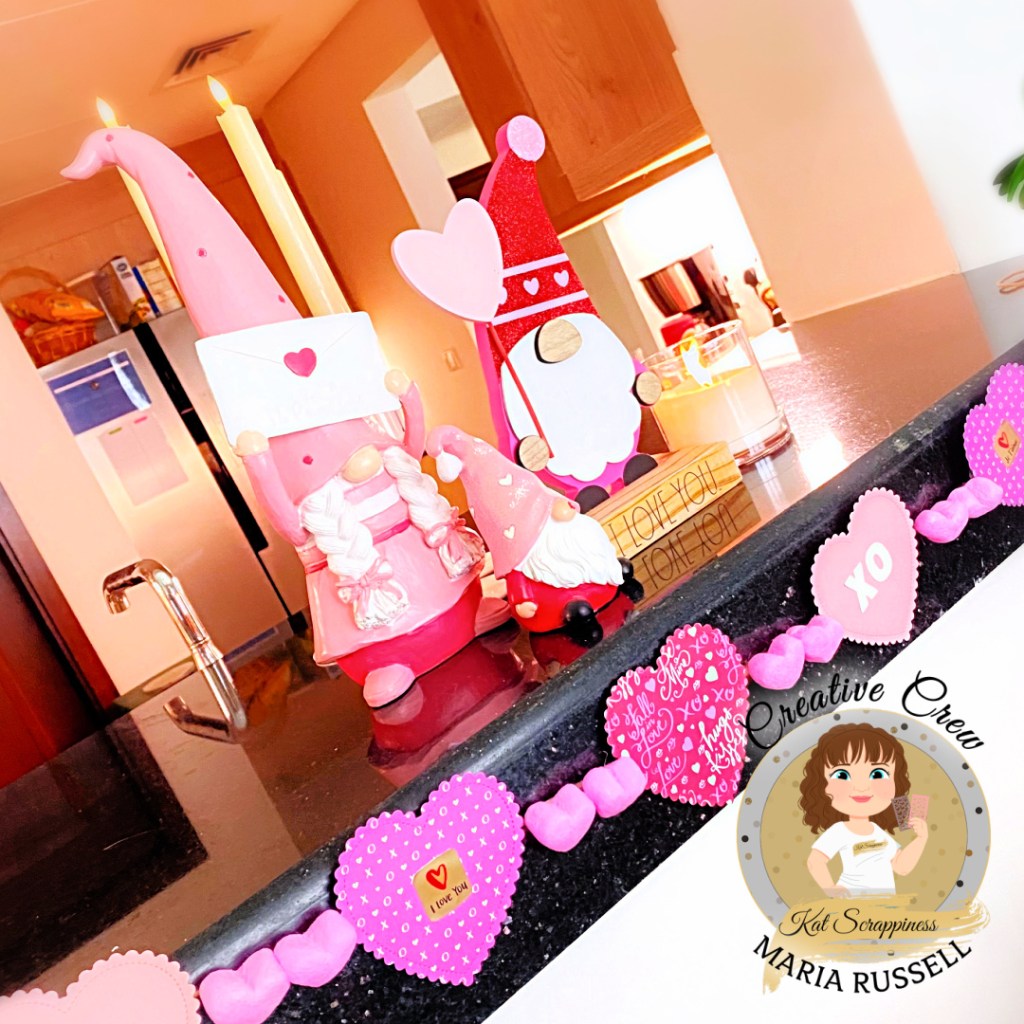
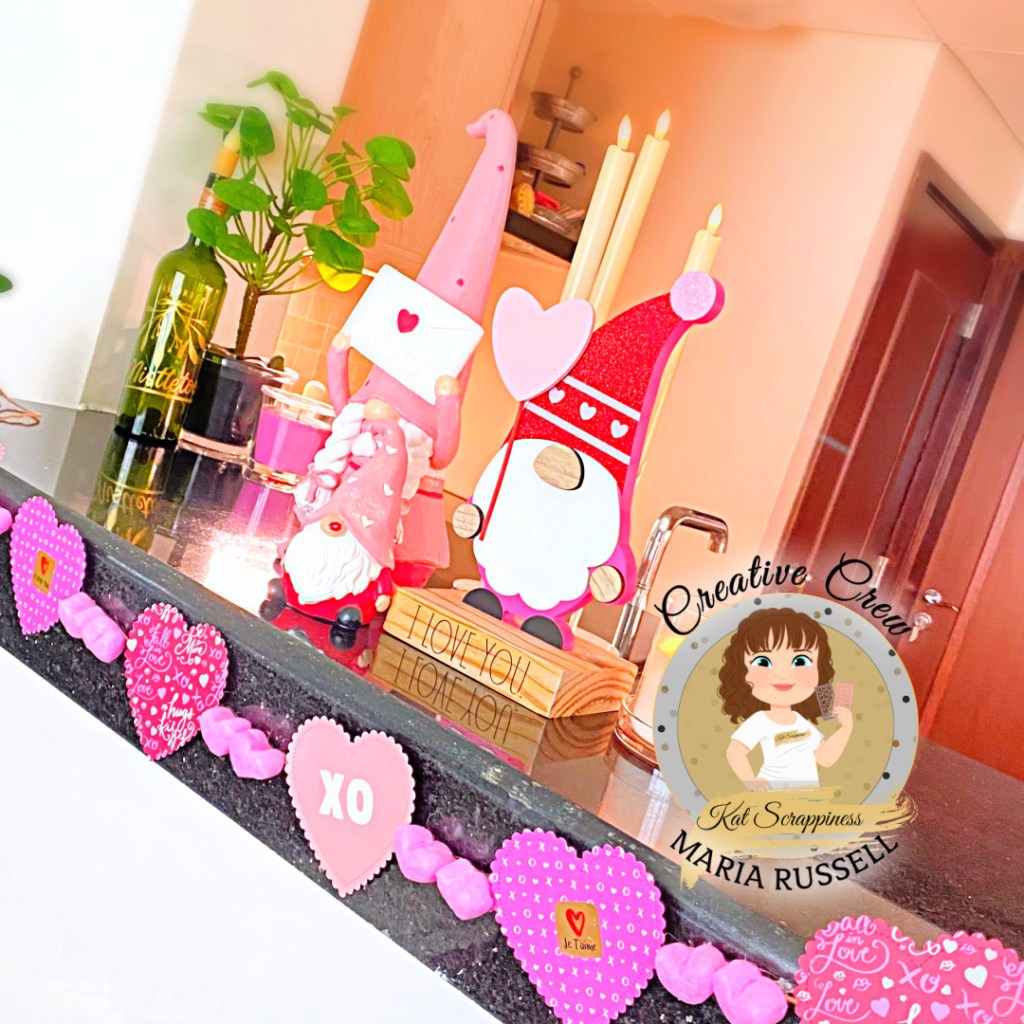
I placed my banner on the kitchen counter and added a few of my favorite decor and candles from Home Goods.
light up the candles and enjoy your work!
Before I go, take advantage of this Valentine’s deal by Kat Scrappiness, Inc. Sale starts today and ends on the 7th. See graphic below for your coupon code:
I hope you like this project today and got inspired. Below, you will find links to the supplies used to create this project. Where available, I use compensated affiliate links at no extra cost to you. Your support helps me to keep bringing you new projects and inspiration. Thank you for stopping by, and have an amazing day!
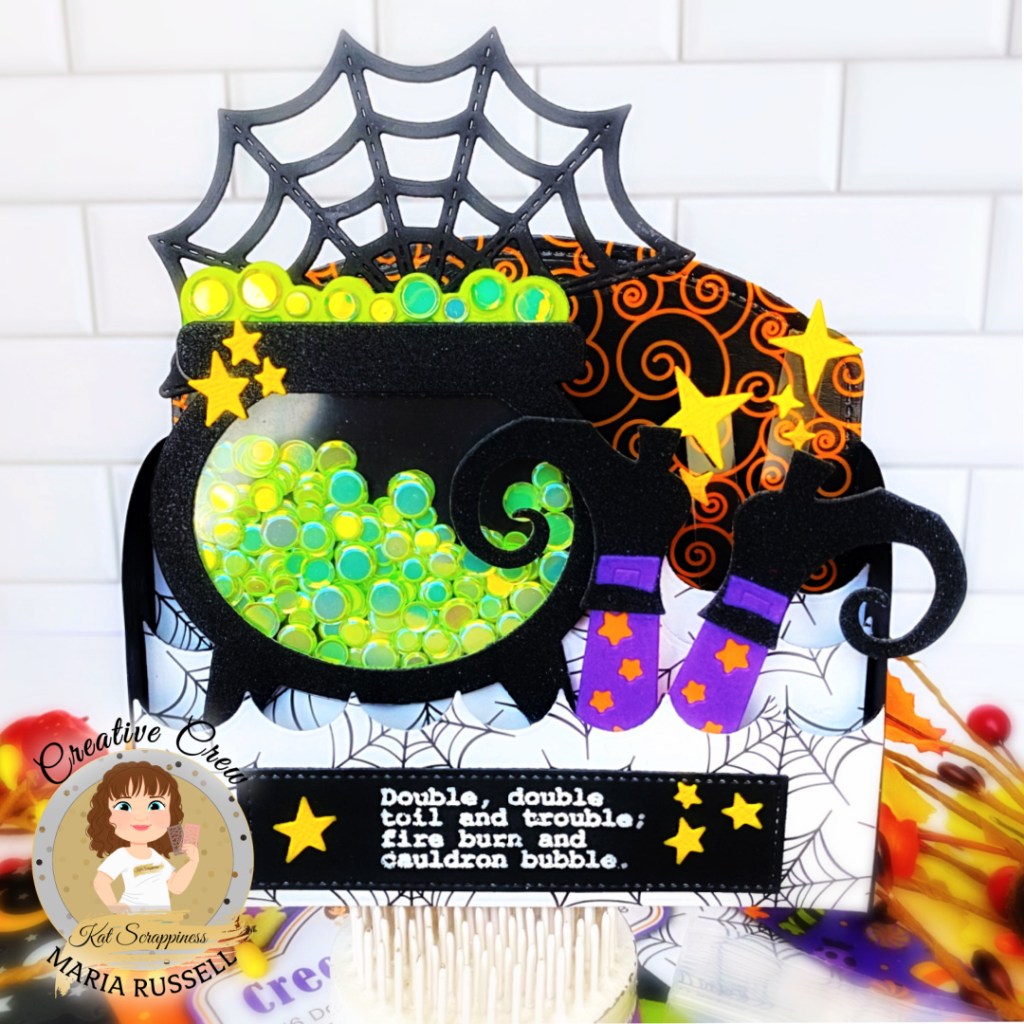
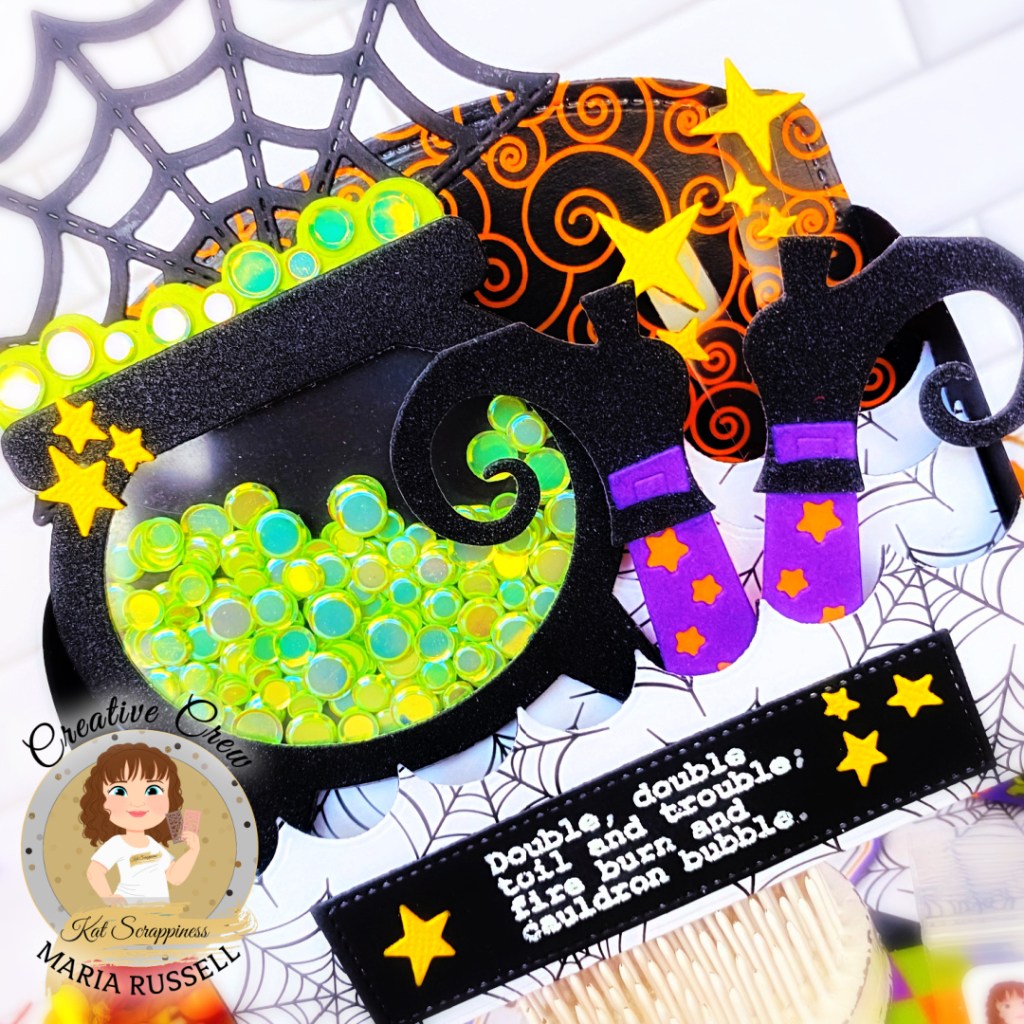
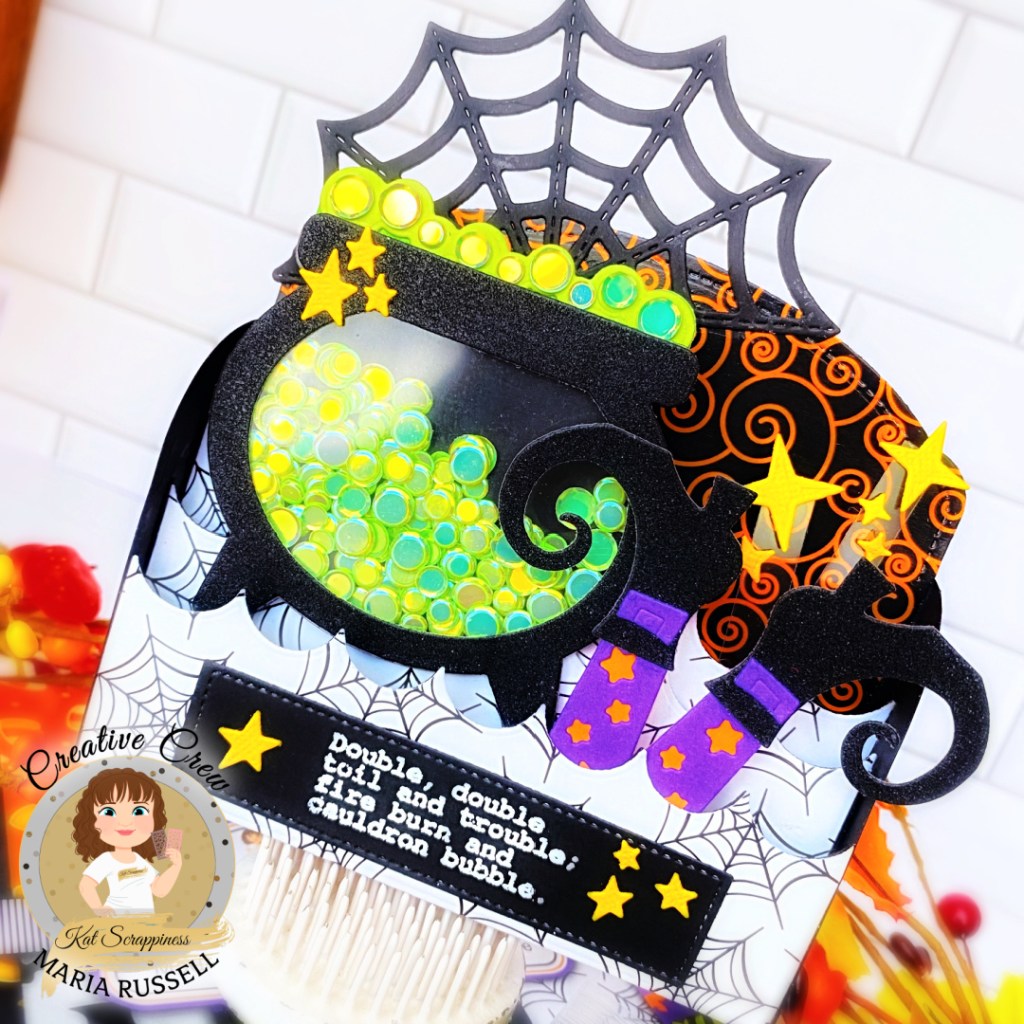
die-cut the cauldron using the Witches Brew Die Set on some black glitter card stock and acetate sheet. adhere the acetate sheet with strong double-side tape.
create the shaker well by adding foam-tape and use the Mint Green Solid Confetti Sequin Mix as the shaker element and close the well with double-sided tape.
adhere stars to the cauldron with liquid glue.
adhere the cauldron on the 3D Box card with liquid glue.
die-cut the witch’s legs from the Witches Brew Die Set from different colors of card stock and adhere them together. Add the witch’s legs to the
adhere the cauldron on the 3D Box card with liquid glue.
die-cut the witch’s legs from the Witches Brew Die Set from different colors of card stock and adhere them together. Add the witch’s legs to the 3D Box card also with strong double-sided tape.
cut a few strips of acetate sheets and adhere some stars that were die-cut using the A2 Reverse Scallop Frame (Stars) for added texture and interest. I love that they look like they are floating!
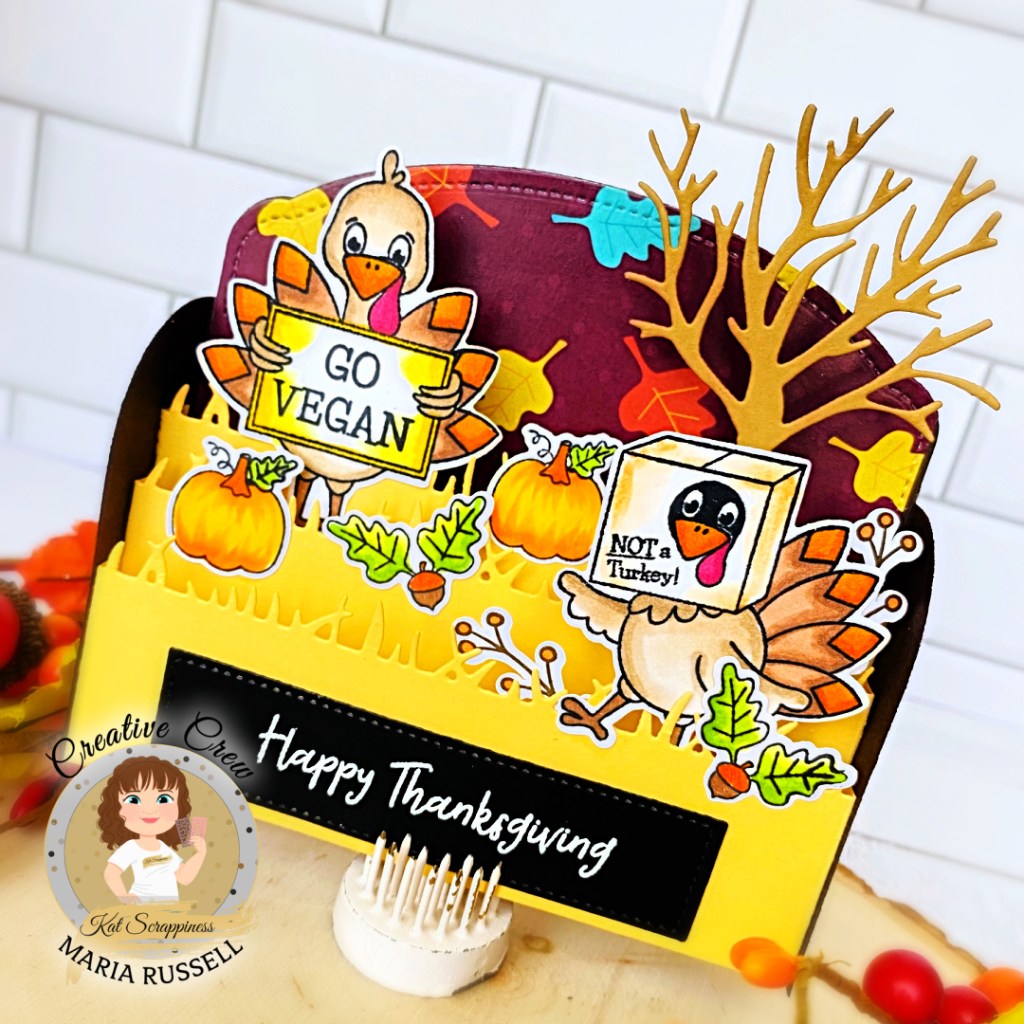
I pretty much did the same steps above. The only difference is I stamped and die-cut the images from the Gobble, Gobble Stamp Set and cut using the Gobble, Gobble coordinating dies. I also used the Gobble, Gobble Paper 6×6 Paper Pad.
The “spooky” tree was die-cut using the Crafter’s Essentials Halloween Dies and adhered with double-sided tape and finishing the card design by adding the sentiment.
In a couple of hours, we are also having an Instagram hop where you can find more projects by the entire Design Team. We also have a GIVEAWAY! Hop on over to my Instagram handle @RPRMLR77 to join and WIN.
I hope you like this card today and got inspired. Below, you will find links to the supplies used to create this project(s). Where available, I use compensated affiliate links at no extra cost to you. Your support helps me to keep bringing you new projects and inspiration. Thank you for stopping by, and have an amazing day!
finish the card design by adding the yellow stars that were die-cut using the A2 Reverse Scallop Die Set.
Sometimes, less is more when designing a cute card. This card is very simple, but I love how it turned out. Here’s another look:
I hope you like this card today and got inspired. Below, you will find links to the supplies used to create this project(s). Where available, I use compensated affiliate links at no extra cost to you. Your support helps me to keep bringing you new projects and inspiration. Thank you for stopping by, and have an amazing day!
Prepare the background by ink-blending a panel of Bristol Smooth White Card Stock measuring 4 1/4 x 5 1/2 inches with Scattered Straw, Cracked Pistachio and Peacock Feathers Distress Oxide Inks using small ink blending tools. Adhere this panel on some A2-size notecard.
Die-cut the pink frame using the Layered Balloons Coverplate Die on some 110 lb. Neenah Solar White Card Stock. Adhere this frame on the ink-blended panel with foam adhesive for added dimension.
Use the Laminator and Deco Foil Toner Sheets with Deco Foil Transfer Sheet in Shattered Glass to foil this panel.
Use the balloon dies from the Layered Balloons Coverplate Die to die-cut the balloons. Foam-mount the pieces on the card panel for added dimension.
Foam-mount the frame on the card for added dimension.
Die cut the words “Happy Birthday” using the Happy Birthday Word Die with Shadow on some Black and white card stock. Adhere them together with liquid glue.
Finish the card design by adhering the sentiment on the card.
I hope you like this simple birthday card today. Below, you will find links to the supplies used to create this project(s). Where available, I use compensated affiliate links at no extra cost to you. Your support helps me to keep bringing you new projects and inspiration. Thank you for stopping by, and have an amazing day!
Stamp the sentiment from the Valentine Quokka Stamp Set on some black card stock with Versamark Ink and heat-set with the heating tool.
Finish the card design by adhering the sentiment.
The images look so realistic, don’t you think? This is honestly one of my favorite layering stamp set of all time! It is so easy to layer and the result is just fantastic! Check out my older project photos of the Layered Chocolate Stamp Set on the website for more samples.
I hope you like my card today. The supplies I used are listed and linked below. Thanks for stopping by today and have an amazing day!
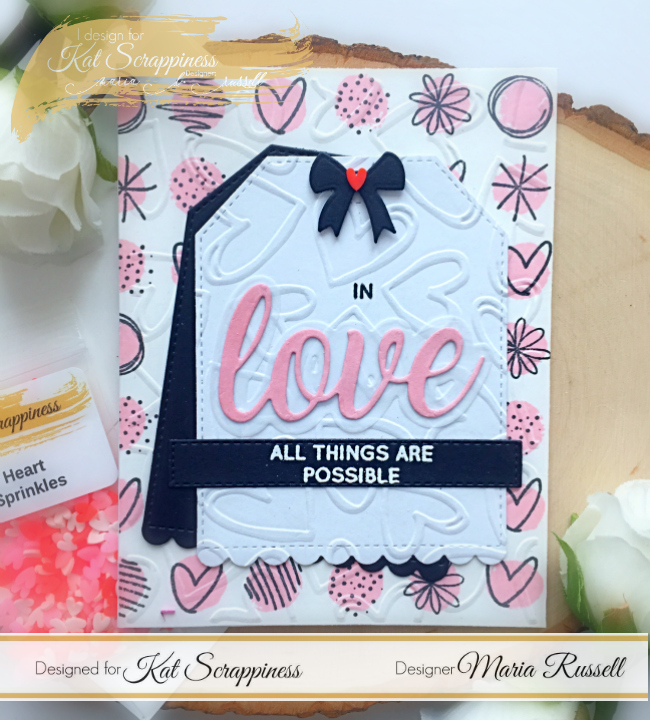
Hello my crafty peeps! It is day 2 of the January release by Kat Scrappiness and the design team is showcasing the new “I Love You” shadow dies. We also have a giveaway every day during release week. We are picking one winner for each release day so a total of three winners! Please head on over the the Kat Scrappiness blog post to leave a comment. Here’s the link: http://katscrappinessblog.com/january-release-day-2-i-love-you-shadow-dies/
I started out by stamping the images on some 110 lb card stock. I used the stamp set from Altenew called Watercolor dots. I embossed this piece using a hearts embossing folder that I purchased from Hobby Lobby. I also die-cut two tags using the Stitched Scalloped Nesting dies.
I die-cut the word “love” from the new I Love You shadow dies on pink, and die-cut the shadow with some vellum. I used my hearts embossing folder to emboss the white tag and adhered this piece on the black tag to layer it. I adhered the “love” sentiment. I stamped the sentiment on black card stock with versamark and heat-set this with my heating tool.
To finish my design, I die-cut the bow from my stash and adhered the red heart from the heart sprinkles embellishment mix. Here’s a closer look:
I really love how this card turned out. Even though the background is busy, the design kind of worked, don’t you think?
I hope you like my project today. Don’t forget to check out the blog post on Kat Scrappiness to leave a comment. Tomorrow is the last day so head on over there! I hope you guys win. The supplies I used are listed and linked below. Have an amazing day!
Hello my crafty peeps! Maria here with you today and I’m back with a Christmas card, showcasing the Merry Critters stamp set. I LOVE this stamp set so much and I just couldn’t wait to play with it.
I started by stamping my images on Neenah solar white card stock and colored them in with my Copic markers. The little yellow bird reminds me so much of tweety! Here’s what the stamp set look like:
Since this stamp set didn’t come with coordinating dies, I die-cut the images using my Brother Scan N Cut 2.
I inked up my background with some distress oxide inks. I ahve been loving the Tumbled Glass and Spun Sugar color combination lately! It gives the perfect wintery-sky! Here’s my card:
I used some white glittered card stock as well to create my snow hill. I think this card turned out so cute. Here’s a little close-up:
I hope you like my project today. The supplies I used are listed and linked blow. Please consider supporting me by clicking on those links. Don’t forget to use my coupon code “MARIA10” for 10% off your order. Have an amazing day!