Stock Your Stash Challenge with Reverse Confetti

Hello my crafty friends! Happy April Fool’s Day! The weekend is here and it is time to get inky and join Reverse Confetti’s Stock Your Stash Challenge and this month’s theme is “MOMS, DADS AND GRADS.”

The Stock Your Stash Challenge link list will be open from the 1st of the month until noon CST on the 29th of the month. Click the “Play Along...” button on our Reverse Confetti’s sidebar to go to the current link list post. Reverse Confetti stamps and/or Confetti Cuts are required to win. This is a way we get to thank their customers for using their stamps. Anyone is welcome to play, though! You may enter as many times as you wish.Use #SYSChallenge when playing along with this challenge.There will be a random winner selected each month and that person will receive a $20 gift certificate to the Reverse Confetti store. The winner of challenge will be posted on the Reverse Confetti blog at the end of the month.

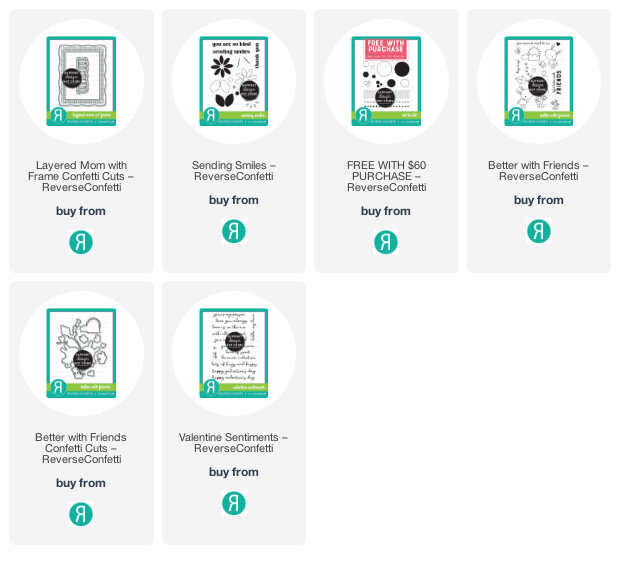
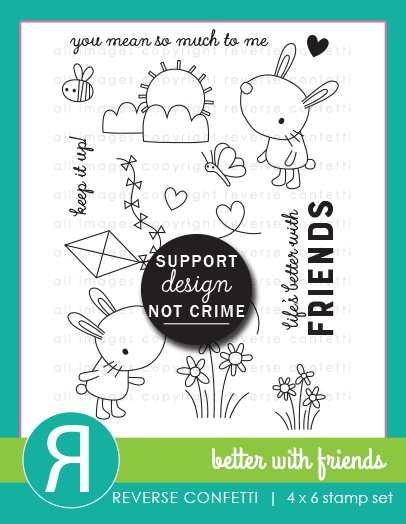
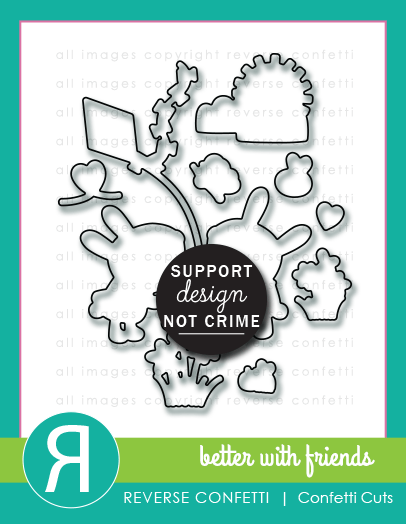
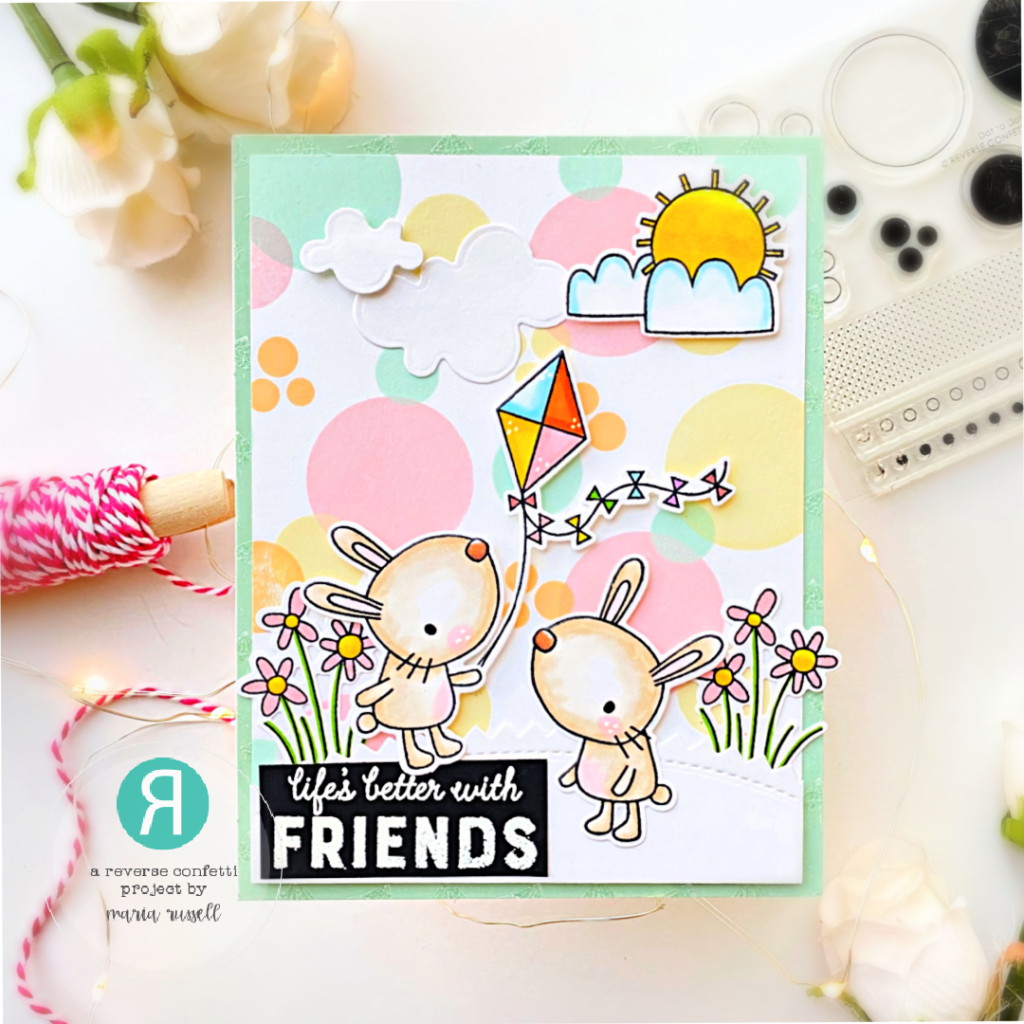
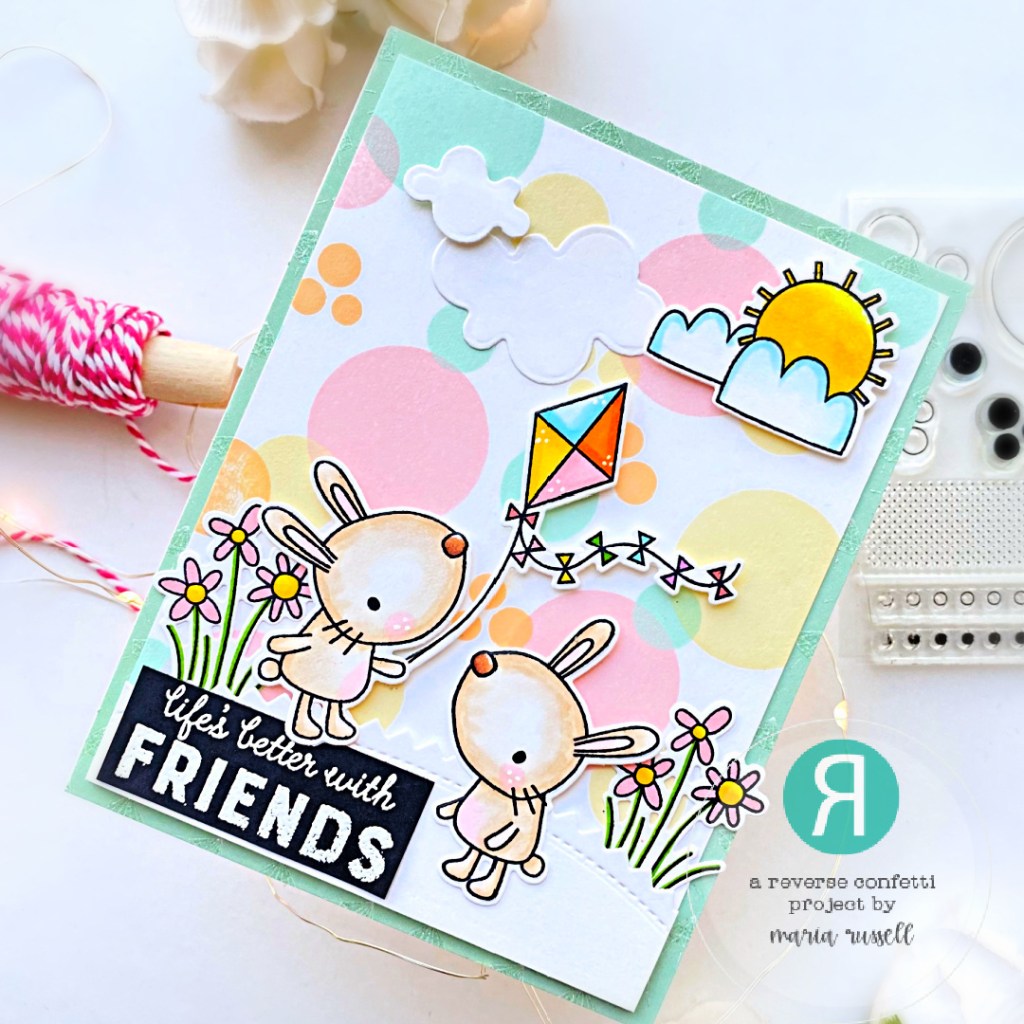
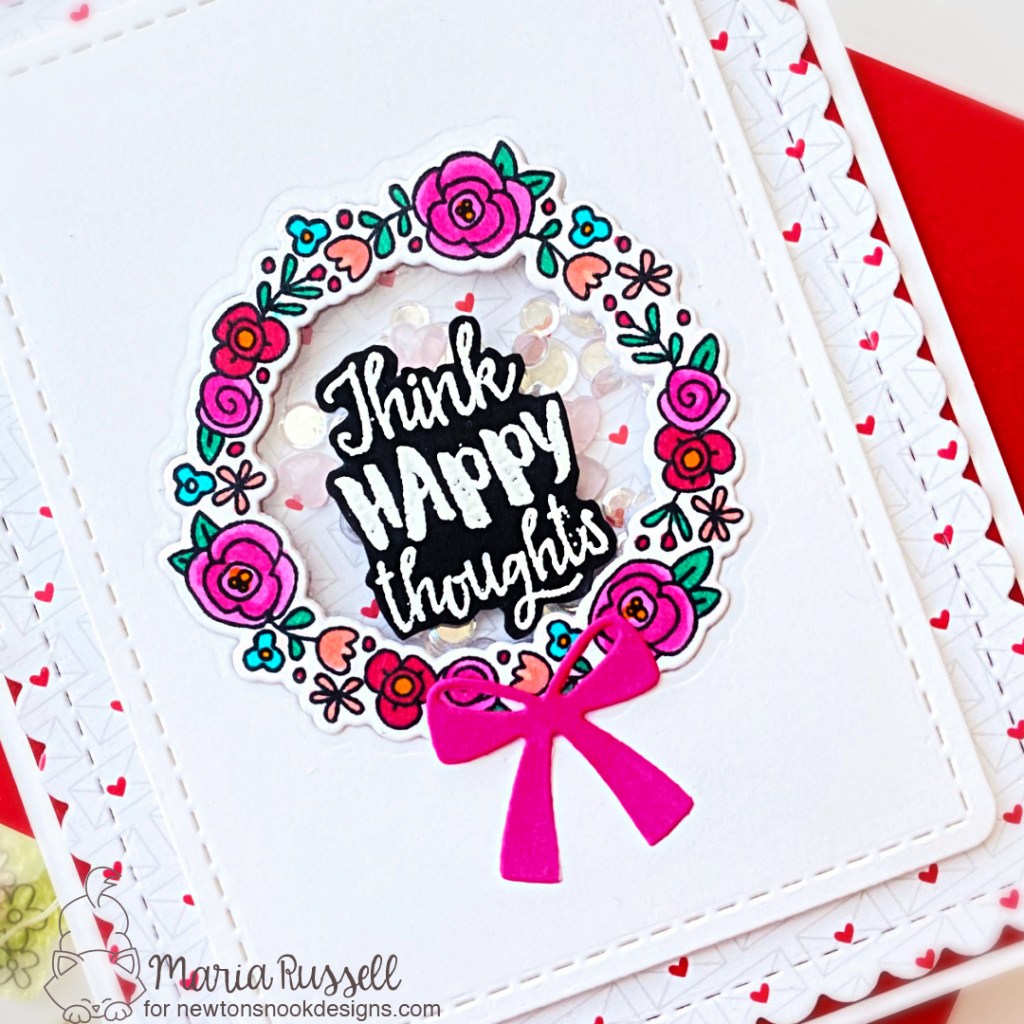
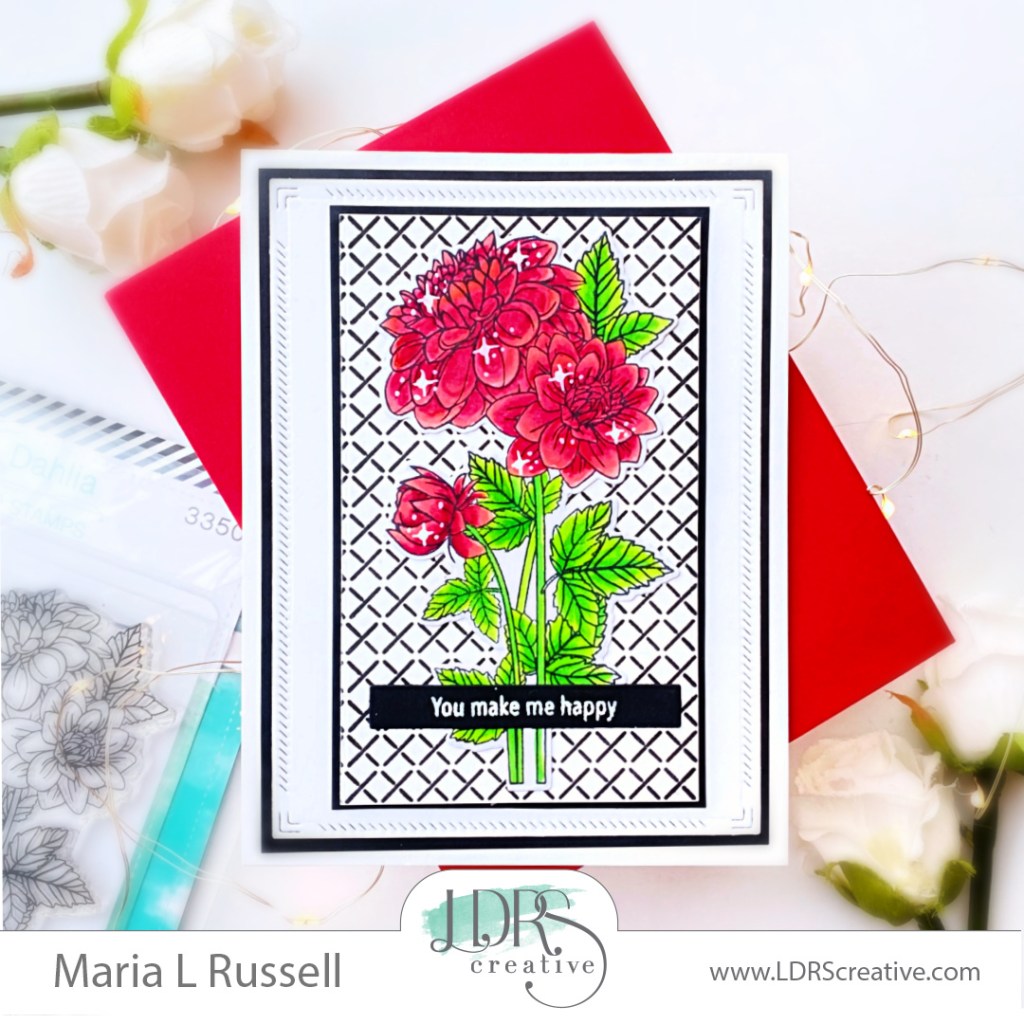
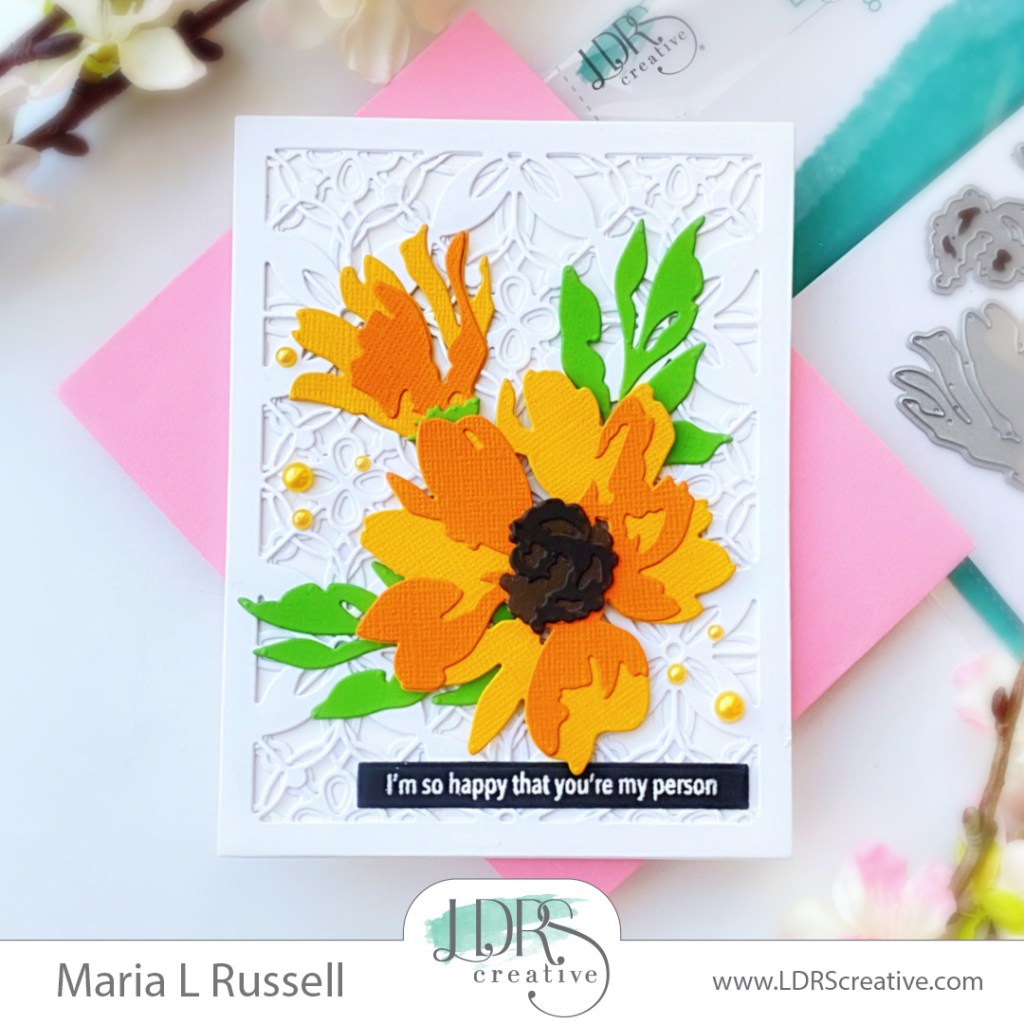
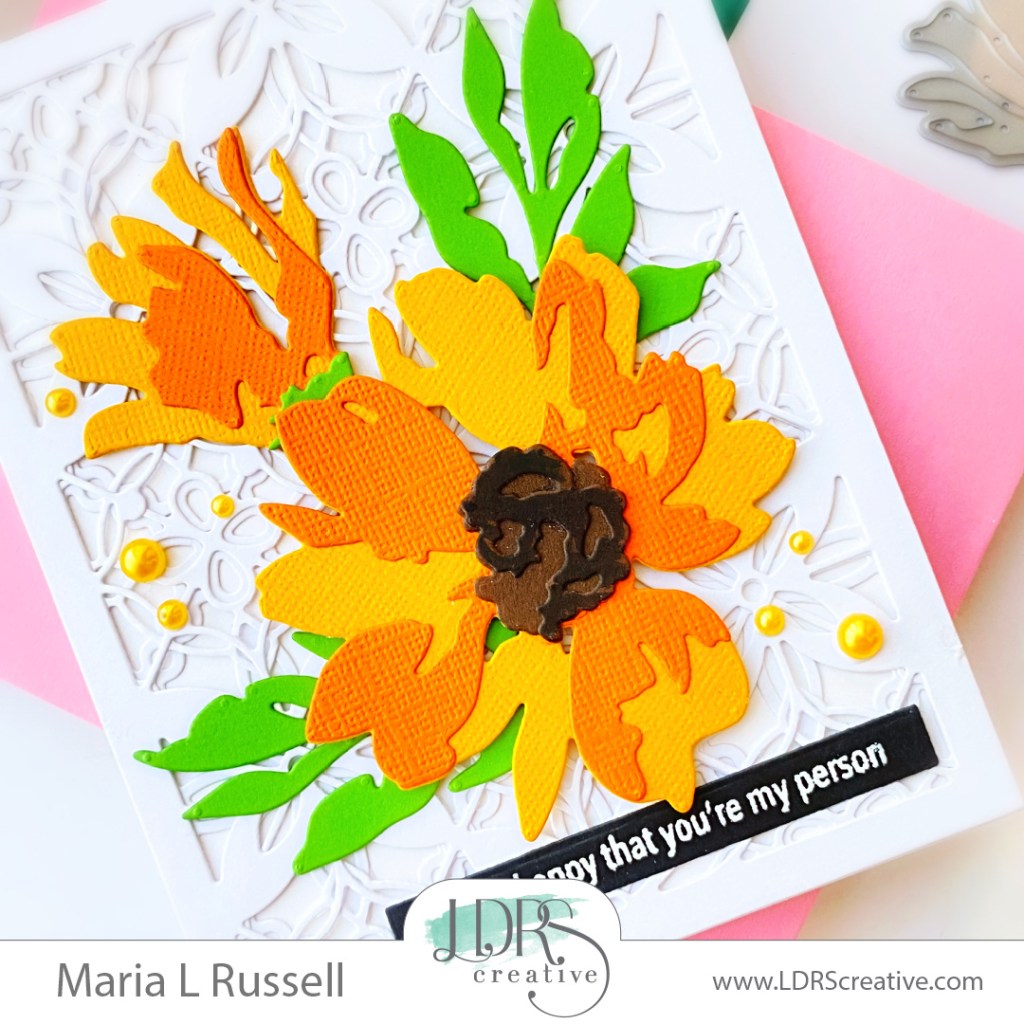
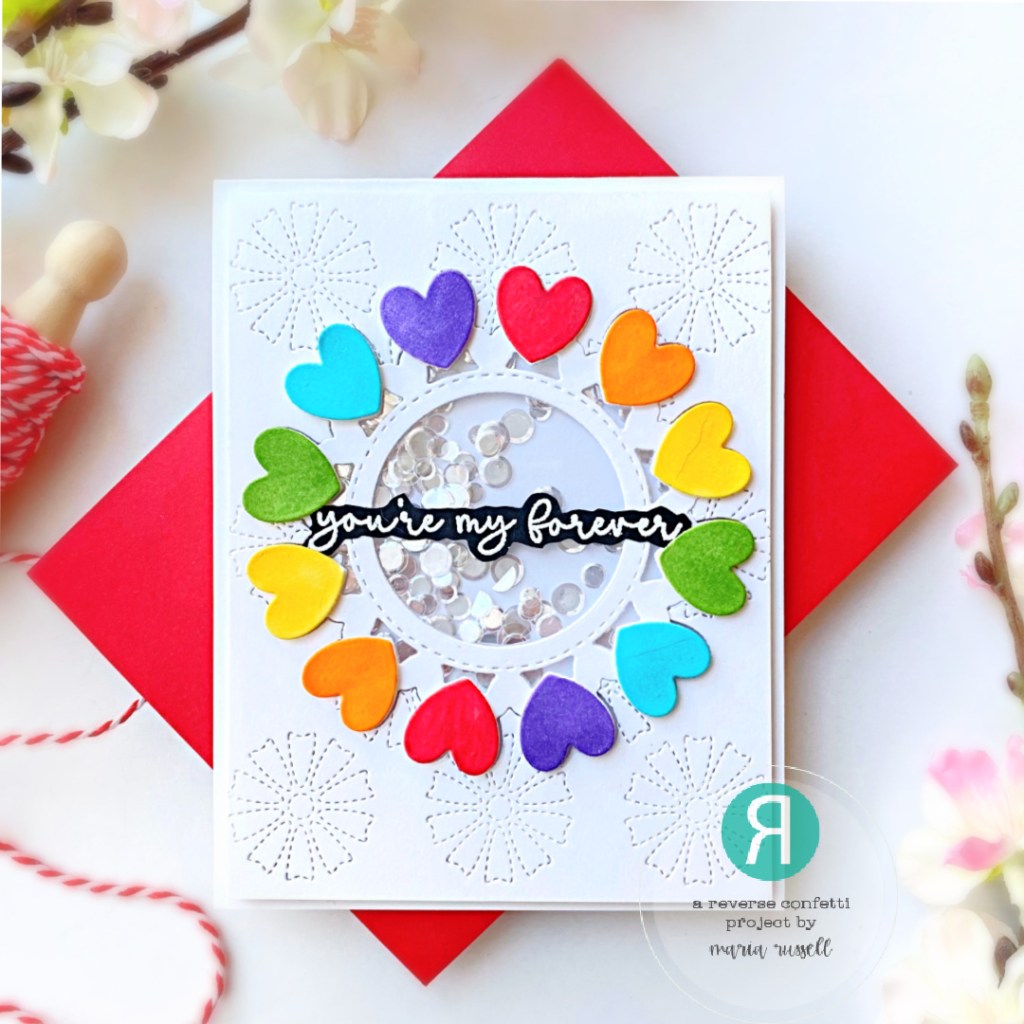
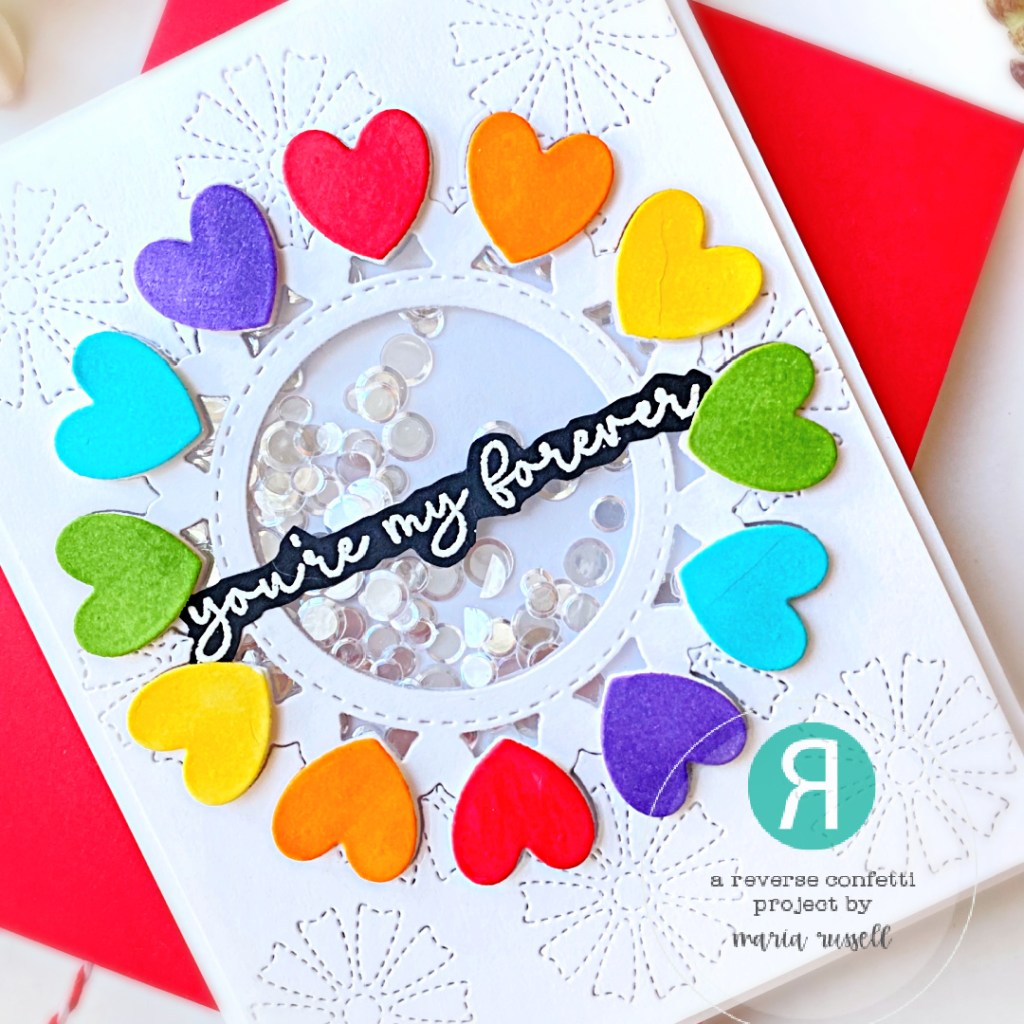
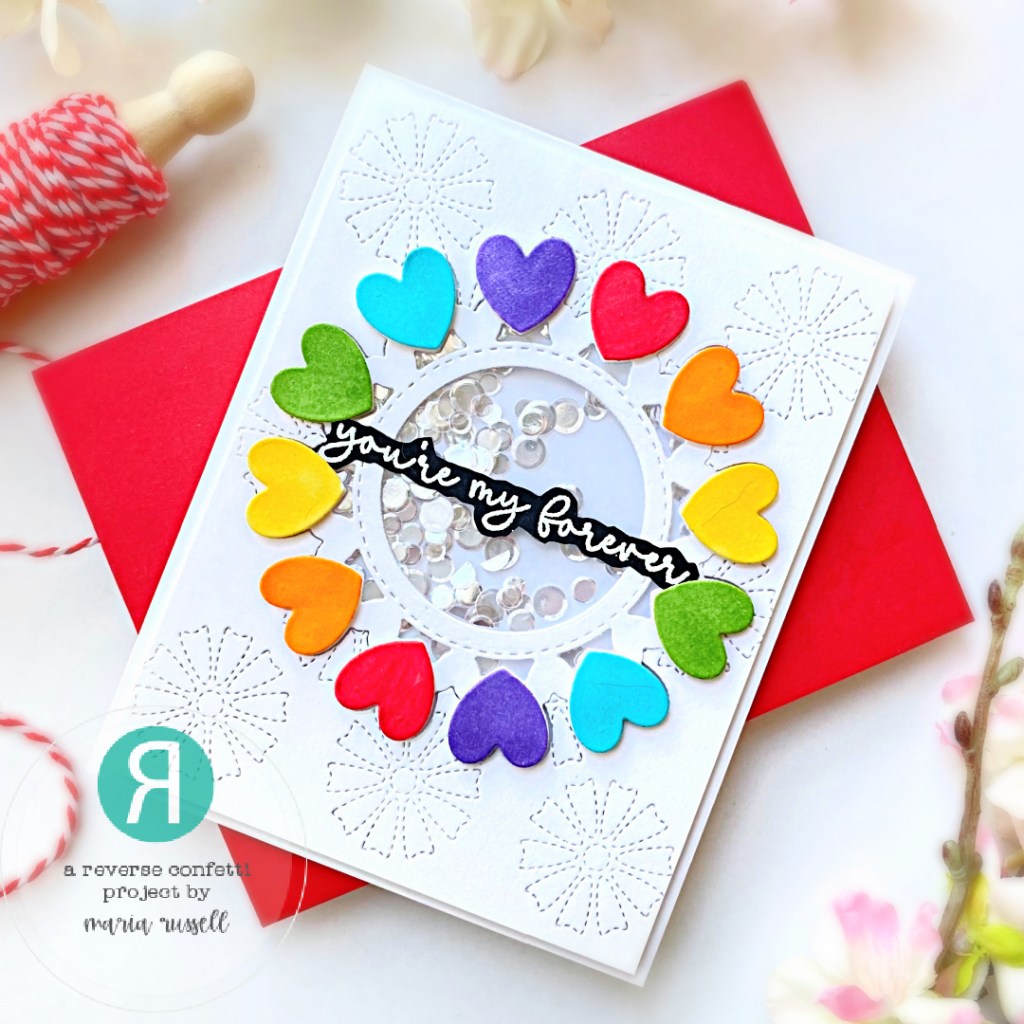
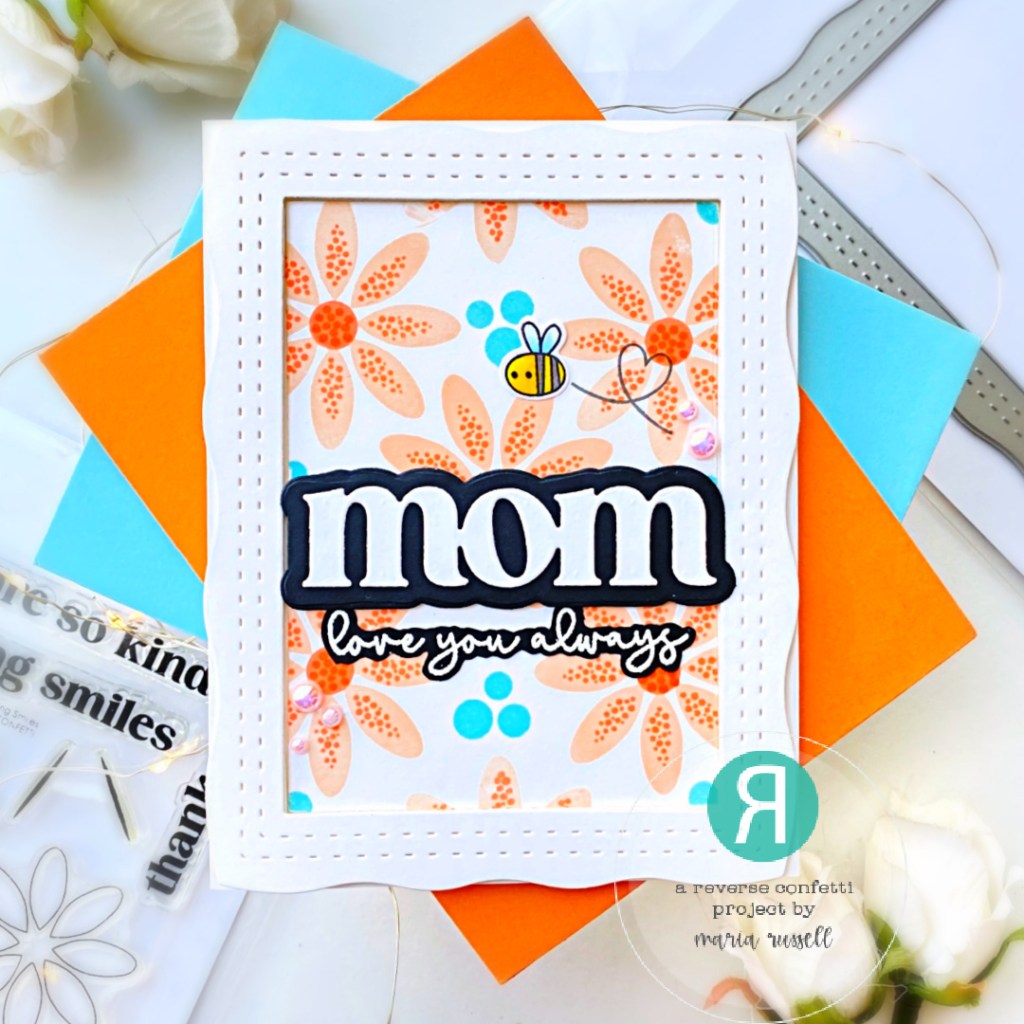
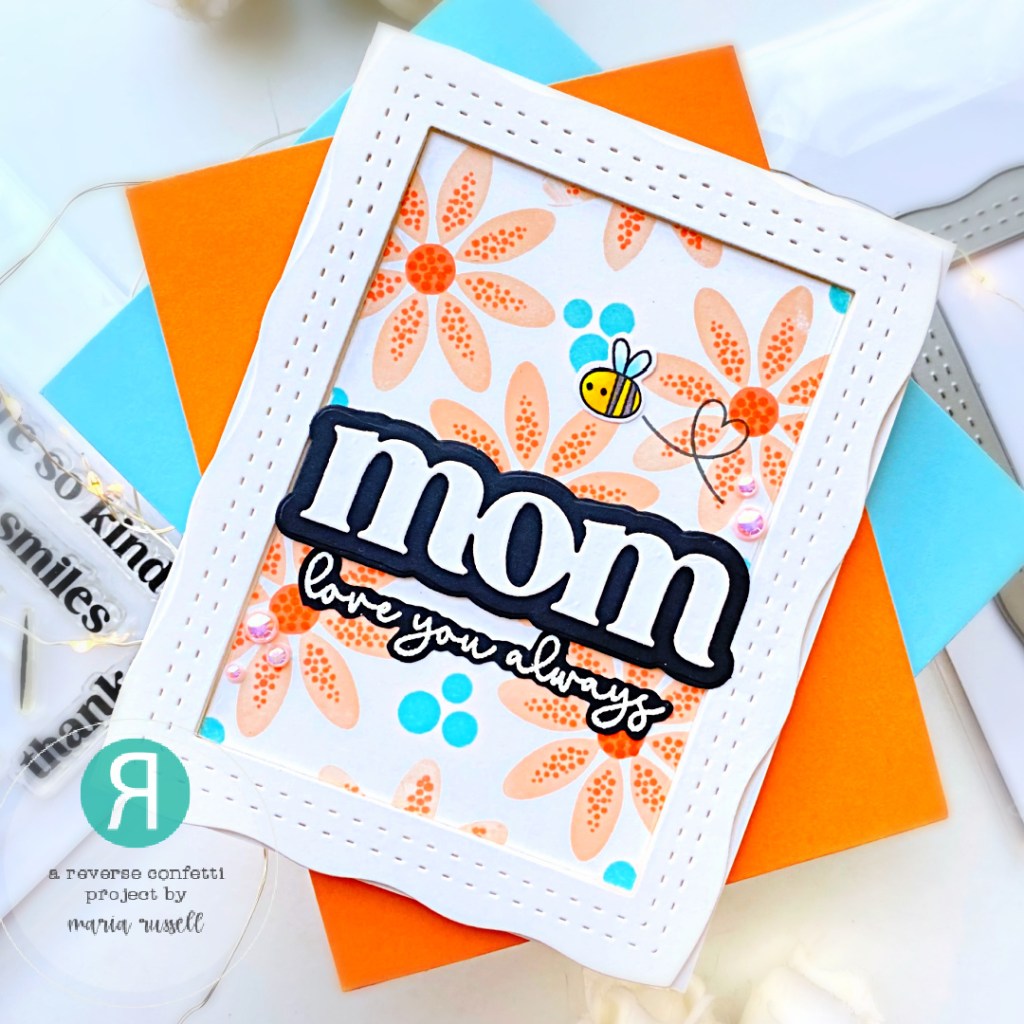
For my card below, I am showcasing the Sending Smiles Stamp Set, Better with Friends Stamp Set and Better with Friend Coordinating Confetti Cuts (bee) along with one of my favorite new dies called Layered Mom With Frame Confetti Cuts and Valentine Sentiment stamp set and the Dot-to-Dot stamp set.

Here’s how I made this card:

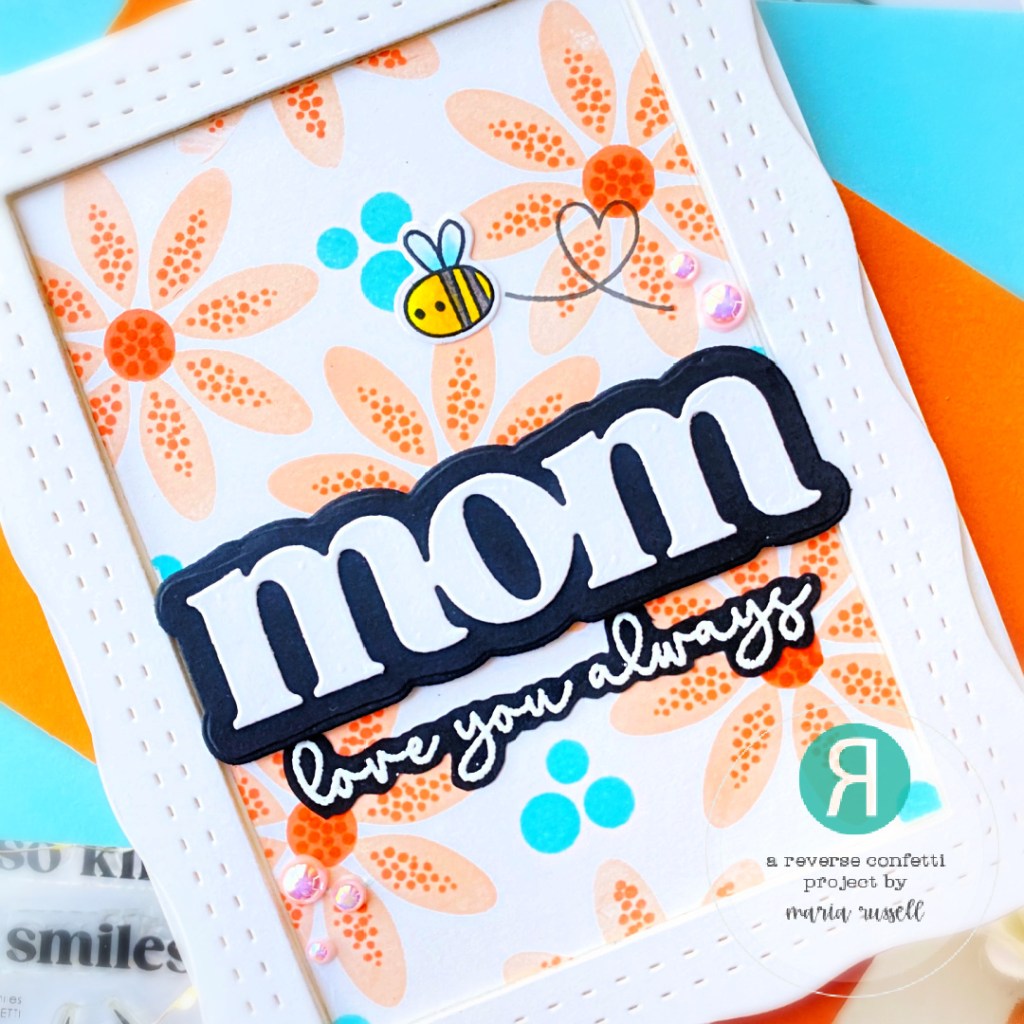
  • Die-cut the word “MOM” using the die from the Layered Mom with Frame Confetti Cuts on some white and black card stock.
  • Adhere this on the card front with foam-adhesive for added dimension.
  • Stamp the sentiment from the Valentine Sentiment Stamp Set on some black card stock with Versamark Ink. Heat-set with the heating tool and adhere on the card panel.
  • Finish the card design by adding some pink gems for added interest.

I hope you like my project today and will play along. The supplies are listed and linked below for your convenience. Thanks for stopping by today!

———–SUPPLIES———

COUNTDOWN TO CONFETTI – DAY 3 – BETTER WITH FRIENDS & PICNIC PALS

It’s Countdown to Confetti Day 3 and I am super excited to share with you my projects today! Don’t forget that there’s a giveaway so read through the end of this post to find out how you can WIN.

For today’s reveal, we are showcasing the Better with Friends stamp set and coordinating confetti cuts with the Picnic Pals stamp set & coordinating confetti cuts.

For my first project, I also used the Dot to Dot stamp set.

Here’s how I made this card:

  • Stamp the images on some X-press it paper and color the images in with alcohol markers.
  • Use the coordinating confetti cuts to cut them out.
  • Use the Dot-to-Dot stamp set and randomly stamp the images with different dye inks on some A2-size panel of Neenah solar white card stock.
  • Matt this background panel with some mint pattern paper and adhere on an A2-size notecard.
  • Use a die from your stash to die-cut the grass panel. Since the background is already busy, I opted for white card stock and foam-mounted this panel.
  • Adhere the rest of the images on the card with both liquid and foam adhesive for added dimension.
  • Use some white gel pen to add more details to the images for texture.
  • Stamp the sentiment on some black card stock with VersaMark ink. Sprinkle some white embossing powder and heat-set with heating tool.
  • Finish the card design by adhering the sentiment.

For my second project, I am showcasing the Picnic Pals stamp set & coordinating confetti cuts with the Layered Mom With Frame Confetti Cuts and (one of my all-time favorite die) the Stitched Circle Cover Panel Confetti Cuts.

  • Die-cut the pink background panel using the Stitched Circles Cover Panel Confetti Cuts and adhere this panel on some A2-size white notecard.
  • Stamp the images on some X-press It card stock and color the images in with alcohol markers.
  • Use the coordinating dies to cut the images.
  • Die-cut the Frame from the Layered Mom with Frame Confetti Cuts and adhere with foam adhesive for added dimension.
  • Assemble the card by adhering the images with liquid and foam adhesive for added dimension.
  • Finish the card design by adding the sentiment that was stamped on black card stock and heat-set with heating tool.

I can’t wait to hop around and see all the wonderful projects prepared by the entire team! Leave a comment by noon central on March 7th for a chance to win. There will be a $15 Gift Certificate for one blog commenter and also one FaceBook commenter. Make sure you pop over to the Reverse Confetti Blog for all the details!

Hop Listing

Reverse Confetti

Audrey Tokach

Maria Russell

Lisa Henke

Cheiron Brandon

Amy Kolling

April Antonio

Dana Kirby

Amy Tsuruta

Joy Baldwin

Jeanne Jachna

Retiring Products Feature Week with Newton’s Nook Designs – HAPPY LITTLE THOUGHTS

Hello and Happy Valentine’s Day everyone! Did you see that Newton’s Nook Designs is having a retiring sale on their website? It’s time to make room for new products so they are retiring select designs! These designs are available at up to 40% off while supplies last so hurry and get your favorites before they’re gone for good!

All throughout this week, the NND Design Team will be sharing inspiration using some of our favorite products from the retiring list!  Check out what I created today and don’t forget to check the NND Blog each day this week for more fun inspiration! Take advantage of this sale because there’s a TON of AMAZING products right now that you can purchase with a huge discount.

For my project today, I am showcasing the Happy Little Thoughts Stamp Set and Happy Little Thoughts Coordinating Dies. The background pattern paper is from the Love & Meows 6×6 Paper Pad that was die-cut using the scallop from the Frames & Flags Die Set.

Here’s how I made this card:

  • stamp the images on some Neenah solar white card stock and color the images in with alcohol markers.
  • die-cut the images using the coordinating dies.
  • die-cut the background panel using the scallop die from the Frames & Flags Die Set and Love & Meows 6×6 Paper Pad. Matt this piece with some red card stock for a little dimension and adhere on an A2-size notecard.
  • die-cut the small rectangle using the die from the Frames & Flags Die Set and Happy Little Thoughts Coordinating Dies.
  • adhere some acetate sheet behind this panel and add foam adhesive to create the shaker well.
  • in-lay the colored image on this panel with liquid glue.
  • add some clear sequins with a few heart enamels as the shaker element and adhere this panel on the card front.
  • stamp the sentiment on some black card stock with versamark ink and sprinkle with white embossing powder. Use heating tool to heat-set the sentiment.
  • fussy-cut the sentiment with precision snips and adhere on the card.
  • finish the design by adding the bow (die-cut using the bow die from the Baby Bib Die Set) with liquid glue.

I am super bummed that this stamp set is retiring. Don’t forget to check out all the Retiring Products Category by Newton’s Nook to see what is going away and grab your favorites now before they are gone for goodHere is a direct link to the retiring products page: http://bit.ly/NNDretiringProducts. The supplies I used are also listed and linked below. Thanks for stopping by and I hope you like my project!

————–SUPPLIES————-

You Make Me Happy – CREATIVE TEAM INSPIRATION DAY 2 with LDRS Creative

It’s inspiration day 2 at LDRS Creative and the entire design team is showing off a few of our favorites from the winter release. For today’s card, I am featuring the Log Cabin Pocket Pals stamp set and Log Cabin Pocket Pals Coordinating Dies with the A2 Diagonal Stitched Layered Card Toppers and In the Grass Die Set.

Here’s how I made this card:

  • Stamp the sentiment on some black card stock with watermark ink. Sprinkle some white embossing powder and heat-set with heating tool.
  • Adhere the sentiment on the focal panel and use some white gel pen to add dots to the background.

Don’t you just love that it looks “glowing” from the inside? I am so happy how this card turned out. I hope you love this card too and got inspired. The supplies I used are listed and linked below. Thanks for stopping by!

———SUPPLIES———-

You Make Me Happy – CREATIVE TEAM INSPIRATION DAY 1 with LDRS Creative

It’s inspiration day 1 at LDRS Creative and the entire design team is showing off a few of our favorites from the winter release. For today’s card, I am featuring the Dahlia stamp set and coordinating dies, with the A2 Diagonal Layered Stitched Card Toppers Die Set, Happy Me Happy You stamp set and the Sentiment Stack II Die.

Here’s how I made this card:

  • Adhere the focal image on the card.
  • Stamp the sentiments from the Happy Me Happy You stamp set and use the Sentiment Stack II Die to cut them all out. I really LOVE these type of stamp & die combo as you get to stamp a few sentiments and die cut all at once.
  • Adhere the sentiment “You Make Me Happy” on the card.
  • Finish the design by using white gel pen to add some dots and stars to the flowers for added texture.

Stay tuned for Day 2 as we bring you more inspiration tomorrow. I hope you like my card today. The supplies I used are listed and linked below. Thanks for stopping by!

———SUPPLIES———-

I’m SO Happy That You’re My Person

Hello everyone, it’s Maria!  It’s the middle of the week and I hope you are having a great day so far!  I am back today with a clean and simple card, showcasing some of my favorite products from the last release by LDRS Creative.

For my project today, I am showcasing the Perfect Petals Layering Dies, along with the Modern Geometric A2 Coverplate IModern Geometric A2 Coverplate IIModern Geometric A2 Coverplate III, Happy Me, Happy You Stack and the Sentiment Stack II die set.

I started by creating the background by die-cutting the 3 layering dies –> Modern Geometric A2 Coverplate IModern Geometric A2 Coverplate IIModern Geometric A2 Coverplate III on some Neenah solar white card stock.  I stacked them up using liquid glue and adhered on an A2-size notecard.

Next, I die-cut the beautiful flowers and leaves using the Perfect Petals Layering Dies with different colors of card stock.  I adhered the small flowers and leaves on the card with liquid glue, then foam-mounted the bigger flower for added dimension.  

I finished the card design by stamping the sentiments from the Happy Me, Happy You Stack with the Watermark Ink on some black card stock.  I sprinkled some white embossing powder and heat-set with my heating tool.  I die-cut the sentiments all at once using the Sentiment Stack II die set.  It is so convenient to have a few sentiment strips on hand using the combo.  I adhered the sentiment on the card and added some yellow-toned flat back pearls to finish the design.

I hope I have given you some inspiration today to create something beautiful.  The supplies I used are listed and linked below.  Thanks for stopping by, and have an amazing day!

 ————-SUPPLIES————–

Stock Your Stash Challenge with Reverse Confetti

Hello my crafty friends, it’s a lazy Sunday on my side of the world! The skies are dark and dreary and it’s raining, boo! I figured today is the perfect time to create something extremely colorful and I am joining the Reverse Confetti’s Stock Your Stash Challenge and this month’s theme is “LOVE IS IN THE AIR“.

The Stock Your Stash Challenge link list will be open from the 1st of the month until noon CST on the 29th of the month. Click the “Play Along...” button on our Reverse Confetti’s sidebar to go current link list post. Reverse Confetti stamps and/or Confetti Cuts are required to win. This is a way we get to thank their customers for using their stamps. Anyone is welcome to play, though! You may enter as many times as you wish.Use #SYSChallenge when playing along with this challenge.There will be a random winner selected each month and that person will receive a $20 gift certificate to the Reverse Confetti store. The winner of challenge will be posted on the Reverse Confetti blog at the end of the month.

For my card below, I am showcasing the Large Circle of Hearts Confetti Cuts along with the Valentine Sentiments Stamp Set and the Stitched Daisies Cover Panel Confetti Cuts.

Here’s how I made this card:

  • Adhere each heart on top with foam dots for added dimension.
  • Flip the background panel and add some acetate sheet and foam adhesive to create the shaker well.
  • Add some bokeh sequins as the shaker element. [Designer tip” since the background is already colorful, you don’t need to add more colors to the design.]
  • Adhere the card panel on some top-folding A2-size notecard to close the shaker well.
  • Finish the card design by stamping the sentiment from the Valentine Sentiments Stamp Set with VersaMark ink. Sprinkle some white embossing powder and heat-set with heating tool. Fussy-cut the sentiment with precision snips and adhere on the focal panel.

I hope you like my project and will play along. The supplies are listed and linked below. Thanks for stopping by! Happy Sunday!

———–SUPPLIES———

COUNTDOWN TO CONFETTI – DAY 4

It’s the final Day of the Countdown to Confetti January Release by Reverse Confetti! The whole gang is here to show you all the amazing projects we’ve put together to encourage you to shop! Remember, all of the products are now available today!

For my projects below, I used the Stitched Daisies Cover Panel, the hearts from the Postal Cover Panel, and the sentiment from the Valentine Sentiments stamp set.

Sometimes, simplicity is the key to a beautiful card. I die-cut the background panel using the Stitched Daisies Cover Panel Die and adhered on a white A2-size notecard. I die-cut the hearts using the medium heart die from the Postal Cover Panel die set on different colors of pattern paper. I layered the hearts and foam-mounted all of them onto the card.

The sentiment was stamped on some black card stock with VersaMark Ink. I sprinkled some white embossing powder and heat-set with my heating tool. I adhered the sentiment with foam and liquid adhesive.

I finished my design by adding another heart from the Love Bugs stamp set and covered with Stickles.

To go with this beautiful card, I decided to make a little treat box using a Punchboard from the collection. I filled it with some Hershey’s Kisses and closed both ends with some pink ribbon.

I added the die-cut sentiment using the Layered Lots of Love die set and adhered on the treat box with liquid glue. I finished this treat box by adding the cute little honeybee. Here are both projects again:

I hope you got inspired and like my projects this week! Hop along with us and see all the amazing projects prepared by the entire team!

Here’s the hop list:


Reverse Confetti

Cheiron Brandon

Audrey Tokach

Becky Roberts

Maria Russell (you are here)

Amy Rohl

Lisa Henke

Kelly Lunceford

Dilay Nacar

Amy Kolling

Michelle Short

Kellianne Wilson

Tiffany Pryce Russom

Andrea Shell

Rachel Alvarado

Dana Kirby

Candice Fisher

Susan Wymer

Amy Tsuruta

Tricia Barber

Melissa Phillips

Jenny Colacicco

Olga Moss

Jeanne Jachna

Lien Leysen
Heather Ruwe

COUNTDOWN TO CONFETTI – DAY 3

It’s Day 3 of the Countdown to Confetti January Release by Reverse Confetti and we have more amazing products to show you! Remember, all of the products you will see during the reveals will be available on January 8th.

Don’t forget to leave a comment each day during reveal week here on the blog and on the Reverse Confetti FaceBook group for a chance to win the gift certificate.

For today’s sneak peek, we are showcasing the Hello Daisy Stamp Set and Dies.

I am honestly 100% fan of daisies! They just remind me of happy days and sunshine! I didn’t think that this card below will need anything else because the images speak for themselves, don’t you think? You can easily mass-produce the card I have below for a little “hello, I love you-just-because” kind of thing!

I started by stamping the images in with Memento Tuxedo Black Ink on some Express-It blending card stock. I colored the images in with my Spectrum Noir alcohol markers. I adhered the panel on some A2-size notecard.

I stamped the sentiment “hello” a few times with some Versafine ink to get a good impression to make sure it stands out. Other than that, I didn’t think it needed anything else because the images just speak for themselves, don’t you think?

I hope you got inspired as much as I did! Don’t forget to check our tomorrow’s post fo the finale and get more inspiration from the whole team. Hop along with us for a chance to win the gift certificate. Check out the rest of the inspiration below:

Here’s the hop list:
Reverse Confetti

Audrey Tokach

Maria Russell (you are here)

Lisa Henke

Amy Kolling

Kellianne Wilson

Dana Kirby

Amy Tsuruta

Melissa Phillips

Jeanne Jachna