Shades of Autumn with Newton’s Nook Designs

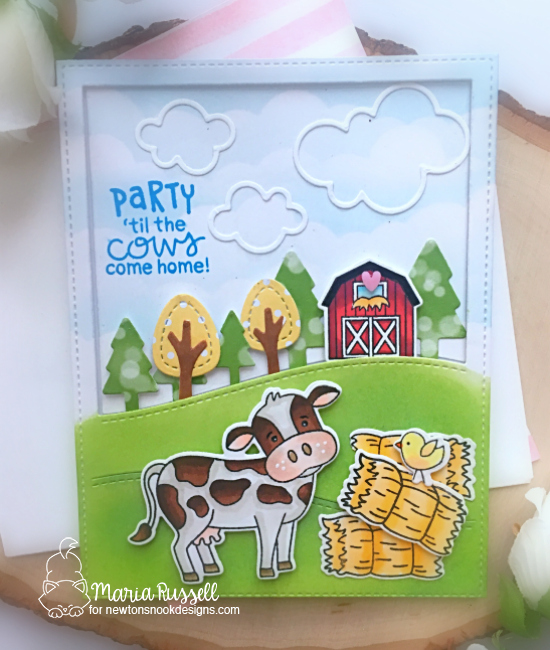
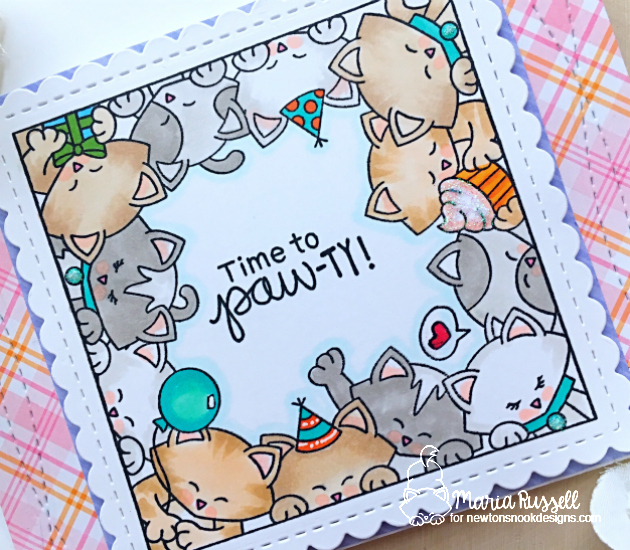
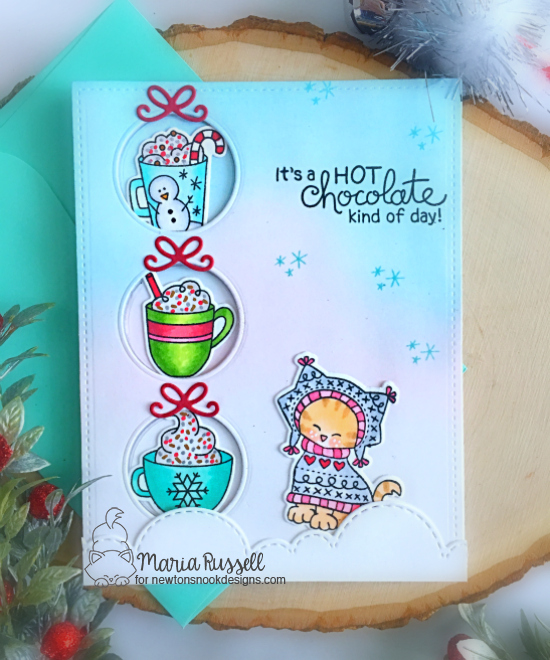
Hello my crafty friends! It is officially fall and I am celebrating by sharing this card with you today, showcasing the Shades of Autumn stamp, along with the Fall-ing For You stamp set.   This card was inspired by Angelica Conrad from The Greetery.  The color combination that she used in her card was stunning and I knew I just had to try it.


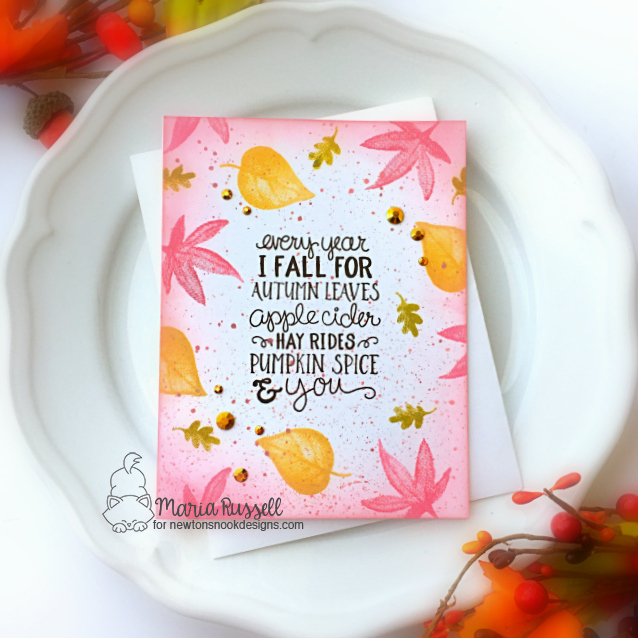
To begin, I stamped the sentiment from the Fall-Ing For You stamp set with Spectrum Noir Finesse Alcohol-Proof Ink in Rustic Brown on an A2-size card panel.  Next, I stamped the leaves randomly with Worn Lipstick and Aged Mahogany, Scattered Straw and Fossilized Amber, with Crushed Olive and Forest Moss.  I used my mini sponge daubers to intensify the colors and create deeper shadows.


I pressed my Aged Mahogany ink pad onto an acrylic block and added some water, then used my watercolor brush to mix it well and flicked it onto my card panel for added texture.


To finish my design, I adhered the Gold Rhinestone jewels with liquid glue for added dimension.  This card is very simple and can be easily mass-produced.  Here’s another look:


I hope you like my card today.  The supplies I use are listed and linked below.  Thank you so much for stopping by and happy fall season everyone!


———–SUPPLIES————


Let’s Be Merry Together with Newton’s Nook Designs

Hello my crafty friends! I am back today to share with you yet another Christmas card showcasing a lot of products from the October release by Newton’s Nook Designs.  I just really love the versatility of the stamp sets, dies and stencils by Newton’s Nook.  If you are like me, I like to mix and match my stamp sets and dies to create a unique card.


For my project today, I am featuring the Festive Fawns stamp set and coordinating dies for my main focal point. The sentiment is from the Newton’s Christmas Kittens stamp set and the presents are from the Christmas Trimmings stamp set.


I started by stamping my image on some Neenah solar white card stock and colored them in with my alcohol markers.  I die-cut the image using the coordinating dies.


To create my background, I inked up some Bristol smooth white card stock using distress oxide inks and my mini ink blending tools.  I used Blueprint Sketch, Chipped Sapphire and Black Soot.  To create more texture and interest, I used some White Copic paint and smooshed a little bit of it on my acrylic block and watered it down so that I can splatter some paint onto my colored background.  This will create the look of snow!  I left this piece to dry for about half an hour.


To build up my scene, I die-cut the birch trees using the Forest Scene Builder dies, the bow from the Pines & Holly die set and the snowbank using the Land Border dies.  Now that I have all of the elements that I needed, I started to build my scene.


I adhered the birch trees first with some liquid adhesive and added the first snowbank.  I adhered another birch tree and added the other layer of snowbank.  I also added the red bows for a festive look!


Lastly, I adhered my focal image and also added the Christmas presents and the peppermints.  To finish my design, I stamped the sentiment using some lobster ink from the Christmas Trimmings stamp set.  Here’s my card.


I love the simplicity of this card.  The dark background and the red bows just made the images pop!   Here’s a closer look:


I hope you like my card today and got inspired.  The supplies I used are listed and linked below.  Have an amazing week and happy stamping!


————-SUPPLIES———–


Hang in There – Clean & Simple Card with The Rabbit Hole Designs

Hello The Rabbit Hole Designs fans!  For the past few months, I have been making a lot of very-detailed handmade cards with scenes up the wazoo and I figured sometimes I just need a break from that and create some clean and simple (CAS) cards.  After all, less is more, right?!

For today’s project, I am showcasing the We are Family stamp set.

Here’s my card:

TRHDHangInThereKite1A

Here’s how I made the card:

  • Stamp the kite image on smooth white card stock and color the images in with Copic markers (or any medium of your choice).
  • Die-cut the image with an electronic die-cutting machine or fussy cut with scissors.  I used my Brother Scan N Cut 2.
  • Cut an A2 size piece of smooth white card stock and use the Kites Embossing folder to dry-emboss the background.
  • Die-cut the “Hang In There” sentiment on some black card stock. Die-cut the same on some fun foam and adhere this piece on the black card stock.
  • Adhere the sentiment on the embossed background.
  • Adhere the kite with some liquid adhesive.
  • Finish the design by using Sakura white gel pen to add some lines and dot to the kite.

Here’s a closer look:

This card is super simple, but I really love how it turned out.   I hope you like my card and got inspired.  The supplies I used are listed and linked below.  Have an amazing day and happy crafting!

For more inspiration, updates, and news make sure to check out these places.

————-SUPPLIES————–

Newton’s Nook Designs April Release – Day 3 – Moo Stamp Set

NND_April19

It is the third day of the April reveals by Newton’s Nook Designs.   Were you able to check out the last two days of the reveal?   Which one is your favorite so far?  You have a chance to win each stamp set during release week so check out the details I have indicated at the end of this blog post.  [Just a little important note:  I know some of you had difficulties finding the comments section.  If you would like to leave a comment to participate in the giveaway, the “comments section” will only be ever visible when a single post on Word Press is being viewed. Please click on this particular blog post and you will be able to leave a comment below.  Thank you!]  

For the third day, the design team is showcasing the Moo stamp set and coordinating dies.  Here’s what it looks like:

NND_APR19_Moo

Here’s my card:

NNDMoo1A

Here’s how I made my card:

  • stamp the images on some Neenah solar white card stock and color the images in with Copic markers.  Die cut the images using the coordinating dies.  I opted to color the cow with some dark brown Copic markers instead of the typical black to make it stand out.
  • cut an A2 size piece of Bristol smooth white and use distress oxide inks to ink up the background.
  • use a die from my stash to die-cut the colored background.
  • use some small dies to die-cut the trees with some patterned papers.
  • adhere this piece on an A2 size card base with liquid and foam adhesive.
  • die-cut the clouds silhouette using some clouds die from my stash.
  • adhere the clouds on the card.
  • adhere the rest of the elements to the card.

Here’s a closer look:

NNDMoo1B

I finished my card design by adding some pink enamel heart to the barn.!  Here’s another look:

NNDMoo1C

Would you like to win the “Moo” Stamp Set? This stamp set will be given away to ONE lucky winner!

Here’s how to win:

Comment on the NND blog and Design Team blogs (see list below)! The winner will be chosen at random from the collective reveal posts. Make sure to check out each of their blogs and comment for your chance to win. You will not know which blog has been chosen so the more you comment on the better your chances are of winning! You have until Thursday April 11th at 9pm EST to comment  — winners will be announced on the blog post on Friday, April 12th.

Check out all the awesome Design Team Blogs below to enter:

Newton’s Nook Designs

Amanda Bodine

Holly Endress

Larissa Heskett

Samantha Mann

Zsofia Molnar

Naki Rager

Maria Russell

Andrea Shell

Tatiana Trafimovich

————SUPPLIES—————

All You Need is a Little Vitamin Sea

Hello The Rabbit Hole Designs fans!  Before I start with my post, I just want to let you all know that TRHD is having a St. Patrick’s day special (see details below).   Take advantage and order your favorites now!

For my project today, I am showcasing the beautiful Sofishticated 6×8 stamp set.   Here’s what it looks like:


Here’s my card:


HERE’S HOW I MADE IT:

  • Stamp the images on smooth white card stock and color the images in with Copic markers (or any coloring medium of your choice).
  • Die-cut the image with an electronic die-cutting machine or fussy cut with scissors.  I used my Brother Scan N Cut 2.
  • Use some 110 lb card stock to die-cut using the Coral Collage die and the Under the Sea Collage die.
  • Color with copic markers.

  • Use the Under the Sea Collage die again to die-cut fun foam.  Adhere this piece on top of the “colored” Coral Collage to give them dimension.
  • Adhere the colored images on the foreground.
  • Use Peacock Feathers distress oxide ink to stamp the sentiment “All you need is a little vitamin sea” with your MISTI stamping tool.

Here’s a closer look:

I finished my design by adding some sparkling clear jewels to make them look like bubbles.  Here’s another look:

I hope you like my sea-themed card today.  The supplies I used are listed and linked below.  For more inspiration, updates, and news make sure to check out these places. Have an amazing day and happy crafting!  

————-SUPPLIES————-

Newton’s Nook Designs March Release – Day 3 – Newton’s Block Party & Frames Squared Die Set

NNDReleaseIcon_March19

It is the third day of the March reveals by Newton’s Nook Designs.   Were you able to check out the last two days of the reveal?   Which one is your favorite so far?  You have a chance to win each stamp set during release week so check out the details I have indicated at the end of this blog post.  [Just a little important note:  I know some of you had difficulties finding the comments section.  If you would like to leave a comment to participate in the giveaway, the “comments section” will only be ever visible when a single post on Word Press is being viewed. Please click on this particular blog post and you will be able to leave a comment below.  Thank you!]  

For the third day, the design team is showcasing the Newton’s Block Party stamp set and the Frames Squared Die set that we revealed yesterday.

NNDMar19_NewtonsBlockParty_PKG
NEWTON’S BLOCK PARTY
NNDMar19_FramesSquared_DIE_PKG
FRAMES SQUARE DIE SET

NNDNewtnsBlockParty1A

Here’s how I made my card:

  • die-cut the scallop frame from the Frames Squared die set with some Neenah solar white card stock.
  • color the images using Copic markers (or any coloring medium of your choice).
  • adhere this colored image onto a purple patterned paper. Cut the excess.
  • cut an A2 size card base and cover with patterned paper.
  • i used a die from my stash to add the wonky stitch details on both sides.
  • adhere the colored image on the card base.

Here’s a closer look:

NNDNewtnsBlockParty1B

To finish my card design, I added some Stardust stickles to the cupcake and white dots using my Sakura gel pen!  Here’s another look:

NNDNewtnsBlockParty1C

Would you like to win the “Newton’s Block Party” Stamp Set?  This stamp set will be given away to ONE lucky winner!

Here’s how to win:

Comment on the NND blog and Design Team blogs (see list below)! The winner will be chosen at random from the collective reveal posts. Make sure to check out each of their blogs and comment for your chance to win. You will not know which blog has been chosen so the more you comment on the better your chances are of winning! You have until Thursday March 14th at 9pm EST to comment  — winners will be announced on the blog post on Friday, March 15th.

Check out all the awesome Design Team Blogs below to enter:

Newton’s Nook Designs

Amanda Bodine

Holly Endress

Larissa Heskett

Samantha Mann

Zsofia Molnar

Naki Rager

Maria Russell

Andrea Shell

Tatiana Trafimovich

————SUPPLIES—————


Newton’s Nook Designs February Release – Day 3 – Newton’s Peeps

NNDReleaseIcon_Feb19


It is the third day of the February reveals by Newton’s Nook Designs.   Were you able to check out the last two days of the reveal?   Which one is your favorite so far?  You have a chance to win each stamp set during release week so check out the details I have indicated at the end of this blog post.  [Just a little important note:  I know some of you had difficulties finding the comments section.  If you would like to leave a comment to participate in the giveaway, the “comments section” will only be ever visible when a single post on Word Press is being viewed. Please click on this particular blog post and you will be able to leave a comment below.  Thank you!]  


For the third day, the design team is showcasing the Newton’s Peeps stamp set and coordinating dies.  Here’s what it looks like:


NNDFEB19_NewtonsPeeps
NEWTON’S PEEPS STAMP SET & DIES


Here’s how I made my box card:

  • stamp and color the images using the Newton’s Peeps stamp set.
  • use the coordinating dies to die-cut the images.
  • use the grassy hills die from the land border die set and die-cut the grass using green patterned papers.
  • die-cut the box die with card stock and patterned paper.
  • die-cut the rest of the elements to create the scene.
  • die-cut the “Happy Easter” from some black card stock. The happy easter die is from the Spring Pile Up die set and we are showcasing them tomorrow.
  • assemble the card.


NNDNewtonsPeeps2A


I love this scene with Newton and his peeps and I think the colors are so cheerful.  This card will be displayed in my studio, for sure.  Here’s a closer look:


NNDNewtonsPeeps2C


I adhered the sun with some acetate sheet.  The white flowers are from the Woodland Spring stamp set that we showcased yesterday.


NNDNewtonsPeeps2B


Would you like to win the “Newton’s Peeps” Stamp Set?  This stamp set will be given away to ONE lucky winner!

Comment on the NND blog and Design Team blogs (see list below)! The winner will be chosen at random from the collective reveal posts. Make sure to check out each of their blogs and comment for your chance to win. You will not know which blog has been chosen so the more you comment on the better your chances are of winning! You have until Thursday February 14th at 9pm EST to comment  — winners will be announced on the blog post on Friday, February 15th.

Check out all the awesome Design Team Blogs below to enter:

Newton’s Nook Designs

Amanda Bodine

Holly Endress

Ellen Haxelmans

Larissa Heskett

Samantha Mann

Zsofia Molnar

Naki Rager

Maria Russell

Andrea Shell

Tatiana Trafimovich

————SUPPLIES—————

Newton’s Nook Designs January Release – Day 3 – Love Owl-ways

nndreleaseicon_jan19

It is the third day of the January reveals by Newton’s Nook Designs.   Were you able to check out the last two days of the reveal?   Which one is your favorite so far?  You have a chance to win each stamp set during release week so check out the details I have indicated at the end of this blog post.  [Just a little important note:  I know some of you had difficulties finding the comments section.  If you would like to leave a comment to participate in the giveaway, the “comments section” will only be ever visible when a single post on Word Press is being viewed. Please click on this particular blog post and you will be able to leave a comment below.  Thank you!]  

For the third day of the reveals, the design team is showcasing the Love Owl-ways stamp set and coordinating dies.  Here’s what it looks like:

nndjan19_loveowl-ways

For my project today, I also used the “What A Hoot” stamp set and its coordinating dies with the Sunscape Stencil.  If you know me or have been following me for awhile, you know that I LOVE OWLS!  They are my spirit animal!  It is safe to say that this is my favorite stamp set of the month!  These images are so cute!

For my first card, I inked up my background with Squeezed Lemonade and Spiced Marmalade distress oxide inks.  I used the Sunscape stencil to add more details to the background.  I set this aside to dry.

I stamped my images on Neenah solar white card stock and die-cut the images using the coordinating dies.  The tree branch is from the What a Hoot stamp set.  I adhered the images onto my card.  Here’s what the first card look like:

nndloveowl-ways1a

To finish my design I also added the pink hearts using the Heart Sprinkles Embellishment mix by Kat Scrappiness.  Here’s a closer look:

nndloveowl-ways1b

I absolutely adore these images.  They re perfect for Valentine’s Day but you can also use this for any occasion.  The possibilities are endless using this set.

nndloveowl-ways1c

Would you like to win the “Love Owl-ways” Stamp Set?  We will choose ONE lucky winner to win this stamp set!

Here’s how to win:

Comment on the NND blog and Design Team blogs (see list below)! The winner will be chosen at random from the collective reveal posts. Make sure to check out each of their blogs and comment for your chance to win. You will not know which blog has been chosen so the more you comment on the better your chances are of winning! You have until Thursday January 17th at 9pm EST to comment  — winners will be announced on the blog post on Friday, January 18th.

Check out all the awesome Design Team Blogs below to enter:

Newton’s Nook Designs

Amanda Bodine

Holly Endress

Ellen Haxelmans

Larissa Heskett

Samantha Mann

Zsofia Molnar

Naki Rager

Maria Russell

Andrea Shell

Tatiana Trafimovich

————SUPPLIES————–


It’s A Hot Chocolate Kind of Day – Fall/Winter Coffee Lover’s Blog Hop

Hello my fellow coffee-lovers!  This is my second post for the Coffee Lover’s Blog Hop.  I wanted to enter another card today showcasing some of my favorite stamp sets by Newton’s Nook Designs.

For my card below, I am featuring the Cup of Cocoa stamp set and its coordinating dies, the Sweater Weather stamp set and coordinating dies and the Sky borders die set.

Just like my first blog post, I stamped the images on Copic friendly ink and colored them  in with my Copic markers. I die-cut the images with the coordinating dies.  I inked up a piece os Bristol smooth white card stock with my Distress Oxide inks and used a circle trio die from my stash to cut the windows.

I adhered the colored background onto my card base with some foam adhesive.  I also die-cut another piece of white card stock using the sky borders die set.   I adhered the images with foam adhesive and some Nuvo liquid glue.

NNDWinterCLBH20181A

To finish my design, I die-cut the little bows and also stamped the sentiment.  Here’s a little close-up of my card:

NNDWinerCLBH20181B

I don’t know about you but this kitty cat certainly makes me want to put on some skinny jeans, UGG boots and comfy sweater and drink hot chocolate all day long!  Okay, maybe not all day because I now have low-tolerance on caffeine but maybe two cups will be my limit!  Haha!  Here’s another look:

NNDWinerCLBH20181C

I hope you like my second card for today!  The supplies I used are listed and linked below.  Have an amazing day!

—————–SUPPLIES—————–