Countdown to Confetti September Release Day 3 – Poinsettia & Christmas Card Greetings + Giveaway Info

It’s the last day of the Countdown to Confetti Day by Reverse Confetti and we have some beautiful Christmas inspiration for you all today! TOMORROW IS RELEASE DAY and you can purchase everything you saw here on the countdown! There is also a GIVEAWAY so please read through the end of this post to find out how you can WIN!

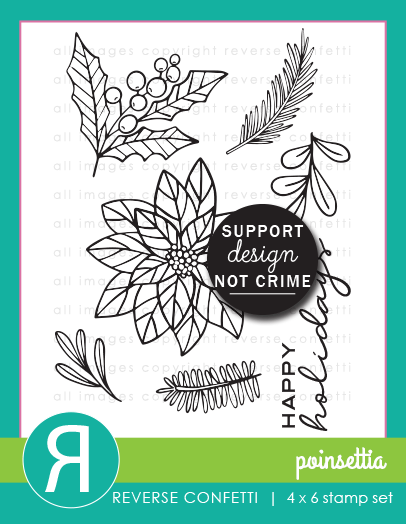
For today’s reveal, the design team is showcasing the Poinsettia Stamp Set and Poinsettia Confetti Cuts along with the Christmas Card Greetings Stamp Set. I also used the Bag & Tags Creator Confetti Cuts.

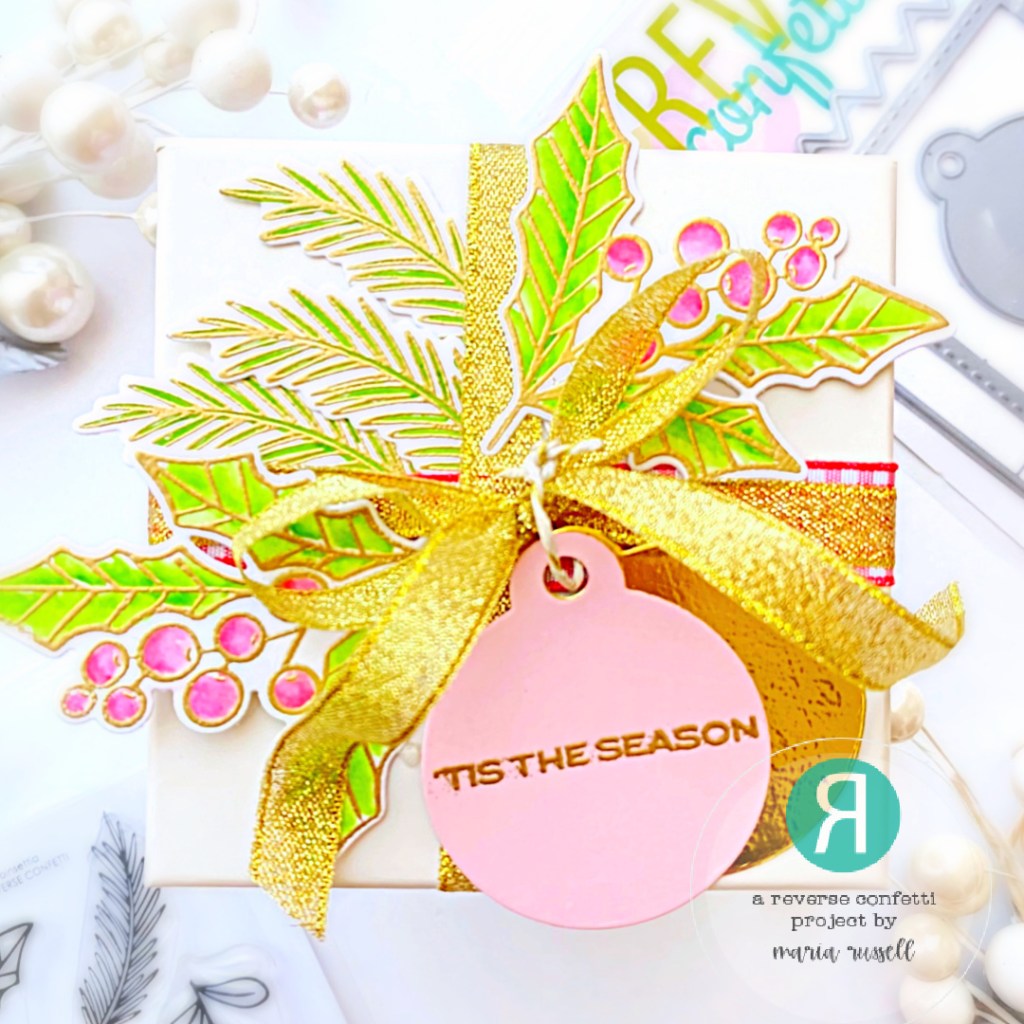
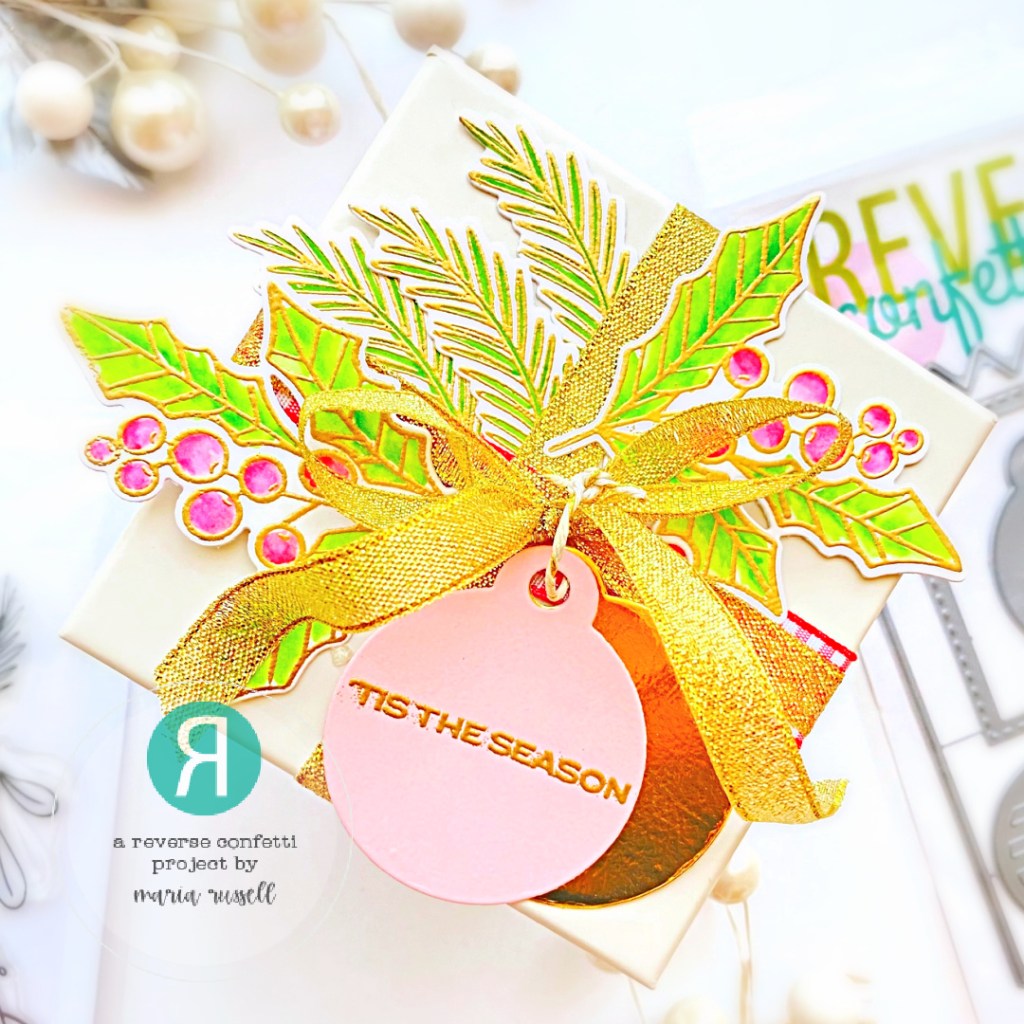
I already started Christmas shopping and I thought the stamp set and dies will go perfectly well to decorate this present for a friend. The images are so beautiful and using these to accessorize the present will definitely give it a special personal touch.

Here’s how I made this project:

  • stamp the images a few times on some Bristol smooth white card stock with Versamark ink. Sprinkle some gold embossing powder and heat-set with the heating tool.
  • color the images in with Zig Clean Color Real Brush Markers (or any watercolor of your choice.
  • use the coordinating dies to cut them out.
  • die-cut the tags on some gold and pink card stock and stamp the sentiment from the Christmas Card Greetings Stamp Set with Versamark ink. Sprinkle some gold embossing powder and heat-set with the heating tool.
  • use some gold twine and loop through the tags.
  • wrap the present using some white wrapper.
  • use some gingham red & white ribbon first, then loop through the gold ribbon to finish wrapping the present.
  • add the pink and gold tags.
  • finish the present by adhering the stamped images on the box.

Here’s another closer look:

Hop along with us and see what the other team members have created! Leave a comment by noon central on September 15th for a chance to win. There are two $15 Gift Certificates up for grabs; one for a blog commenter and also one for a FaceBook commenter. Winners will be announced on the Reverse Confetti Blog and FB Group at 5 PM CST on September 15th (that is TODAY!). Make sure you pop over to the Reverse Confetti Blog for all the details!

Hop Listing

Reverse Confetti

Emelie Hessler

Maria Russell  (that’s me!)

Lisa Henke  

Meg Brooks  

Amy Kolling  

Jennifer Kotas   

Dana Kirby  

Jeanne Jachna  

Amy Tsuruta  

Colleen Beamish

Countdown to Confetti September Release Day 2 – Fall Foliage and Autumn Sentiments + Giveaway Info

I am pleased to join the Countdown to Confetti Day 2 by Reverse Confetti and we have autumn inspiration for you! There is also a GIVEAWAY so please read through the end of this post to find out how you can WIN!

For today’s reveal, the design team is showcasing the Fall Foliage Stamp Set with Fall Foliage Confetti Cuts. I have also used the beautiful Window Confetti Cuts with the Autumn Sentiments.

As soon as I saw these stamp set and dies, I knew I wanted to create this project today. I know you can’t really tell on the photo, but there is a battery-operated tea light inside that makes this card glow at night.

Here’s how I made this project:

  • stamp the images on some Bristol smooth white card stock with Versamark in. Sprinkle some white embossing powder and heat-set with the heating tool.
  • color the images in with Zig Clean Color Real Brush Markers (or any watercolor of your choice.
  • use the coordinating dies to cut them out.
  • adhere some blue plaid pattern paper on some A2-size top folding notecard.
  • open the card panel and die-cut the window using the Window Confetti Cuts. Use the same Window Confetti Cuts and die-cut some white card stock.
  • adhere some vellum on the open window then adhere the white window die-cut with liquid glue.
  • adhere the focal images on the card-front, making sure to alternate and layer the colors.
  • stamp the sentiment from the Autumn Sentiments on some Terracotta card stock with Versamark ink. Sprinkle some white embossing powder and heat-set with heating tool.
  • fussy-cut the sentiment and adhere on the card.

Hop along with us and see what the other team members have created! Leave a comment by noon central on September 15th for a chance to win. There are two $15 Gift Certificates up for grabs; one for a blog commenter and also one for a FaceBook commenter. Winners will be announced on the Reverse Confetti Blog and FB Group at 5 PM CST on September 15th. Make sure you pop over to the Reverse Confetti Blog for all the details!

Hop Listing

Reverse Confetti

Emelie Hessler

Maria Russell  (that’s me!)

Lisa Henke  

Meg Brooks  

Amy Kolling  

Jennifer Kotas   

Dana Kirby  

Jeanne Jachna  

Amy Tsuruta  

Colleen Beamish

Countdown to Confetti September Release Day 1 – Hello Bootiful + Giveaway Info

I am pleased to join the Countdown to Confetti Day 1 by Reverse Confetti. We have lots to show you and there is also a GIVEAWAY so please read through the end of this post to find out how you can WIN!

For today’s reveal, the design team is showcasing the Hello Bootiful Stamp Set and Hello Bootiful Confetti Cuts. I have also used the Head in the Clouds Confetti Cuts with the Nuts About You Confetti Cuts (grass panel).

I wanted something fun to also display on my mantle so I decided to create a see-through card. This is so much fun to make!

Here’s how I made this project:

  • stamp the images on some Neenah solar white card stock and color the images in with alcohol markers (or any medium of your choice).
  • use the coordinating dies to cut them out. Set these images aside for now and prepare the background panel.
  • on some A2-size top-folding black notecard, cut the front panel leaving about an inch of the fold. Adhere some A2-size acetate sheet on this panel.
  • die-cut another frame using the Head in the Clouds Confetti Cuts and adhere on the acetate sheet.
  • die-cut the grass panel twice using the Nuts About You Confetti Cuts on some black card stock and adhere the first grass on the card-front.
  • cut some pattern paper and adhere on the back panel using tape runner.
  • adhere the other grass panel on the back.
  • adhere the pumpkins to create the scene.
  • adhere the ghosts and stars on the focal panel.
  • stamp the sentiment on the front with Versamark ink. Sprinkle some white embossing powder and heat-set with heating tool.
  • finish the card design by adhering some yellow stars for added texture and interest.

I can’t wait to hop around and see what the other team members have created! Leave a comment by noon central on September 15th for a chance to win. There are two $15 Gift Certificates up for grabs; one for a blog commenter and also one for a FaceBook commenter. Winners will be announced on the Reverse Confetti Blog and FB Group at 5 PM CST on September 15th. Make sure you pop over to the Reverse Confetti Blog for all the details!

Hop Listing


Reverse Confetti

Emelie Hessler

Maria Russell  (that’s me!)

Lisa Henke  

Meg Brooks  

Amy Kolling  

Jennifer Kotas   

Dana Kirby  

Jeanne Jachna  

Amy Tsuruta  

Colleen Beamish

————SUPPLIES——–

Halloween Inspiration Week

This week Newton’s Nook Designs is getting ready for Halloween with a fun Inspiration week! All week the NND Design Team will be sharing inspiration using some of their favorite Halloween products to get you in the mood for tricks and treats! Check out what I created today and don’t forget to check the NND Blog each day this week.

For my project, I am showcasing the Witchy Newton Stamp Set + coordinating die, along with the Fancy Edges Tag Die Set and Halloween Trio Die Set.

Here’s how I made my project:

  • use the Fancy Edges Tag Die Set and die-cut the tag three times on some white, yellow and orange card stock. adhere them together with liquid glue.
  • die-cut the tag hole reinforcement on some black card stock and adhere to the tag.
  • stamp the image on some x-press it card stock and color the images in with alcohol markers.
  • use coordinating die to die-cut the image and adhere on the tag.
  • use black ribbon and some halloween-themed twine to finish the tag assemble.
  • die-cut the word Trick or Treat using the Halloween Trio Die Set on some purple card stock and adhere on the tag with liquid glue.
  • finish the tag by stamping the sentiment with some black dye ink.
  • adhere the tag on the treat box with double-sided adhesive.

Don’t forget to visit the Halloween Products Category at Newton’s Nook Designs and get your favorites for creating cute and spooky Halloween crafts! Check out all the design team’s inspiration this week on the Newton’s Nook’s Blog.

——-SUPPLIES——-

CC Designs September Release Sneak Peek – Roberto Rascal’s Ghosts

Hello my crafty friends. I have another sneak peek for you of the September Release by CC Designs. For my card today, I am showcasing the Roberto Rascal’s Ghosts Stamp Set and Coordinating Dies.

Here’s how I made the card:

  • stamp the images on some X-Press It Card Stock and color the images in with alcohol markers.
  • die-cut the images using the coordinating die.
  • use pattern paper and adhere the same on some A2-size notecard.
  • on some black A2-size black card stock, use stitched circle dies to die-cut the windows. Foam-mount the same to the card for added dimension.
  • adhere the focal images on the card with liquid glue.
  • stamp the sentiment on the card front with Versamark ink. Sprinkle some white embossing powder and heat-set with heating tool.
  • adhere some stars on the card for added interest and texture.

Tomorrow is release day! We will also have an Instagram/BLOG Hop and there are two $15 gift certificates to CC Designs up for grabs. One comment will be pulled out from the Blog commenter and one from the Instagram commenter.

Thanks for stopping by!

CC Designs September Release Sneak Peek – Roberto Rascal’s Bats

It’s been a crazy day for me so far and it’s only Monday! I am currently traveling but I wanted to share with you a sneak peek of the September Release by CC Designs. For my card today, I am showcasing the Roberto Rascal’s Bats Stamp Set and Coordinating Dies.

Here’s how I made the card:

  • stamp the images on some X-Press It Card Stock and color the images in with alcohol markers.
  • die-cut the images using the coordinating die.
  • ink-up a panel of Strathmore Bristol Smooth white card stock using a stencils with distress oxide ink. Adhere this panel on an A2-size notecard.
  • use another stencil and black distress ink to add the spooky trees. Leave it to dry for about half an hour.
  • die-cut the hills using a die from my collection.
  • adhere the images on the card front with liquid glue.
  • stamp some bats on the background using versafine black ink.
  • stamp the sentiment on the card with Versamark ink.
  • sprinkle some white embossing powder and heat-set the sentiment with heating tool.

Aren’t those images adorable?! Stay tuned this week as we give you more sneak peeks of the September release. I will be back on September 7th to give you another peek.

We will also have an Instagram/BLOG Hop on September 9th, which is the release day and there are two $15 gift certificate to CC Designs up for grabs. One comment will be pulled out from the Blog commenter and one from the Instagram commenter.

Thanks for stopping by!

Less is More with Kat Scrappiness Products

Hello Kat Scrappiness, Inc. fans! Today’s super simple card showcases the newly-released stamp set called Pawsome Dogs, along with the A2 Reverse Scallop Die Set, Pawsome Dogs Sentiments and Stitched Sentiment Strip Dies.

Here’s how I made this card:

  • stamp the images on some Neenah Classic Crest Solar white card stock.
  • color images in with alcohol markers (or any medium of your choice).
  • die-cut the images using the coordinating die or your Scan N Cut Machine.
  • die-cut some yellow, pink and blue card stock using the Stitched Sentiment Strip Dies
  • adhere the strips on an A2-size, top-folding notecard.

Sometimes, less is more when designing a cute card. This card is very simple, but I love how it turned out. Here’s another look:

I hope you like this card today and got inspired. Below, you will find links to the supplies used to create this project(s). Where available, I use compensated affiliate links at no extra cost to you. Your support helps me to keep bringing you new projects and inspiration. Thank you for stopping by, and have an amazing day!

——–SUPPLIES——–

NND August Release Day 4 – Harvest Haul + Newton’s Crate + Giveaway

I am a bit bummed because it’s the last day of the August reveals by Newton’s Nook Designs! Were you able to hop along with us for the first three days? Which one is your favorite so far? Remember that you have a chance to win the stamp set being revealed each day so please read through til the end of the blog post to find out more info.  [Just a little important note:  I know some of you had difficulties finding the comments section.  If you would like to leave a comment to participate in the giveaway, the “comments section” will only be ever visible when a single post on Word Press is being viewed. Please click on this particular blog post and you will be able to leave a comment below.  Thank you!]  

For the final day of the reveals, we are showcasing the Harvest Haul Stamp Set + coordinating dies along with the Newton’s Crate Stamp Set + coordinating dies.

For my first project, I started by masking some Bristol smooth white card stock with masking tape and ink-blending this panel using the Sunscape Stencil and some distress oxide inks. I cut this panel and adhered on some Neenah solar white card stock with liquid glue.

I added some texture to the foreground by using some embossing folder and partially embossed the same on the die-cutting machine, then adhering it to a top folding notecard.

I finished the card design by stamping the sentiment on the banner that was die-cut from the Frames & Flags Die Set and heat-set with the heating tool. Here’s another look:

The next project is so cute and I love how this turned out. I started by temporarily taping the Jack-O-Lantern stencil no. 1 on some Neenah solar white panel. I used some orange ink and a blending brush to add the pumpkins.

I did the same to add the pumpkin stems detail by taping Jack-O-Lantern stencil no. 2 to the panel and used some lime green dye ink with another blending brush. I removed the stencil and cut this panel and adhered on some pattern paper from the Autumn Paper Pad with liquid glue.

I needed to ground the pumpkin images from the pattern paper so I adhered two orange strips on both sides, and added the scallop vellum that was die-cut using the Oval Frames Die. The vellum somehow toned down the busy patterns of the background, don’t you think?!

I stamped the images on some Neenah solar white card stock and die-cut using the coordinating die. I colored the images with some alcohol markers and foam-mounted to the card-front for added dimension. I stamped the sentiment on the image with some black ink.

Lastly, I added the orange bow to the card to finish my design. In case you’re wondering, the bow is from the Baby Bib Die Set. Here’s another look at the card:

Would you like to win the “Harvest Haul” or the “Newton’s Crate” Stamp Set? We will choose ONE lucky winner for each stamp set!

Here’s how to win: Comment on the NND blog and Design Team blogs (see list below)! The winner will be chosen at random from the collective reveal posts. Make sure to check out each of their blogs and comment for your chance to win. You will not know which blog has been chosen so the more you comment on, the better your chances are of winning!  You have until Thursday August 18th at 9pm ET to comment  — winners will be announced on the blog post on Friday, August 19th

Check out all the awesome Design Team Blogs below to enter:

Newton’s Nook Designs

Donna Idlet

Ellen Haxelmans

Tina Herbeck

Larissa Heskett

Samantha Mann

Zsofia Molnar

Maria Russell (you are here)

Farhana Sarker

Tatiana Trafimovich

Amanda Wilcox

———-SUPPLIES———

NND August Release Day 3 – Autumn Oval + Autumn Paper Pad + Giveaway

It’s Day 3 of the August release by Newton’s Nook Designs! Are you enjoying the reveals so far? Remember that you have a chance to win the stamp set being revealed each day so please read through til the end of the blog post to find out more info.  [Just a little important note:  I know some of you had difficulties finding the comments section.  If you would like to leave a comment to participate in the giveaway, the “comments section” will only be ever visible when a single post on Word Press is being viewed. Please click on this particular blog post and you will be able to leave a comment below.  Thank you!]  

For Day 3, we are showcasing the Autumn Oval Stamp Set that coordinates perfectly with the previously-released Oval Frames Die Set with the BEAUTIFUL Autumn Paper Pad.

The background was created by die-cutting the Autumn Paper with a rectangle die from my collection. I adhered this panel on some A2-size, top-folding notecard.

The focal image was stamped on some Neenah solar white card stock and die-cut using the Oval Frames Die Set. I fussy-cut around the images using precision snips for added texture and interest.

Alcohol markers were used to color the pumpkins, leaves and berries, including the detailed oval on the side to ground the images [Designer tip: this somehow made the images pop against the yellow background].

I finished the card design by adding the sentiment that was heat-set with heating tool and die-cut using the smallest die from the Oval Frames Die Set.

Would you like to win the “Autumn Oval” Stamp Set? This stamp set will be given away to ONE lucky winner!

Here’s how to win: Comment on the NND blog and Design Team blogs (see list below)! The winner will be chosen at random from the collective reveal posts. Make sure to check out each of their blogs and comment for your chance to win. You will not know which blog has been chosen so the more you comment on, the better your chances are of winning!  You have until Thursday August 18th at 9pm ET to comment  — winners will be announced on the blog post on Friday, August 19th

Check out all the awesome Design Team Blogs below to enter:

Newton’s Nook Designs

Donna Idlet

Ellen Haxelmans

Tina Herbeck

Larissa Heskett

Samantha Mann

Zsofia Molnar

Maria Russell (you are here)

Farhana Sarker

Tatiana Trafimovich

Amanda Wilcox

———-SUPPLIES———