COUNTDOWN TO CONFETTI – DAY 3 – Love Wins

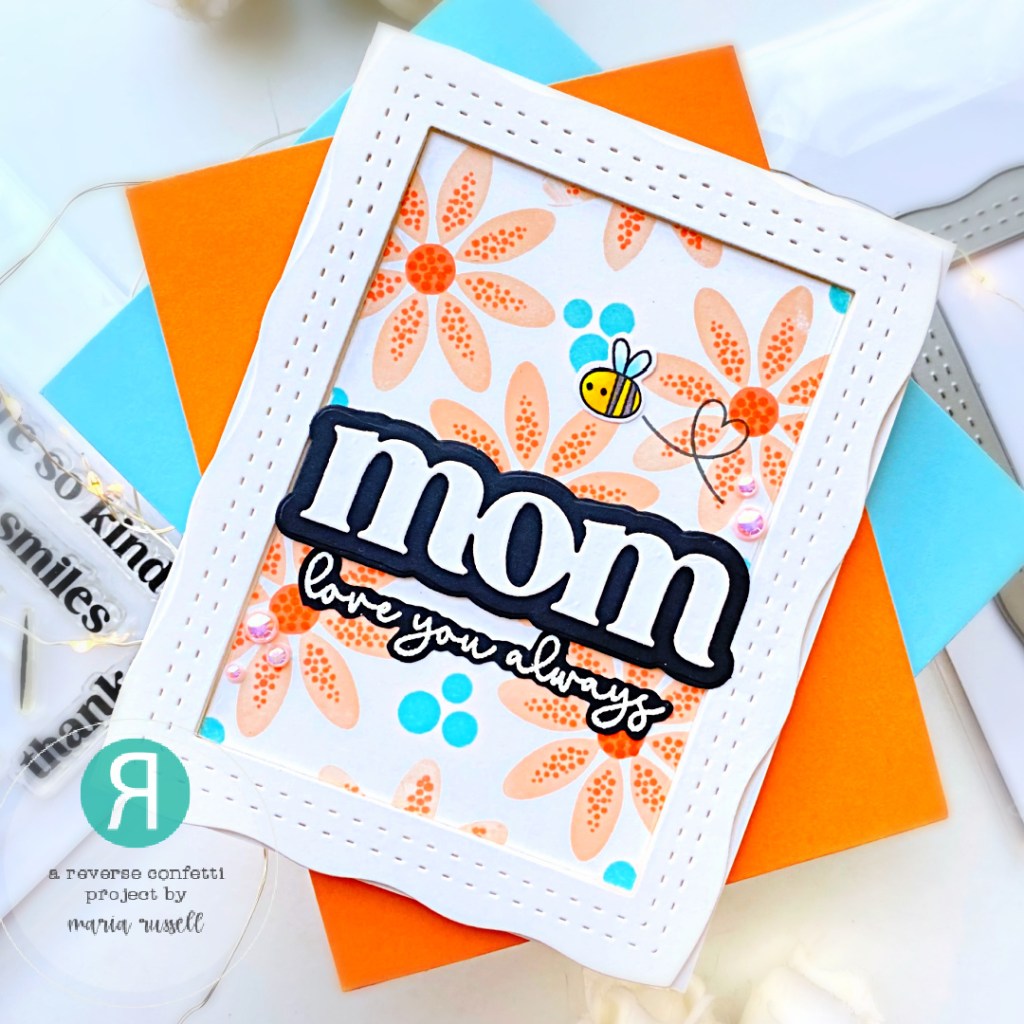
Thank you for stopping by today and joining me for the Countdown to Confetti Day 3 by Reverse Confetti. We have lots to show you and there is also a GIVEAWAY so please read through the end of this post to find out how you can WIN!

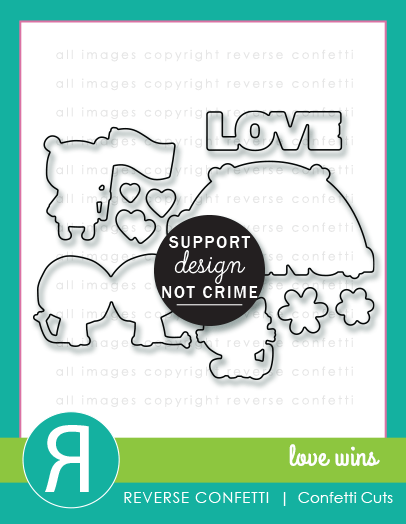
For today’s reveal, we are showcasing the Love Wins Stamp Set and Love Wins Coordinating Confetti Cuts. I also used the Head in the Clouds Cover Panel. A portion of sales will be made to both Human Rights Campaign and The Trevor Project.

This is one of my favorite stamp sets from the latest release. I think it’s really beautifully-illustrated and is another must-have for any stamper/card-maker.

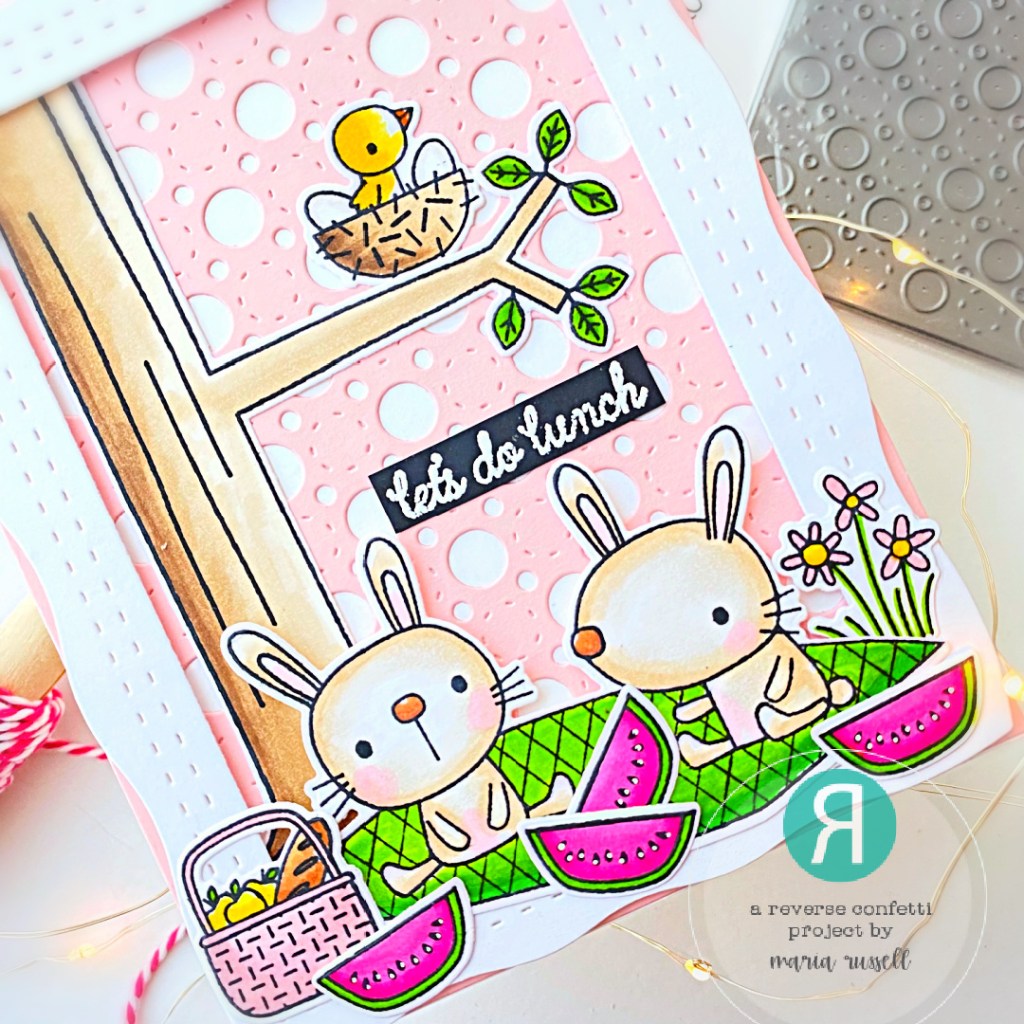
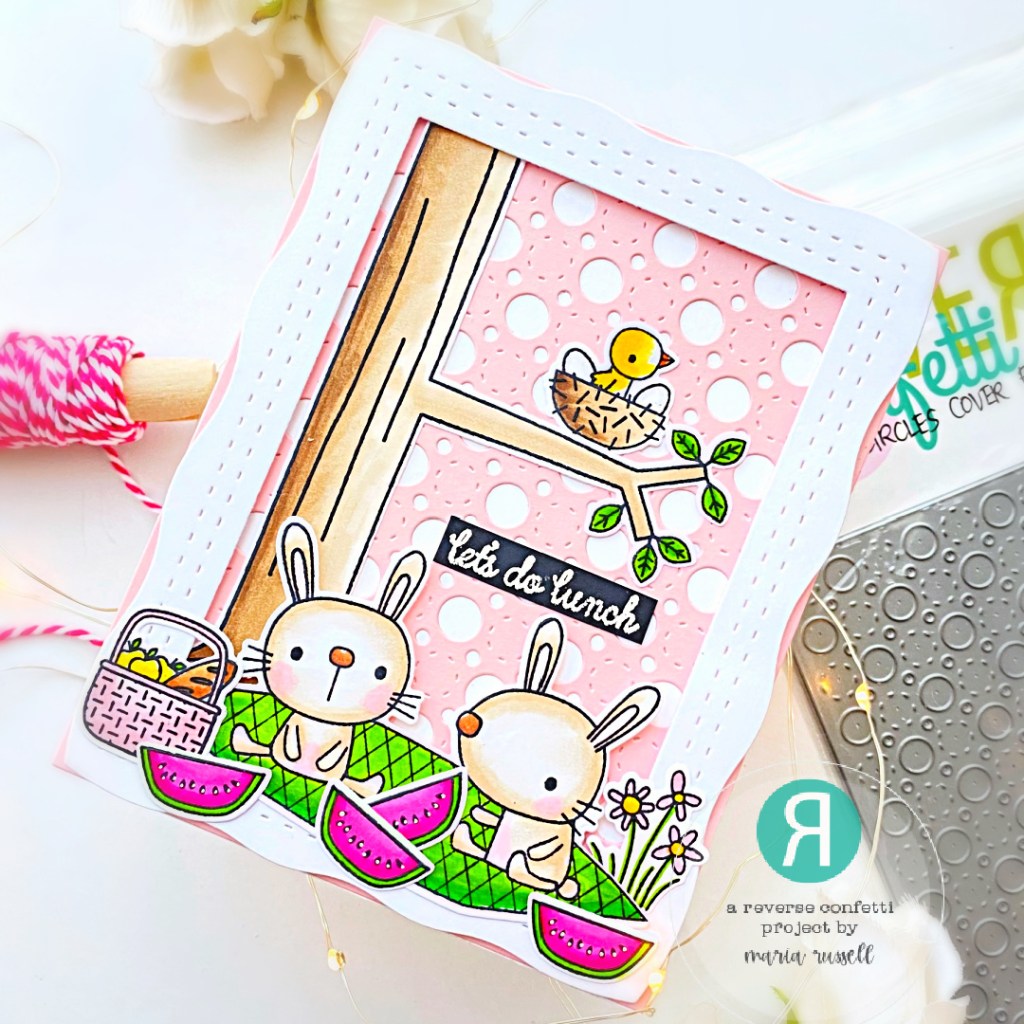
The images from the Love Wins Stamp Set were stamped on some X-Press It blending card stock and colored with alcohol markers. I die-cut the images using the Love Wins coordinating dies.

Next, I prepared the background panel by using the Head in the Clouds Cover Panel to die-cut some 110 lb. Neenah Solar White Card Stock. I foam-mounted the positive die-cut on some A2-size notecard and ink-blended the negative using some clouds stencil and light blue dye ink. I adhered this panel with liquid glue.

I die-cut the grass border panel using the Nuts About You Confetti Cuts (retiring) and foam-mounted to the card for added dimension. I adhered the colored images with either foam adhesive and liquid glue. Here’s another look:

Don’t forget to come back tomorrow as we showcase more products from the May release! I have more in store for you!

I can’t wait to hop around and see what the other team members designed! Leave a comment by noon central on May 7th for a chance to win. There will be a $25 Gift Certificate for one blog commenter and also one FaceBook commenter. Make sure you pop over to the Reverse Confetti Blog for all the details!

Hop Listing

Reverse Confetti

Cheryl Espie

Audrey Tokach

Maria Russell

Lisa Henke

Anita Madden

Amy Kolling

Dana Kirby

Jeanne Jachna

Amy Tsuruta

Colleen Beamish

COUNTDOWN TO CONFETTI – DAY 2 – A Beautiful Day, Roses & Wildflowers

Thank you for stopping by today and joining me for the Countdown to Confetti Day 2 by Reverse Confetti. We have lots to show you and there is also a GIVEAWAY so please read through the end of this post to find out how you can WIN!

Brace yourselves because we have A LOT to show you! For today’s reveal, we are showcasing the A Beautiful Day Stamp Set, A Beautiful Day Coordinating Confetti Cuts, along with the Roses Stamp Set, Roses Coordinating Confetti Cuts, Wildflowers Stamp Set and Wildflowers Coordinating Confetti Cuts.

For my first project, I also used the beautiful Folklore Cover Panel.

Simplicity is the key component for this first project. The background was die-cut using the Folklore Cover Panel Confetti Cuts and adhered on a top-folding notecard.

The images from the A Beautiful Day Stamp Set were stamped on some Bristol Smooth White card stock with Versamark ink, and heat-set with heating tool. I used some distress oxide inks to blend the colors on each butterfly, then used the A Beautiful Day Coordinating Confetti Cuts to die-cut the images.

I foam-mounted the die-cut images on the card panel for added dimension and finished the design by adhering the sentiment that was heat-embossed on some black card stock.

For my second project, I am showcasing the Roses Stamp Set and Roses Coordinating Confetti Cuts.

I die-cut the background panel using the Roses Confetti Cuts with some pattern paper. I adhered this panel with liquid glue on some top-folding notecard. I watered down some white paint and used the brush to splatter some on the background panel for added interest.

The images from the Roses Stamp Set were stamped on some X-Press It Blending Card and colored with alcohol markers. I used the coordinating die to cut it out and adhered on the card front with foam adhesive for added dimension. I finished the design by adding the sentiment strip. Here’s another look:

For my third and last project for the day, I am showcasing the Wildflowers Stamp Set and Wildflowers Coordinating Confetti Cuts, along with the Outlined Frame Cover Panel.

I die-cut the some Neenah solar white card stock using the Outlined Framed Cover Panel and adhered this on some blue top-folding notecard.

Next, I stamped the images from the Wildflowers Stamp Set on some X-Press it Blending card and colored the images in with alcohol markers. I used the Wildflowers Coordinating Die to die-cut the image and adhered on the card with liquid glue.

I finished the card design by stamping the sentiment and used some white gel pen to draw dots to the images for added texture. Here’s another look:

I can’t wait to hop around and see what the other team members designed! Leave a comment by noon central on May 7th for a chance to win. There will be a $25 Gift Certificate for one blog commenter and also one FaceBook commenter. Make sure you pop over to the Reverse Confetti Blog for all the details!

Hop Listing

Reverse Confetti

Cheryl Espie

Audrey Tokach

Maria Russell

Lisa Henke

Anita Madden

Amy Kolling

Dana Kirby

Jeanne Jachna

Amy Tsuruta

Colleen Beamish

COUNTDOWN TO CONFETTI – DAY 1 – Birthday Buddies & Birthday Buddies Banter

I am pleased to join the Countdown to Confetti Day 1 by Reverse Confetti. We have lots to show you and there is also a GIVEAWAY so please read through the end of this post to find out how you can WIN!

For my first project, I am showcasing the Birthday Buddies Stamp Set and Coordinating Confetti Cuts along with the Circle Gift Card Holder Confetti Cuts (a must-have!) and Birthday Buddies Banter stamp set with the Circle Gift Card Holder Confetti Cuts.

I have also used the All You Need Is Love Stamp Set which is, incidentally, a free with $60 purchase.

I am so excited to share TWO projects today, showcasing the above-mentioned products. First is this gift card holder:

Here’s how I made this project:

  • Stamp the images on some Neenah solar white card stock and color the images in with alcohol markers (or any medium of your choice).
  • Use the coordinating dies to cut them out. Set this aside for now and prepare the background panel.
  • Use the Circle Gift Card Holder Confetti Cuts to die-cut some Strathmore Bristol Smooth White Card Stock.
  • Ink-up this panel using a stencil and some Distress Oxide Inks.
  • Adhere this panel on a top-folding notecard halfway through so that it can be lifted up when opened by the recipient (see photo below)
  • Stamp the sentiment from the Birthday Buddies Banter Stamp Set on some black card stock with VersaMark ink and heat-set with the heating tool. Adhere the sentiment on the card with foam-adhesive so that when the card is opened, the main panel can stand up on its own.
  • finish the design by using some white gel pen to for added interest to the images.

I really LOVE the Circle Gift Card Holder Confetti Cuts and this is a must-have for any card-maker! Also, the Birthday Buddies Stamp set have the cutest images and I love that the Coordinating Confetti Cuts makes it super easy to die-cut the inside portion of the balloon strings!

For my second project, I am showcasing the Free with 60 Stamp Set called All you Need is Love with the Large Rainbow Circle Confetti Cuts.

I decided to create a very colorful card design! I love Rainbows and I think this card is so cheerful, it will make anyone’s day!

  • Prepare the background panel by die-cutting some Neenah Solar White Card stock using some clouds border die from your collection. Foam-mount both die-cuts on some A2-size white notecard.
  • Stamp the sentiment from the “All You Need is Love” Stamp Set with different colors of dye inks.
  • Use the Large Rainbow Circle Confetti Cuts to die-cut some Neenah solar white card stock. Color each die-cut using some alcohol markers and adhere them all together using a wide-packing tape.
  • Foam-mount the Large Rainbow Circle die-cut to the card front and use your paper trimmer to trim off the excess.
  • Finish the card design by adhering the hearts on the Large Rainbow Circle.

I can’t wait to hop around and see what the other team members designed! Leave a comment by noon central on May 7th for a chance to win. Since this is Reverse Confetti’s 9th Birthday, there will be a $25 Gift Certificate for one blog commenter and also one FaceBook commenter. Winners will be announced on the Reverse Confetti Blog and FB Group at 5 PM CST on May 7th. Make sure you pop over to the Reverse Confetti Blog for all the details!

Hop Listing

Reverse Confetti

Cheryl Espie

Audrey Tokach

Maria Russell

Lisa Henke

Anita Madden

Amy Kolling

Dana Kirby

Jeanne Jachna

Amy Tsuruta

Colleen Beamish

APRIL CREATIVE HOP WITH REVERSE CONFETTI

I am so happy to join Reverse Confetti’s Creative Hop where you’ll find a lot of AMAZING inspiration using products from the last release. Check out the hop listing below to see the wonderful projects prepared by the entire team. There is also a 20% off from today until the 10th so don’t forget to use the coupon code: SPRING to avail the discount.

For my card below, I am showcasing the Better With Friends Stamp Set and coordinating dies, along with the Big Sun Confetti Cuts, Head In the Clouds Cover Panel and Over the Rainbow Confetti Cuts.

Here’s how I made this card:

  • stamp the images from Better with Friends stamp set and color them in with alcohol markers.
  • use the Better with Friends Confetti Cuts to cut them all out.
  • prepare the background by cutting a panel of Strathmore Bristol Smooth White Card Stock and ink-blend distress oxide colors with some blending brushes. [Designer tip: make sure you are blending the colors with the brushes to create a smooth blend]
  • use the Head In the Clouds Die and die-cut the ink-blended panel. Foam-mount the frame on an A2-size notecard for added dimension.
  • die-cut the Big Sun using the Big Sun Confetti Cuts and the clouds using the cloud dies from the Over the Rainbow Confetti Cuts.
  • use the grass die from the Nuts About You Confetti Cuts to die-cut the grass hill on some white card stock. Incidentally, this die-set is retired but still available at the shop so grab it before it’s gone!
  • start assembling the scene by adhering the negative die-cut in the middle. Foam-mount the Big Sun for added dimension and add the clouds with foam and liquid adhesive.
  • adhere the grass panel using tape runner.
  • adhere the focal images on on the card
  • finish the card design by using some white gel pen to add some stars and dots to the background for added interest.

I really LOVE mixing and matching old and new products by Reverse Confetti and I really like the design of this card. I hope you like it too and got inspired! The supplies I used are listed and linked below. Remember that you will get a FREE STAMP SET on orders over $60.00!!!!

Don’t forget to hop along and check out more inspiration from the entire team. Thanks for stopping by and have a great weekend!

Here’s the hop listing:

Reverse Confetti

Cheiron Brandon

Audrey Tokach

Maria Russell (you are here)

Lisa Henke

April Antonio

Amy Kolling

Joy Baldwin

Andrea Shell

Dana Kirby

Heather Ruwe

Amy Tsuruta

Tricia Barber

Jeanne Jachna

Lien Leysen

———-SUPPLIES———

Stock Your Stash Challenge with Reverse Confetti

Hello my crafty friends! Happy April Fool’s Day! The weekend is here and it is time to get inky and join Reverse Confetti’s Stock Your Stash Challenge and this month’s theme is “MOMS, DADS AND GRADS.”

The Stock Your Stash Challenge link list will be open from the 1st of the month until noon CST on the 29th of the month. Click the “Play Along...” button on our Reverse Confetti’s sidebar to go to the current link list post. Reverse Confetti stamps and/or Confetti Cuts are required to win. This is a way we get to thank their customers for using their stamps. Anyone is welcome to play, though! You may enter as many times as you wish.Use #SYSChallenge when playing along with this challenge.There will be a random winner selected each month and that person will receive a $20 gift certificate to the Reverse Confetti store. The winner of challenge will be posted on the Reverse Confetti blog at the end of the month.

For my card below, I am showcasing the Sending Smiles Stamp Set, Better with Friends Stamp Set and Better with Friend Coordinating Confetti Cuts (bee) along with one of my favorite new dies called Layered Mom With Frame Confetti Cuts and Valentine Sentiment stamp set and the Dot-to-Dot stamp set.

Here’s how I made this card:

  • Die-cut the word “MOM” using the die from the Layered Mom with Frame Confetti Cuts on some white and black card stock.
  • Adhere this on the card front with foam-adhesive for added dimension.
  • Stamp the sentiment from the Valentine Sentiment Stamp Set on some black card stock with Versamark Ink. Heat-set with the heating tool and adhere on the card panel.
  • Finish the card design by adding some pink gems for added interest.

I hope you like my project today and will play along. The supplies are listed and linked below for your convenience. Thanks for stopping by today!

———–SUPPLIES———

REVERSE CONFETTI MARCH RELEASE BLOG HOP

It’s finally here –> the Reverse Confetti’s March Release Blog Hop and the whole gang is here to show you all the amazing projects we’ve put together to encourage you to shop! Remember, all of the products are available today! Don’t forget to leave a comment on the Blog and the Facebook Group before noon today to participate in the giveaway.

For my projects today, I am showcasing the Big Sun Confetti Cuts along with the Sending Smiles Stamp Set.

When I saw this Big Sun Confetti Cuts, I immediately thought about this card design below. I knew I wanted to create a card that is cheerful and this truly makes me smile!

Here’s how I made this card:

  • Prepare the background panel with the rainbow pattern paper and die-cut the middle using the Big Sun Confetti Cuts. Adhere some acetate sheet to create the shaker well.
  • Use the Big Sun Confetti Cuts again to die-cut some yellow card stock and in-lay the sun on the background panel. Adhere some foam adhesive and add some sequins as the shaker element to close the shaker well.
  • Use some white gel pen to add some dots and starbursts to the card front for added texture.
  • Finish the card design by adding the sentiment that was heat-embossed using the Sending Smiles stamp set.

My next project features the Egg Carton Confetti Cuts with the Springtime Sentiments Stamp Set, Sending Smiles stamp set (leaves), Eggstra Cover Panel and Circle of Wave Confetti Cuts.

Die-cut the background panel using the Eggstra Cover Panel and the Circle of Wave Confetti Cuts. Ink-blend the Circle of Wave Confetti Cuts with distress oxide inks and adhere both die-cuts on an A2-size notecard.

Use the Egg Carton Confetti Cuts and die-cut the egg carton on some white card stock, and the eggs with some pastel-color card stock. I wanted to add texture to the eggs so I used my watercolor brush and some Pumice Distress Oxide ink to add splatters on the eggs. Adhere the eggs with liquid glue and foam-mount the Egg Carton Confetti Cuts on the card front for added dimension. I finished the card design by adding the sentiment that was heat-embossed with my heating tool. Here’s another look:

I hope you got inspired and like my projects this week! Hop along with us and see all the amazing projects prepared by the entire team with our special guest designers! Don’t forget to leave a comment before noon today for a chance to win!

Hop listing:

Reverse Confetti

Cheiron Brandon

Audrey Tokach

Becky Roberts

Maria Russell

Amy Rohl

Lisa Henke

Kelly Lunceford

April Antonio

Amy Kolling

Michelle Short

Joy Baldwin

Tiffany Pryce Russom

Andrea Shell

Rachel Alvarado

Dana Kirby

Susan Wymer

Heather Ruwe

Amy Tsuruta

Tricia Barber

Jenny Colacicco

Jeanne Jachna

Lien Leysen

COUNTDOWN TO CONFETTI – DAY 3 – BETTER WITH FRIENDS & PICNIC PALS

It’s Countdown to Confetti Day 3 and I am super excited to share with you my projects today! Don’t forget that there’s a giveaway so read through the end of this post to find out how you can WIN.

For today’s reveal, we are showcasing the Better with Friends stamp set and coordinating confetti cuts with the Picnic Pals stamp set & coordinating confetti cuts.

For my first project, I also used the Dot to Dot stamp set.

Here’s how I made this card:

  • Stamp the images on some X-press it paper and color the images in with alcohol markers.
  • Use the coordinating confetti cuts to cut them out.
  • Use the Dot-to-Dot stamp set and randomly stamp the images with different dye inks on some A2-size panel of Neenah solar white card stock.
  • Matt this background panel with some mint pattern paper and adhere on an A2-size notecard.
  • Use a die from your stash to die-cut the grass panel. Since the background is already busy, I opted for white card stock and foam-mounted this panel.
  • Adhere the rest of the images on the card with both liquid and foam adhesive for added dimension.
  • Use some white gel pen to add more details to the images for texture.
  • Stamp the sentiment on some black card stock with VersaMark ink. Sprinkle some white embossing powder and heat-set with heating tool.
  • Finish the card design by adhering the sentiment.

For my second project, I am showcasing the Picnic Pals stamp set & coordinating confetti cuts with the Layered Mom With Frame Confetti Cuts and (one of my all-time favorite die) the Stitched Circle Cover Panel Confetti Cuts.

  • Die-cut the pink background panel using the Stitched Circles Cover Panel Confetti Cuts and adhere this panel on some A2-size white notecard.
  • Stamp the images on some X-press It card stock and color the images in with alcohol markers.
  • Use the coordinating dies to cut the images.
  • Die-cut the Frame from the Layered Mom with Frame Confetti Cuts and adhere with foam adhesive for added dimension.
  • Assemble the card by adhering the images with liquid and foam adhesive for added dimension.
  • Finish the card design by adding the sentiment that was stamped on black card stock and heat-set with heating tool.

I can’t wait to hop around and see all the wonderful projects prepared by the entire team! Leave a comment by noon central on March 7th for a chance to win. There will be a $15 Gift Certificate for one blog commenter and also one FaceBook commenter. Make sure you pop over to the Reverse Confetti Blog for all the details!

Hop Listing

Reverse Confetti

Audrey Tokach

Maria Russell

Lisa Henke

Cheiron Brandon

Amy Kolling

April Antonio

Dana Kirby

Amy Tsuruta

Joy Baldwin

Jeanne Jachna

COUNTDOWN TO CONFETTI – DAY 2 – FRIENDLY FLORALS

Thank you for stopping by today and joining me for the Countdown to Confetti Day 2 by Reverse Confetti. We have lots to show you and there is also a giveaway so please read through the end of this post to find out how you can WIN!

For today’s reveal, we are showcasing the Friendly Florals Stamp Set.

I wanted to showcase the stamp set so beautifully so I decided to create a simple card.

I stamped the images on some A2-size Neenah solar white panel with Memento Tuxedo Black Ink and colored the images in with alcohol markers. I adhered the panel on an A2-size Notecard.

I masked off the images and used my watercolor brush and splattered some black watercolor to the panel for added texture. I finished the card design by stamping the sentiment a few times to get a good impression. Here’s another look:

For my second project, .I am showcasing the Big Egg Cover Panel with Springtime Sentiments and Eggstra Cover Panel.

I started by die-cutting the background using the Eggstra Cover Panel on some patterned paper and adhered this background on an A2-size notecard.

Next, I created a fun shaker element by die-cutting the big egg using the Big Egg Cover Panel 7 times. I adhered them all together with liquid glue and added different colors of sequins as my shaker element. I closed the shaker by adhering some patterned paper.

I finished the card design by adding some flowers that I put together using the Easter Cover Panel and the sentiment from the Springtime Sentiment stamp set. Heres another look:

I can’t wait to hop around and see what the other team members designed! Leave a comment by noon central on March 7th for a chance to win. There will be a $15 Gift Certificate for one blog commenter and also one FaceBook commenter. Make sure you pop over to the Reverse Confetti Blog for all the details!

Hop Listing

Reverse Confetti

Audrey Tokach

Maria Russell

Lisa Henke

Cheiron Brandon

Amy Kolling

April Antonio

Dana Kirby

Amy Tsuruta

Joy Baldwin

Jeanne Jachna

COUNTDOWN TO CONFETTI – DAY 1 – SPRINGTIME SENTIMENTS & SENDING SMILES

I am pleased to join the Countdown to Confetti Day 1 by Reverse Confetti. We have lots to show you and there is also a giveaway so please read through the end of this post to find out how you can WIN!

For my first project, I am showcasing the Springtime Sentiments and Sending Smiles Stamp Set and coordinating dies, along with the Layered Mom & Frame Confetti Cuts.

I have also used the Dot to Dot stamp set which is, incidentally, a free with $60 purchase.

I have two projects to show you today and I am so excited to share them with you.

Here’s how I made this project:

  • Stamp the images on some Neenah solar white card stock using layering dye inks.
  • Use the coordinating dies to cut them out. Set this aside for now and prepare the background panel.
  • Cut some A2-size panel of some blue card stock and use the Dot-to-Dot stamp set to start randomly stamping the images on the panel with blue and white pigment inks. Let this panel dry and adhere on some A2-size note card.
  • Die-cut the frame from the Layered Mom & Frame Confetti Cuts and adhere with foam adhesive for added dimension.
  • Adhere the focal images using liquid glue. Add some foam adhesive to layer the flower.
  • Stamp the sentiment from the Sending Smiles stamp set on some black card stock with VersaMark ink and heat-set with the heating tool. Adhere the sentiment on the card and finish the design by adding some enamel dots.

I really LOVE the simplicity of the Sending Smiles stamp set. It’s so easy to stamp and layer! This stamp set is a must-have for sure!

For my second project, I am showcasing the Easter and Eggstra Cover Panel Confetti Cuts.

  • Prepare the background panel by die-cutting some white and yellow card stock using the Easter Cover Panel.
  • Use an embossing mat to dry-emboss the Eggstra Cover Panel Confetti Cuts on some white card stock.
  • Adhere the yellow scallop on some A2-size notecard.
  • Foam-mount the white Eggstra Cover Panel on the card for added dimension.
  • Die-cut the Easter Cover Panel with some pastel-color card stock and put it together by following the photo instruction below:
  • Adhere the egg die-cuts on the foreground with liquid glue and layer the flowers with foam adhesive for added dimension.
  • Ink-blend a panel of some Bristol smooth white card stock with some distress oxide inks.
  • Use the Happy Easter Confetti Cuts to die-cut the words and adhere on the card front with liquid glue.
  • Finish the design by using some white gel pen to add more interest to the words Happy Easter.

I can’t wait to hop around and see what the other team members designed! Leave a comment by noon central on March 7th for a chance to win. There will be a $15 Gift Certificate for one blog commenter and also one FaceBook commenter. Winners will be announced on the Reverse Confetti Blog and FB Group on March 7th at 5 PM CST. Make sure you pop over to the Reverse Confetti Blog for all the details!

Hop Listing

Reverse Confetti

Audrey Tokach

Maria Russell

Lisa Henke

Cheiron Brandon

Amy Kolling

April Antonio

Dana Kirby

Amy Tsuruta

Joy Baldwin

Jeanne Jachna