CC Designs December Social Media Release Hop + Giveaway

Welcome to the C.C Designs December Release Social Media Hop! This month we have two stamp sets, Breakfast Animals & Winter Snow. Hop along for your chance to WIN one of two $15 G.C to the store! We will pull one comment from Instagram and one from the blog. The Design Team has darling creations to inspire you to shop and create with C.C Designs!

You should have come from MadebyMeghanK‘s blog.

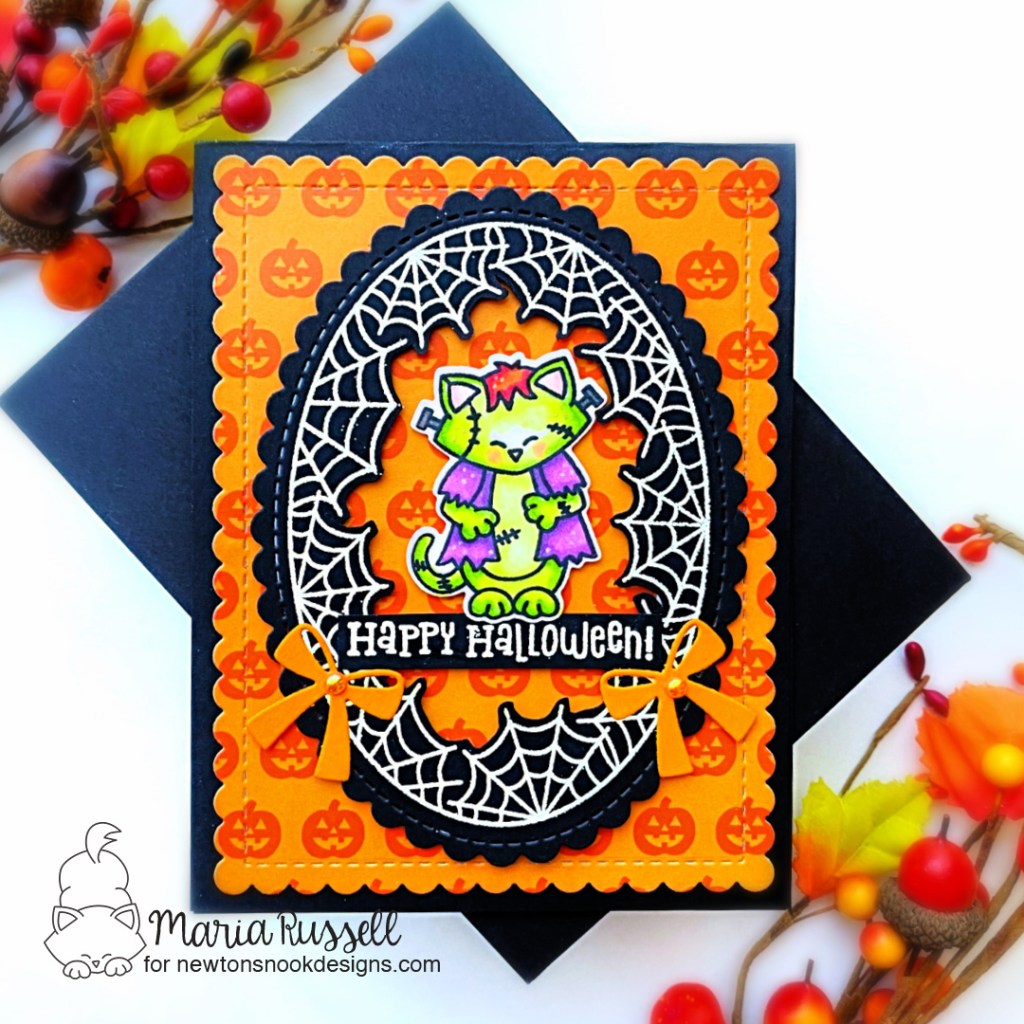
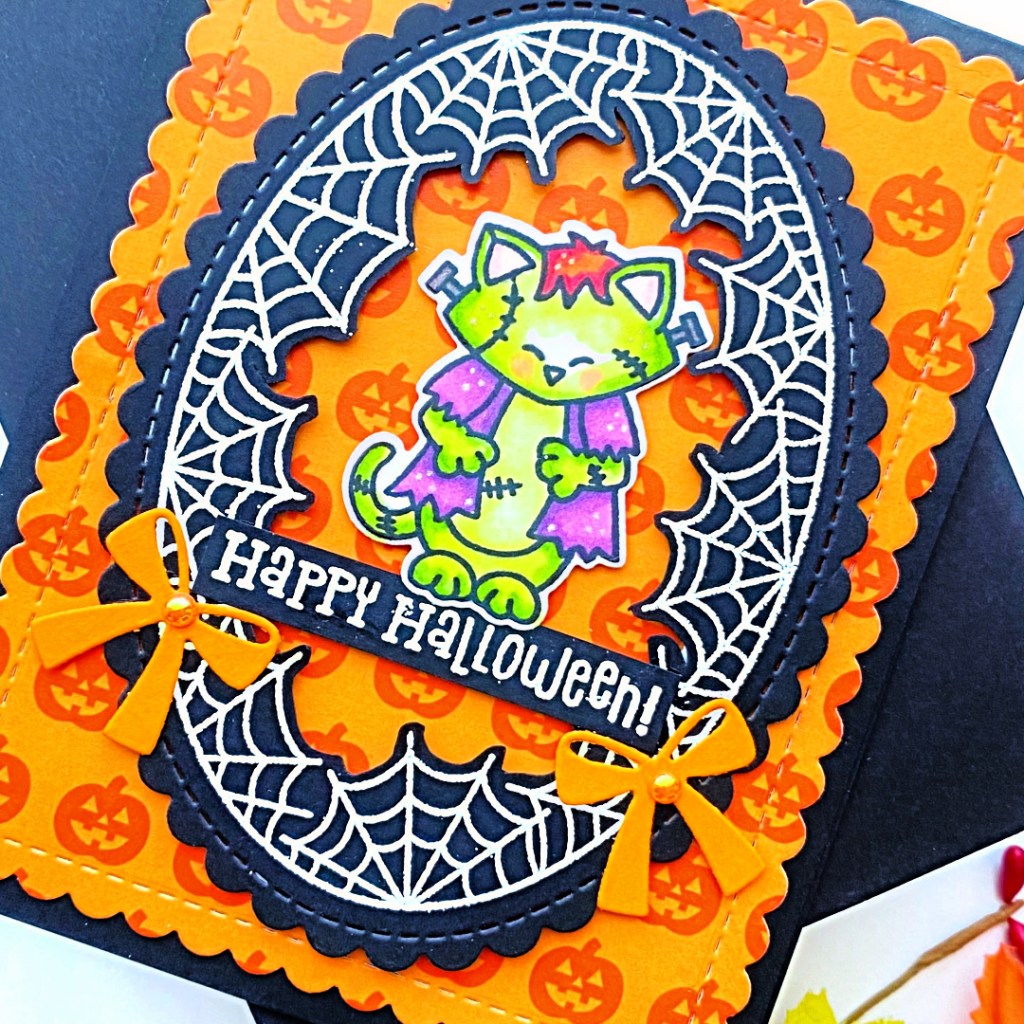
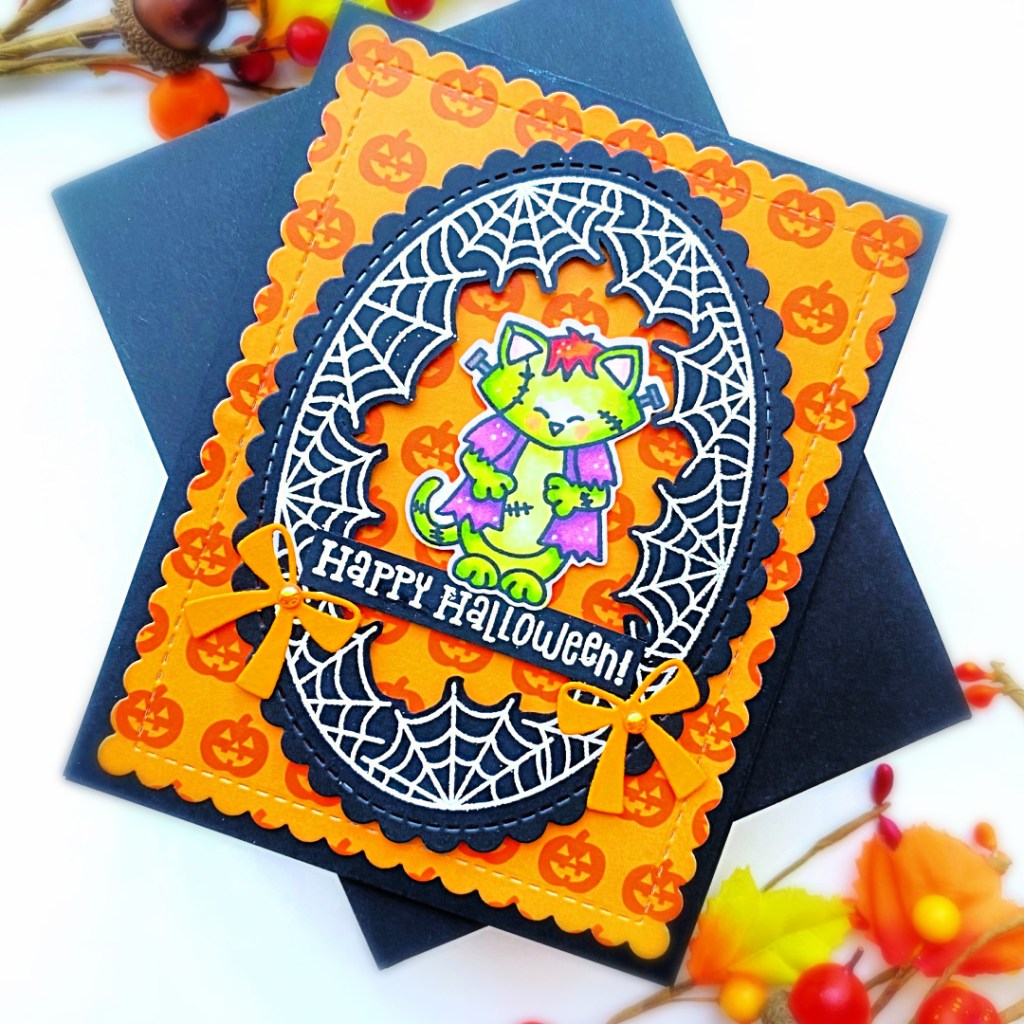
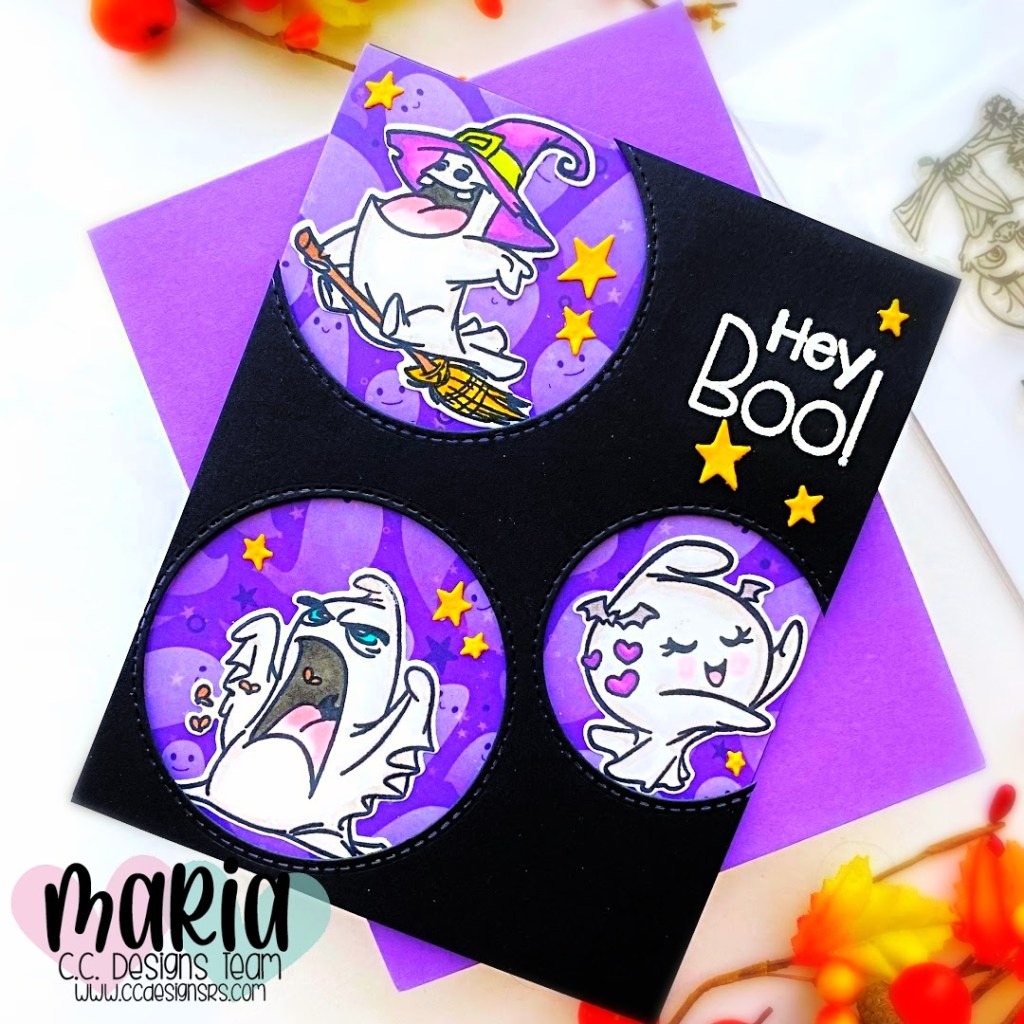
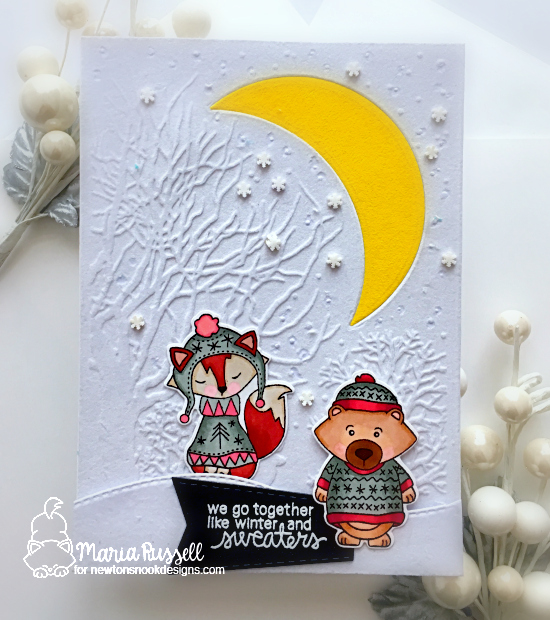
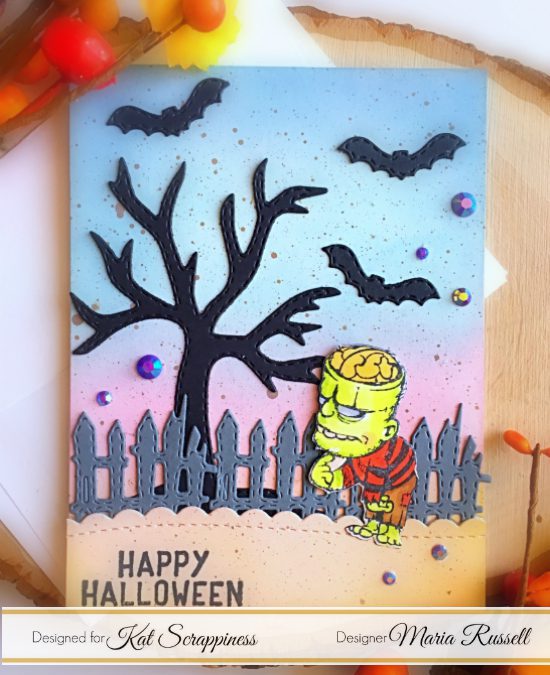
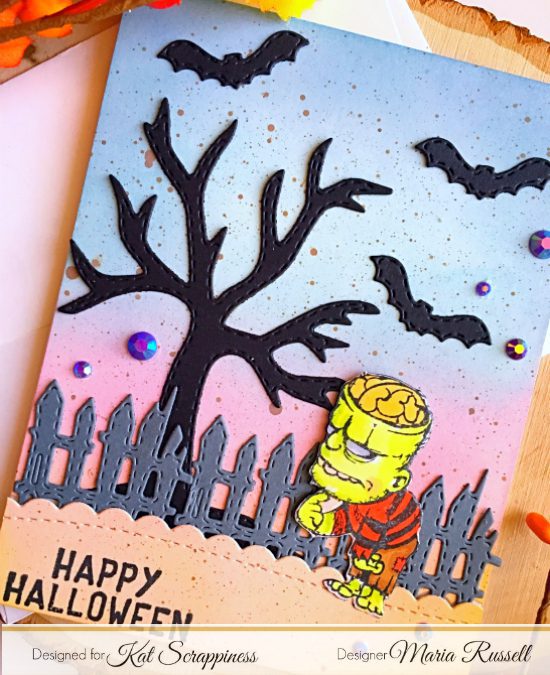
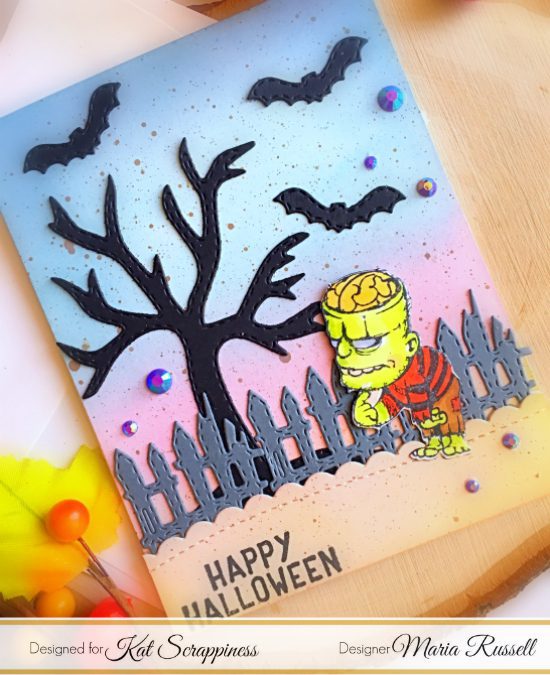
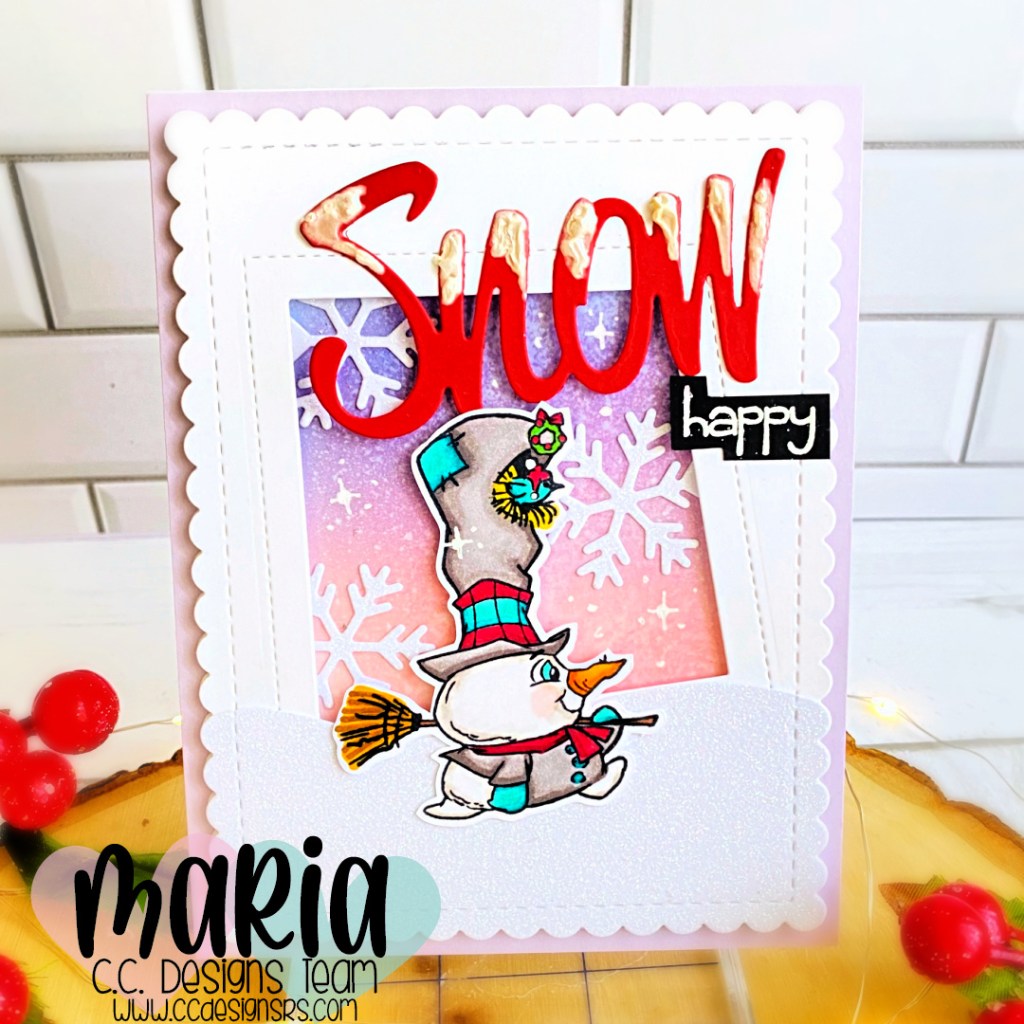
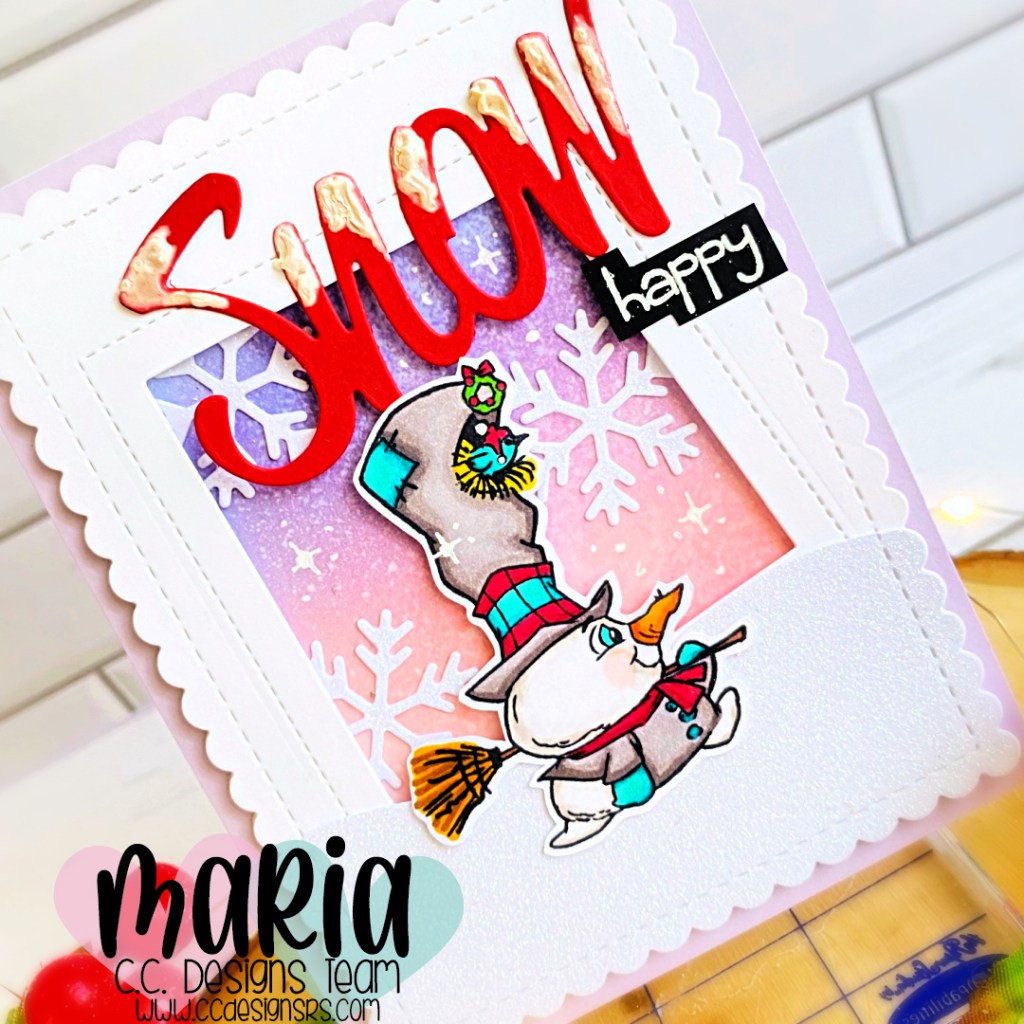
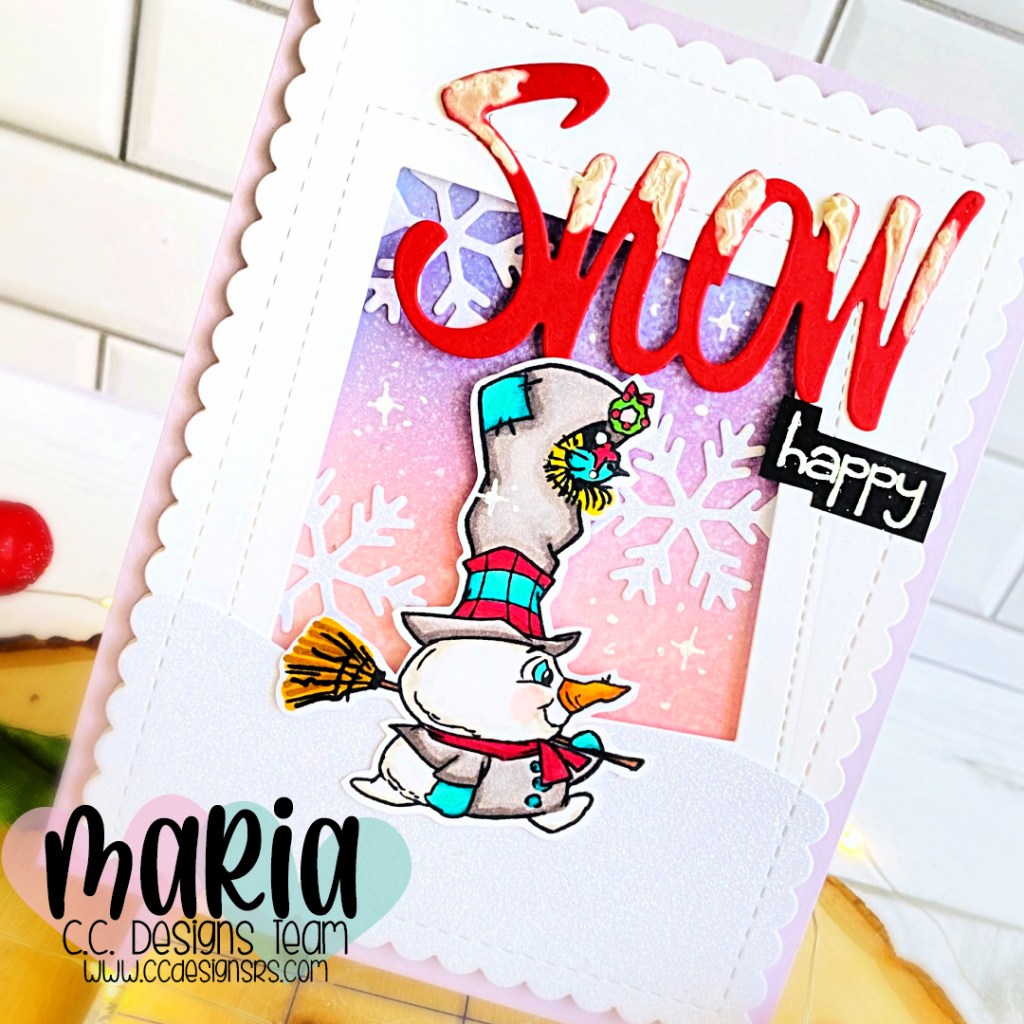
For my project today, I am showcasing the adorable Winter Snow Stamp Set with the Snow Metal Die.

Here’s how I made the card:

  • stamp the images on some X-press It card stock and color the images in with alcohol markers
  • since this stamp set does not have coordinating dies, I used precision snips to fussy-cut the image.
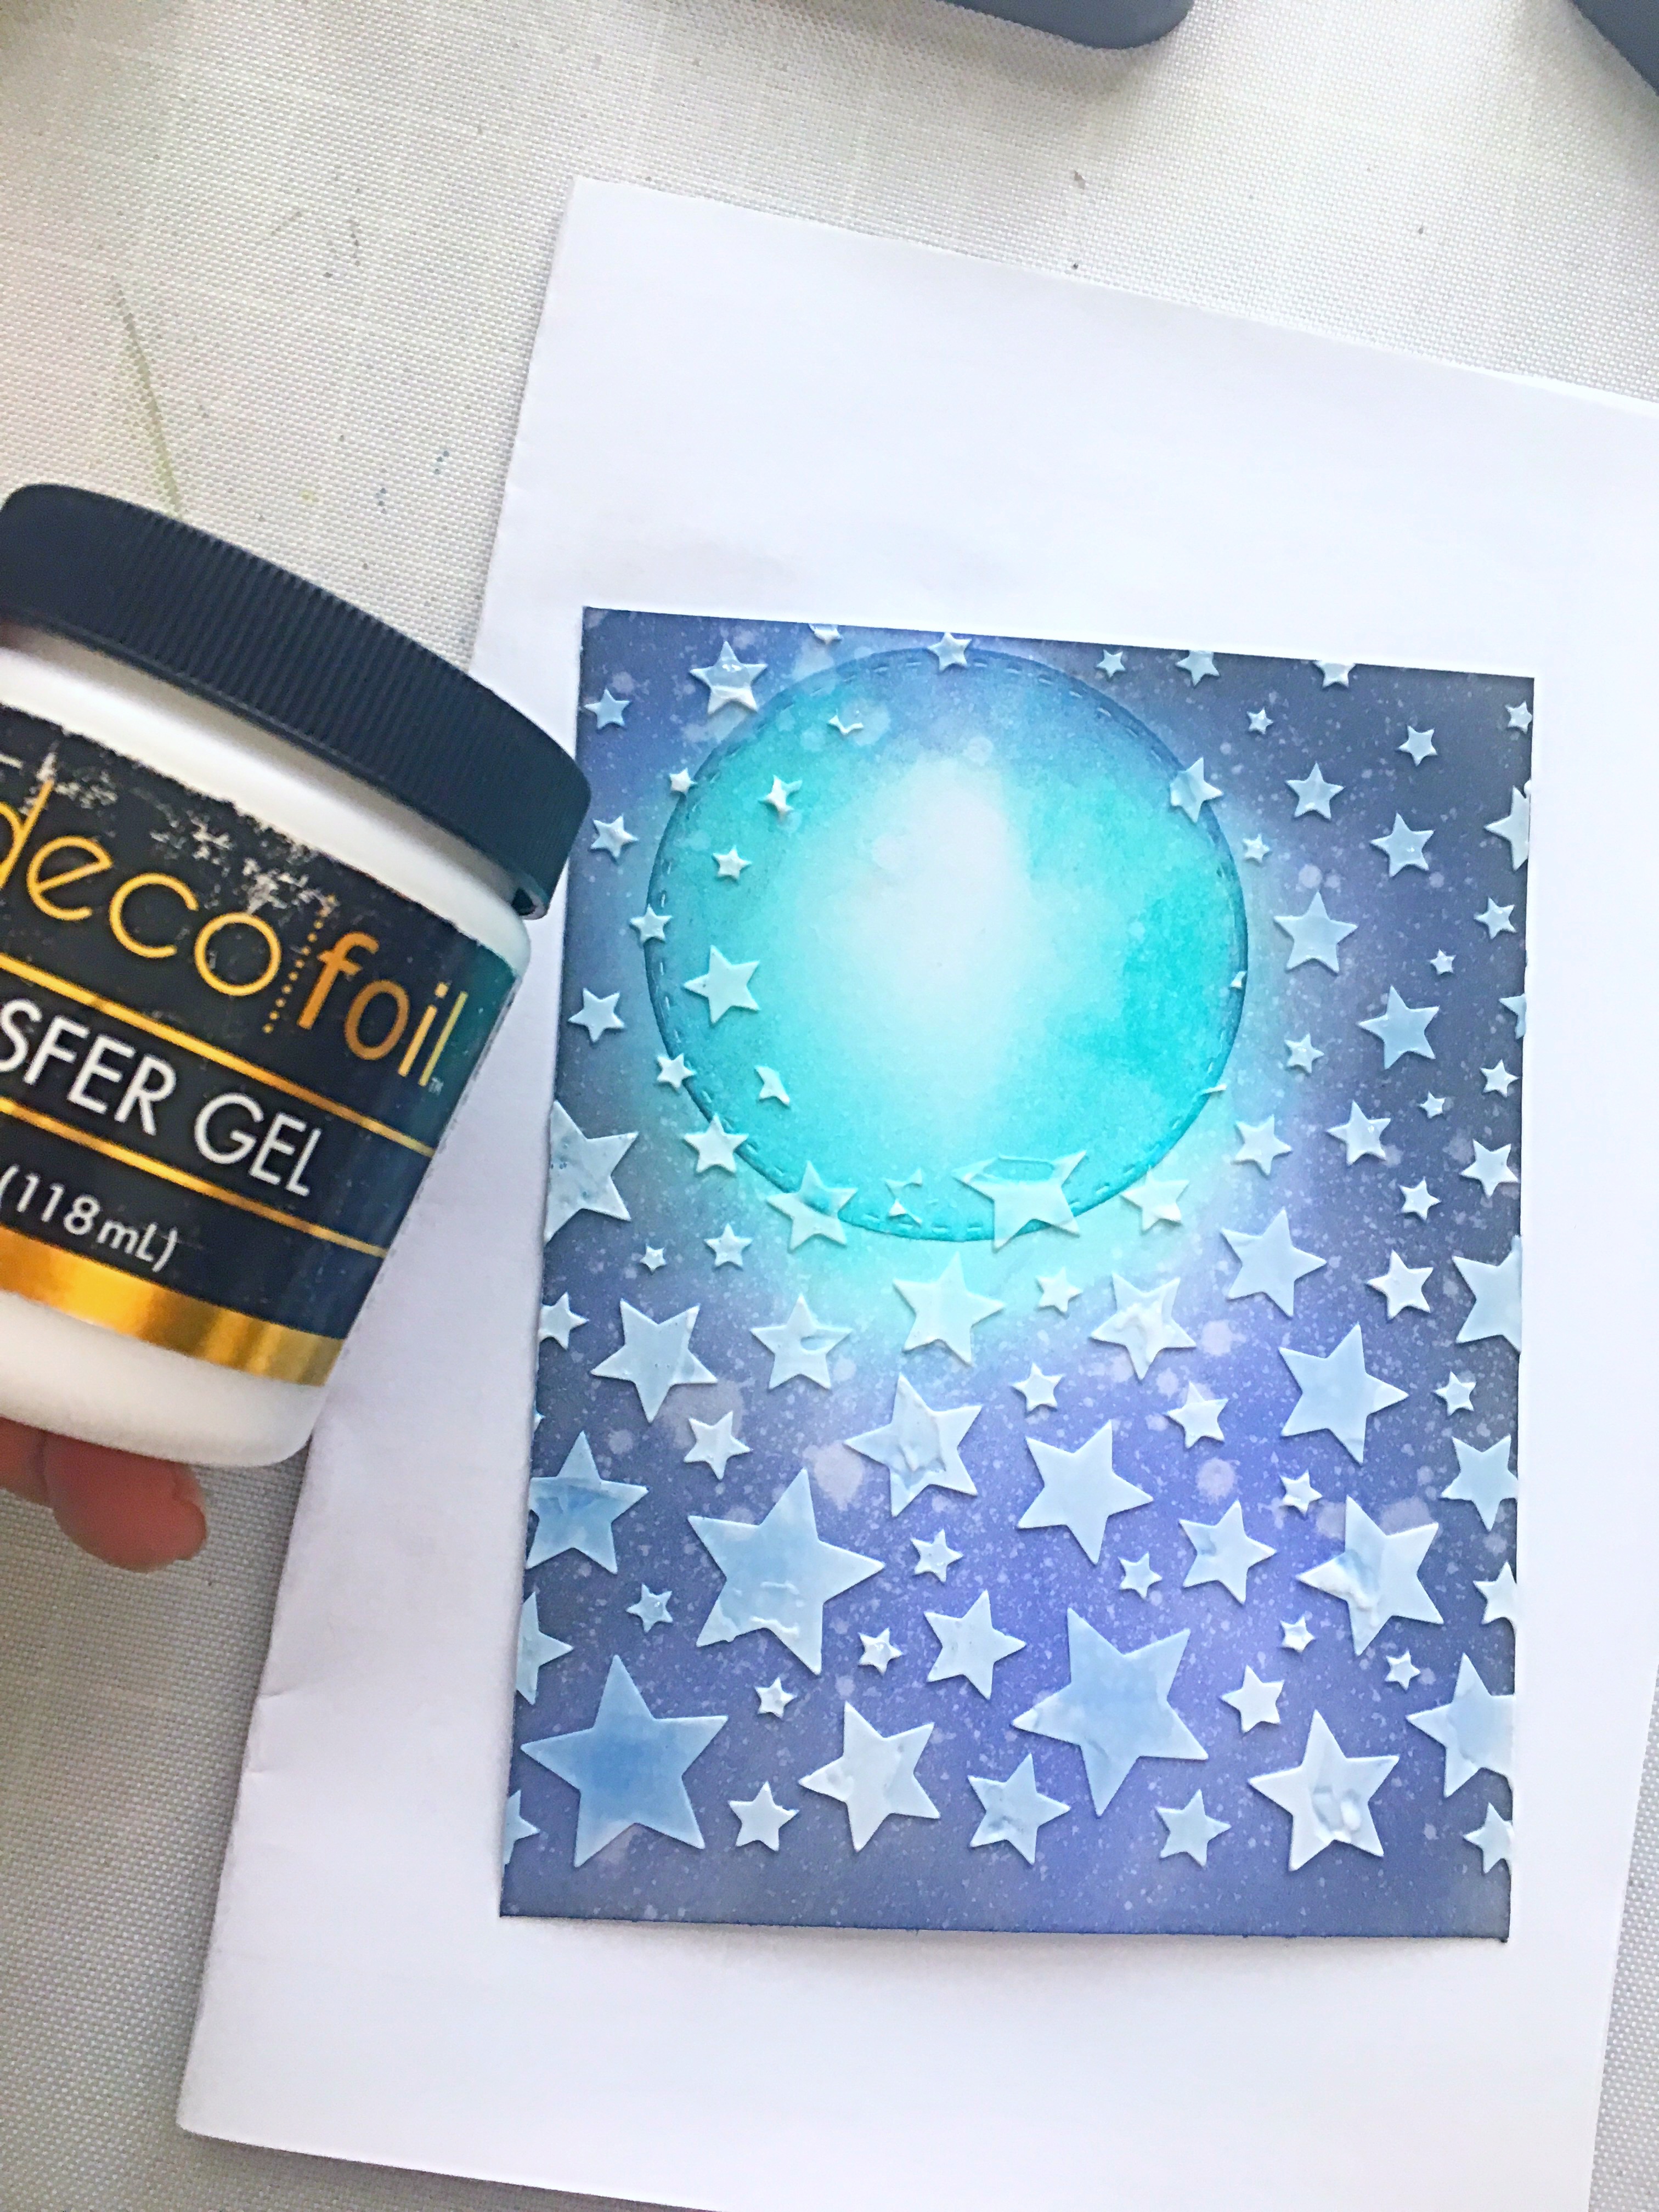
  • ink-blend an A2-size panel of Strathmore Bristol smooth white card stock with distress oxide inks. I used the Colors Blueprint Sketch, Worn Lipstick and Spun Sugar.
  • adhere this panel on some A2-size top folding notecard.
  • die-cut the background panel using dies from your stash.
  • foam-mount this panel on the notecard for added dimension.
  • use a snowflake die to die-cut a few snowflakes on some glitter card stock. Adhere on the card with liquid glue.
  • adhere the focal image and use white gel pen for added interest.
  • die-cut the word “Snow” using the Snow Metal Die on some red card stock.
  • use snow marker and heating tool to add the snow to the word for added texture. Adhere this piece on the card.
  • finish the design by stamping the word “happy” on some black card stock. Sprinkle some white embossing powder and heat-set with the heating tool.
  • adhere the strip sentiment on the card.
  • use white gel pen and draw some stars to the card for added texture and interest.

Here is the full line up on Instagram:

C.C Designs Blog

Meghan Kennihan

Maria Russell (that’s me)

Cindy Beland

Kerri Boucher

Cristena Bagne

Cari Scharping

Melissa Goodman

To enter:

  1. Subscribe to the Design Team Blogs, Instagram, & YouTube Channels
  2. Leave a comment here on the blog and on Instagram
  3. Tag your friends.

Entries will be accepted until Wednesday December 14th, Winners will be announced on the C.C Designs Blog and FB Page on Friday December 16th.
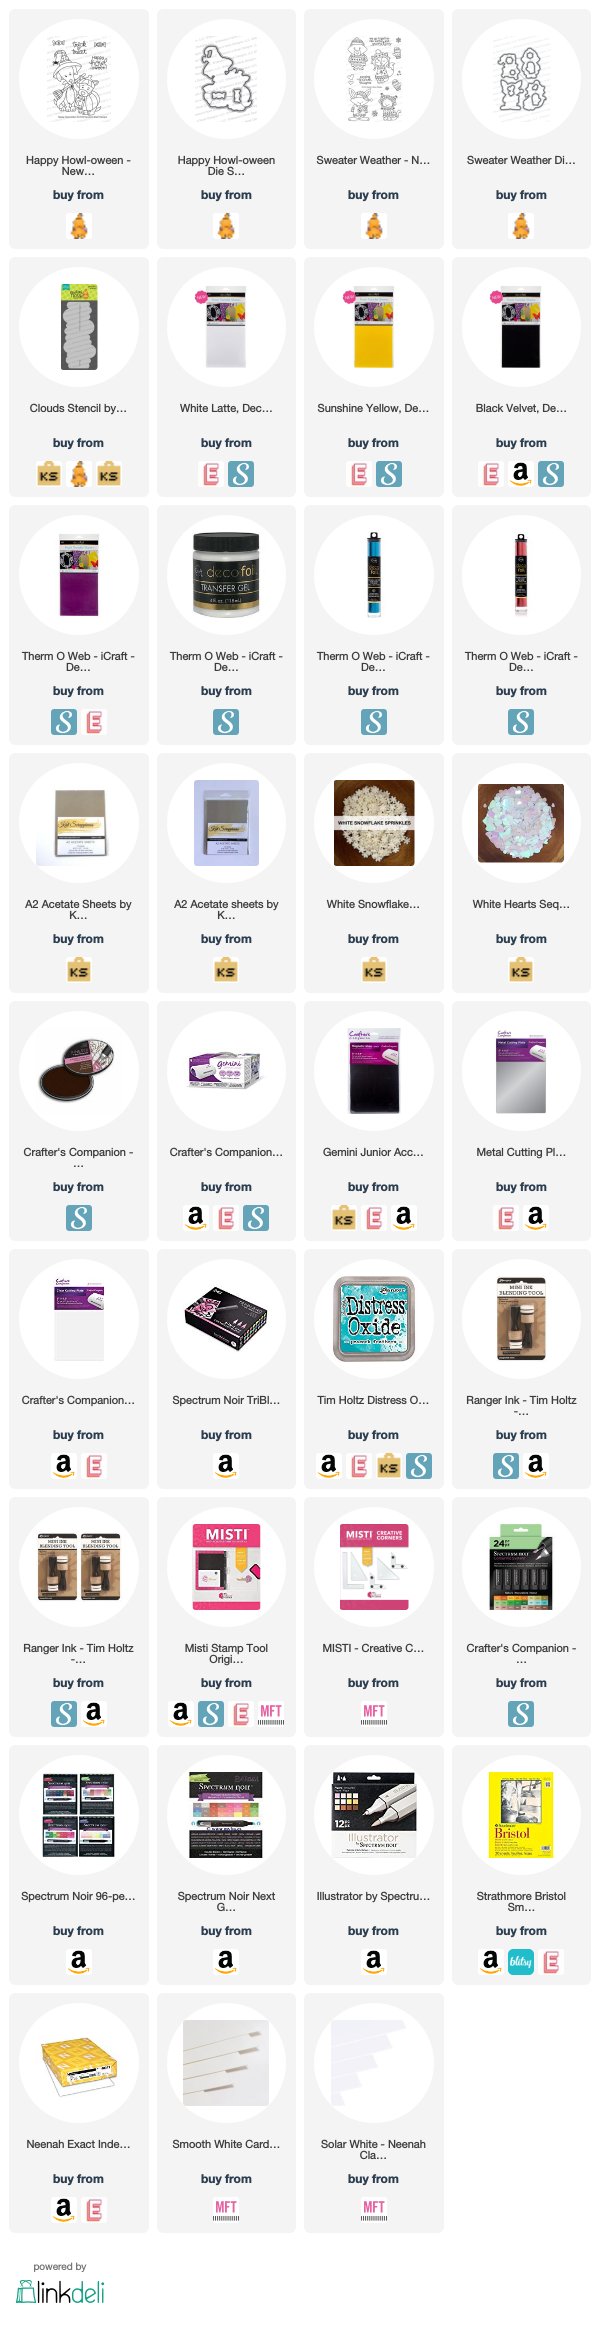
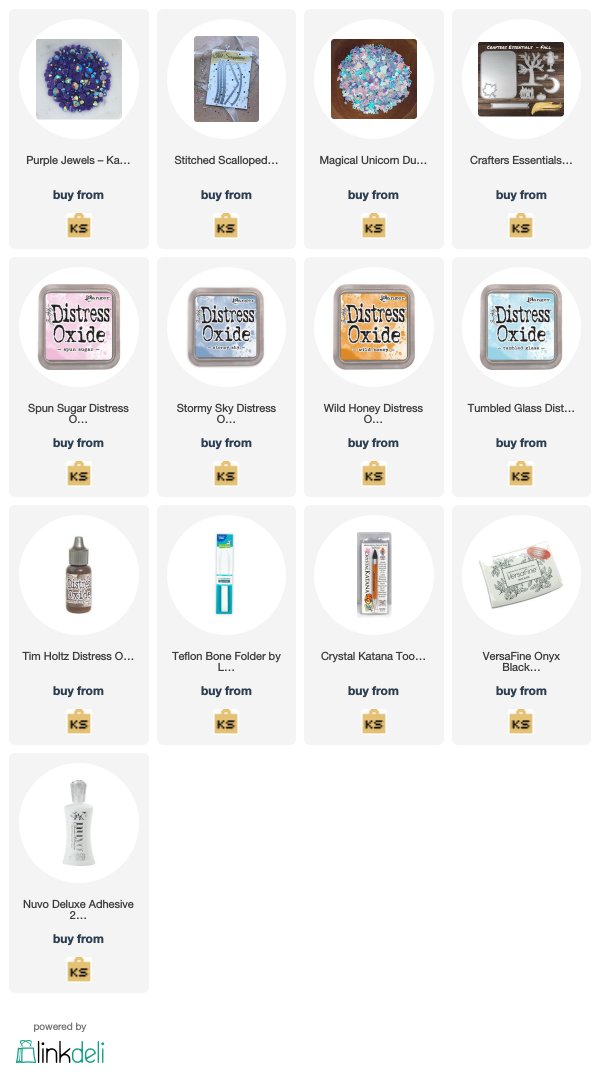
———SUPPLIES——–

Happy Halloween with Franken Newton

Hello Newton’s Nook fans! Thanks for joining me today and I am also up on the Newton’s Nook blog to share another Halloween card, featuring the newly-released Spiderweb Oval Stamp Set that coordinates with the Oval Frame Dies, along with the Franken Newton Stamp Set + Coordinating Dies, Halloween Meows Paper Pad and Frames & Flags Die Set.

Here’s how I made this card:

  • die-cut the pattern paper from the Halloween Meows Paper Pad using the scallop die from the Frames & Flags Die Set. Adhere this piece on some A2-size top-folding notecard.
  • stamp the Spiderweb Oval Stamp Set on some black card stock with Versamark ink. Sprinkle some white embossing powder and heat-set with heating tool. Die-cut the stamped image using the Oval Frame Dies.
  • fussy-cut the middle part of the spiderweb using precision snips and foam-mount this panel on the card for added dimension.
  • stamp the focal image from the Franken Newton Stamp Set and die-cut using the Coordinating Die. adhere this on the card front with foam-adhesive.
  • stamp the sentiment on some black card stock with Versamark ink and sprinkle some white embossing powder. Heat-set the sentiment with the heating tool and adhere on the card also with foam adhesive.
  • finish the card design by adding the bows using the bow die from the Baby Bib Die Set and add some half orange pearls for added texture and interest.

Looking back now, I think I should have used a different color for the bows but I still like the way this card turned out. Here’s another look:

I hope you like this card today and got inspired. Below, you will find links to the supplies used to create this project(s). Where available, I use compensated affiliate links at no extra cost to you. Your support helps me to keep bringing you new projects and inspiration. Thank you for stopping by, and have an amazing day!

———SUPPLIES——–

I hope you like this card today and got inspired. Below, you will find links to the supplies used to create this project(s). Where available, I use compensated affiliate links at no extra cost to you. Your support helps me to keep bringing you new projects and inspiration. Thank you for stopping by, and have an amazing day!

CC Designs September Release Blog Hop + Giveaway

Welcome to the C.C Designs September Release Social Media Hop! Hop along for your chance to WIN 1 of 2 $15 G.C to the store! This month we have tricks and treats. We have three darling Halloween sets and two sweet treat critter sets. Hop along for your chance to WIN one of two $15 G.C to the store! We will pull one from Instagram and one from the blog comments. The Design Team has been giving you previews all week and now we are sharing our Tricks and Treats to inspire you to shop and create with C.C Designs!.

For my project today, I am showcasing the adorable Roberto Rascal’s Ghosts Stamp Set and coordinating dies.

Here’s how I made the card:

  • stamp the images on some X-press It card stock and color the images in with alcohol markers
  • use coordinating dies to cut them out.
  • ink-blend an A2-size panel of Strathmore Bristol smooth white card stock with distress oxide inks and clouds stencil.
  • adhere this panel on some A2-size top folding notecard.
  • die-cut the background panel using a halloween die from your collection and adhere on the ink-blended panel with liquid adhesive and foam adhesive for added dimension.
  • use a die from your stash to add the tombstone and bats for a spooky effect. I ink-blended the tombstone with some white pigment ink for added texture.
  • stamp the sentiment on the card with some black ink.
  • finish the card design by using some white gel pen to draw some dots to the sky for added interest.

Here is the full line up:

CC Designs

Meghan Kennihan

Cindy Beland

Kerri Boucher

Cristena Bagne

Cari Sharping

Tamara Potocnik

Maria Russell (that’s me!)

Melissa Goodman

To enter:

  1. Subscribe to the Design Team Blogs, Instagram, & YouTube Channels
  2. Leave a comment here on the blog and on Instagram
  3. Tag your friends.

Entries will be accepted until Wednesday, September 14th. Winners will be announced on the C.C Designs Blog and FB Page on Friday September 16th.

CC Designs September Release Sneak Peek – Roberto Rascal’s Ghosts

Hello my crafty friends. I have another sneak peek for you of the September Release by CC Designs. For my card today, I am showcasing the Roberto Rascal’s Ghosts Stamp Set and Coordinating Dies.

Here’s how I made the card:

  • stamp the images on some X-Press It Card Stock and color the images in with alcohol markers.
  • die-cut the images using the coordinating die.
  • use pattern paper and adhere the same on some A2-size notecard.
  • on some black A2-size black card stock, use stitched circle dies to die-cut the windows. Foam-mount the same to the card for added dimension.
  • adhere the focal images on the card with liquid glue.
  • stamp the sentiment on the card front with Versamark ink. Sprinkle some white embossing powder and heat-set with heating tool.
  • adhere some stars on the card for added interest and texture.

Tomorrow is release day! We will also have an Instagram/BLOG Hop and there are two $15 gift certificates to CC Designs up for grabs. One comment will be pulled out from the Blog commenter and one from the Instagram commenter.

Thanks for stopping by!

CC Designs September Release Sneak Peek – Roberto Rascal’s Bats

It’s been a crazy day for me so far and it’s only Monday! I am currently traveling but I wanted to share with you a sneak peek of the September Release by CC Designs. For my card today, I am showcasing the Roberto Rascal’s Bats Stamp Set and Coordinating Dies.

Here’s how I made the card:

  • stamp the images on some X-Press It Card Stock and color the images in with alcohol markers.
  • die-cut the images using the coordinating die.
  • ink-up a panel of Strathmore Bristol Smooth white card stock using a stencils with distress oxide ink. Adhere this panel on an A2-size notecard.
  • use another stencil and black distress ink to add the spooky trees. Leave it to dry for about half an hour.
  • die-cut the hills using a die from my collection.
  • adhere the images on the card front with liquid glue.
  • stamp some bats on the background using versafine black ink.
  • stamp the sentiment on the card with Versamark ink.
  • sprinkle some white embossing powder and heat-set the sentiment with heating tool.

Aren’t those images adorable?! Stay tuned this week as we give you more sneak peeks of the September release. I will be back on September 7th to give you another peek.

We will also have an Instagram/BLOG Hop on September 9th, which is the release day and there are two $15 gift certificate to CC Designs up for grabs. One comment will be pulled out from the Blog commenter and one from the Instagram commenter.

Thanks for stopping by!

I’m Under Your Spell with MFT Stamps

Hello MFT fans! I am super excited to share with you my entry for the MFT Stamps 2021 Card Design Superstar. This card is for the Coloring Virtuoso category.

I started by stamping the images from the Witch Way Is The Candy stamp set with Memento Tuxedo black ink on some Neenah solar white card stock. I colored the images in with my alcohol markers. Even though I have the “older” coordinating dies for this stamp set, I fussy-cut the images with my precision snips. I didn’t want the white border around the images because of the black background.

Next, I die-cut some black card stock, as well as some Bristol smooth white card stock using the Outside The Box Level Up Die-namics. Using the Bristol smooth die-cuts, I ink-blended them all with Seedless Preserves, Carved Pumpkin and Wilted Violet distress oxide inks. I sprayed the pieces with water using distress sprayer and picked up the excess with paper towel. I then assembled the main box card with liquid glue then added the colored panel using my tape runner.

Next was to create my Halloween scene. I die-cut the grass panels using the Outside The Box Grassy Hills Die-namics with some black licorice card stock. I cut the flaps and adhered on the box card with liquid glue.

Now that I have everything colored and assembled, I am ready to put my scene together. I adhered my focal image (being the star of the show) to the foreground. I added the frog and pumpkins with liquid glue.

Next, I have to decorate the background to finish my scene. I die-cut the tree using a retired Trio of Trees Die-namics from MFT with the Sweet Celebration 6×6 Patterned Paper (also retired). I adhered it on the background with liquid glue.

The moon was die-cut using the older Witch Way Is the Candy Die-namics on some Bristol smooth white card stock and inked up with Mustard Seed and Carved Pumpkin distress oxide inks.

To finish my spooky scene, I die-cut the black clouds using the Cloud Cover Die-namics on some black card stock. The first piece was adhered with liquid glue on top of the moon. The other cloud was adhered on acetate sheet and added on the card behind the witch for added dimension. Take a quick look here:

I hope you like my spooky scene. Some of the retired items are of course no longer available. Therefore, I have linked the current supplies that are similar to the retired products I used for my card. Thanks for stopping by today and happy stamping!

——–SUPPLIES———

Happy Haunting with LDRS Creative

Hello my crafty friends!  Maria here on the blog with you today sharing this cute Halloween card, featuring a few of my favorite stamp sets by LDRS Creative.  Halloween is fast-approaching and I want to start creating my cards so that I’ll have plenty of time to mail them to the recipient.


I started by stamping the images on some Neenah solar white card stock using the Raven Hybrid ink.  I colored the images in with my alcohol markers and die cut, using the coordinating dies.  
 
I ink-blended my A2 size panel of Neenah with some Banana Cream Pie Hybrid Ink and mini sponge dauber.  I increased the intensity of the color towards the middle.  I foam-mounted the window, flower box and the black cat on the card panel then started adhering the rest of the ivy leaves with liquid glue.   
 
 
Before adhering my trick-or-treaters, I die-cut the two grass panels out of the Sweater Weather paper using the In the Grass die set.  I added the pumpkins and the treat bag, then foam-mounted the rest of the images for added dimension.
 
I finished my design by stamping the cobweb and spider, then stamped the sentiment using Raven Hybrid Ink.  Here’s another look:
 
 
I absolutely LOVE that you can mix and match these cute stamp sets to create a beautiful Halloween scene.  I hope you like my card today.  The supplies I use are listed and linked below.  Thanks for stopping by and happy stamping!
 
——–SUPPLIES——–

Newton’s Nook Designs & Therm-O-Web Collaboration Week


This week Newton’s Nook Designs and Therm O Web are partnering for fabulous Fall, Halloween and Christmas inspiration! All week long both design teams will be sharing ways to use Therm O Web products with Newton’s Nook Designs stamps!  We also have  GIVEAWAY so please make sure to read at the end of this post to find out how you can WIN.


I went NND and TMW crazy and created three projects for you today!  I am showcasing (one of my all-time favorite stamp set from Newton’s Nook)  the Sweater Weather stamp set and its coordinating dies with the Happy Howl-Oween stamp set and coordinating dies.  I am also showcasing a LOT of products provided to us by Therm O Web, which you will be able to see if you watch my YouTube video below.  I also would like to take this opportunity to thank Therm O Web for spoiling the NND Design Team with your amazing products.


For my first project, I die-cut a masking paper with a circle die and masked my Bristol smooth white card stock.  I inked up my background with some distress oxide inks.  I sprayed my inked background with some water to get the oxidize effect and dabbed it with paper towel to dry.  I used the Deco Foil Transfer Gel and Newton’s Nook Cascading Stars Stencil to create the stars on my background.  I set this piece aside to dry for about 40 minutes and ran it through my laminator with some Deco Foil Ocean Blue Transfer Sheets.  I removed my mask and colored the moon a little bit with my B000 copic marker.


To create my scene for my trick-or-treaters, I used a house die from my stash and TMW Flock transfer sheets in Purple Punch, Sunshine Yellow, Black Velvet and White Latte to create my spooky house.  I also die-cut the grass using the Land Borders die set.


I stamped my image using the Happy Howl-Oween stamp set and colored the images in with my Spectrum Noir alcohol markers.  I die-cut the image using the coordinating die.  Now that I have all of my elements, I started building up my scene.


I used a white pigment ink and a blending brush to highlight the grass.  By doing so, this gave it a more realistic effect since I have a HUGE moon shining over everything!  I finished my design by stamping the bats.  I also stamped my sentiment in Versamark ink and sprinkled some white embossing powder.  I used my Wagner heating tool to heat set the sentiment.  Here’s a closer look at the card:


For my second project, I wanted to use the flock transfer sheets and my embossing folder  to create a winter scene for my critters from the Sweater Weather stamp set.  I have a process video for you for the two Christmas cards.  Here’s the first one:


For the second Christmas card, I used the Oh Christmas Tree Designer Toner Sheets , the White Latte Flock Transfer Sheet and the Gina K Designs for TMW Red Velvet Deco Foil to create a fun shaker card:


Here’s my YouTube process video:


I hope you like my projects today.  I would be so grateful if you could visit my YouTube channel and subscribe if you haven’t already!  The supplies I used are listed and linked below (affiliate links may have been used for some of the items at no additional cost to you).

There are more amazing projects today over on the Therm O Web blog so pop over there for more inspiration!


GIVEAWAY DETAILS:
Time for prizes! Would you like to win a $25 store credit at Therm O Web or to Newton’s Nook Designs?  Both companies will be giving away a prize this week!  Visit the Newton’s Nook Designs blog and the Therm O Web Blog  to enter for a chance to win!  Have an amazing day and happy stamping!

————SUPPLIES————


Halloween Card with Crafter’s Essentials – Fall by Kat Scrap (Process Video Included)

Hello my crafty friends! I am back today with this cute Halloween Card, showcasing the Crafter’s Essentials – Fall Die Set, Stitched Scalloped Border Dies, some Purple Jewels and Distress Oxide inks.


I have a video tutorial for you today (link below) so I will keep this blog post short.  Here’s my card:


I love the “evening sky” colors I blended using my distress oxide inks.  I didn’t want to use the typical orange and black for Halloween.   Here’s a little close-up:


Don’t you just LOVE the stitching details to the die-cuts?  Also love the Purple Jewels.  It just adds a little more oomph to the overall card design.


Here’s my step-by-step video tutorial:


I hope you like my project today.  The supplies I used are listed and linked below.  Please don’t forget to use my coupon code “MARIA10” for 10% off your order at the shop.  It is also the last day of the Halloween Sale and prices are already discounted.  Happy crafting!


——–SUPPLIES———-