I am currently in the process of moving to another destination overseas with hubby, so this project was made awhile back. I wanted to share this today since this card is super adorable, and features new products from the latest release by Kat Scrappiness, Inc.
Here’s how I made this card:
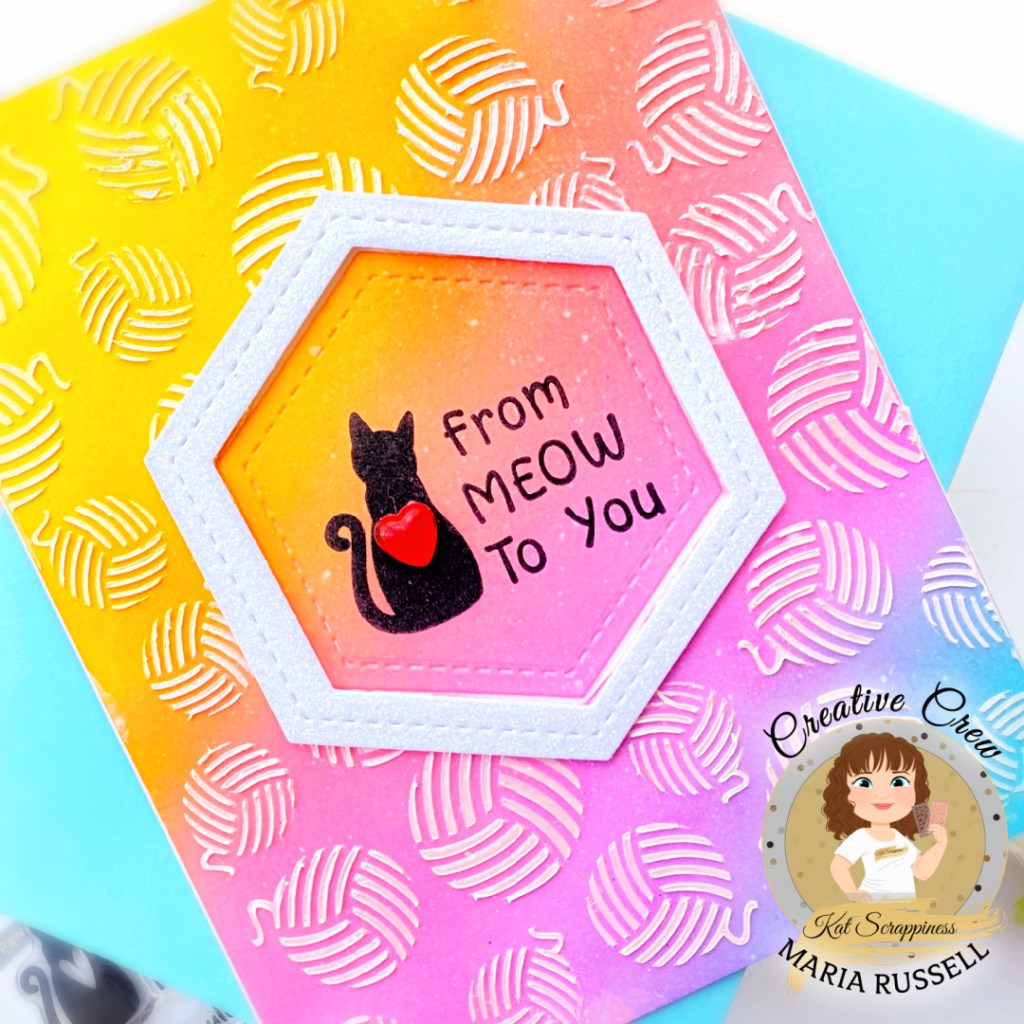
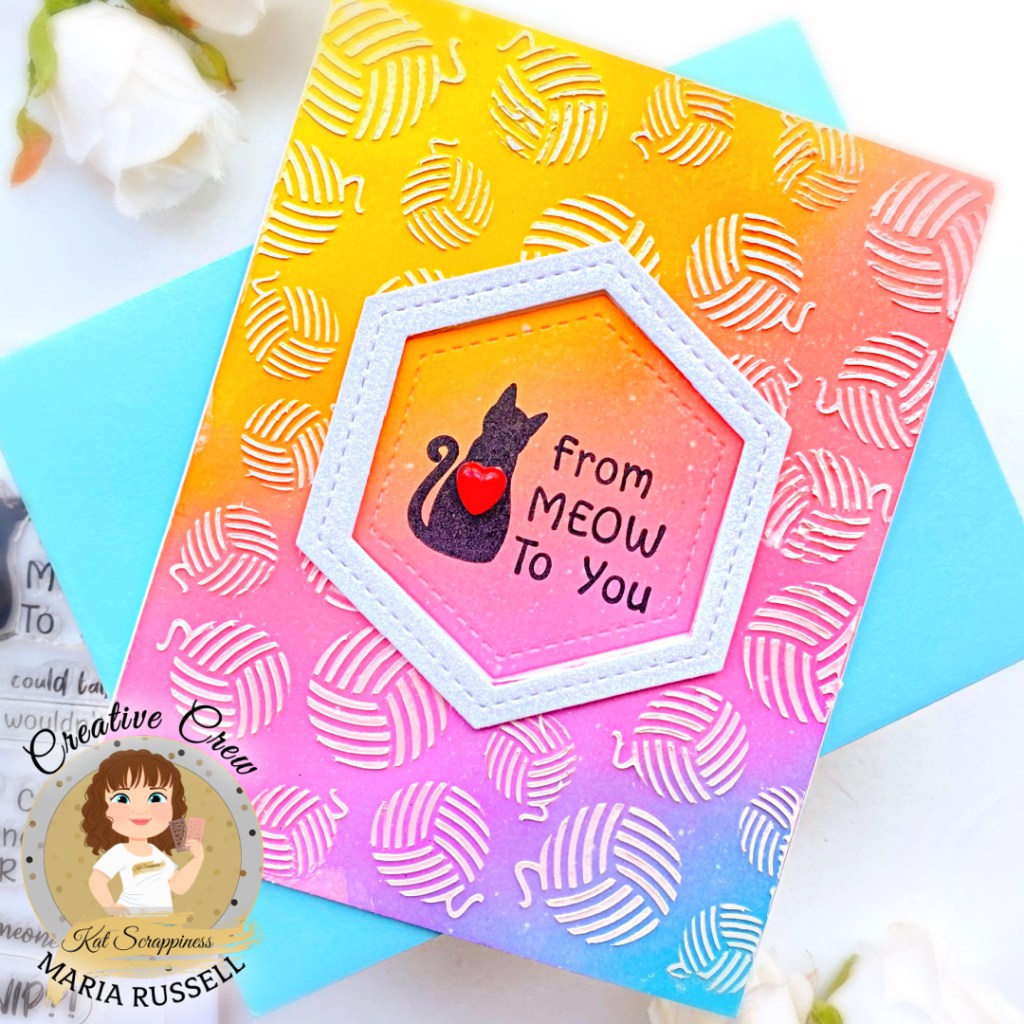
prepare the background panel by ink-blending some Bristol Smooth white card stock with Distress Oxide inks.
use some Distress Sprayer to spray some water on the background. Pick up the excess water using some paper towel.
finish the design by stamping the sentiment onto the card using the Pawsome Cats Sentiments Stamp Set with some Versafine Onyx Black Ink and adhere some red heart for some fun texture.
I hope you like this card today and got inspired. Below, you will find links to the supplies used to create this project(s). Where available, I use compensated affiliate links at no extra cost to you. Your support helps me to keep bringing you new projects and inspiration. Thank you for stopping by, and have an amazing day!
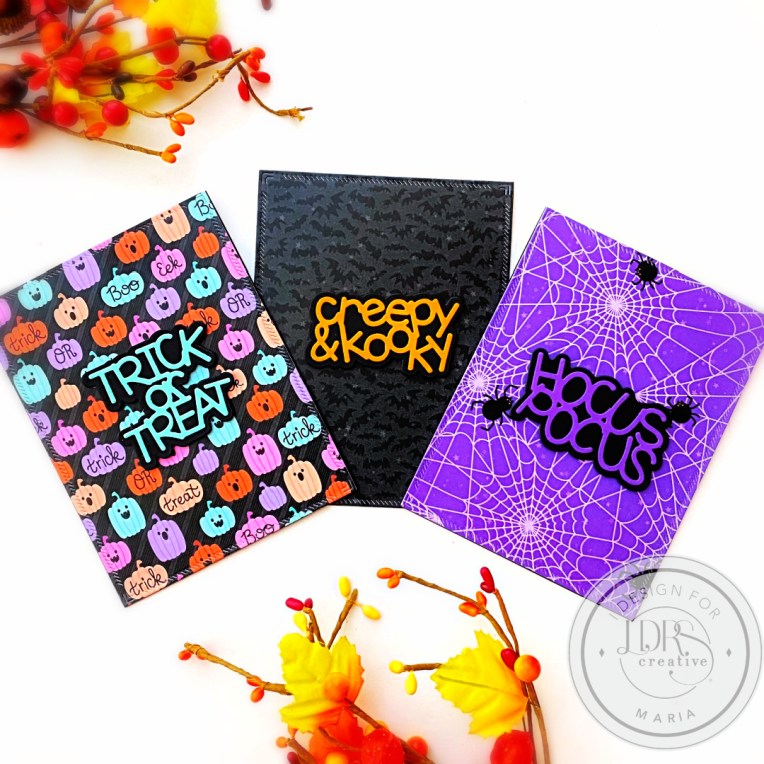
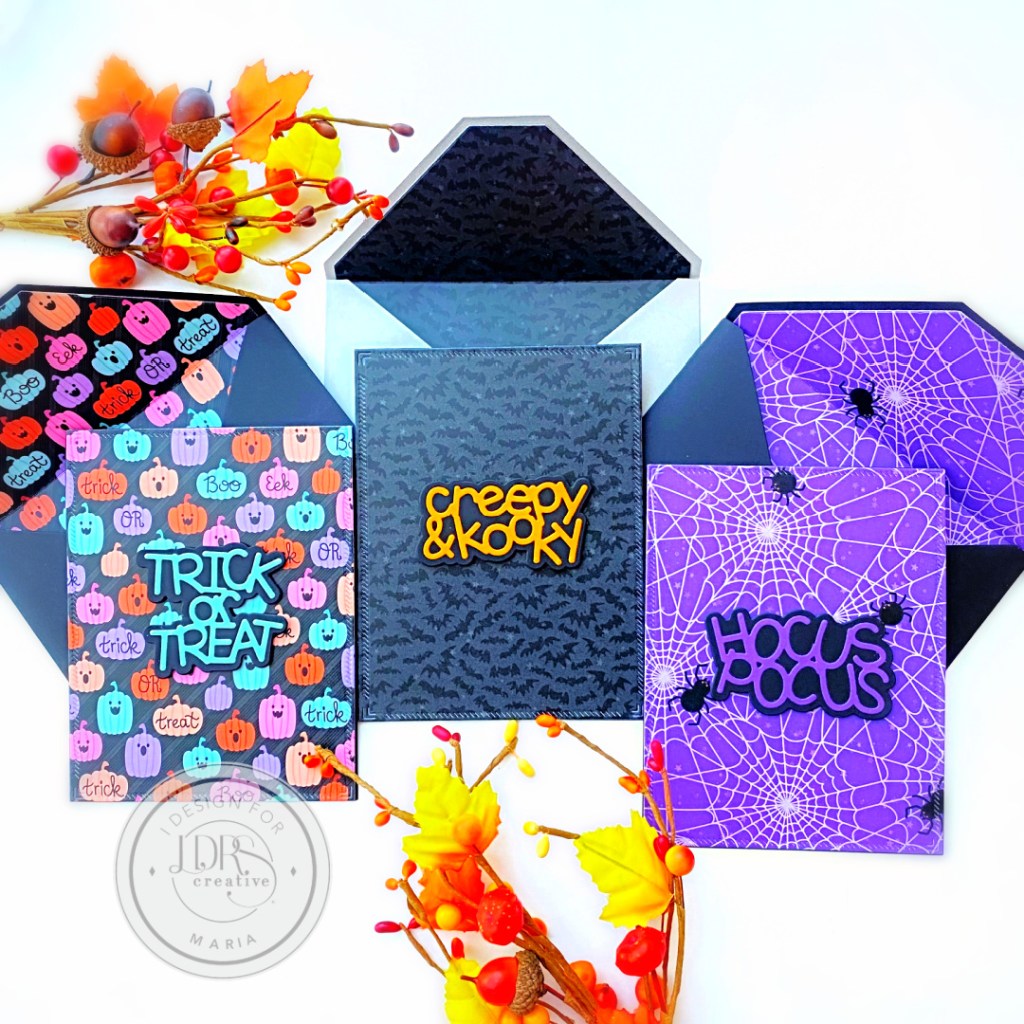
Hello my crafty friends! Are you all done creating Halloween Cards yet?! If you are looking to create some last-minute Halloween cards without the fuss of stamping and coloring images, here’s a cute project for you (or should I say, a couple?)! These cards are so easy to make and they have cute matching envelopes to boot!
All 3 cards (and envelopes) were made the same way! If I wasn’t running out of the Trick-or-Treat Halloween Paper, I could have made more, to be honest!
I started by die-cutting the sentiments using the Large Word Halloween Dies [this die-set is another favorite of mine from the latest release] on some different colors of card stock. I adhered them together with liquid glue.
Next, the background panel was die-cut using the A2 Diagonal Stitched Layered Card Toppers Die and adhered on some black A2-size notecard. I foam-mounted the Halloween Sentiments onto the card for added dimension. Easy peasy and I’m done with all three cards! However, I wanted to add some matching envelopes to finish the design. I used the A2 Envelope Dies and the A2 Envelope Liner Die to die-cut some black and gray card stock and the matching Halloween Paper that I used to create the cards. I adhered them together using some strong adhesive. Here’s another look at the finished projects:
I hope you like these cards today and got inspired. Below, you will find links to the supplies used to create these projects. Where available, I use compensated affiliate links at no extra cost to you. Your support helps me to keep bringing you new projects and inspiration. Thank you for stopping by, and have an amazing day!
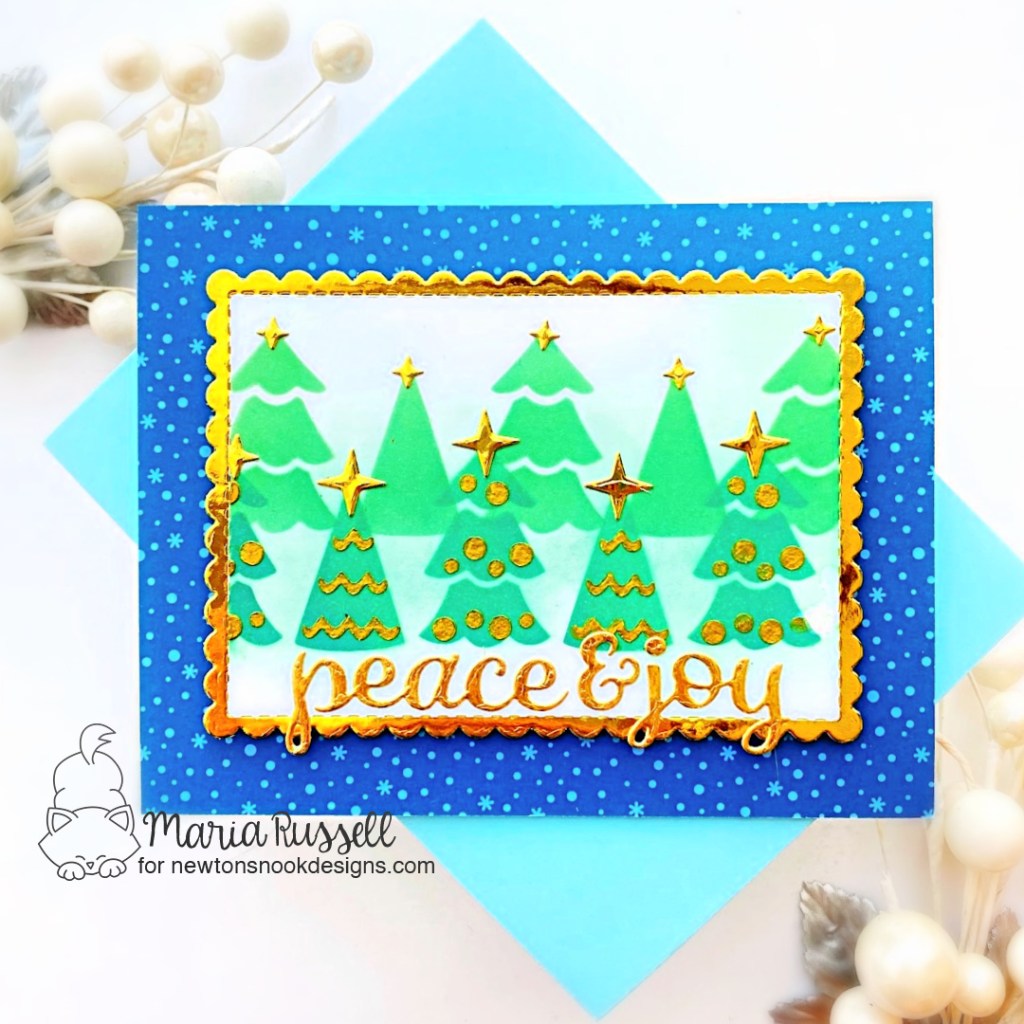
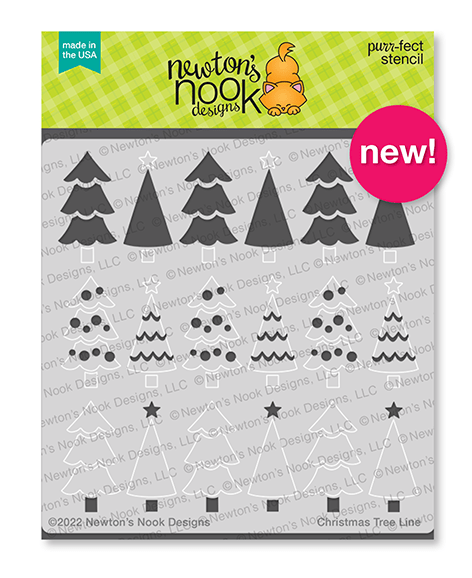
I am finally back and the first thing I did was to create this card for today’s post. This new stencil called Christmas Tree Line by Newton’s Nook Designs is one of my favorite from the last release.
Here’s how I made this card:
die-cut the scallop panel using the scallop die from the Framework Die Set with some Gold and white card stock.
trim the white card stock panel along the perforated line and use the Christmas Tree Line Stencil to start inking up the background.
use some gold texture paste to add texture to the trees.
adhere the inked panel on the gold scallop die-cut.
trim an A2-size panel of pattern paper from the Christmas Time Paper Pad and adhere on some A2-size notecard.
foam-mount the focal panel on the card for added dimension.
die-cut the words “peace & joy” using the die from the Christmas Nap Die Set and adhere on the card with liquid glue.
finish the design by adhering some gold star stickers.
I hope you like this card today and got inspired. Below, you will find links to the supplies used to create this project(s). Where available, I use compensated affiliate links at no extra cost to you. Your support helps me to keep bringing you new projects and inspiration. Thank you for stopping by, and have an amazing day!
I am a bit bummed because it’s the last day of the Newton’s Nook October Release. I hope you were able to check out the reveals since Monday. You also have a chance to win the stamp set being revealed each day so please read through til the end of the blog post to find out more info. [Just a little important note: I know some of you had difficulties finding the comments section. If you would like to leave a comment to participate in the giveaway, the “comments section” will only be ever visible when a single post on Word Press is being viewed. Please click on this particular blog post and you will be able to leave a comment below. Thank you!]
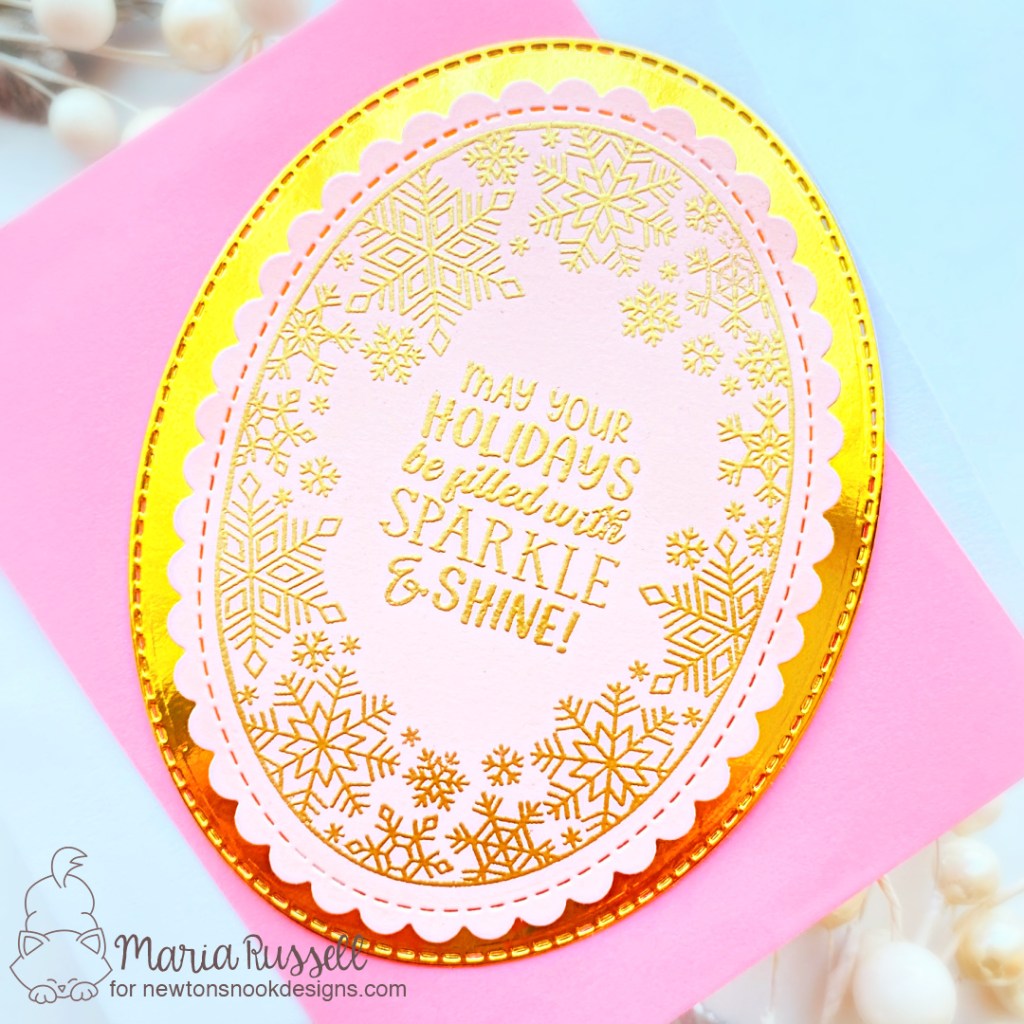
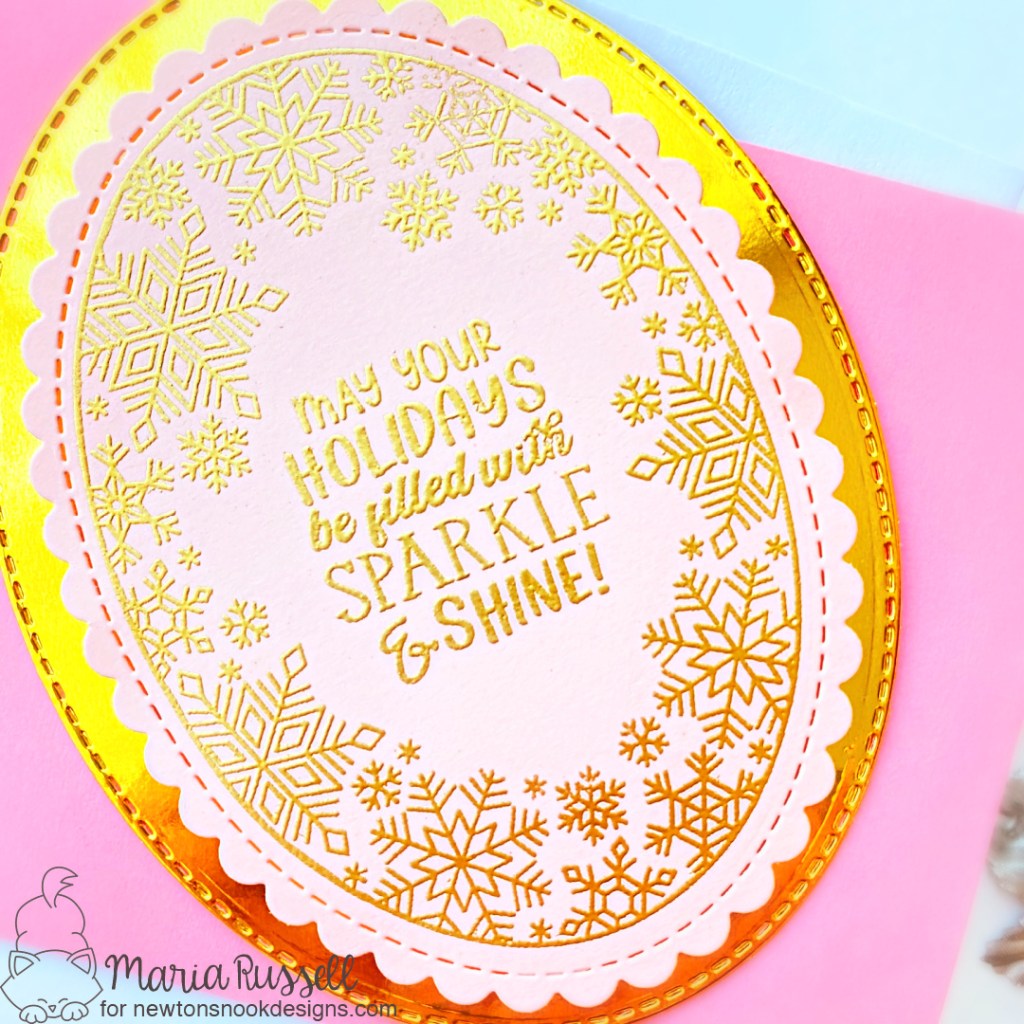
For Day 4, we are showcasing the Snowflake Oval Stamp Set that coordinates with the Oval Frames Die Set.
I started by prepping the pink card stock with the anti-static powder tool. I stamped the image with Versamark ink and sprinkled some gold embossing powder, then heat-set with the heating tool.
I stamped the sentiment also with Versamark ink and used the same gold embossing powder.
Next, I die-cut the focal panel using the Oval Frames Die Set and foam-mounted on a gold oval frames notecard for added dimension. This card is really simple but I love how it turned out.
Would you like to win the “Snowflake Oval” Stamp Set? We will choose one lucky winner for each stamp set!
Here’s how to win: Comment on the NND blog and Design Team blogs (see list below)! The winner will be chosen at random from the collective reveal posts. Make sure to check out each of their blogs and comment for your chance to win. You will not know which blog has been chosen so the more you comment on the better your chances are of winning! You have until Thursday October 13th at 9pm ET to comment — winners will be announced on the blog post on Friday October 14th.
Check out all the awesome Design Team Blogs below to enter:
Hello and Welcome to the Newton’s Nook October Release. I hope you were able to check out the reveals from Monday. You also have a chance to win the stamp set being revealed each day so please read through til the end of the blog post to find out more info. [Just a little important note: I know some of you had difficulties finding the comments section. If you would like to leave a comment to participate in the giveaway, the “comments section” will only be ever visible when a single post on Word Press is being viewed. Please click on this particular blog post and you will be able to leave a comment below. Thank you!]
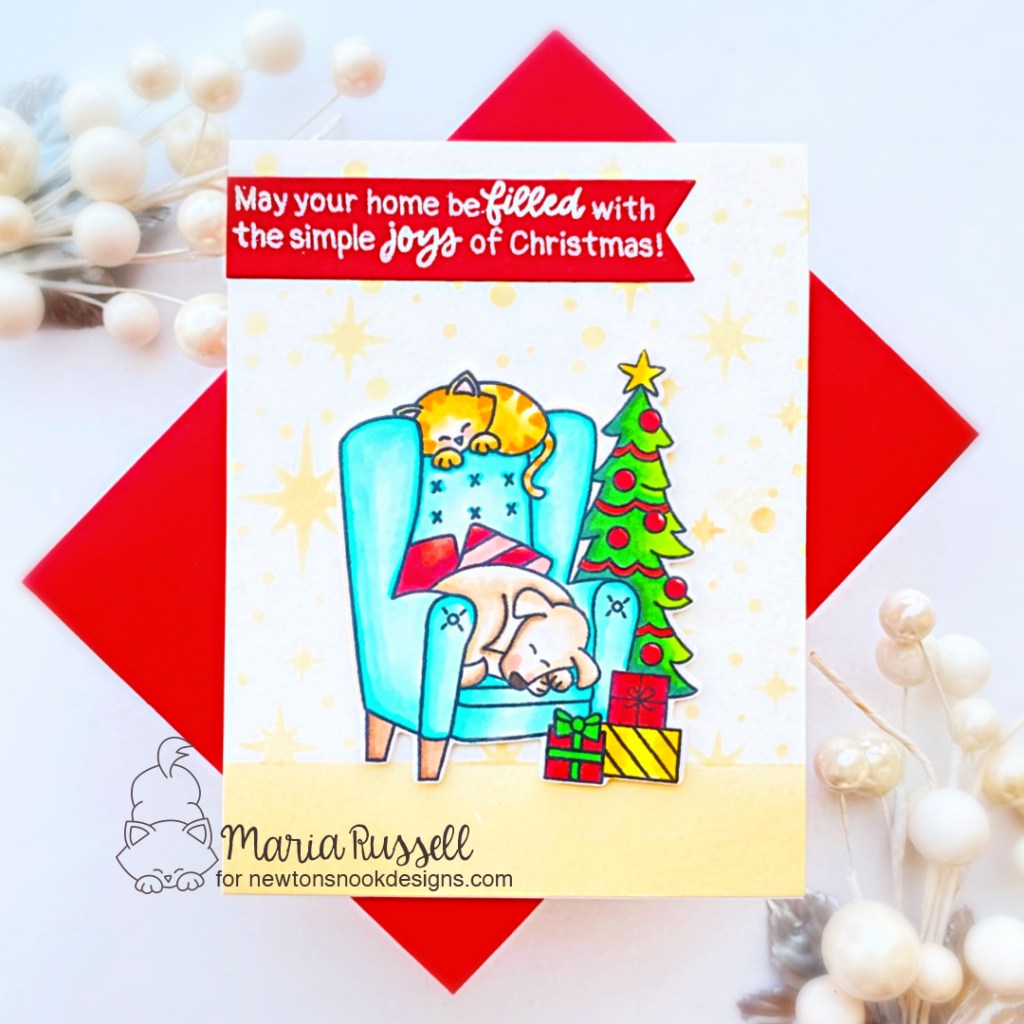
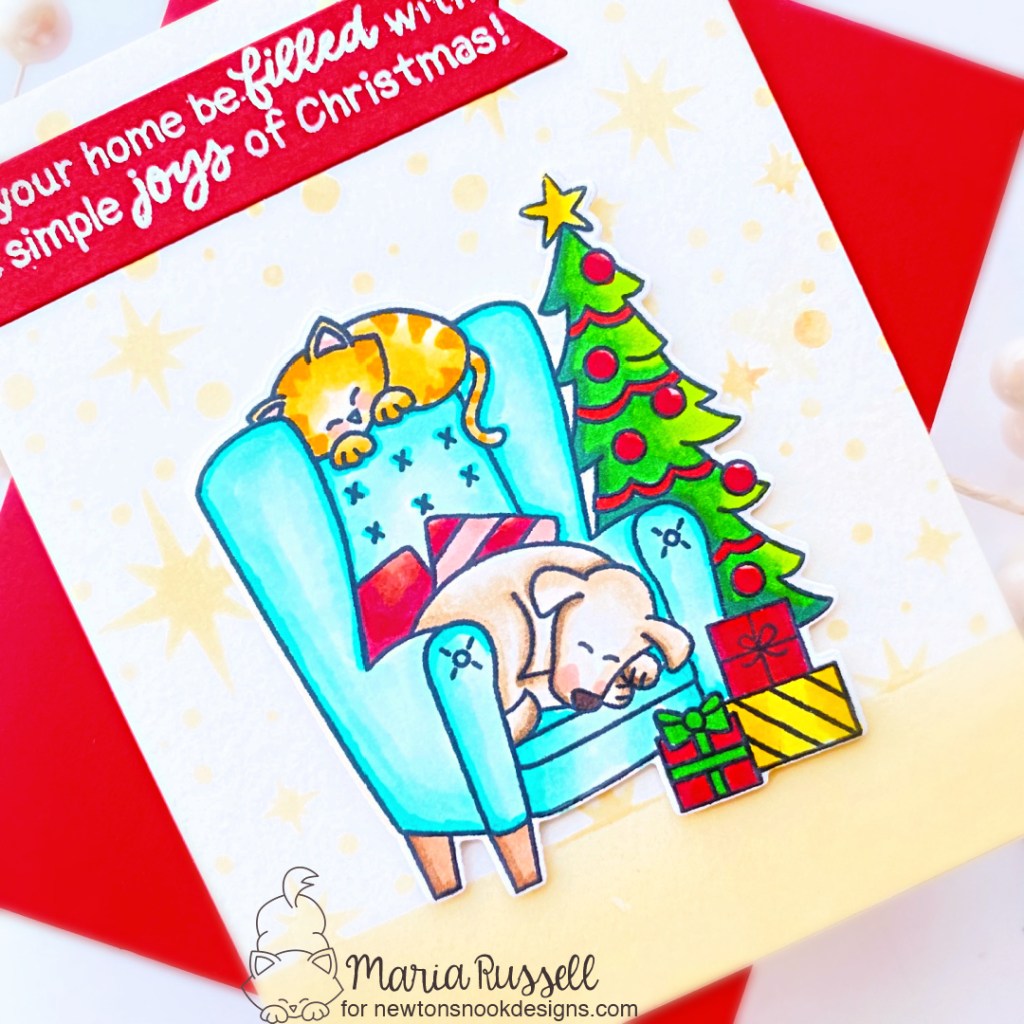
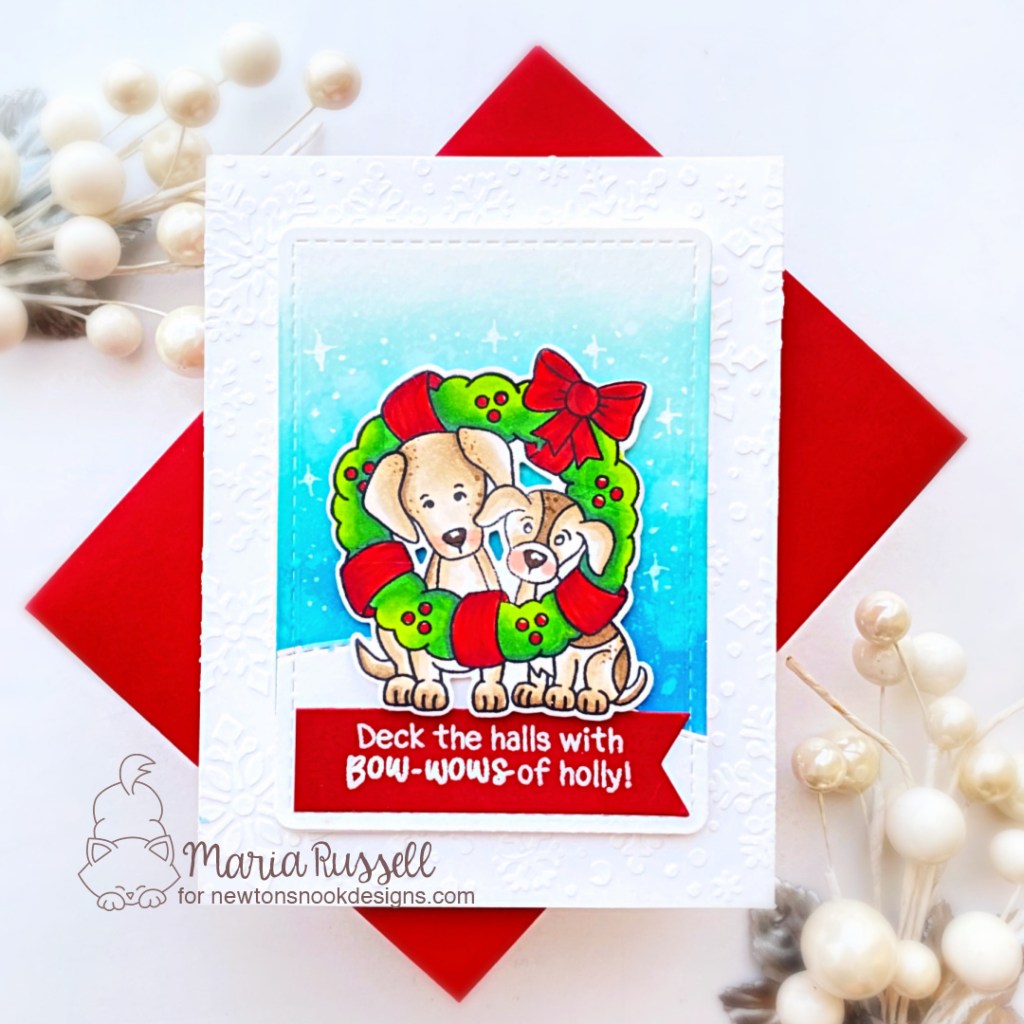
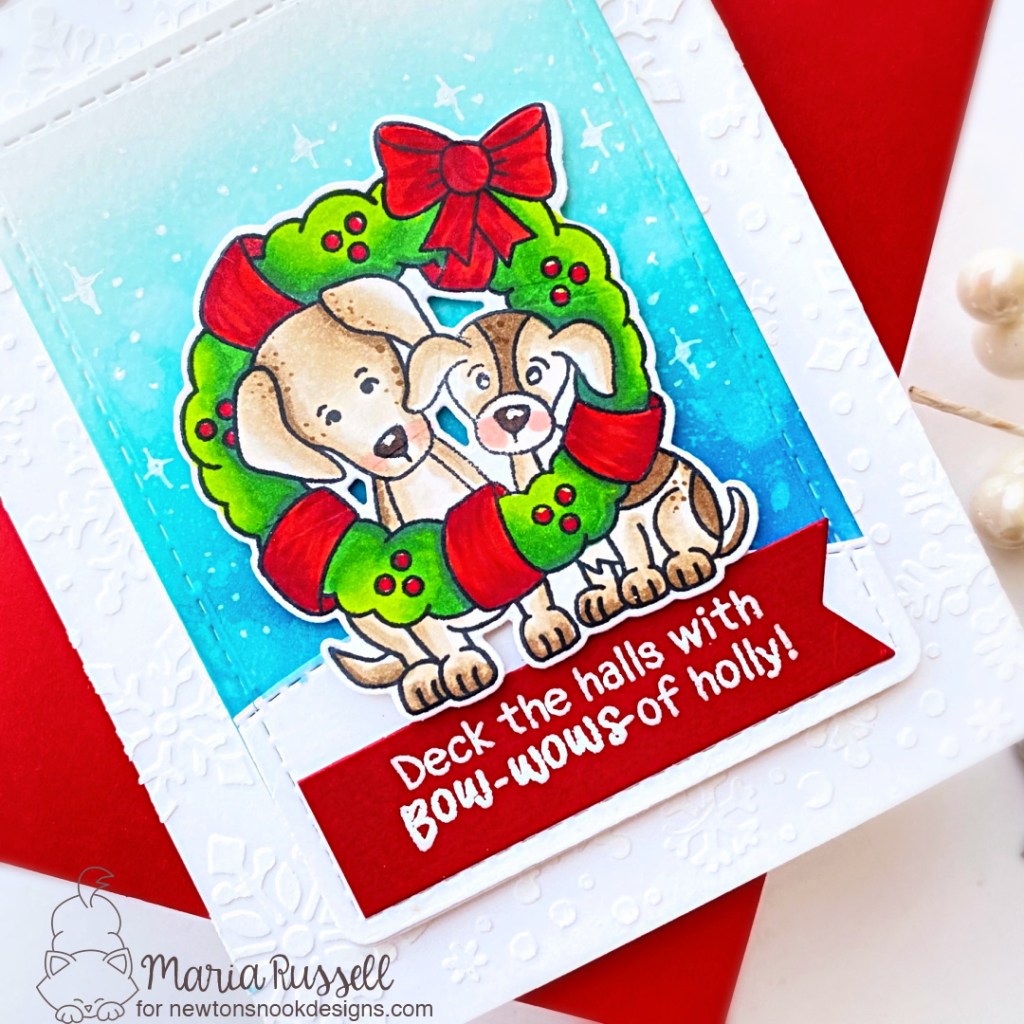
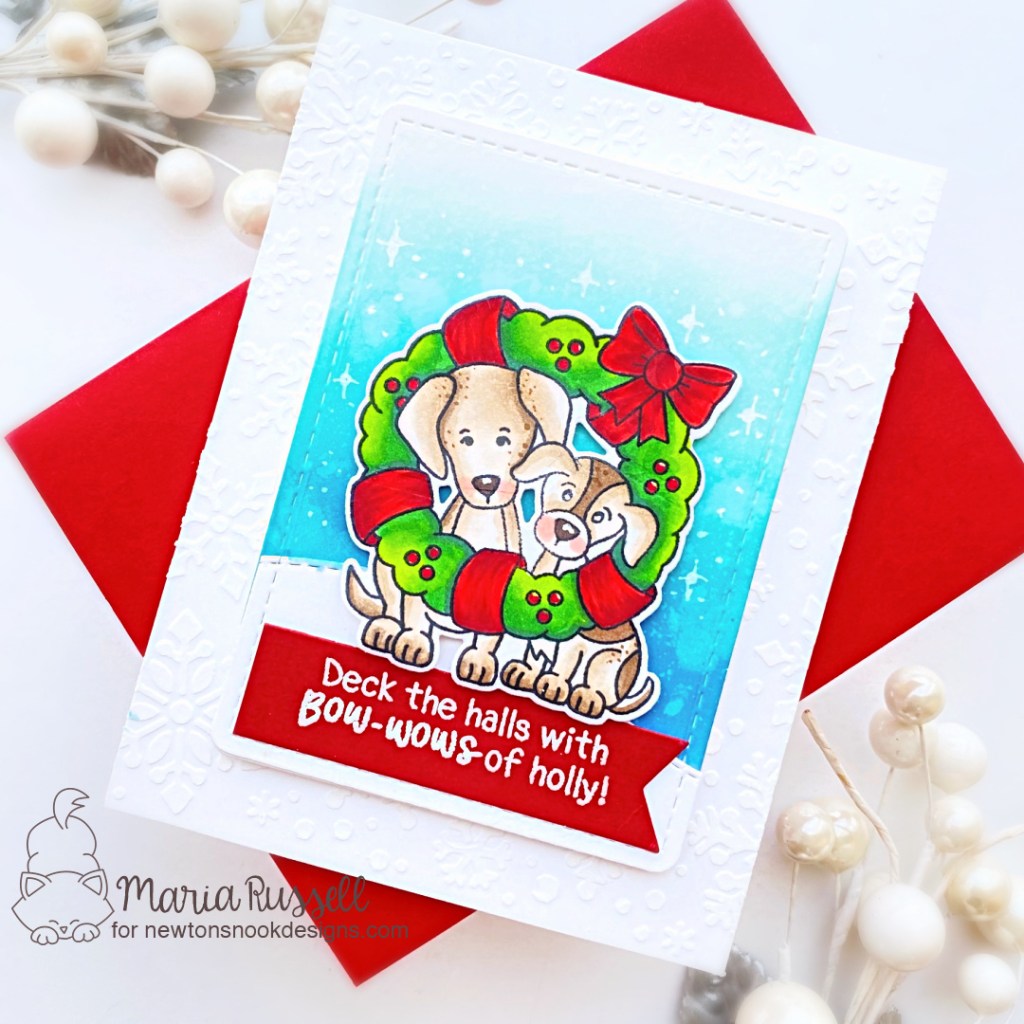
For Day 3, we are showcasing the Christmas Nap Stamp Set + Coordinating Dies with the Newton’s Gift Stamp Set and Coordinating Dies.
I started by stamping my images on some X-Press It Blending Card and colored the images in with alcohol markers. I used the coordinating dies to cut them out.
Next, I ink-blended some Bristol Smooth white card stock and covered the bottom part with masking tape. I used the Starfield Stencil and Antique Linen Distress oxide ink with my blending brush. I removed the masking tape and lightly ink-blended the same color at the bottom of the panel. I adhered this on some A2-size white notecard.
I added the focal image on the card with foam adhesive for more dimension. I stamped the sentiment using Versamark ink on a strip of red card stock. I sprinkled some white embossing powder and heat-set with the heating tool, adhering the sentiment with liquid glue. Here’s another look:
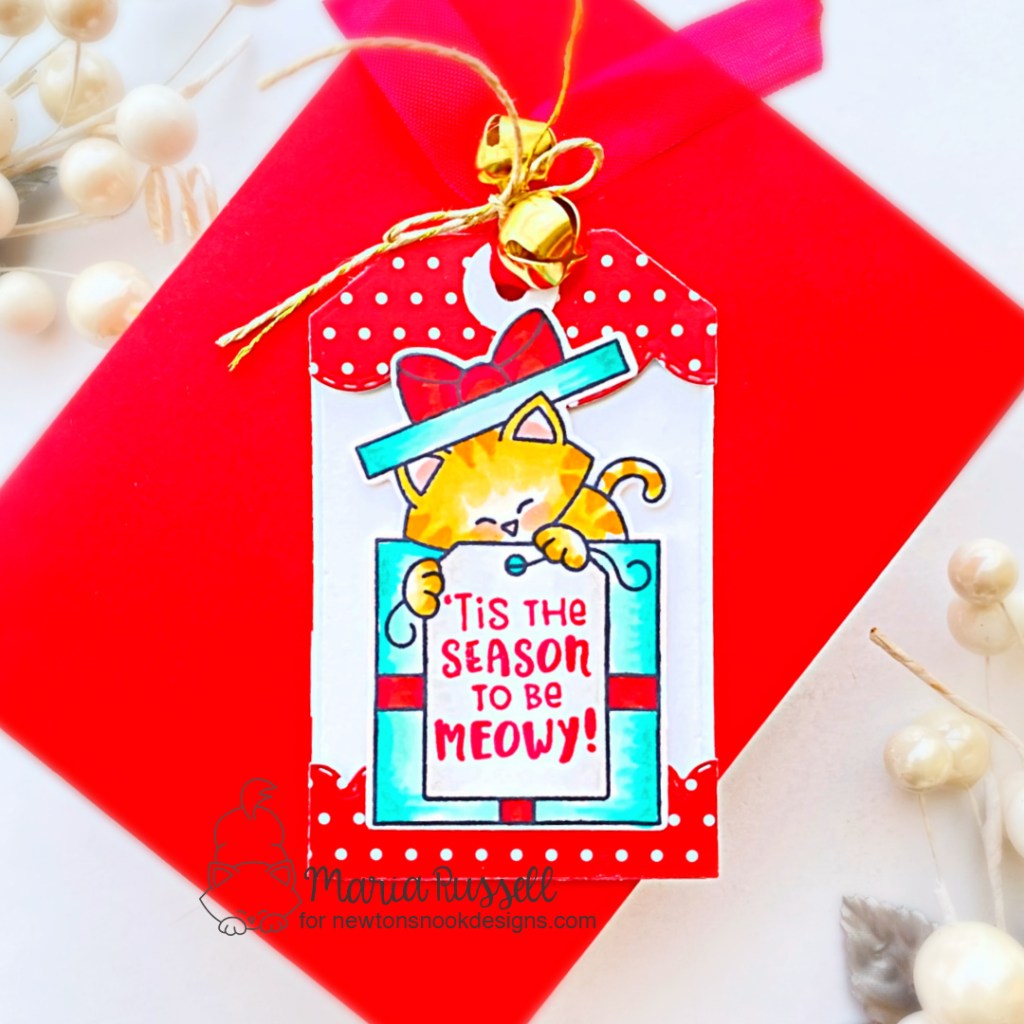
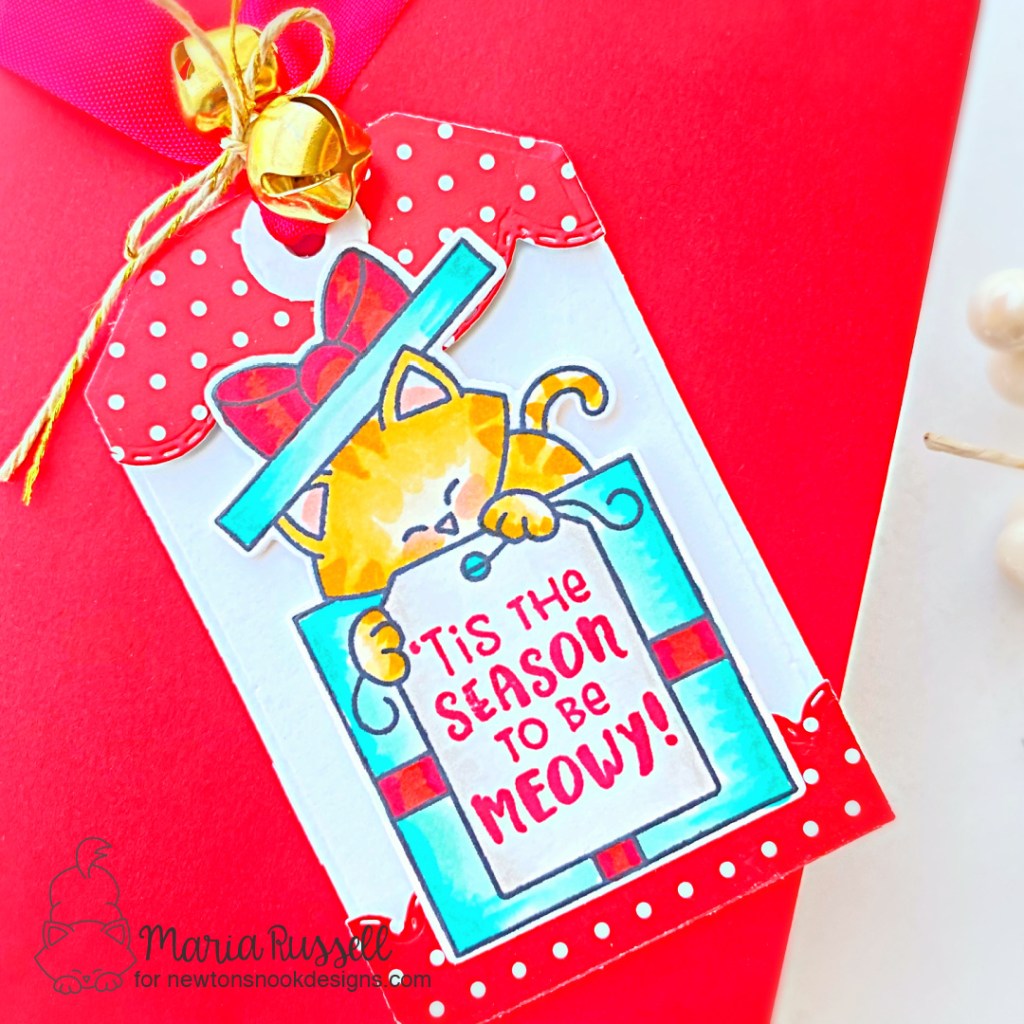
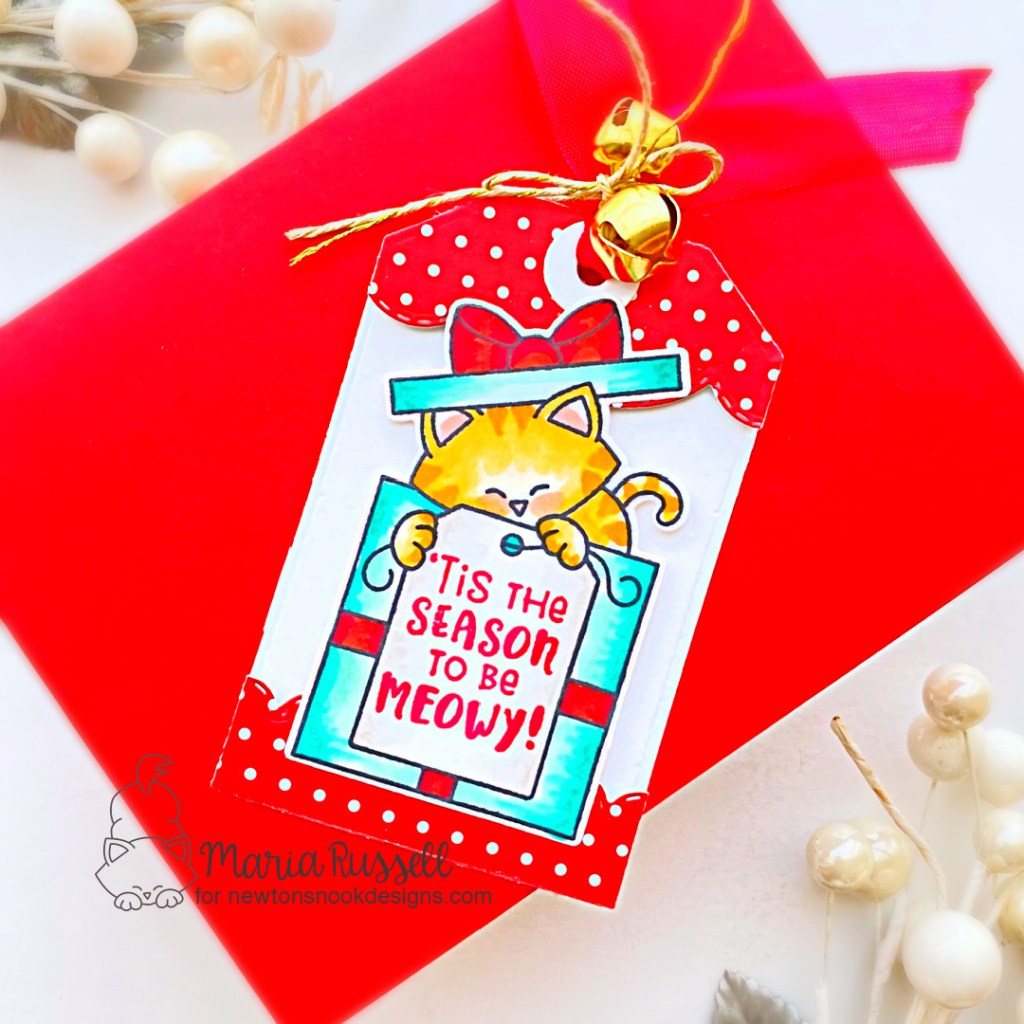
My next project was also stamped on some X-Press It blending card and die-cut with the coordinating die. I also die-cut the tag using the Fancy Edges Tag Die Set with the new Canine Christmas Paper Pad and some Neenah solar white card stock, adhering them with liquid glue.
The focal image was foam-mounted onto the tag for added dimension.
I finished the tag by adding some red ribbon and gold jingle bell, then stamped the sentiment with some red dye ink. Here’s another look:
Would you like to win the “Christmas Nap” or “Newton’s Gift” Stamp Set? We will choose one lucky winner for each stamp set!
Here’s how to win: Comment on the NND blog and Design Team blogs (see list below)! The winner will be chosen at random from the collective reveal posts. Make sure to check out each of their blogs and comment for your chance to win. You will not know which blog has been chosen so the more you comment on the better your chances are of winning! You have until Thursday October 13th at 9pm ET to comment — winners will be announced on the blog post on Friday October 14th.
Check out all the awesome Design Team Blogs below to enter:
Hello and Welcome to the Newton’s Nook October Release. I hope you were able to check out yesterday’s reveal. You also have a chance to win the stamp set being revealed each day so please read through til the end of the blog post to find out more info. [Just a little important note: I know some of you had difficulties finding the comments section. If you would like to leave a comment to participate in the giveaway, the “comments section” will only be ever visible when a single post on Word Press is being viewed. Please click on this particular blog post and you will be able to leave a comment below. Thank you!]
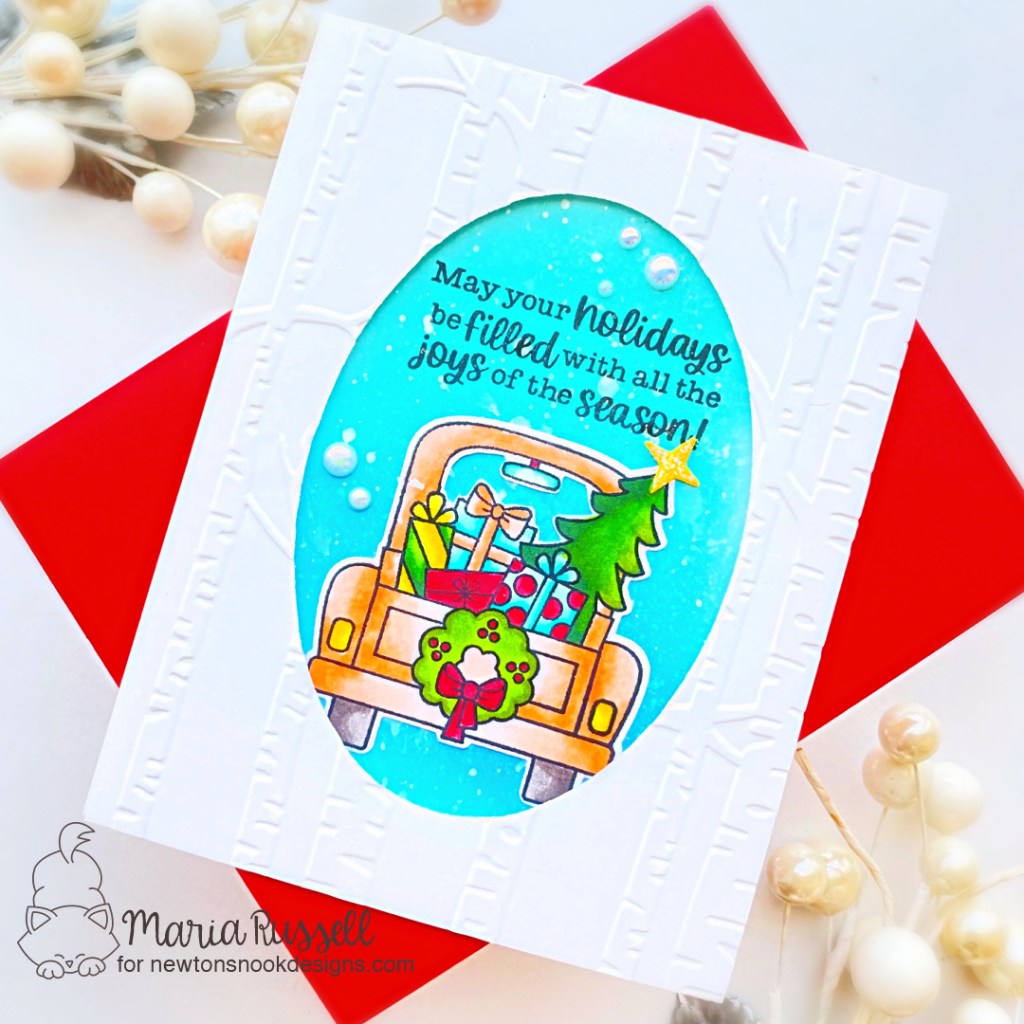
For Day 2, we are showcasing the Christmas Haul Stamp Set + Coordinating Dies with the Wreath Pups Stamp Set + Coordinating Dies.
I started by stamping my images on some X-Press It Blending Card and colored the images in with alcohol markers. I used the coordinating dies to cut them out.
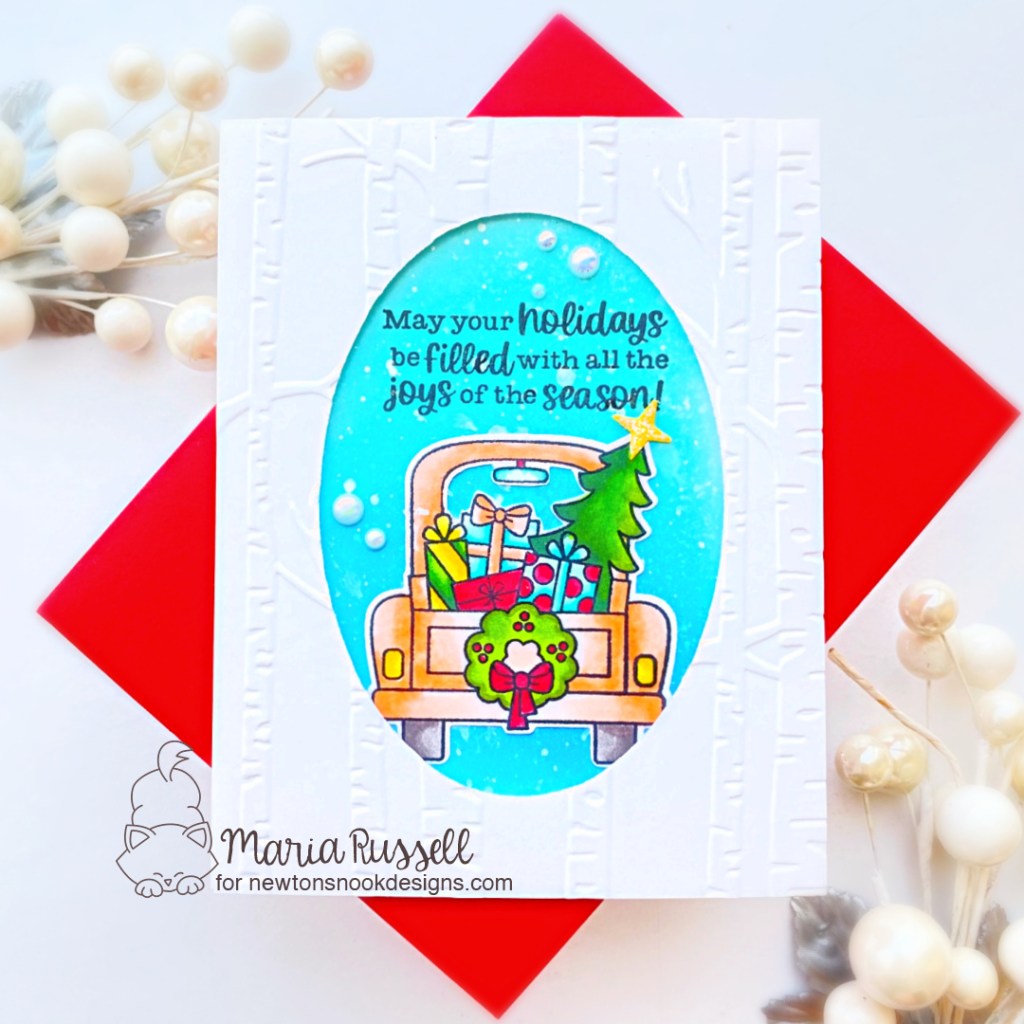
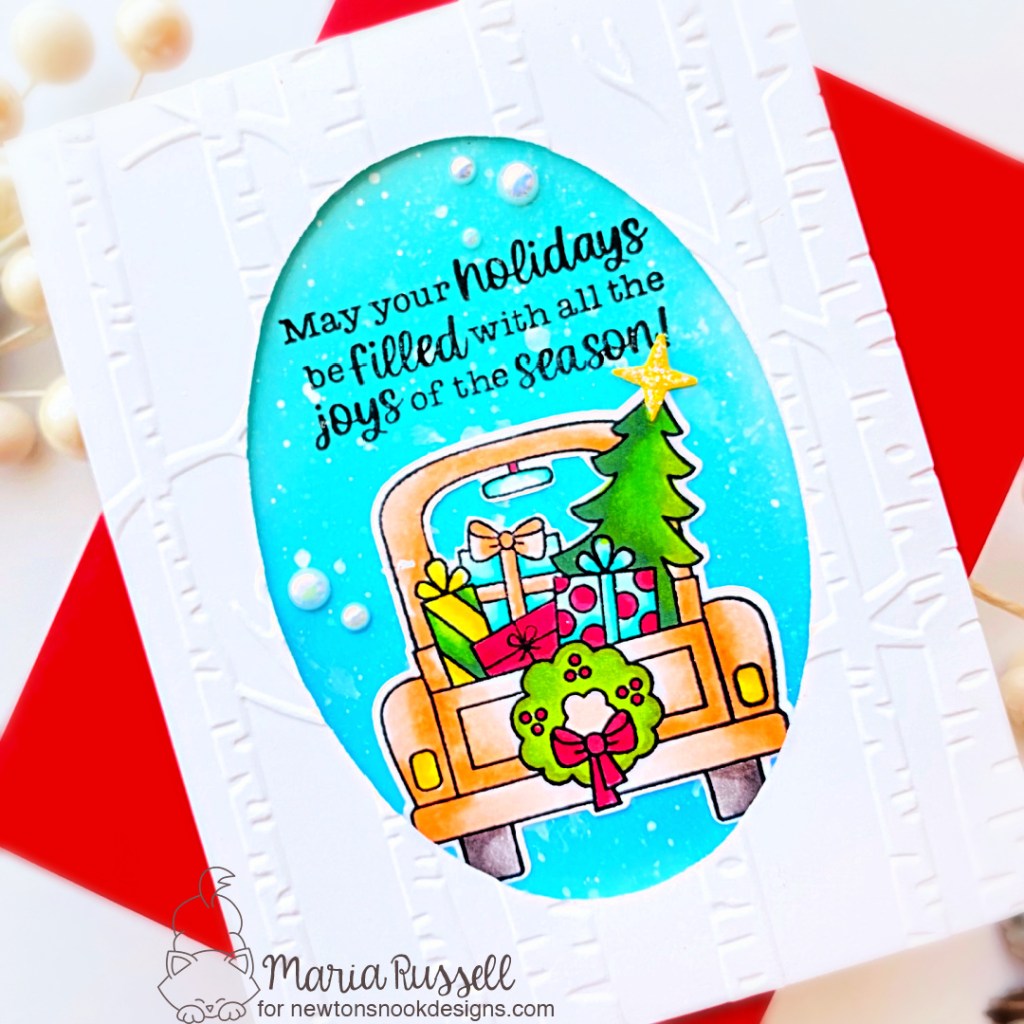
Next, I ink-blended some Bristol Smooth white card stock with some Distress Oxide ink and adhered this panel on some A2-size notecard. I die-cut a panel of some Neenah Solar white card stock using the oval die from the Oval Frames Die Set to create a window. I dry-embossed this using some embossing folder and foam-mounted this panel for added dimension.
I covered the card front with some masking tape and use some diluted white gouache to add some white splatters on the background for added texture. I adhered the focal image on the panel with liquid glue. Lastly, I added some white pearls for added texture and interest and stamped the sentiment with black ink to finish the design. Here’s another look:
My next project has a ton of texture! I used the Snowfall Stencil with some texture paste on some Neenah Solar White Card Stock. I set this aside to dry for about half an hour and adhered this panel on some A2-size notecard.
Next, I die-cut some Bristol Smooth White card using a die from the Frames & Flags Die Set and ink-blended this panel with some distress oxide inks. I also die-cut the snowbank using the Land Border Die and adhered this piece on the card with liquid glue.
Foam-mounting the focal image was necessary to create more dimension to this rather simple card. The sentiment was stamped with Versamark ink and heat-set with heating tool and adhered on the card with liquid glue.
I finished the card design by using some white gel pen to add some dots and stars for added texture and interest. Here’s another look:
Would you like to win the “Holiday Haul” or the “Wreath Pups Stamp Set? We will choosse one lucky winner for each stamp set!
Here’s how to win: Comment on the NND blog and Design Team blogs (see list below)! The winner will be chosen at random from the collective reveal posts. Make sure to check out each of their blogs and comment for your chance to win. You will not know which blog has been chosen so the more you comment on the better your chances are of winning! You have until Thursday October 13th at 9pm ET to comment — winners will be announced on the blog post on Friday October 14th.
Check out all the awesome Design Team Blogs below to enter:
Hello and Welcome to the Newton’s Nook October Release. I am so excited to show off the new products by Newton’s Nook Designs. You also have a chance to win the stamp set being revealed each day so please read through til the end of the blog post to find out more info. [Just a little important note: I know some of you had difficulties finding the comments section. If you would like to leave a comment to participate in the giveaway, the “comments section” will only be ever visible when a single post on Word Press is being viewed. Please click on this particular blog post and you will be able to leave a comment below. Thank you!]
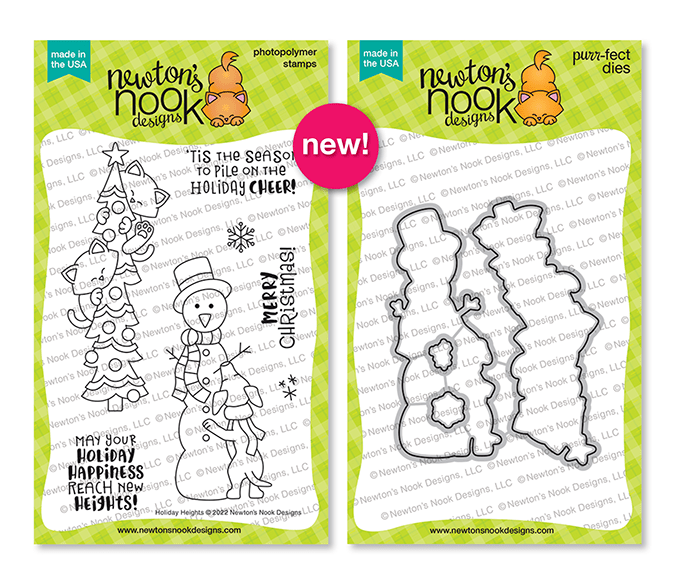
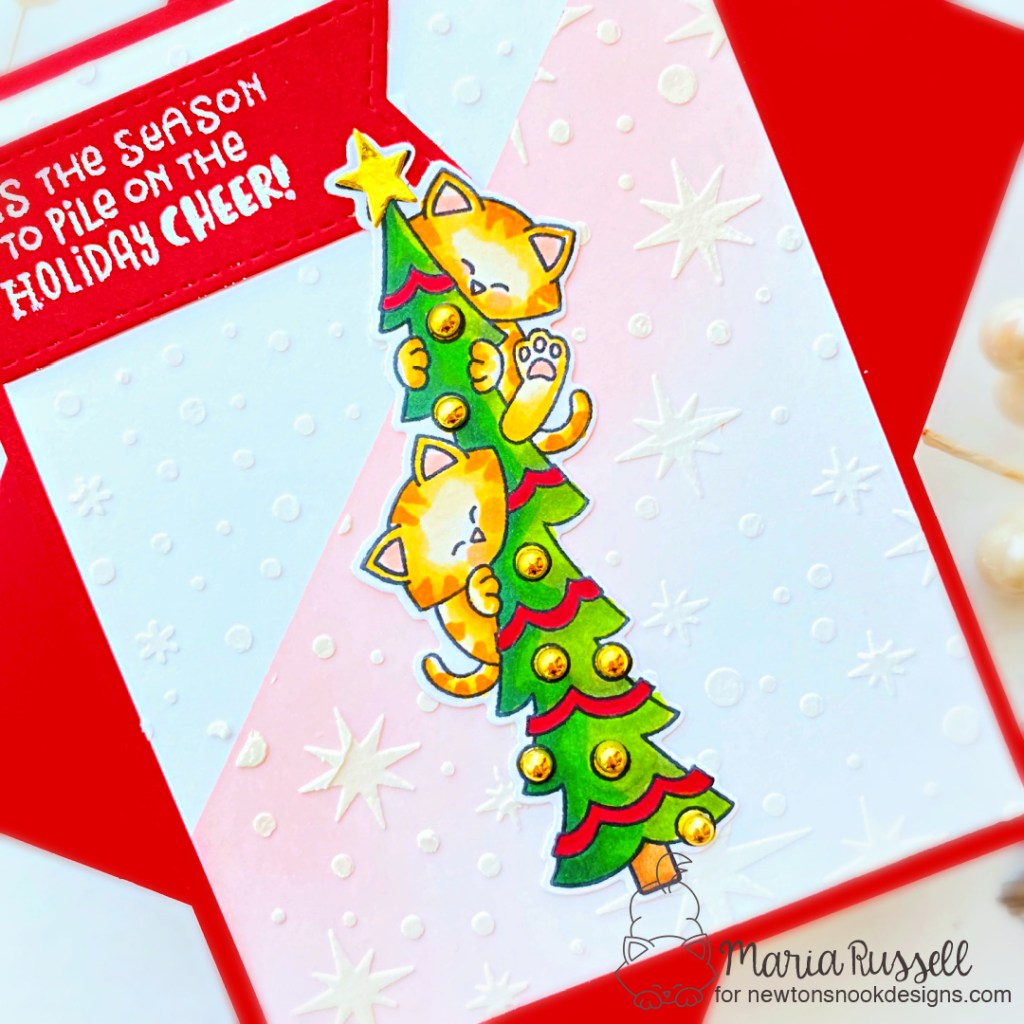
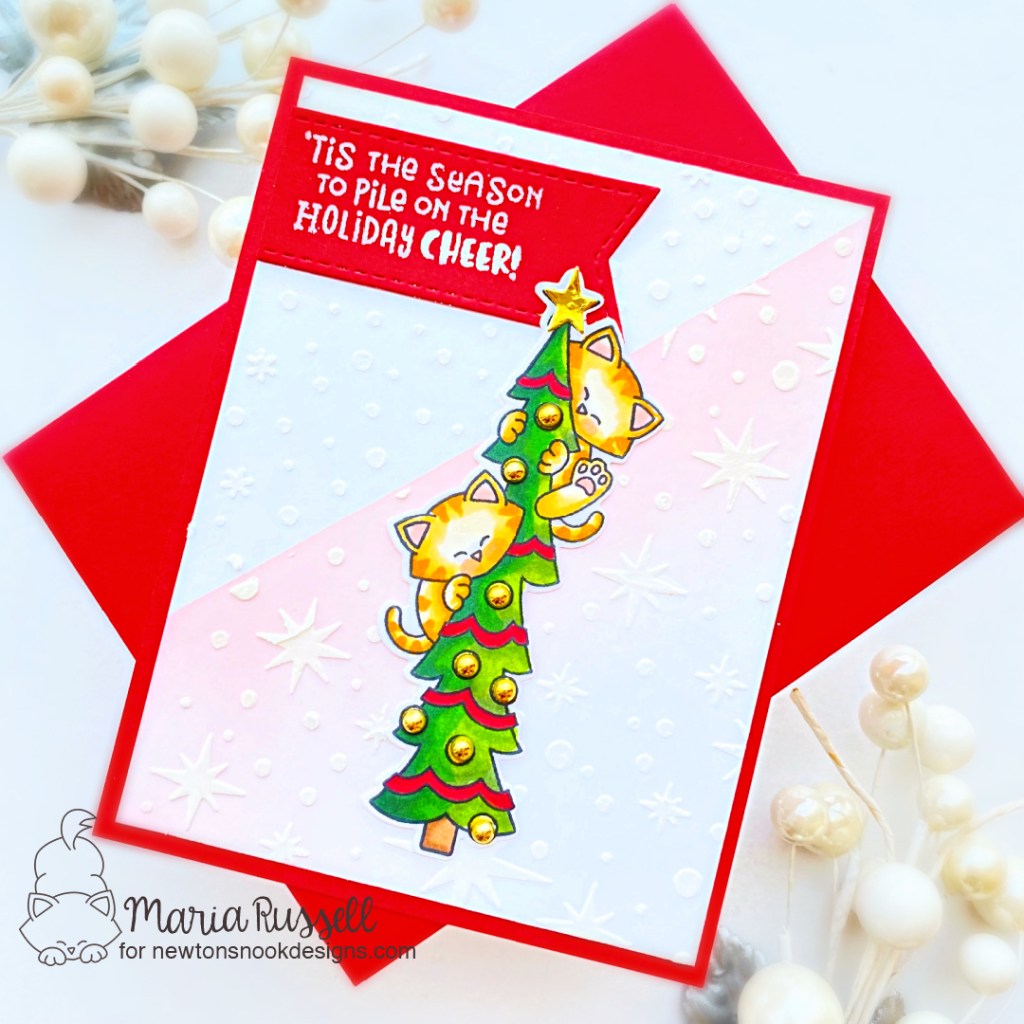
For Day 1 of the reveals, we are showcasing the Holiday Heights Stamp Set + Coordinating Dies, along with the Canine Christmas and Christmas Time Paper Pad with the Christmas Tree Line Stencil.
I started by stamping my images on some X-Press It Blending Card and colored the images in with alcohol markers. I used the coordinating dies to cut them out.
On some A2-size Neenah solar white card stock, I used some masking tape and temporarily adhere it diagonally and used some blending brush and SpuN Sugar Distress Oxide ink to slightly add color to this panel. I then used the Starfield Stencil and some texture paste to add more texture to the panel. I set this aside to let it dry for about half an hour and adhered the colored image to the panel.
Next, I adhered the card front on some red notecard. I also adhered some white card stock inside the notecard measuring 4 X 5 1/4.
I die-cut the sentiment strip using a one of the dies from the Frames & Flags die set. I stamped the sentiment using VersaMark ink and sprinkled some white embossing powder. I used my heating tool to heat set and adhered the strip onto the card with liquid glue.
I finished the card design by adding a gold star on top of the tree and gold baubles for added texture. Here’s another look:
Would you like to win the “Holiday Heights” Stamp Set? This stamp set will be given away to ONE lucky winner!
Here’s how to win: Comment on the NND blog and Design Team blogs (see list below)! The winner will be chosen at random from the collective reveal posts. Make sure to check out each of their blogs and comment for your chance to win. You will not know which blog has been chosen so the more you comment on the better your chances are of winning! You have until Thursday October 13th at 9pm ET to comment — winners will be announced on the blog post on Friday October 14th.
Check out all the awesome Design Team Blogs below to enter:
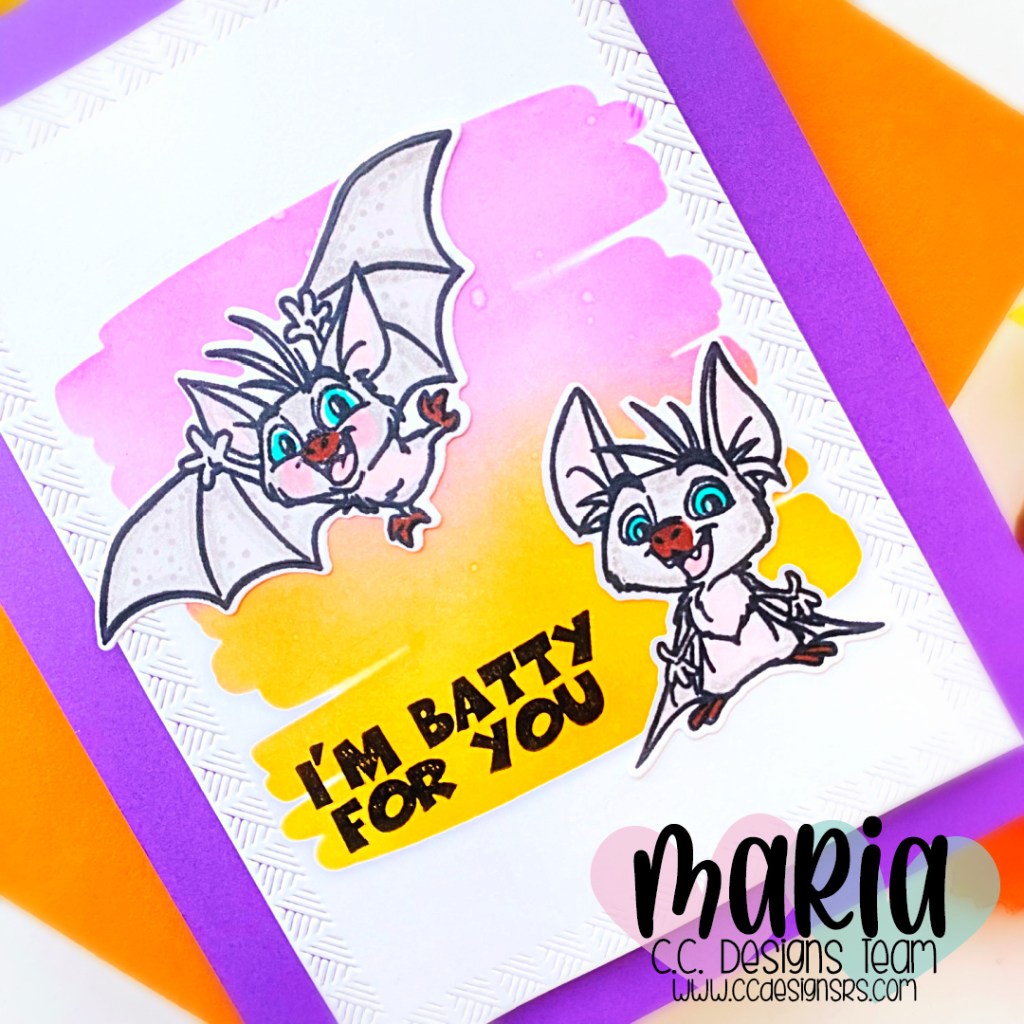
use a stencil from your stash with Wilted Violet and Carved Pumpkin Distress Oxide inks to ink-blend the background. I used my Mini Sponge Daubers to lightly blend the colors.
adhere the focal images on the card with liquid glue.
finish the design by stamping the sentiment with Memento Tuxedo Black ink.
Even though this stamp set is meant for Halloween, I wanted to stretch my supplies and use it for a non-Halloween project. It’s simple but it turned out really cute!
I hope you like this card today and got inspired. Below, you will find links to the supplies used to create this project(s). Where available, I use compensated affiliate links at no extra cost to you. Your support helps me to keep bringing you new projects and inspiration. Thank you for stopping by, and have an amazing day!
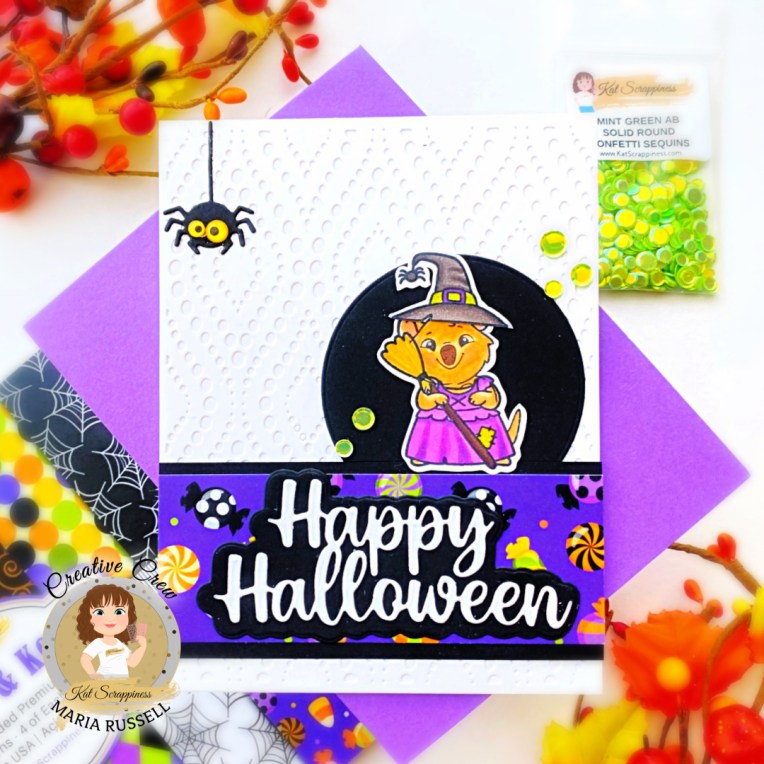
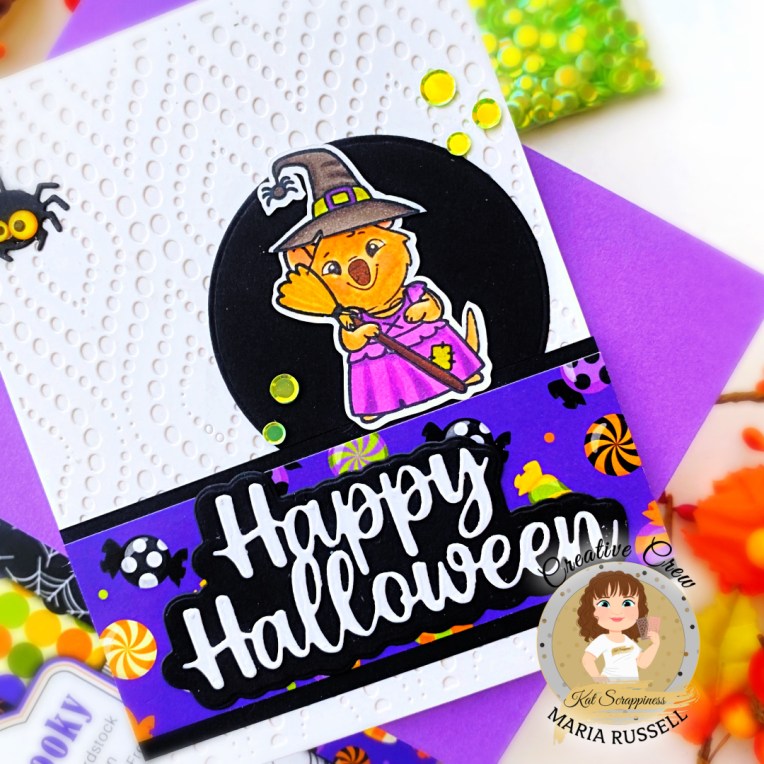
Sometimes, you just don’t have the time or energy to die-cut a lot of pieces to create a scene for your card. I am showing you a simple way to create a cute Halloween card without spending too much time, and use up those cute pattern paper without overwhelming the design.
Here’s how I made this project:
Stamp the image from the Quokka Halloween Costume Add On Stamp on Neenah solar white card stock. Stamp the image again on some masking paper and use precision snips to fussy-cut the masking image.
Stamp the Dress-Up Quokka Stamp Set onto the masked image. Remove the mask and color the images with alcohol markers.
Use Brother Scan N Cut machine to die-cut the image or precision snips if you don’t have the machine.
Die-cut the background panel using the Peacock Backdrop Die and adhere on some A2-size top-folding notecard.
Die-cut some black circle using the Never-Ending Circle Dies and cut some black strip as well measuring 2 1/4 by 4 1/4. Adhere both pieces on the card.
I hope you like this super simple Halloween card today and got inspired. Below, you will find links to the supplies used to create this project(s). Where available, I use compensated affiliate links at no extra cost to you. Your support helps me to keep bringing you new projects and inspiration. Thank you for stopping by, and have an amazing day!