Waterless Snow Globe with Xyron

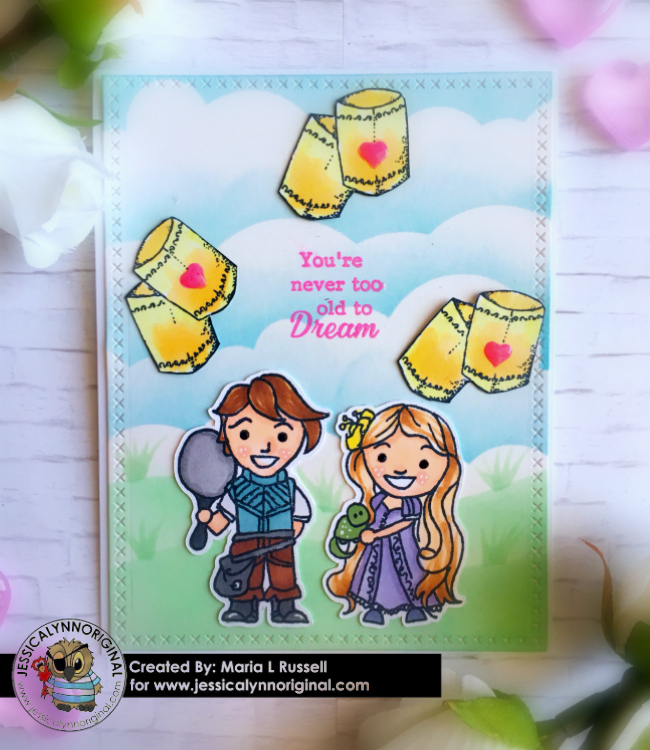
Hello everyone! I hope you’re all excited and getting ready for Christmas. In my case, I haven’t even put up the tree just yet. I was traveling for my daughter’s graduation and just came back yesterday. The children are finally home and we have started decorating the house today.

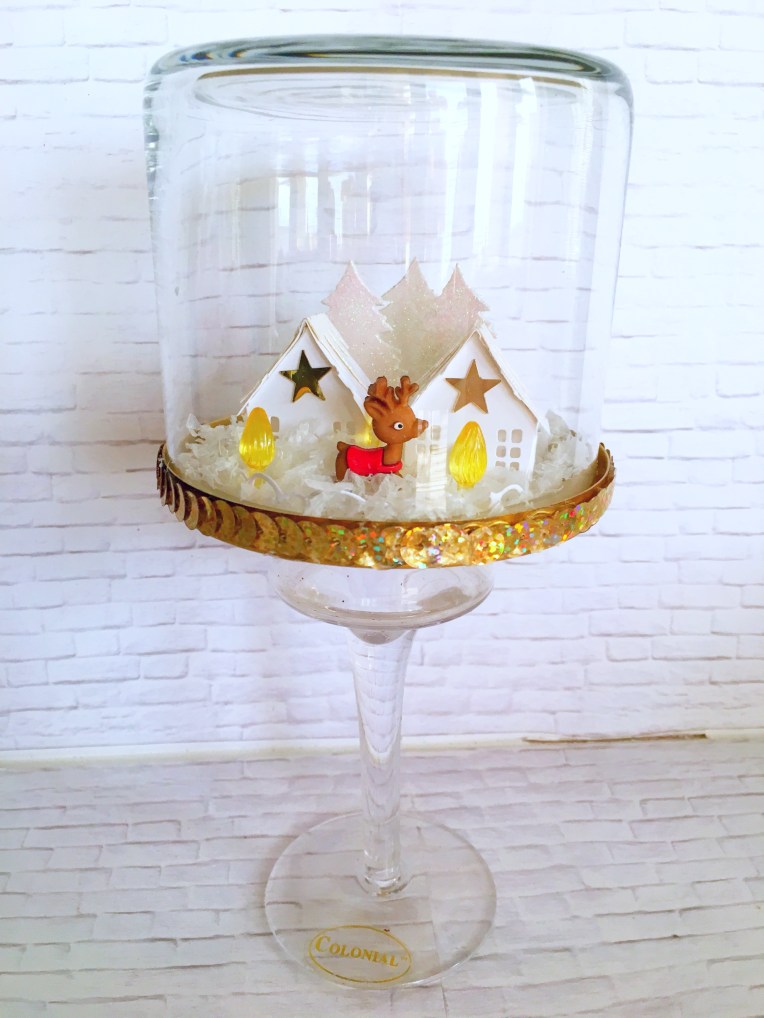
One of our family traditions over the holidays is to create a handmade ornament or Christmas décor. A few years ago, we made this cute “waterless” snow globe using a recycled candle jar and it turned out so cute, I wanted to create another one this year. Here’s what we made last year:

IMG_6337

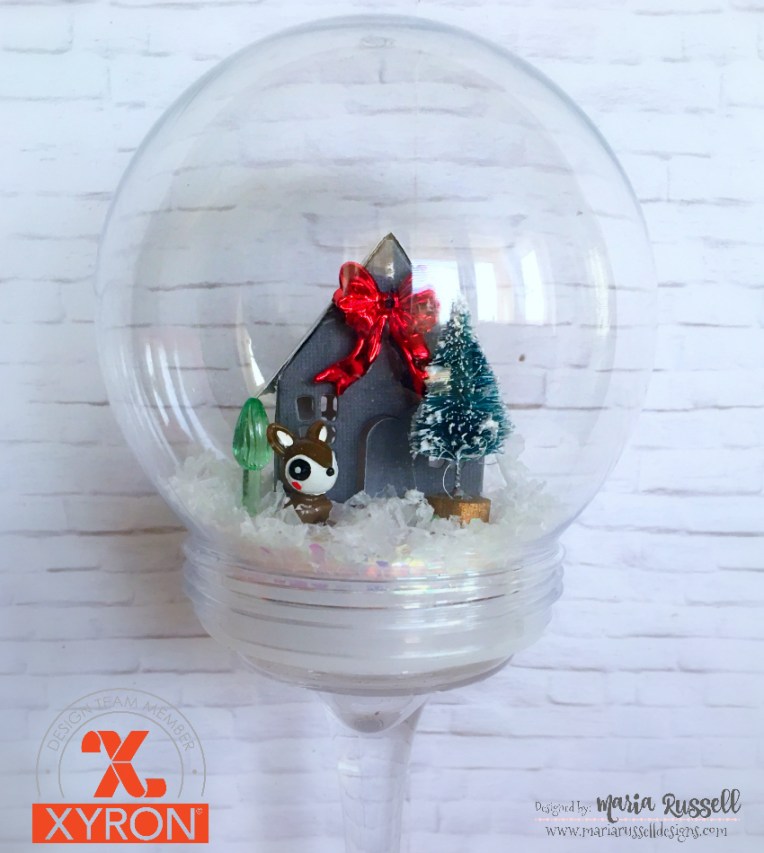
For this year’s snow globe, I bought a shatterproof water globe from the craft store. I started out by die-cutting my little houses on DCWV 80 lb. card stock with my Magnolia Doohickey house die. I assembled the house using my favorite Xyron mega runner adhesive. I also die-cut a circle to cover the bottom of the lid.

IMG_6324

I adhered my little house on the lid, and added some embellishments to my scene. First I added the red bow to the house, and then adhered the pine tree and the reindeer on the lid. I also added the little light bulb.

IMG_6329

IMG_6339.jpg

To finish the design, I added some fake snow and iridescent confetti to the jar and closed the lid. You can add as many or as little snow as you’d like.

It is so much fun to keep shaking this waterless snow globe. Here’s a close-up look:

XyronSnowGlobe1

XyronSnowGlobe2

XyronSnowGlobe3

I hope you like my project today and got inspired to create your very own waterless snow globes. These are also great to give as gifts or start your family tradition by making your own ornaments/Christmas décor this year. Have a wonderful day!

———SUPPLIES——-

[Affiliate links provided.]

Home For the Holidays by Wild Whisper With Xyron

Hello my crafty friends.  The Xyron DT is teaming up with Wild Whisper all week long.  I have 3 very simple cards to share with you today, showcasing the new stamp set by Wild Whisper called Home for the Holidays, as well as the coordinating patterned papers, with adhesives by Xyron.  Here are the products I got to play with.  Thank you Wild Whisper and Xyron, Inc. for the amazing goodies!


IMG_6253


For my first card, I started out by cutting an A2 size white card stock and also die-cut a small rectangle masking paper by Inkadinkado, to mask the middle of my card.  I stamped the images onto my card stock with different stamp inks.


IMG_6254


I removed the mask, and positioned my stamp onto the card front so that I can stamp the sentiment right in the middle.  This technique made the sentiment pop even with the busy background.  I adhered the card stock to my card base with my favorite Xyron Mega Runner.


IMG_6252


To finish my design, I added glossy accents to the bottle images, and added a few colorful dots.


Here’s my card:


XyronWildWhisper1


For my second card, I stamped the doily image using versa mark ink on my Sahara Sand card stock.  I wanted the background to be subtle.  I then stamped the sentiment and the antlers.  I colored the antlers with my Copic markers.  I finished my design by adding the bow, and the gold stars.


XyronWildWhisper2


For my third card, I drew a circle on the center of my white card stock, and stamped the stars around the circle to create my wreath.  I stamped the antlers and the sentiment using Versafine Onyx black ink.  It is a very simple card but I love how it turned out.


XyronWildWhisper3

I hope you like my projects today.  Please visit www.wildwhisperdesigns.com to shop for for your paper crafting supplies.  Also visit the Xyron, Inc. Facebook page for more project inspiration.  Have an amazing day!


Chocolate Lover’s Card Kit – 5 Projects

Hello, hello my crafty peeps!  I hope you are all having a wonderful day!  I am back to share with you my projects, showcasing the limited-edition Chocolate Lover’s card kit by Kat Scrappiness.  I ABSOLUTELY LOVE THIS KIT!  There are so many possibilities using the supplies included in this kit.  Here’s what’s inside, plus the two add-ons, which is the Chocolate Lover’s sentiment stamp set and the Wonky Wavy Stitched Heart Dies.


KatScrapCardKit


For my first project, I wanted to create a fun shaker card using the 6 X 6 paper pad by Pebbles and the Mint Sprinkles Sequin mix as my shaker material.  I love this color combo.  I also included a short video showing you how to stamp the layered chocolate stamp set.  It looks so realistic.  Here’s the first card:


KatScrapChocolate1


Here’s the close-up:


KatScrapChocolate1A


Here’s the YouTube video showing you how I stamped the chocolate:


For my second project, I wanted to create a simple, one-layer card, with the chocolate layering stamp set and the Chocolate Lover’s sentiment stamp set.  I added the pink and blue dots and finished my design with glossy accents.  The card is very simple but I love how it turned out.  Here’s the second card:


KatScrapChocolate2


For my third project, I used the chocolate image again with the “Sweet” script sentiment  die included in the kit, as well as the Fancy Scalloped Stitched Border dies.  I finished my design by adding the gold twine.  Here’s the third card:


KatScrapChocolate3


For my fourth project, I used the chocolate candy bar stamp set again but this time, I added a wreath die-cut using the Avery Elle Star Frames Elle-Ments Dies and also created a wavy card-front using the Fancy Scalloped Stitched Border Dies.  I finished my design by adding the wooden heart embellishments from the kit, coloring it with my Copic marker.  Here’s the fourth card:


KatScrapChocolate4


For my last project today, I wanted to use the stamp set to decorate a giant Hershey’s chocolate candy bar to give as a gift either for Christmas or Valentine’s Day.

I wrapped the candy bar with a plain white typing paper.  I used a stamp from my stash to stamp the snowman’s face on the paper, and colored it with my Copic markers.  I cut a square and a rectangle black card stock to create the snowman’s hat.  I then stamped my sentiment on the hat with versa mark ink, and heat-embossed it with my white embossing powder.  I adhered the hat to the snowman.  I used my 1/2 inch circle punch to create the buttons for the snowman, and adhered it onto the wrapped candy with my Xyron Mega Tape Runner.  To finish my design, I added the red seam binding for the snowman’s scarf, and added the heart embellishment by pebbles, included in the kit.  It turned out so cute.  You can easily mass-produce this project to give as gifts to teachers, your friendly neighborhood mailman/mailwoman, or anyone else.  Here’s my fifth project.  Isn’t he cute?


KatScrapChocolate5

I hope you like all of the projects that I created today and got inspired.  The supplies I used are listed and linked below if you are interested.  Have a wonderful day!

————SUPPLIES———-


Christmas Tags with Kat Scrappiness Naughty Stamp Set and Die

Hello everyone.  This is my second post for the day.  Happy Thanksgiving!  Kat Scrappiness is also having a Black Friday/Cyber Monday sale at the shop so take advantage and place your order using the coupon code XMAS2017 for 15% off.

KatScrapBlackFri2017

I am sharing some cute tags today showcasing the Kat Scrappiness Naughty stamp set and die, with the Gerda Steiner Peeking Friends stamp set, Stitched Scalloped Nesting Tag Dies and Pop-Out die, plus a bunch of other supplies available at the shop.

I stamped my images on Neenah solar white card stock with my memento tuxedo black ink using my Tim Holtz Stamp Platform.  I colored my images in with Copic markers.   Since I didn’t have the die for the Gerda Steiner stamp set, I fuzzy-cut them with my scissors.  I also die-cut the naughty sentiment die on black card stock twice.

I die-cut 4 tags using the stitched scalloped nesting tag dies on white card stock, as well as 4 tags with the Doodblebug Christmas patterned paper.  I used the pop-out die to die-cut the window on the patterned paper.  I adhered the images first on the white card stock, and then adhered the patterned paper on top.  To finish my design, I stamped the sentiment on black card stock for two of the tags with VersaMark ink and heat-embossed it with white embossing powder.

Here are my Christmas tags today:

KatScrapNaughtyTags

I hope you like my projects.  Please visit www.katscrappiness.com to shop for crafting supplies.  Have a great Thanksgiving!

———–SUPPLIES———


You’re Never Too Old to Dream and Miracles Take Time by Jessica Lynn Original

Hello my crafty friends.  Happy Thanksgiving to those of you celebrating this very special occasion.  I am back today to share with you some cards that I made showcasing the new stamp sets by Jessica Lynn Original called You’re Never Too Old to Dream and Miracles Take time.

I started out by stamping all of my images on Neenah solar white card stock using my stamping platform and memento tuxedo black ink.  I colored my images in with Copic markers and used my Brother Scan N Cut2 machine to die-cut the images.  I also used my Distress Oxide Inks to color my background with my mini ink blending tools.

Here are my cards for the You’re Never Too Old to Dream.  I made two:

JLOTangled1

JLOTangled2

Two cards showcasing the Miracles Take Time stamp set:

JLOCinderella1

JLOCinderella2

These stamp sets are available for purchase today at www.jessicalynnoriginal.com.   Please visit the links below to see the rest of the design team’s projects.  Happy Thanksgiving!

Jessica Lynn Original

Lisa Reynolds Bzibziak

Maria Russell (you are here)

Carolyn Ellenberg Labille

Tasha RJ

Kelli Horger

Jeannie Ellis

——–SUPPLIES——-

Simple Inlaid Christmas Cards

Hello my crafty friends!  I hope you are all having a great week so far. I’m back today with some simple inlaid Christmas Cards that you can easily mass-produce, showcasing the new Woodlands Reindeer Die, Double Stitched Rectangle Dies and a bunch of other supplies available at Kat Scrappiness.

I have a process video for you all today so I will keep this blog post short.  Here are the photos, and the video is also linked below.  I have also listed and linked the supplies I used.  Have a great week!

KatScrapReindeer1KatScrapReindeer2KatScrapReindeer3

Video:

————-SUPPLIES———–


You Are My Happy Ending by Jessica Lynn Original

JLOHappyEndingGraphic


Today I am showcasing a new stamp set by www.jessicalynnoriginal.com called You Are My Happy Ending Pirate Kids 4 x 4 stamp set.  Here’s what the stamp set looks like:

JLOHEnding

Since I didn’t receive the physical stamp set in time for the launch, I had to work on the digital images.  I printed them off on neenah solar white card stock with my laser printer, and colored the images in with my Copic markers.  I fuzzy-cut the images with my precision cut scissors and set them aside. I stamped other images from stamp sets that I had from my collection to decorate my front panel.   Here’s my card today:

JLOHappyEndingcard

I hope you got inspired today.  Please visit www.jessicalynnoriginal.com for more cute stamps and product inspiration.  If you also would like to check the other DT projects, please click on the link below. Have a great weekend!


Jessica Lynn Original

Lisa Reynolds Bzibziak

Maria Russell (you are here)

Jeanie Ellis

Tasha RJ

Kelli Horger

Carolyn Ellenberg LaBille

 ————SUPPLIES———-


Easy Thanksgiving Crafts with Xyron

I hope you are all having a great week so far.  All week long, the Xyron Design Team will be sharing easy Fall/Thanksgiving projects on the Xyron Facebook group.  For my projects today, I am making a bunch of treat bags to give to my guests for Thanksgiving.  I also made some place card holders and decorated a bunch of LED candles to decorate my table.


If you don’t have the supplies to create the treat bag, you can definitely buy some bags from the dollar store or craft stores, and decorate them with silk fall leaves or any other fall-themed embellishments, and fill them with surprise treats for your guests.


I started out by die-cutting some American Crafts card stock using my Mama Elephant Treat Bag die.  To decorate the bag, I die-cut the pumpkin with the Mama Elephant pumpkin add-on dies.  For my sentiment, I die-cut the “Thank You” script using my Kat Scrappiness Thank you script die.


XyronThanksgiving1


I assembled the bag using my Xyron Mega Runner.  I also used the mega runner to adhere the pumpkin.  To make things easier, I used my Xyron sticker maker to adhere the tiny pieces that goes with the pumpkin, as well as the Thank You Script sentiment.  I filled my bag with some treats.


IMG_5966IMG_5967


Here’s the treat bag:


XyronThanksgiving2


Since I have some leftover leaves that I die-cut from a previous project, I decided to make some place card holders, that will hold the utensils and a note pad for my guests to write what they are thankful for this year.  Here’s what it looks like:


XyronThanksgiving3


I also decorated some LED candles to decorate my table, using my Xyron sticker maker and Mega Runner.


XyronThanksgiving4


Naughty Elves Card & Tag with Kat Scrappiness Naughty Stamp Set

Hello my crafty friends. It’s Maria here with you today with a Christmas Card and Gift Tag project, showcasing the new Kat Scrappiness Naughty Stamp Set, Cross Stitched Square and Cross-Stitched Rectangle Dies and the Stitched Scalloped Nesting Dies.

Since I have a process video for you today, I will keep this blog post short.  Have an amazing day!

Here is the card:

KatScrapNaughty1

Here’s the tag:

KatScrapNaughty2

Process video:

———-SUPPLIES———-