Today’s card features my all-time favorite stamp so far, from Stampin’ Up! called Sheltering Tree. This stamp set is so versatile and you can use it for any occasion. I wanted to create a simple, yet elegant card for Father’s Day. The card that I designed today is really beautiful but it is also very easy to make. Please watch the video below and see for yourself. I have listed the supplies I used here on my Blog but for instructions to make the card, please refer to my YouTube video.
Supplies I used:
Sheltering Tree Stamp Set from Stampin’ Up! & Fahter’s Day Paper Pumpkin Stamp
Look Up to Father Stamp Set from Stampin Up
Whisper White card stock 1 piece of 8 1/2 x 11 card stock – cut at 5 1/2 (to get two pieces of 8 1/2 x 5 1/2)
Pistachio Pudding Designer Series Paper – 5 1/4 x 4
Whisper White card stock – 5 x 3 3/4
Labels Framelits
Wood grain embossing folder
Early Espresso Stampin Pad
Pistachio Pudding and Wild Wasabi Stampin Pads
Memento Tuxedo Black Stampin Pad
Created by Maria RussellCreated by Maria Russell
I hope you found the video helpful and hope to see what you create. Happy Father’s Day to all the amazing Dads out there, and happy crafting!
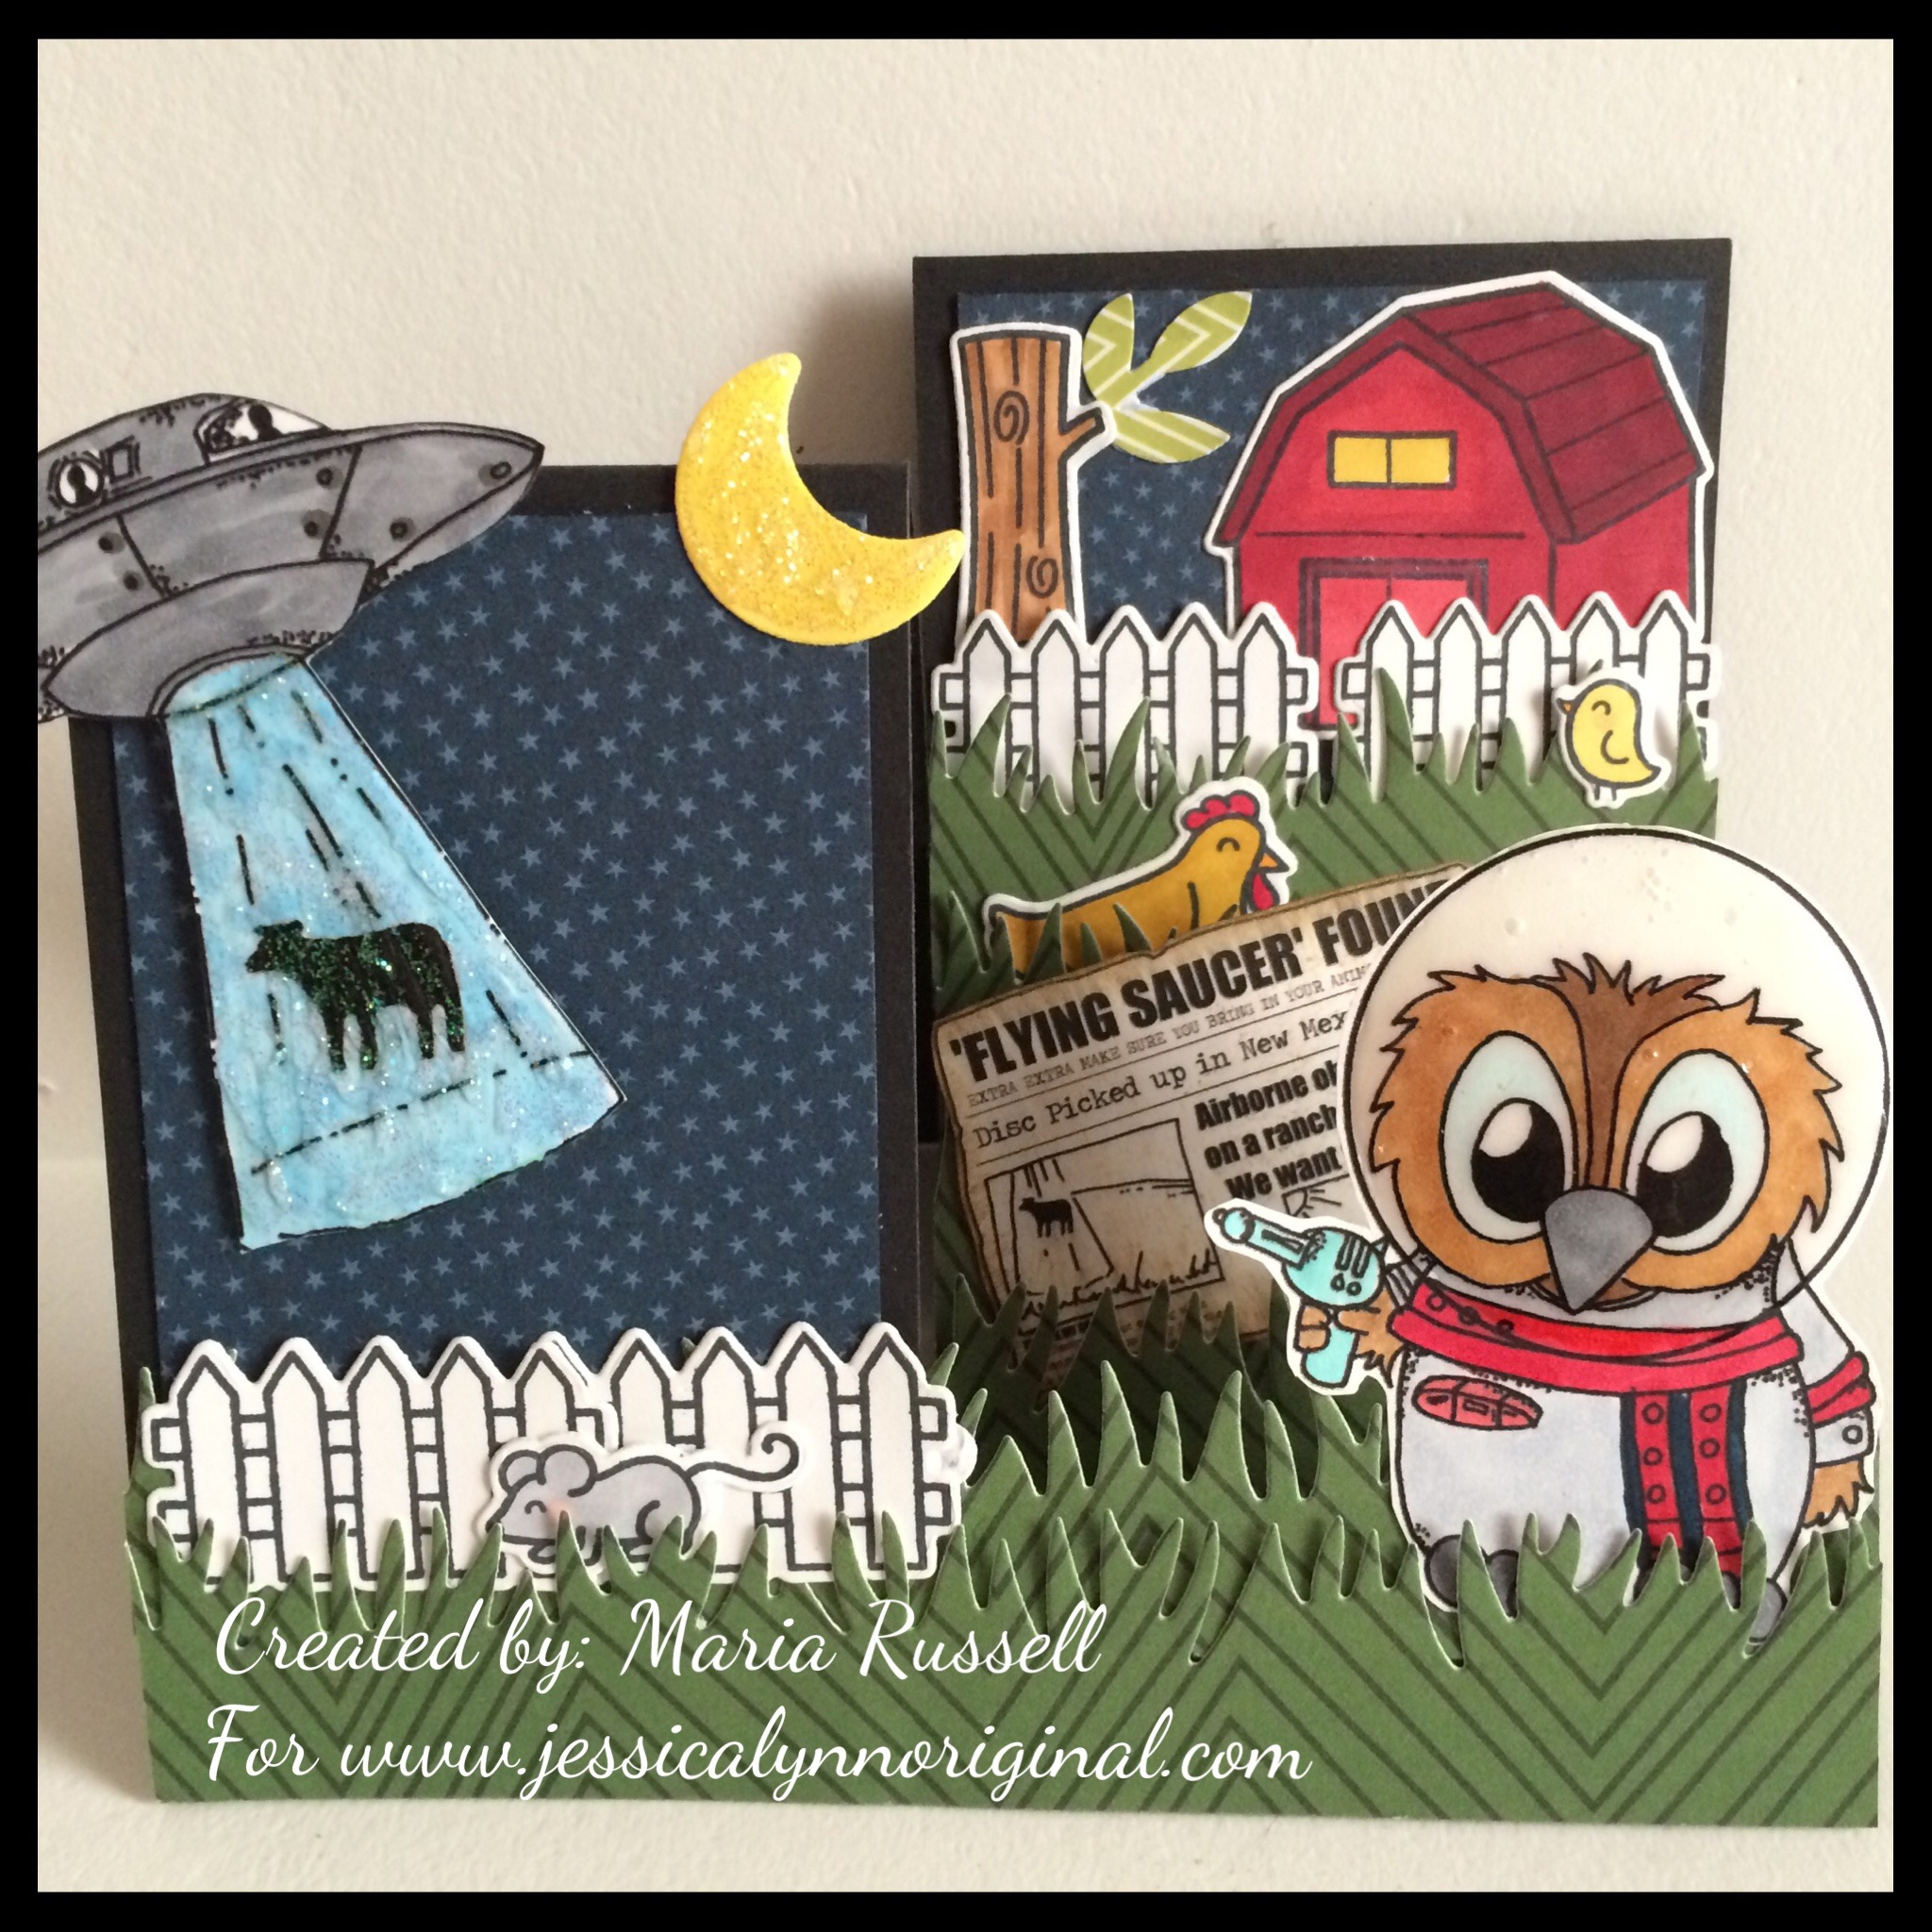
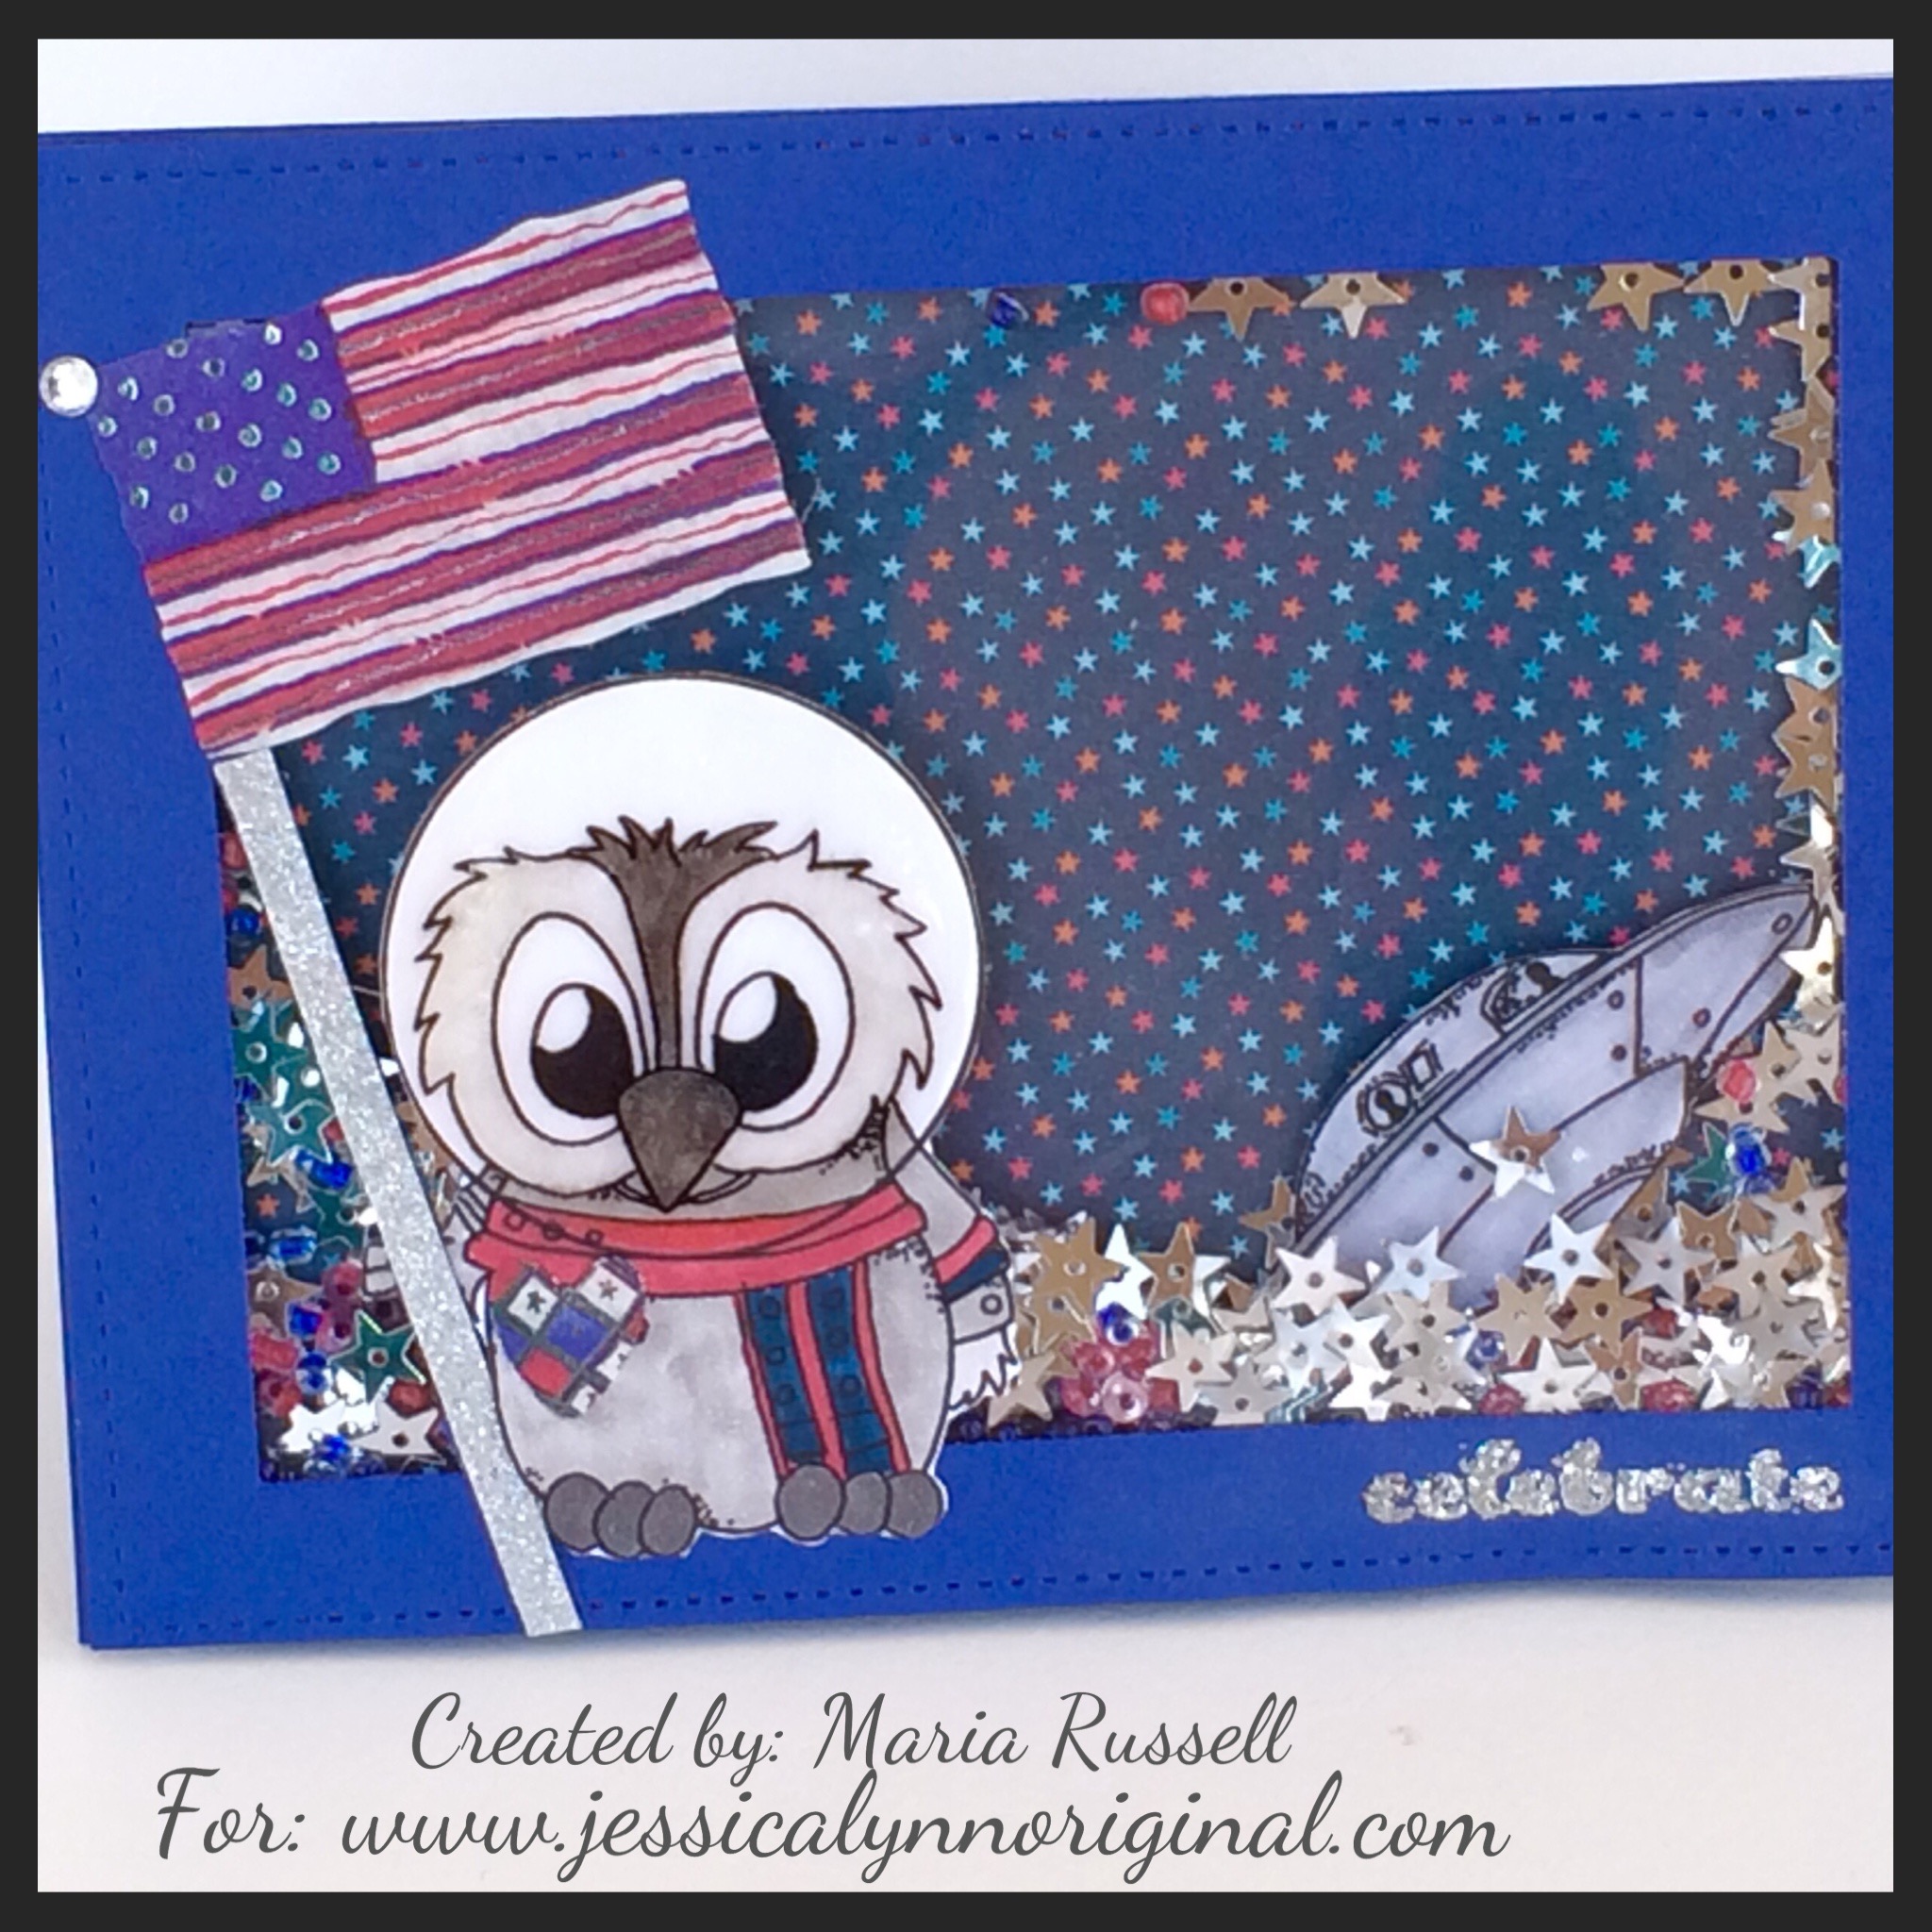
Today I am featuring two cards that I created using the new Stamp Set by http://www.jessicalynnoriginal.com called the “UFO Brentwood Owl”. I am super excited to share these cards with you today because I absolutely love the images that Jessica created for this set. If you would like to win this stamp set, please head on over and leave a comment on Jessica’s Blog post (http://jessicalynnoriginalstamps.blogspot.com). Jessica will choose a random winner and she will announce it on her Blog, so please stay tuned for that.
To start, this stamp set reminds me of my love for the 90’s TV show, “Roswell”. My children and I were addicted to Roswell, and Buffy The Vampire Slayer – two famous TV shows at the time when my children were still young. Since we live overseas, I always pre-recorded the shows so that after homework and dinner, the kids and I will have some quality time together watching the show. We even listened to the Roswell soundtrack in my car while I drove them to school.
The first card below is a side-step card. I always love creating interactive cards, and I thought that Brentwood needed to have more space so that I can highlight each of the stamp images in their own way, without it getting “lost”. I think I was able to capture this sense by making a farm-scene at night with the moon shining in the background.
I first colored Brentwood and the UFO images with my Copics. Then I put glossy accents on Brentwood’s helmet to achieve the look of glass, and make it look more realistic. While waiting for the glossy accents to dry, I then stamped the other images using some of the stamps I already have in my stash and preceded to die-cut the pieces. Once I had everything laid out, it was really easy to put the card together. I added stickles to the moon and the UFO beam to make it stand out a little.
The second card below is very patriotic. With the 4th of July coming up, I think this is a perfect project to make in time for our Independence Day. My original idea was to create a scene where Brentwood was holding the USA flag landing on the moon, but one of our design team members already made a card using a similar design. I was in Germany and Lithuania for a week and only came back yesterday, so I was a bit late creating these cards. However, I still wanted to create a scene in space, so I decided to create a shaker card. Brentwood is holding the USA flag, but with the UFO, stars confetti, blue and red seed beads as the shaker material. I also added glossy accents to Brentwood’s helmet but unfortunately it didn’t show through the photo. I had so much fun creating this card. What do you guys think? I will post a tutorial on my YouTube channel for these two cards.
Hello and Welcome to the Start of the Summer Design Team Showcase Blog Hop created by the JessicaLynnOriginal June 2015 – January 2016 Design Team! I am pleased to announce that I am one of the designers for JessicaLynnOriginal.Com.
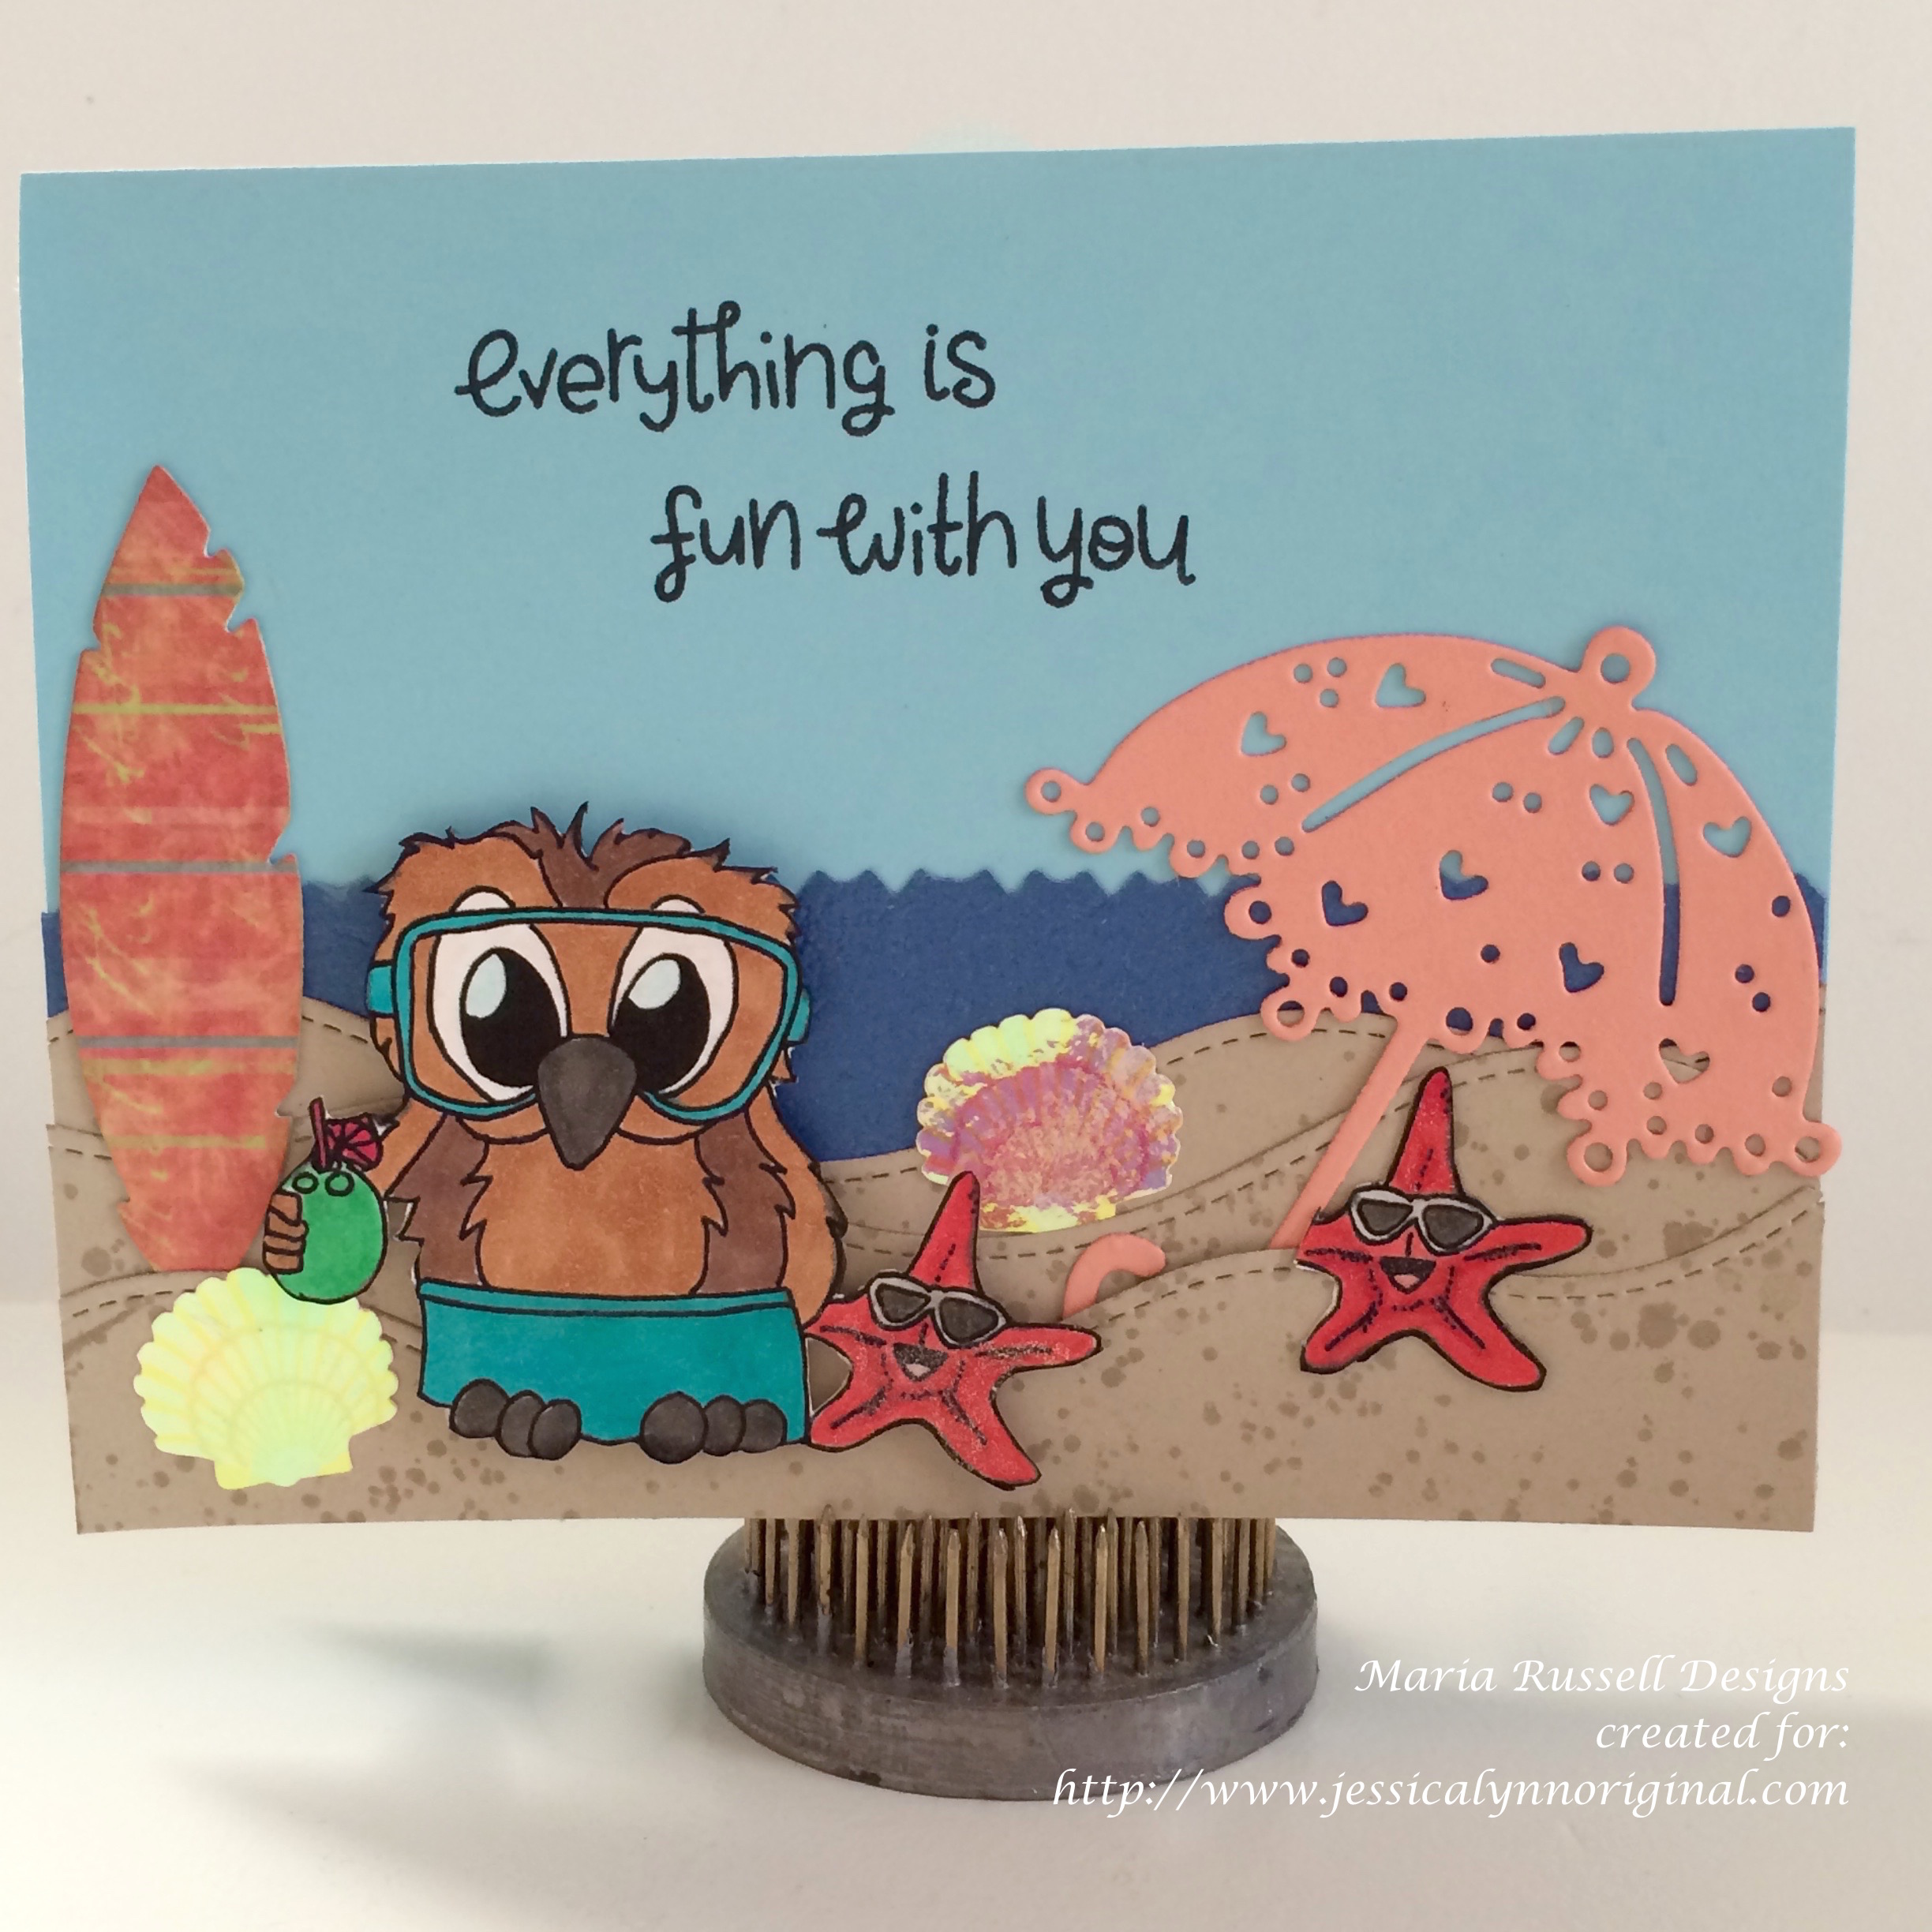
Today we are featuring projects using the Brentwood at the Beach Digi Stamp that really showcase and introduce our talented design team members! This fun stamp captures that summer vacation and can be used in many ways. This card kind of reminds me of my son when we were on a holiday in The Maldives. He loves surfing and scuba diving but most importantly, he loves to just hang out by the shore, collect shells and play with hermit crabs. Put your feet up and grab a cool drink to sip as you travel along the hop, getting inspired by the different takes from each of our designers. If you are coming from Jessica’s blog, then you’re in the right place.
Here is the card:
If you’d like to see a video on how I created this card please watch it here:
Brentwood at the Beach Digital Stamp
Card base – Light Blue Card Stock (8 1/2 by 5 1/2, scored at 4 1/4)
Dark Blue Card Stock – 4 1/4 by 5 1/2 to create the water background
Tan Colored Card Stock – Used to die-cut and create the “Sand”
Designer Series Paper – Used to cut the Surf Board
Orange Card Stock – used to die-cut the umbrella
Dies – Umbrella Die, Stitched hillside border die, feather framelits
Copic Markers Used for the Owl ~ E25 and E35 blended with Dark Chocolate Brown Alcohol Marker (main body). I also used R000 and B00 for the eyes.
The shorts were colored using Coastal Cabana Alcohol Markers.
Copic Markers Used for the Starfish – R24 and R29
Copic Marker Used for the Coconut – G05
Hologram Shell Stickers
Win a prize! Please let me know what you think in the comments below. Comment on each of the blogs in the hop and you will be eligible to win a $25 gift certificate towards anything at JessicaLynnOriginal.com! After the hop, Jessica will randomly select a winner and announce the lucky person on her blog on Sunday, May 24th. Here is the link to Jessica’s Blog ~ http://jessicalynnoriginalstamps.blogspot.com.
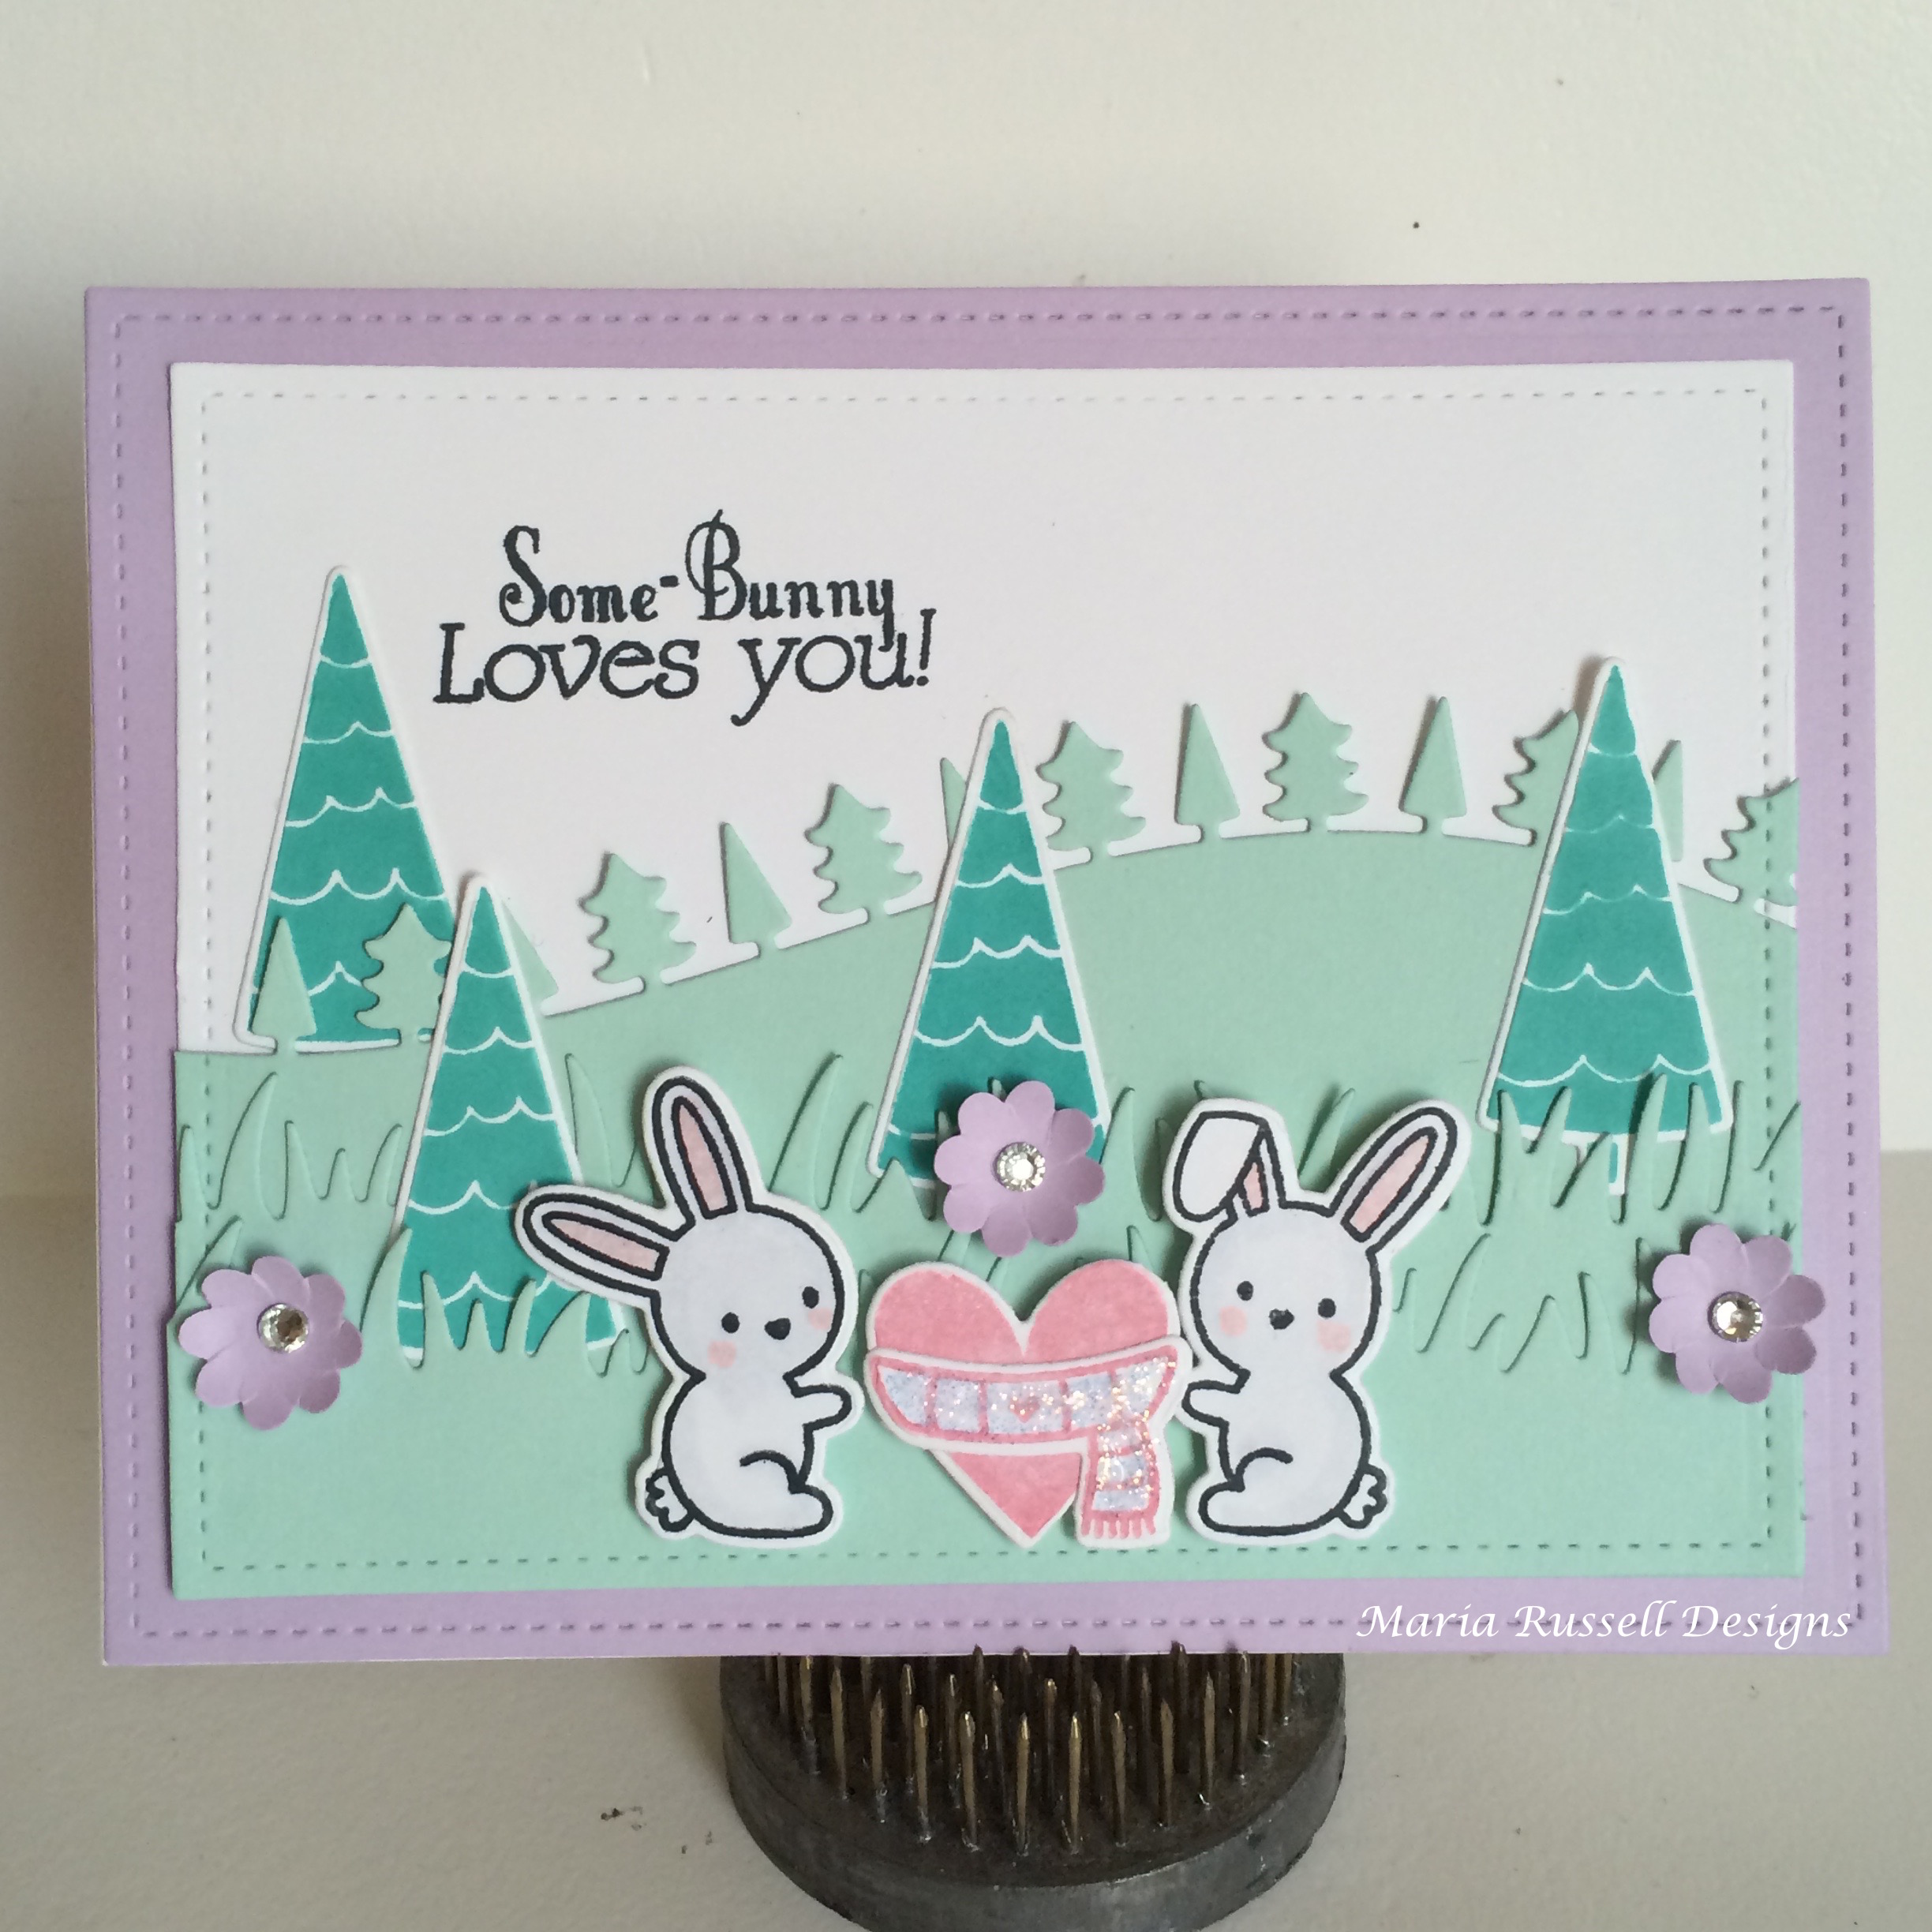
My creativity mojo is visiting today so I decided to take advantage and create this card using my cute stamp set from Lawn Fawn called Snow Day. This stamp set is so versatile and is just not meant for winter or Valentine-themed card. You can also use this for your spring-themed cards, or create a “Just-Because” card like this one.
The idea to make this card actually came to me while my daughter and I were having our little heart-to-heart talks. She is currently visiting for two weeks during her school break. I am really enjoying our time together. During one of our talks, I realized that the shy, little girl I once drove to school every day, has now turned into this beautiful, intelligent, amazing woman. It’s actually making me a bit emotional just writing this Blog, LOL! Wait, where was I going with this? Oh, right! During one of our “talks”, she mentioned to me that her boyfriend calls her “Bunny”. I don’t know about you but I think sometimes we, as crafters, get our crafting ideas out of the blue. I even have them while I’m in bed trying to get some sleep (note to self: put a little notebook by the bed stand). I thought about the stamp set that I recently purchased from Lawn Fawn and started crafting today.
My daughter’s favorite color is purple. I wanted this ‘just because” card to look really subtle but sweet at the same time. I think I’ve achieved this by combining the pinks and the lilac with a soft mint-green and a darker aquamarine ink to create the trees in the background. What do you guys think?
I hope I somehow inspired you to get your creative juices flowing and start crafting. Here’s to a great weekend!
I have created this card for Mother’s Day. Unfortunately, I was not able to post it here on my Blog because my hubby and I traveled back home to Orlando to see our family, and move our daughter out of her dorm. It has been a busy month of May so far for me. I apologize for neglecting this Blog but I promise to post more regularly from now on.
This card is perfect not only for Mother’s Day but for any occasion. I hope that you will give it a try. I would love to hear from you if you did.
This is a very easy tutorial to follow to create 2 box cards out of one 8 ½ x 11 card stock:
Materials Used:
One cardstock (8 ½ x 11) cut in half measuring 5 ½ x 8 1/2
2 pieces – Designer Series paper – cut at 1 ¾ X 5 ¼
6 pieces – Designer Series paper – cut at 1 ¾ X 2 ½
3 pieces – card stock cut at 3 X 1 ¼ (these pieces will go in the middle of your box card to hold the embellishments
Optional ~ 3 pieces of card stock cut at 2 inches wide using a decorative die or deco punch
Acetate sheets
Stickers and other ephemeras to decorate your box card
Double-sided tape or Tombow Glue
Mini Glue Dots
Are your kids worried about Santa not being able to enter the house to bring presents because you don’t have a Chimney? Lol! Then you can solve this problem by making this project.
The Poem:
Dear Santa,
We don’t have a chimney
And I was worried as could be
About how you’d bring the
Presents to my family & me…
But now I’ve solved the problem
And I’m not sad anymore
For hanging from this ribbon
Is the key to our front door!
Materials You’ll Need:
Card Stock ( 11 by 4 ½ inches)
Designer Series Paper (cut at 8 X 4 inches)
Designer Series Paper (cut at 4 x 2 ½ inches)
Envelope Punch Board
1 3/8 Circle Punch
Key (I found mine at Michael’s)
Other Embellishment to decorate your tag
Scissors
Adhesive
Trim or Ribbon
Do some crafting with your kids and create great memories!