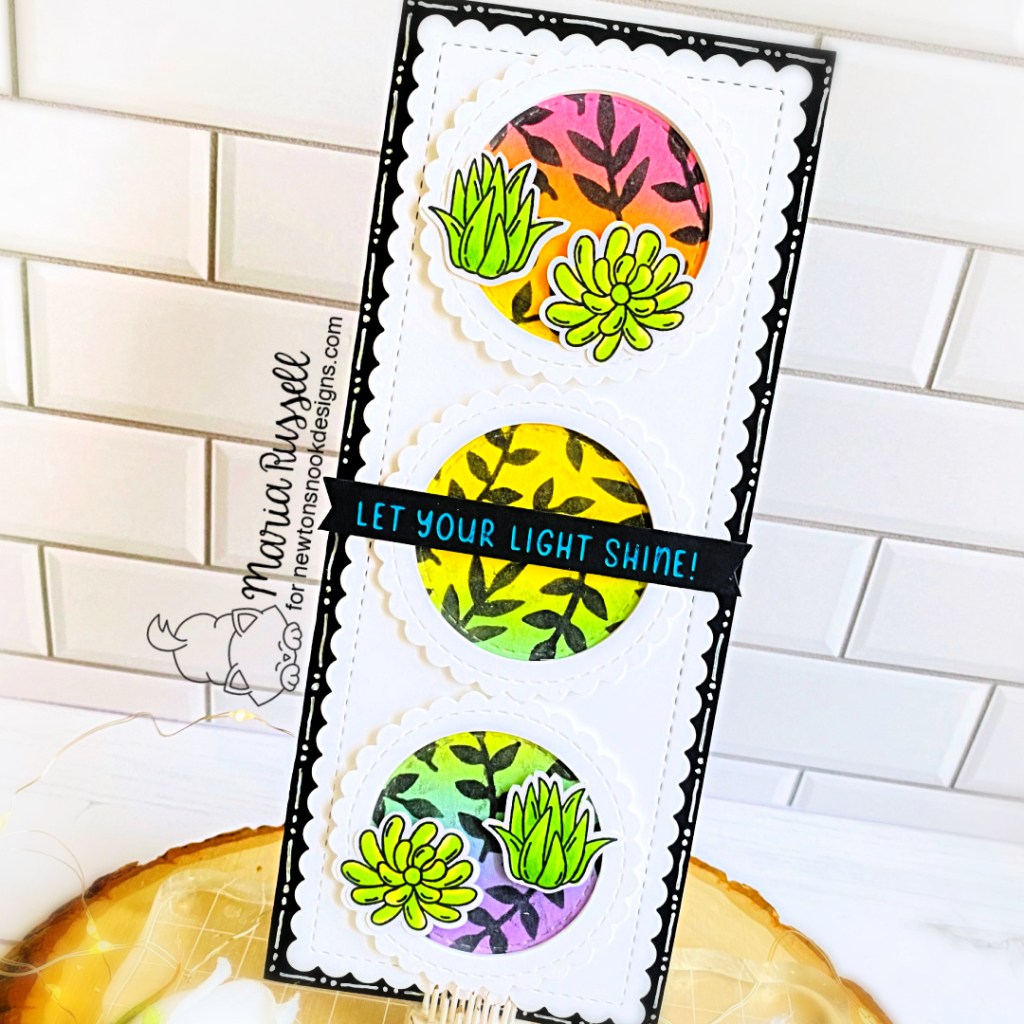
Have a Mice Birthday Card with Newton’s Nook

I have a very simple (watercolor background) birthday card today, featuring the Birthday Mice stamp set + coordinating dies along with the Frames & Flags Die Set and Circle Frames Die by Newton’s Nook Designs.

Lately, I have been inspired to create simple cards and this one below did not disappoint!

Here’s how I made this card:

  • create the background by simply using some flat watercolor brush and spread some water on some watercolor paper.
  • start adding the colors doing a swiping motion back and forth. In case you’re wondering, I used Prima Pastel Dreams Watercolor.
  • add some texture to the background by diluting some Aged Mahogany Distress Ink with water and add the splatters.
  • leave the background panel to dry or use your heat gun if you can’t wait.
  • die-cut the watercolor panel using the scallop die from the Frames & Flags Die Set and adhere on a top-folding white card base.
  • adhere the focal image on the card.
  • stamp the sentiment on the black circle die-cut with versamark ink and heat-embossed with the Heating Tool/Gun.
  • finish the card design by using some white gel pen to add some dots for added texture and interest.

I hope you like this card today and got inspired. Below, you will find links to the supplies used to create this project. Where available, I use compensated affiliate links at no extra cost to you. Your support helps me to keep bringing you new projects and inspiration. Thank you for stopping by, and have an amazing day!

———-SUPPLIES———-

Sweet Treats Blog Hop + Giveaway with Newton’s Nook

nndsweettreatsbloghopsq

The Newton’s Nook Design Team is hopping along today to share some sweet treats – just in time for Valentines dayMake sure to scroll down at the bottom of this post to see the whole list, and hop along and comment for a chance to win!

As an extra treat to you, we are celebrating with a SALE!  Use code TREAT to receive 15% off your order this weekend!  Now through Monday, February 6th at www.newtonsnookdesigns.com.

For my project today, I am showcasing the Smitten Kittens stamp set and coordinating dies, along with the Tree Line Stencil, Clouds stencil, Hills & Grass Stencil, Newton’s Sweetheart stamp set, Land Borders Die Set, Fence Die, Frames & Flags Die Set and Sky Scene Builder Die Set. [Can you tell I had a lot of fun mixing and matching these products to create the beautiful scene?!]

I purchased a few of my husband’s favorite chocolates and they all fit in this white paper sack that I decorated to create a unique Valentine’s treat bag!

Here’s how I made this project:

  • die-cut the sun and clouds using the Sky Scene Builder Die Set. Adhere them on the paper sack with liquid and foam adhesive for added dimension.
  • foam-mount the focal images, making sure they are nicely-centered onto the scene.
  • die-cut the sentiment strip using the Frames & Flags Die Set. Stamp the sentiment from the Newton’s Sweetheart stamp set on the sentiment strip and adhere to the project.
  • finish the design by adhering a heart sticker on the sun.

Enter to Win! Sweet Treats Blog Hop Prizes!


We will be choosing two lucky winners to win a $25 store credit for Newton’s Nook Designs online shop! To enter, just leave comments on the Design Team Member and Guest blogs (see list below)! Two winners will be chosen at random from the collective blogs in the blog hop. Make sure to check out each of their blogs and comment for your chance to win. You will not know which blog has been chosen so the more you comment on the better your chances are of winning! You have until Sunday, February 5th at 9 pm EST to comment — winners will be announced on the NND blog on Monday, February 6th.

Check out all the awesome Design Team Blogs below to enter:

Newton’s Nook Designs

Donna Idlet

Ellen Haxelmans

Tina Herbeck

Larissa Heskett

Samantha Mann

Zsofia Molnar

Maria Russell (you’re here)

Farhana Sarker

Tatiana Trafimovich

Amanda Wilcox

————SUPPLIES———-