Hey Ewe! With CC Designs

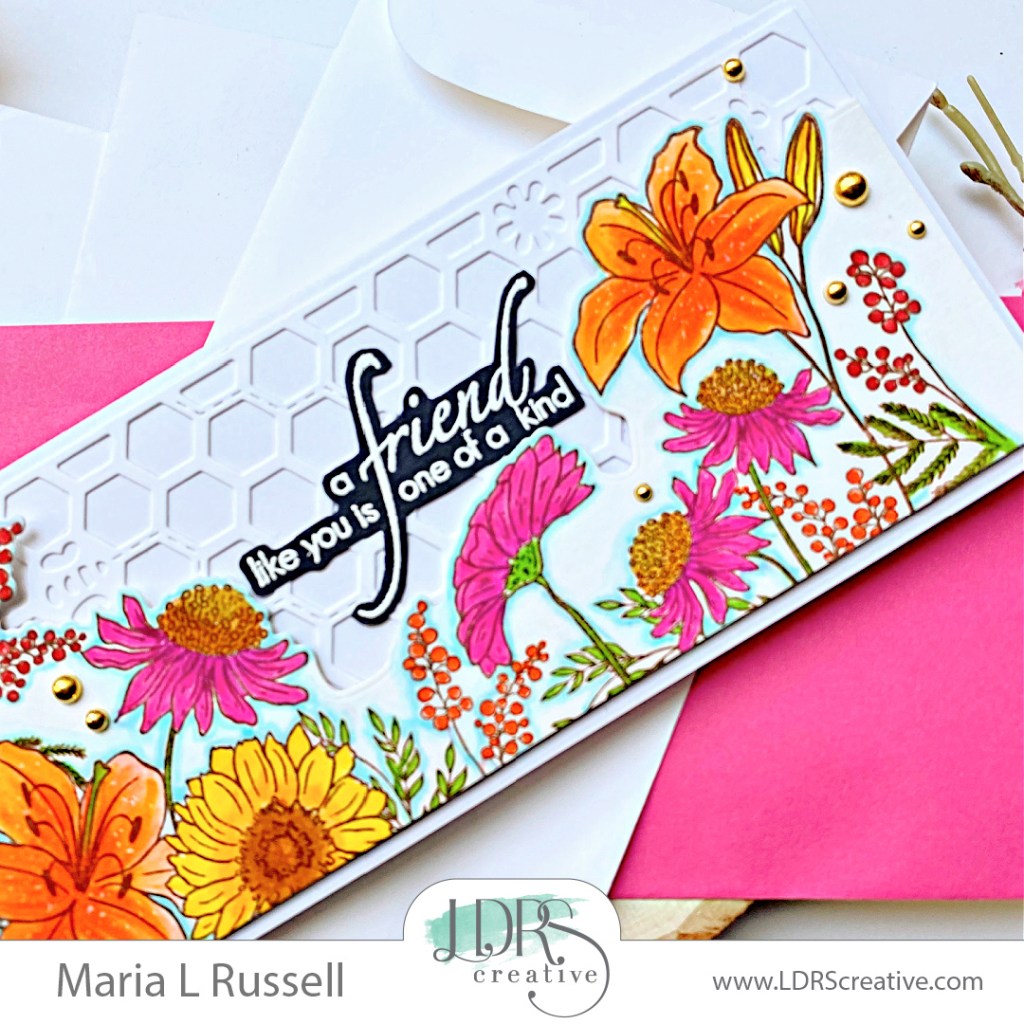
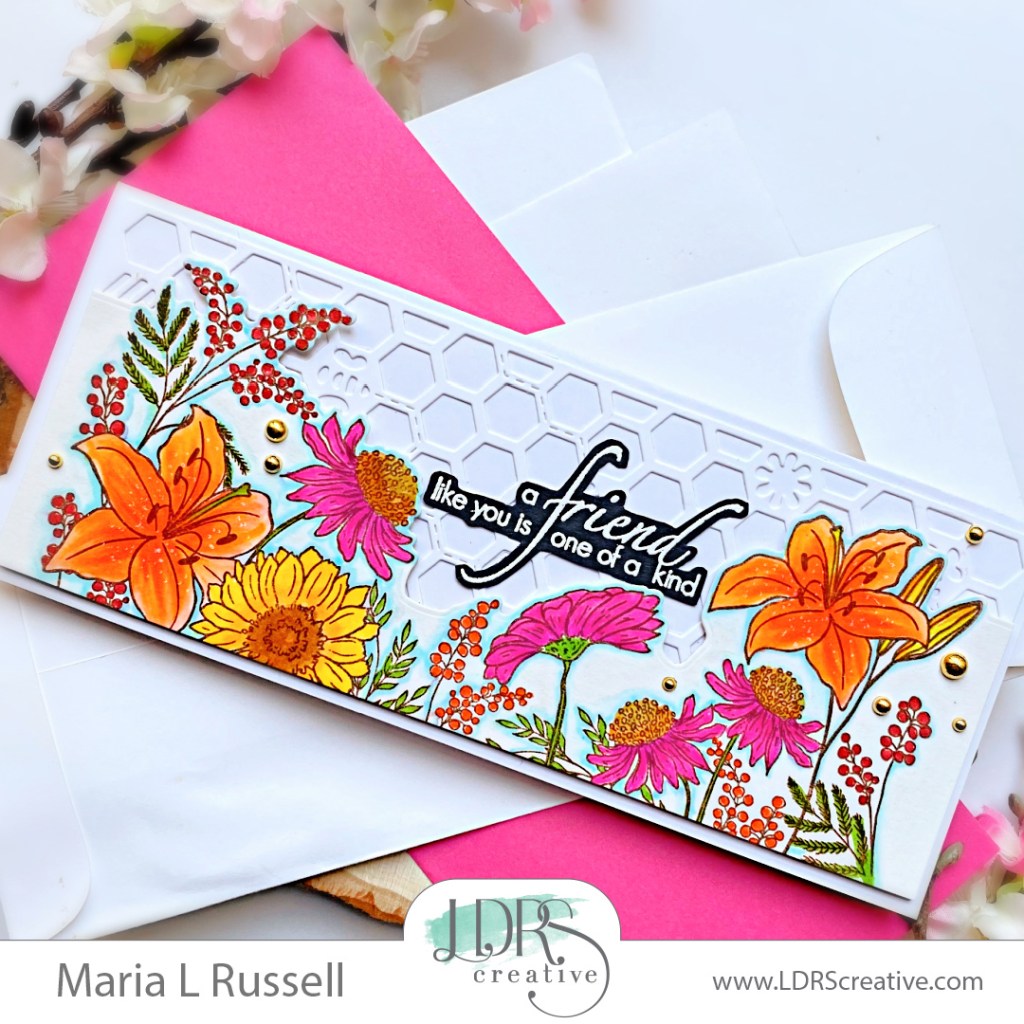
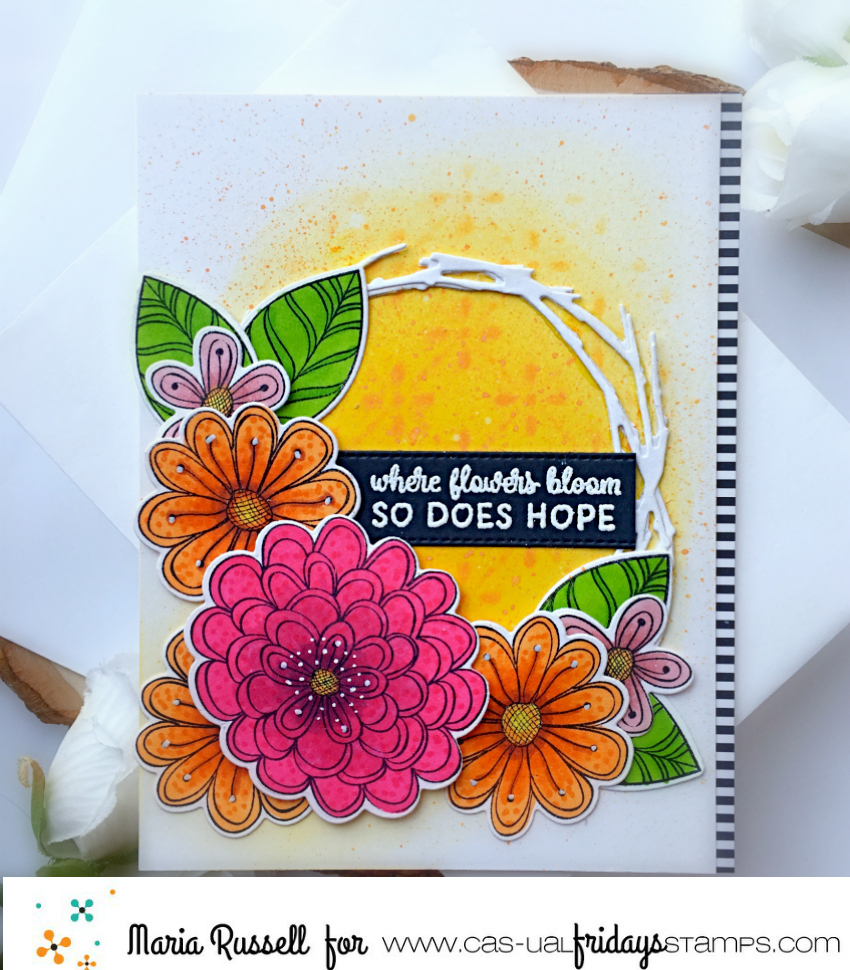
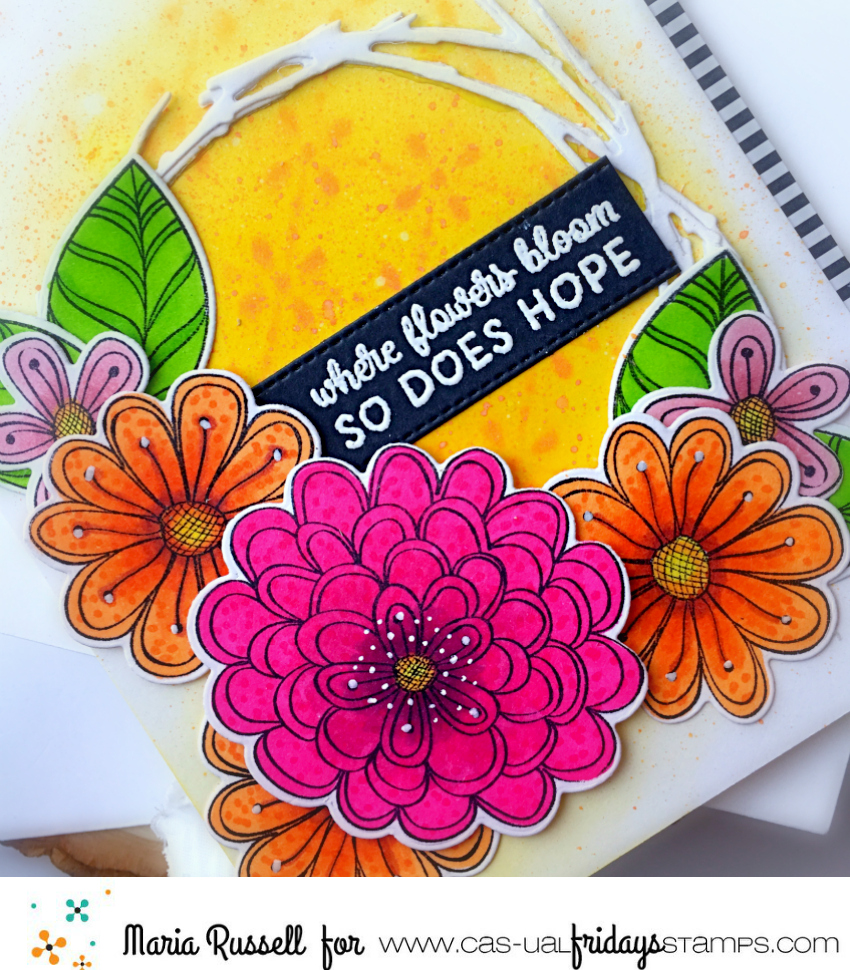
Good morning CC Designs fans!  I am back today sharing this cute, “just-because” circular card showcasing the Sheep Stamp Set and Sheep Outline Dies, along with the Circle Metal Die and Winter Border Metal Die.

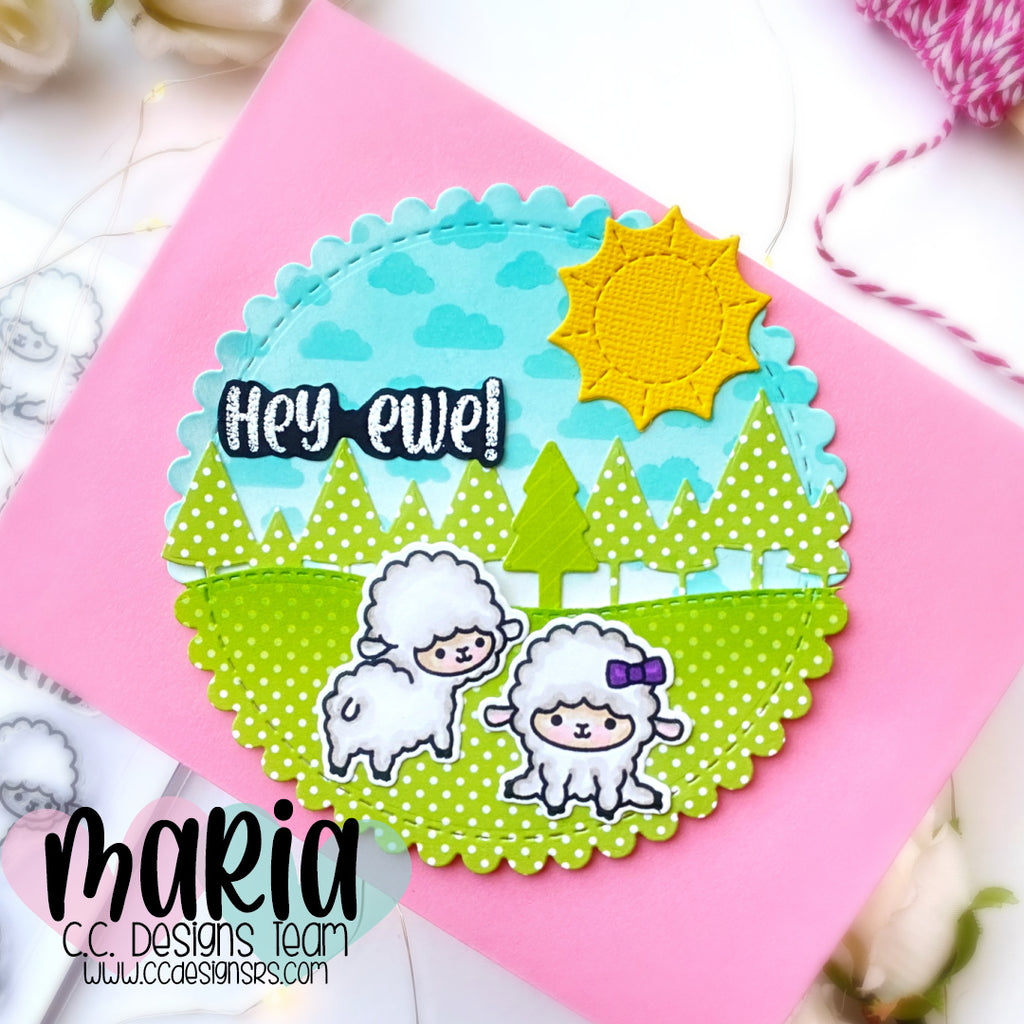
I started by stamping the images on some Neenah solar white card stock and colored the images in with alcohol markers.  I used the Sheeps Outline Die to cut them all out.

The background was made by using the scallop die from the Circle Metal Die Set to die-cut some Strathmore Bristol Smooth white card stock that was ink-blended with distress oxide ink and some clouds stencil.  I used the same scallop die to die-cut some patterned paper and also used the Winter Border Metal Die Set to die-cut the grass hill and the trees.

Now that I have all of the components for my card, I am ready to assemble the circular card.  The background was adhered onto a circular card using tape runner.  I foam-mounted the grassy hill for added dimension and adhered the trees with liquid glue.  I also adhered the colored images and the sun to finish my scene.

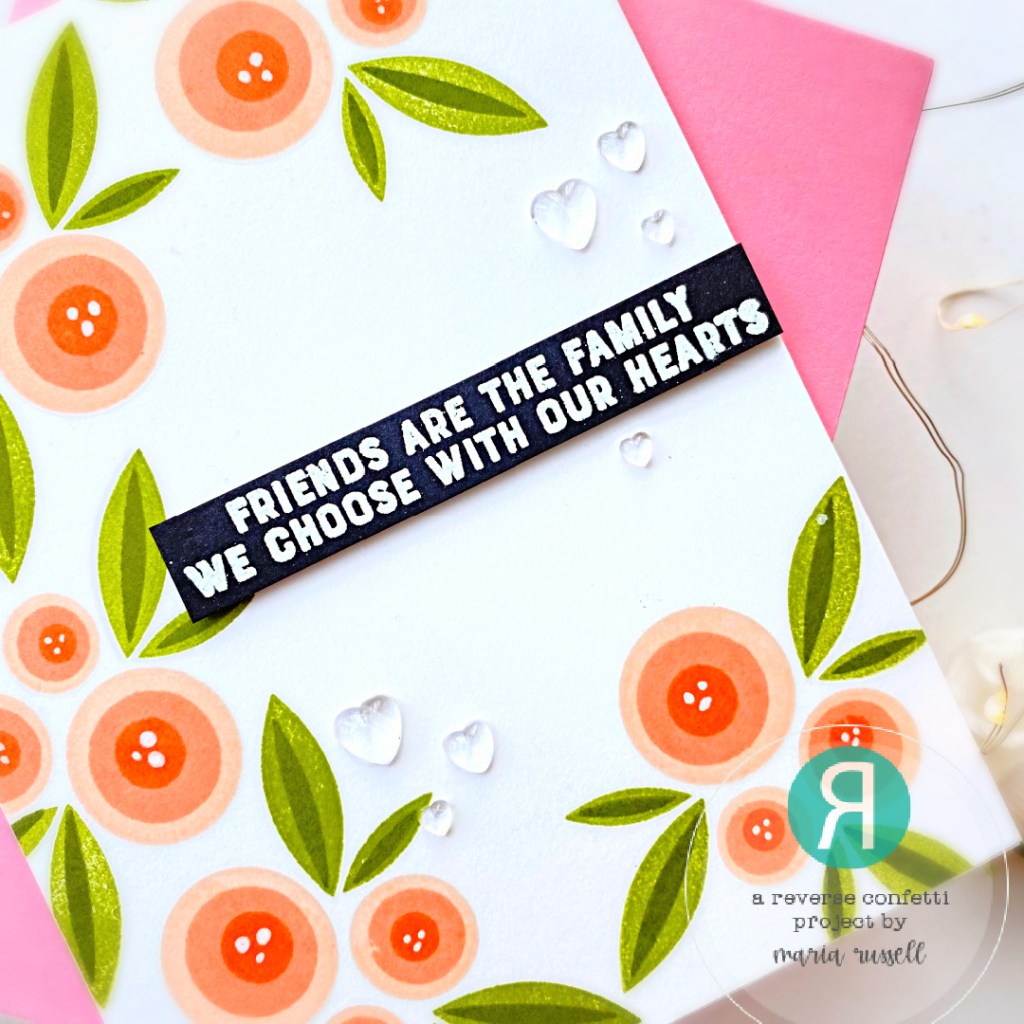
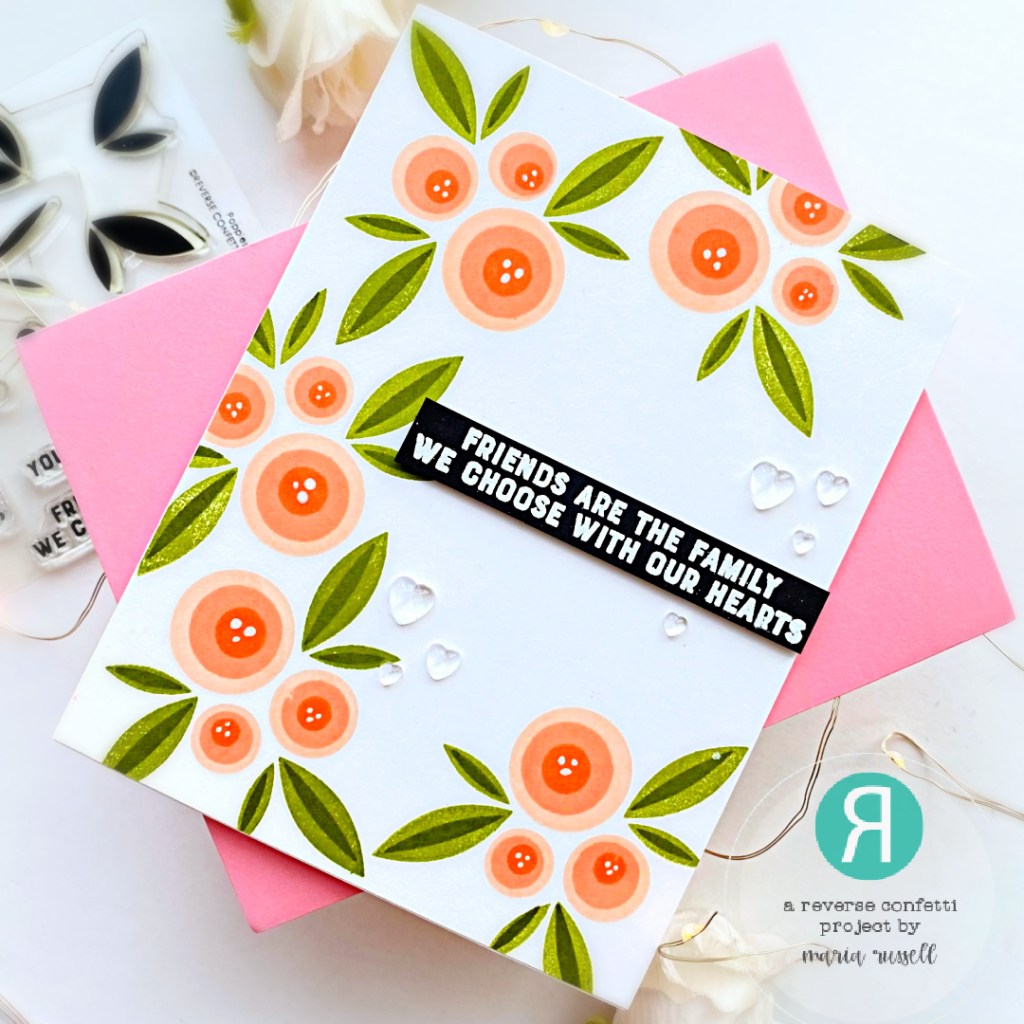
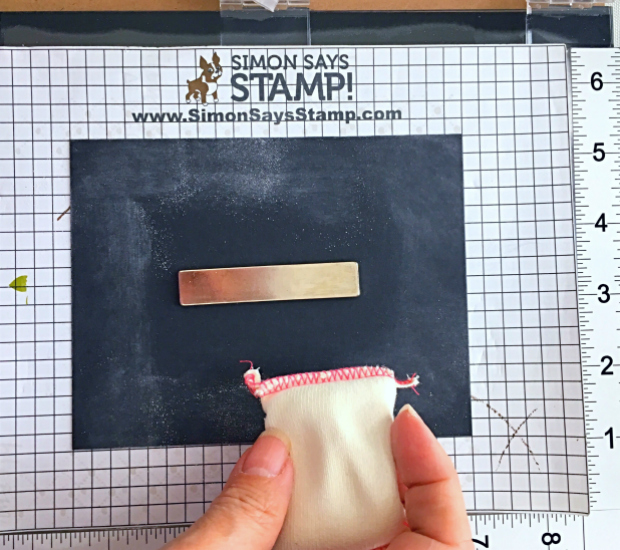
To finish the card design, I stamped the sentiment on some black card stock with Versamark ink.  I sprinkled some white embossing powder and heat-set with my heating tool.  I fussy-cut the sentiment and adhered it onto the card panel with liquid glue.  Here’s another look at the card:

I hope you like this card today.  The supplies I used are listed and linked below.  Thanks for stopping by!

————SUPPLIES———–

Friendship Card with Reverse Confetti

Hello everyone! Happy Friday! I am pleased to tell you all that a few of the stamps & dies that were sold out from the January release are now back in stock at the Reverse Confetti Shop!

My card today features the Poppies stamp set. This time, I stamped it the way it should be without all of the glitter in between.

Here’s an easy, peasy design for you that you can mass-produce! I stamped the outline image first with some Ink-On-3 Fadeout ink. I didn’t want the outline to show but I still needed it so that I can position the flowers and leaves perfectly. I used 3 color variations of peach dye inks to stamp the flowers first, then moved on to stamping the leaves with two shades of green.

I stamped the sentiment on some black card stock with Versamark ink and sprinkled some white embossing powder then heat-set with my heating tool. I foam-mounted the sentiment onto the card for added dimension.

I used some white gel pen and added dots to the centers of each flower for more texture and adhered some Clear Heart Droplets to finish the design. Here’s another look:

I hope you like my card today and got inspired. Thanks for stopping by and have a great weekend!

We Otter Be Friends with CC Designs

I have been making a lot of holiday-themed cards lately and I wanted to take a break from that. Luckily, I have this Otters Stamp Set and coordinating dies by CC Designs that I can play with. I always like having just-because cards in my stash to send to family and friends.

Here’s how I made it:

  • Cover an A2-size watercolor panel with Pink, Yellow and orange watercolors. Let this dry for about half an hour.
  • Temporarily adhere the stencil to the background panel with Pixie Spray. Use the stencil and palette knife to spread texture paste for added interest. Let this dry for half an hour and adhere on an A2-size notecard.
  • Stamp the images on some Neenah solar white card stock and color the images in with alcohol markers.
  • Die-cut the images using the coordinating dies.
  • Adhere the focal images on the card.
  • Stamp the sentiment on some black card stock with Versamark ink and speinkle some white embossing powder. Use heating tool to heat-set the sentiment.
  • Adhere the sentiment on the card with liquid glue.
  • Finish the design by adding some stars.

This is honestly one of the quickest cards I’ve ever made! I hope I have given you some inspiration today. The supplies I used are listed and linked below. Thanks for stopping by!

———-SUPPLIES——–

A Friend Like You is One of a Kind

Hello LDRS fans!  Maria here with you on the blog today sharing this slimline card, showcasing the Garden’s Edge Slimline stamp set, along with the Garden’s Edge Coordinating die and the Honeycomb Cover Plate slimline die

I love sending some “just-because” cards to my friends and this beautiful floral stamp set is exactly what I needed.  I started by stamping the images on some Bristol smooth white card stock using Coffee Bean Hybrid ink.   What I love about the LDRS hybrid inks is the fact that you can use either alcohol or water-based markers and it will not smudge.  I colored the images in with some water-based markers.  I die-cut the colored image with the coordinating die. 

The Honeycomb Cover Plate slimline die was used to die-cut some Neenah solar white card stock and adhered with liquid glue on a slimline card base.  The focal image was popped up with foam adhesive for added dimension.  I stamped the sentiment on some black card stock using Watermark ink.  I sprinkled some white embossing powder to this and heat-set with my heating tool.  I fussy-cut the sentiment with my precision snips and adhered the same with liquid glue on the card. 

I finished my card design by adding some gold baubles for added interest.  Here’s another look: 

I hope I have given you some inspiration to create something beautiful today from the latest release.  The supplies I used are listed and linked below.  Thanks for stopping by! 

————SUPPLIES———–

I Am Never Not Thinking of You with LDRS Creative

Hello again LDRS Creative fans!  I’ve been creating a lot of “just-because” cards for my family and friends lately so I thought I’d share one of the cards with you today.

For my project today, I am showcasing the A View for All Seasons stamp set, along with the A View for Al Seasons DiesAnytime Stack stamp setSentiment Stack coordinating dies, the grass using the In the Grass border die set and the Coffee Bean Hybrid ink.

I started by stamping the images on some Neenah solar white card stock using the Coffee Bean hybrid ink.  I love using the hybrid inks because you can color your images using any coloring medium and it wouldn’t bleed.  I colored my images in with my alcohol markers and used the A View for All Seasons coordinating dies to die-cut the images.

To create my scene, I needed to die-cut some grass hills.  I used the In the Grass border die set to die-cut two of them using the Daisy Delights paper pad.  I also used the Prickly Pear Perfection hybrid ink and some blending brush to add more depth and dimension to the front grass.  I adhered both pieces onto the card with some liquid glue and added the potted plants as well.

To add a little depth to the window, I used the Bali Blue hybrid ink and a blending brush.  I foam-mounted my focal image to the card and added the cat also with foam adhesive.  At this point, I realized I needed more “ivy” to add to my scene so I stamped a few more and colored them in.  I used the die to die-cut them out and adhered to the card with some liquid glue.

The sentiment from the Anytime Stack stamp set was stamped with the Watermark ink.  I sprinkled some white embossing powder and heat-set using my heating tool.  I die-cut the sentiment using the Sentiment Stack die set.  This combo is starting to be my go-to in card-making.  I love the convenience of stamping a bunch of sentiments and die-cutting all of them in one go!  I put the rest of the sentiment strips into the pouch so that I can use them for future projects.

To finish my design, I added the little “brick” image using the small stamp included in the set with some Alloy hybrid ink.  In order to get a subtle gray color, I stamped it onto a piece of scratch paper twice before stamping onto my card.  Here’s another look:

Isn’t this the cutest scene ever?  I love, love, love this stamp set!  I cannot wait to use this stamp set again to create a fall or Halloween card! 

I hope I have given you some inspiration today to create something beautiful.  The supplies I use are listed and linked below.  For a limited time, LDRS will also include the stamp set that you see below until supplies last.  Take advantage and order your favorites now to get this freebie!  Thanks for stopping by and happy stamping!

 
————SUPPLIES————

Mice Cards with Trinity Stamps

Hello my crafty friends!  I’m back today for Trinity Stamps sharing two cute cards, showcasing the 4×6 Mouse House stamp set and Mouse House coordinating dies, with the Slimline Card Series: Scenic Border die set, and the Blending Buddy brush.


To begin, I stamped the images on some Neenah solar white card stock and colored them in with my alcohol markers.  I used the coordinating dies to die-cut the images.


To make my first card, I ink-blended some Bristol smooth white card stock with some distress oxide ink and used the Blending Buddy brushes to blend the colors.  I used some circle dies from my stash to die-cut some holes on this card stock.  I foam-mounted the piece on an A2 size card base, cutting the excess.  I adhered the mice with some liquid adhesive.


I finished my design by stamping the sentiment on some black card stock and heat-setting with white embossing powder, and adding some red hearts.  Here’s a closer look:


For my second card, I also ink-blended my background and used a stencil from my stash to add the sun-rays.  I die-cut two grass panels using the Slimline Scenic Borders die set.  I also die-cut the rest of the elements that I needed to create my scene.


The sentiment was stamped with Versamark ink and heat-set with my heating tool. I used my black gel pen to add more dimension to the mice.  I also added the clouds to finish my design.  Here’s a closer look:


I hope you like my cards today and got inspired.  Thanks for joining me, and happy stamping!


———SUPPLIES———-

Crafting of Hue Sponsorship with Cas-ual Fridays – Celebrate Life

Hello everyone!  I’m super excited to share today’s post!  Cas-ual Fridays Ink Squad is celebrating with  a 20% off the entire collection (using coupon code: HUE20) at the shop and we are this week’s sponsor for Crafting of Hue.


This weekend’s theme is all about “CELEBRATION” and my project today is about “Celebrating Life“.   I have a friend who is going through so much pain lately and this card is for her.  I want her to know that “life is beautiful” and even though it seems that her world is surrounded by darkness, there’s always light at the end of the tunnel.


For my card today, I am showcasing the Tin Roof stencilPretty Posies stamp set, Posies Fri-Dies and the sentiment is from the Flower Angel stamp set.


To make my card, I started by stamping my images on Neenah solar white card stock and colored the images in with my Spectrum Noir alcohol markers.  I use the Posies fri-dies to die-cut the images.


I cut an A2 size piece of Bristol smooth white card stock and inked up this panel with Mustard Seed and Spiced Marmalade distress oxide ink.  I used the Tin Roof stencil and Spiced Marmalade ink to create more texture for my background.  I smooshed the ink pad onto an acrylic block and added some water, then used my watercolor brush to add droplets to this panel.  I then wiped it with my paper towel and set it aside to dry.


I die-cut the white wreath using a die from my stash and adhered this piece on my colored background.  I added the flowers with foam and liquid adhesive and put this piece back on to my paper trimmer and trimmed about an eighth of an inch.   I added this panel to an A2 size card base.


To ground the bold images and balance it out, I added a strip of black and white patterned paper.


I stamped the sentiment on a strip of black card stock and sprinkled some white embossing powder then heat-set with my heating tool.  I adhered this piece in the middle using my tape runner.  Here’s my card:


To finish my design, I used my white gel pen and drew some white dots on the images for added texture and dimension.  Here’s a closer look:


I hope you like my card today.  The supplies I used are listed and linked below.  Thanks for stopping by and have a great weekend!


———-S U P P L I E S———


Stretch Your Stamp Sets & Create a Holiday Card with the Hedgehog Hollow

Hello, The Hedgehog Hollow fans!  I am back today with my second project as a guest-designer this month.  I wanted to show you guys that you can stretch your stamp sets for any occasion, even if they are not meant for the holidays.   I have always wanted to to try my pearl watercolors on black card stock so this is what I am doing today.  I really LOVE how this card turned out!

For my project today, I am showcasing the Feather Background and Peacock stamp set, that is part of the September HH box and some pearl watercolors.  Here’s how I made my card:

1. I prepped my black card stock by using my powder bag.  This will help get rid of static and make sure that the embossing powder wouldn’t be all over the card.

2. Using my MISTI, I put my black card stock inside and held it with the magnets.  I carefully positioned the stamps where I wanted them to be.  I closed the lid of my MISTI, then opened it back so I can use my Versamark ink to stamp the image.  I flipped the card stock and stamped the images on the other side.


3. I sprinkled clear embossing powder on the card.


4.  I used my Wagner heating tool to heat-set the embossing powder.


5.  I “carefully” colored the stamped images using my pearl watercolor in Bronze.  I made sure that I didn’t use a lot of water since this black card stock is not meant for water coloring.


6. Once it dries, apply a second coat to make the colors stand out.  Here’s what it looks like after the second coat dried.  Isn’t it beautiful?


7.  I used a micro-fiber cloth to get rid of the powder that was on the black card stock.


8.  I used my pearl watercolor again in “gold” to put some splatters of color on my background. I also die-cut the “Season’s Greetings” sentiment with some gold card stock and adhered it onto my card.  Here’s what it looks like:


To finish my design and add more texture, I used some bronze gems and adhered it onto the card.  Here’s a closer look:

I hope have given you some inspiration to stretch your stamps.  I’d love to see your projects using the September stamp sets; please tag me on instagram @rprmlr77.  Thank you for stopping by and happy stamping!

She Believed She Could So She Did with the Hedgehog Hollow

Hello everyone! It’s Maria Russell here with you and I am super excited to be guest-designing for the Hedgehog Hollow. For my project today, I am showcasing the Feather Background and Peacock stamp set, that is part of the September HH box.


To start, I stamped my image on Bristol smooth white card stock with versa mark ink. I sprinkled this with some gold embossing powder by Wow and heat-set with my heating tool.


I used my Spectrum Noir Glitter brush pens (colors Blue Topaz and Soft Jade) to color my image. Since this stamp set didn’t come with a coordinating die, I used my cutter-bee scissors to fussy-cut the image.


On another piece of Bristol smooth white card stock, I used my Newton’s Nook Clouds stencil and Peacock Feathers distress ink to create my clouds. I die-cut two branches from a die that I have in my stash so that the peacock has something to perch on. I adhered the first branch onto my colored background with liquid adhesive. To add more dimension, I foam-mounted the other brach onto my card and also added foam adhesive to the peacock.


I die-cut some leaves using an older Lawn Fawn die-set and adhered them with foam adhesive.


Since this card is mostly blues and greens, I decided to adhere some flower sprinkles onto my card for added texture and color. I also added the scallop frame from an older Lawn Fawn die set to ground my images.


To finish my design, I stamped my sentiment using my Spectrum Noir Quick Dry Dye ink in Lagoon and added some crystal jewels all over my background. Here’s my card:


I really love the simplicity of this card. I think the stamp sets that are included in the September box are so pretty, you can use it for any occasion. I can’t wait to create more cards using the stamp sets. Here’s a closer look at my card:


I also have a video tutorial for you below in case you’re interested.


Thank you so much for stopping by! I’d love to see your projects using the September stamp sets; please tag me on instagram @rprmlr77. I will be back in a few days for more projects and inspiration. Happy stamping!