MFT Stamps Monster Love

I am completely obsessed with MFT Stamps lately so when I was asked by Jamie of not2ShabbyShop to pick the stamps I wanted for my design team package for September, I naturally picked a cute stamp from MFT called “Monster Love”.  What’s not to love?  They are so easy to stamp and with a stamping tool, you can easily achieve perfect results each time.
I originally filmed a process video for the cards but with a vertigo attack recently, I accidentally deleted the footage!  I still shared them on my recent YouTube video though if you’d like to see it.
Here are the 3 cards that I designed showcasing the stamp set.  I also used my all-time favorite Tag Builder Blueprints No. 5.

I hope I have given you some inspiration today! Have an amazing day!

World’s Best Dad~A Father’s Day Card

Father’s Day is just around the corner. My daughter is staying with us for the summer and as she discuss her plans of making my husband his favorite coconut cream pie on Sunday, I decided that this is the perfect time for me to make him a Father’s Day card.


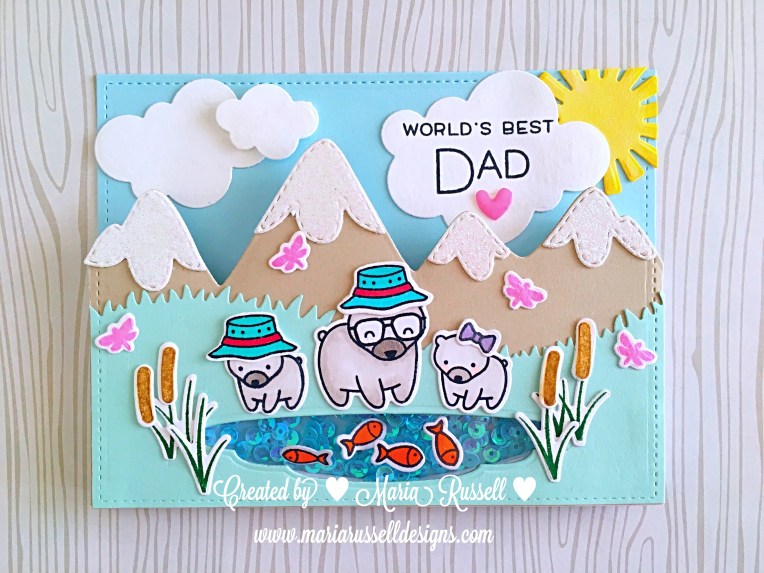
I recently went crazy with my Lawn Fawn Summer release order and I have been dying to use the Dad & Me stamp set. I wanted to create a scene with snow-capped mountains in the background. It reminds me of our summer trip in Washington in 2003. We stayed at Silver Lake Resort. The cabin was pretty basic but the view was just breathtaking. The card I made below represents my husband, my son and my daughter fishing in the lake.


My husband taught my children how to fish. He also taught me, but fishing is not my cup of tea! Just the whole process of putting bait on the hook creeps me out so I sit there and watch while they all fish. I was the sunscreen police! They can fish for hours! I can close my eyes right now and still see their cute little faces light up when their little fishing line starts to wiggle!


Here is the card. I decided to make a shaker card because I wanted the little fishes to move around below with the blue cotton candy sequins from http://www.katscrappiness.com/?aff=21.   I think shaker cards are so much fun!


Supplies Used:


Lawn Fawn Dad & Me stamp set and coordinating dies

Lawn Fawn Hello Sunshine Lawn Cuts

Lawn Fawn Puffy Clouds Lawn Cuts

Mama Elephant Snow-capped mountain die

MFT Stamps Grassy Hillside Border die-namics

Copic Markers W0, W1, W3, W5, V22, BG13, R29, YR17

Hero Arts Bubblegum Ink Pad

Lawn Fawn Noble Fir Ink Pad

Stampin Up Baked Brown Ink Pad

Sequins – 4 mm Blue Cotton Candy from KatScrappiness

Acetate

Fun Foam

White Card Stock for the Card base

Blue Card stock

Baked Brown Sugar Card Stock

Mint Card Stock

Daffodil Delight Card Stock

Dazzling Diamonds Card Stock

Spectrum Noir Sparkle Brush Marker in Clear

Tombow Mono-Dot Adhesive


IMG_1164


I hope I have given you some inspiration to create something wonderful for your father, grandfather, husband or partner. Have an amazing day!

A Latte Love for Valentine’s Day & Planner Stamp

The day has finally arrived to introduce to you, two brand new sets from Jessica Lynn Original stamps ~ Jam & Coffee Rubber Stamp and the new All Season Planner Stamps. These two stamp sets can be purchased as a bundle at a discounted price, plus free shipping, We only have 30 sets so if you like them, please go to Jessica’s online store or click on this link before you miss this deal: http://www.jessicalynnoriginal.com/february-bundle-deal-calendar-planner-jam-and-coffee-rubber-stamp-set/


I am the last person on this blog hop.  I hope we inspired you today to start creating with JLO stamps.


Here are the photos of the cards I made and a YouTube video link so you all can see the planner stamps as well. Have a great Valentine’s weekend!

IMG_9304IMG_9305IMG_9306


Masking with Tombow Removable Adhesive

As you all know, Valentine’s Day is on Sunday, and I needed to make a cute treat holder to house my husband’s favorite chocolates. I have an empty Mason jar but I wanted to amp it up a little and spray paint it to create a cute heart design in the front. I could have used stickers to decorate the jar but I wanted something more “handmade”.


I didn’t have any masking paper so I decided to die-cut the heart using my heart die, and used Tombow Removable adhesive to create my “mask” before spray-painting the Mason jar.


I was so impressed with how well the adhesive held on to the glass jar. I gave the jar two coats of paint and it didn’t budge at all. When I removed the “mask”, I got a really nice impression of the heart. The die-cut mask is still sticky enough that I can use it for another project. Just simply amazing!


I also made a heart rosette and a tag to go with my treat jar. After I assembled the heart rosette using hot glue, I used Tombow permanent adhesive to attach the small heart to decorate the front of the rosette. Attaching the rosette to the tag using the permanent adhesive, I thought it needed a little bit more. I then proceeded to die-cut the “love” script sentiment using one of my dies, and attached it to the tag using my all-time favorite, Tombow mono liquid glue. The tip of this glue is perfect to use for intricate dies like the one that you see on the photo.


IMG_9338IMG_9337

This was a very quick and inexpensive project to make for Valentine’s Day. I hope you like this simple project and have an amazing day!

Rock Lobster Stamp Set by JessicaLynnOriginal

I am thrilled to finally be able to post photos of this new stamp set by Jessica Lynn Original called Rock Lobster. I love Brentwood, but don’t you just love that little smiley fish? It’s so adorable! Jessica is such a talented artist and a wonderful person; I am so proud to be a member of her design team.

Below you will find a photo of the stamp set. I think this will be a great addition to your collection. Just like the rest of Jessica’s stamps, this is made of high quality photo polymer material. You don’t have to be a skilled stamper to use this set.

IMG_8927

Since today is Halloween, I wanted to create a Halloween card. I have always believed that you can use any stamp set for any occasion, with just a little imagination. I always liked stretching my stamps and dies. Since Brentwood is already dressed up as a lobster for Halloween, I figured he needed some confetti to go along and celebrate my favorite holiday! I also used my We Are Memory Keepers Fuse tool for the first time to create a flat shaker. Note to self: next time, do not touch the fuse tool with your fingers to check it it’s hot enough! Ouch!

IMG_8899

The next card is one of my all time favorites! I think everything just worked and blended together beautifully. I love the colors on this card. I used my Avery Elle Wonky Stitched rectangle die to create the frame for my shaker card. I used a combination of blue, iridescent and white sequins and seed beads for my shaker elements. A video tutorial will be posted soon on my YouTube channel so please stay tuned for that.

IMG_8889

I hope you like what I’ve created. Please don’t forget to go to www.jessicalynnoriginal.com to grab this stamp set.  Happy Halloween!

Happy Haunting ~ Lawnscaping Challenge No. 112 ~ Embossing

Good morning crafters!  I wanted to start my Halloween cards early this year so when I checked my emails and received a notification for another Lawnscaping Challenge, I just couldn’t resist.

For my card today, I am using the Lawn Fawn Spooktacular stamp set, Sweater Weather stampset and their coordinating dies, Grass Border and Stitched Rectangle dies. These stamp sets and dies are so much fun and so versatile; you can mix and match them for any occasion.

Happy Haunting
Happy Haunting

I first stamped all the images that I needed for the card on white card stock and colored them using my copic markers. Then I cut my card base, and black card stock as well as the vellum using the stitched rectangle die. I didn’t really have any design in mind at this point. I knew I wanted a round moon, so I cut it using my circle die, and dry-embossed it with my dots embossing folder. I then sponged the edges of my moon using my yellow inkpad to add a little bit of color. I proceeded to die-cut the trees with black card stock using the sweater weather dies, then went ahead to die-cut the rest of the stamped images and the grass border. I also used my bridge dies to create a cute little scene for my cat. Now that I had everything laid out in front of me, I started to create my card. The last thing that I did was to stamp the sentiment “happy haunting” using my white embossing powder on some dark purple card stock, then I adhered it to the front of my card. Oh, of course I had to use my wink of stella to give the moon some glittery effect, as well as the pumpkins, the witch’s hat and the leaves.

What do you guys think? I hope you like my card today.  Happy Crafting and Happy Haunting!

Lawn Fawn Life is Good Box Card ~ Process Video

IMG_8317
Created by Maria Russell ~ http://www.youtube.com/rprmlr772
IMG_8319
Created by Maria Russell ~ http://www.youtube.com/rprmlr772

Launch of Toy and Working Dog Breed Stamp Sets by JessicaLynnOriginal

I am really excited to share today’s blog post. We are launching two wonderful new stamp sets at Jessica Lynn Original called “Toy and Working Breed”. I have always loved dogs! I grew up with them and I can’t imagine not having a dog in my life. They are amazing, loving, funny, faithful – truly a man’s best friend!

The toy breed stamp set is very special to me. The Chihuahua image that Jessica has for this set had a striking resemblance to my beloved pet, Chi-Chi. Chi-Chi was my constant companion and I took her everywhere with me. She was very stylish and had outfits for every occasion. She was super spoiled! I lost Chi-Chi in 2013 and I was really sad for a long time that I still couldn’t bring myself to getting another Chihuahua.

IMG_1085

When I first received the stamp set, I really had a hard time trying to think about card designs. I’ve always loved stamping, but I’ve never had stamp images that are so life-like, it was honestly hard to get creative. I am a novice with Copic markers so it was really hard for me to color the images and make it look realistic.

I decided to stamp and color a couple of the images on white card stock. I then fuzzy-cut the images and gathered my card supplies but when it came to putting the card together I was just stumped! I made one mistake after another.  I just couldn’t get creative! I left it alone for a few days and decided to look at Chi-Chi’s old photographs! For some reason, I had a light-bulb moment and got my crafty mojo back. I started with a simple card below, but then since I had all the other images already cut and colored, the ideas just kept coming. I guess it’s obvious since this is the very first time I actually have 4 card samples and one Doggie Treat bag for the launch.   You can tell I had so much fun playing around with the stamp images, I used a lot of my dies to “dress-up” the dogs.

I am not going to list all of the dies that I used for the cards because I would like to eventually post a YouTube video showing you how I made some of the cards, as well as the doggie treat bag.

Please let me know what you think about the cards or if you would like to see a tutorial for any of the cards I’ve shown today. Which one is your favorite? To order your sets, here is the link to the toy dogs stamp set: http://www.jessicalynnoriginal.com/jessicalynnoriginal-akc…/ and the link to the working breed stamp set: http://www.jessicalynnoriginal.com/jessicalynnoriginal-akc…/

Have a great weekend and happy crafting!

Created by Maria Russell for http://www.jessicalynnoriginal.com
Processed with Moldiv
Birthday Pop-Up Card by Maria Russell for http://www.jessicalynnoriginal.com
Created by Maria Russell for http://www.jessicalynnoriginal.com
Processed with Moldiv
Created by Maria Russell for http://www.jessicalynnoriginal.com
Doggie Treat Bag Created by Maria Russell for http://www.jessicalynnoriginal.com