Caution: I’m a Little Prickly Before Coffee with Newton’s Nook

Hello Newton’s Nook fans!  I hope you are all doing well.  I’m back today to share some Southwest-themed cards, showcasing the Cuppa Cactus stamp set and coordinating dies along with the new Circle Frame Die Set.  I also made a one-layer card today (for those of you who loves  simple cards), showcasing the Cultivated Cacti stamp set.


To begin, I stamped my images on some Neenah solar white card stock and colored them in with my Spectrum Noir alcohol markers.  I used the coordinating dies to die-cut them out.


I used the Circle Frame dies to die-cut some white card stock three times, and die-cut three colors of patterned paper.  I adhered the pieces together with some liquid adhesive.


For my background, I die-cut a neutral patterned paper and adhered this piece on an A2-size, side-fold card base.  I adhered two of the circle frames with some glue and foam-mounted the third piece for added dimension.  I added the colored images on the center of each circle frame.


I finished my design by using my white gel pen to add some dots on the cacti and stamped the sentiment with some Versafine ink in Onyx black.


My next project is very simple and can be easily mass-produced.   I want some cheerful cards to donate at the local nursing homes so I actually made 30 of these cards.


I stamped the images using some Quick-dry ink by Spectrum Noir.  I used my mini sponge dauber to add a deeper shade on each image.


I didn’t do any measurements for this card.  The images are very easy to line up and I love that I didn’t have to color them because of the solid stamping.  You can easily get more depth and dimension by adding a deeper shade of the color that you used.


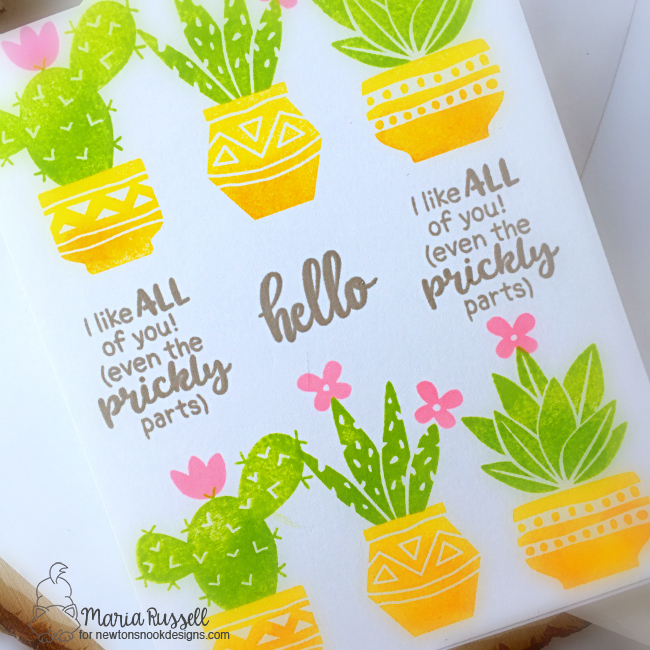
The sentiment was stamped using a light brown-gray ink.  


I hope I gave you some inspiration today to create something beautiful.  The supplies I use are listed and linked below.  Thank you for stopping by and have an amazing day!  Happy stamping!


———–SUPPLIES———–

You Are Capable of More Than You Know

How’s everyone doing?  Maria here on the blog with you today and I am back to give you more inspiration using products from the last release.  

Lately, I have been making more clean and simple cards that can be easily mass-produced to send to friends.  For my project today, I am showcasing the Terrific Flowers stamp set, along with the Blossom Bubble stencil.


To make the card, I started by using my anti-static powder tool and dabbed this on some Neenah solar white card stock.  I used my Misti stamping tool to stamp the flower images with some versamark ink.  I then sprinkled some white embossing powder and used my heating tool to heat-set the image.

I used pixie spray on the Blossom Bubble stencil and placed it against the stamped image.  The spray will make the stencil a bit tacky so that it doesn’t shift while you’re coloring the image.  This is a must-have tool for anyone who loves to use stencils.

To color the images, I used my mini sponge dauber and some hybrid inks and started pouncing lightly until the colors are well-blended, putting more pressure to the bottom of each flower for added dimension.  Easy peasy!

I stamped the sentiment from one of my favorite stamp sets from Cas-ual Fridays called “Be”, using some light gray dye ink.  To add texture, I used the same gray dye ink and watercolor brush to add some splatters to the card.  I finished my design by adding some iridescent jewels to the card, giving it more dimension.  Here’s another look:

I hope I have given you some inspiration today to create some clean and simple cards, using stamps and stencils from the shop.  The supplies I use are listed and linked below.  Please don’t don’t forget to use my coupon code (below) to get 15% off your order.   Thanks for stopping by and happy stamping!

———-SUPPLIES———

Cas-ual Fridays Release – Day 4 – Hearty Horse

We are super excited because today Day 4 of Cas-ual Fridays Stamps 7th-year anniversary release.  You also have a chance to win a prize during each reveal day so please stop by the main Cas-ual Fridays Stamp blog post to find out more info.


For the fourth day of the reveals, we are showcasing the Hearty Horse stamp sets.  Check out the Cas-ual Fridays online store or click on the supplies list below to purchase the stamps we are revealing each day.  Don’t forget to use my coupon code below to get 15% off your order.


I have another simple card today.  I stamped my image on some Neenah solar white card stock and colored the image in with my Spectrum Noir alcohol markers.  I used the small solid heart stamp and stamped the hearts with different dye inks.


I die-cut a stitched flag die from my stash and stamped my sentiment with Versamark ink.  I foam-mounted this piece onto my card.


To finish my design, I added the pink bow and Nuvo glitter drops to the hearts.  Here’s my card:


This card is so simple but I love how it turned out.  Here’s a closer look:


I hope you like my card today.  The supplies I used are listed and linked below.  Please visit Cas-ual Fridays Blog for a chance to win some prizes.  Come back tomorrow for Day 3 of the reveals.  Thank you so much for joining me and happy stamping!


———–SUPPLIES————


Hang in There – Clean & Simple Card with The Rabbit Hole Designs

Hello The Rabbit Hole Designs fans!  For the past few months, I have been making a lot of very-detailed handmade cards with scenes up the wazoo and I figured sometimes I just need a break from that and create some clean and simple (CAS) cards.  After all, less is more, right?!

For today’s project, I am showcasing the We are Family stamp set.

Here’s my card:

TRHDHangInThereKite1A

Here’s how I made the card:

  • Stamp the kite image on smooth white card stock and color the images in with Copic markers (or any medium of your choice).
  • Die-cut the image with an electronic die-cutting machine or fussy cut with scissors.  I used my Brother Scan N Cut 2.
  • Cut an A2 size piece of smooth white card stock and use the Kites Embossing folder to dry-emboss the background.
  • Die-cut the “Hang In There” sentiment on some black card stock. Die-cut the same on some fun foam and adhere this piece on the black card stock.
  • Adhere the sentiment on the embossed background.
  • Adhere the kite with some liquid adhesive.
  • Finish the design by using Sakura white gel pen to add some lines and dot to the kite.

Here’s a closer look:

This card is super simple, but I really love how it turned out.   I hope you like my card and got inspired.  The supplies I used are listed and linked below.  Have an amazing day and happy crafting!

For more inspiration, updates, and news make sure to check out these places.

————-SUPPLIES————–

Birthday Fishes – Underwater Scene with Copic Markers

Print


Hello MFT fans!  I am back today with this underwater scene card using stamps by My Favorite Things for the 2018 Card Design Superstar contest.  I finally summoned up some courage to “freehand” my background and I thought I was going to hurl!  Haha!   I am so very thankful to MFT for this contest because they encourage us all to join and get out of our comfort zone, whether you are a beginner or an expert!  I am certainly a beginner when it comes to drawing/coloring my own scene.  I had second thoughts about joining since this is a tough competition.  Just looking at all the other entries make me nervous but I thought I’d go ahead and try anyway.


I only have a few MFT dies and stamps with me to get by since I have just packed up my entire studio and shipped it back to my home in Orlando, FL about a month ago.  However, that will not stop me from joining the contest!   This card entry is for the Coloring Virtuoso category.


I envisioned a design in my head and started drawing my background with different Copic markers on some Neenah 110 lb. white card stock.  I layered different colors of blue, blue green and lilac Copics to create my water scene.  I also drew some seaweeds with different green and yellow Copic markers and mixed it up a little with brown.  To draw the sand, I used Earth tones – E40, E41, E43, E44.


I stamped my images with MFT Black Licorice Hybrid ink using the BB Gill Friends stamp set and Beach Buds stamp set.  I colored them in with Copic markers and fussy-cut them with my precision scissors.  I adhered them onto my card base with liquid adhesive.


To finish my design, I used my Colorless blender to create bubbles on the water and stamped my sentiment with Versafine Onyx black ink.  I also used my Sakura white gel pen to add more details to the fishes.


MFTDesignSuperstarColor1A


I was so nervous creating this background but I absolutely LOVE how this card turned out!  The images on both stamp sets can be mixed and matched to create a wonderful scene.   Here’s another look:


MFTDesignSuperstarColor1B


Doesn’t this card make you want to go snorkeling in the Maldives?  That crab wearing the sunglasses is just adorable!


MFTDesignSuperstarColor1C


I hope you like my card today!  I’d like to take this moment to THANK MFT Stamps for this great opportunity and for keeping us motivated to get out of our comfort zone!  Good luck to everyone playing along!  The supplies I used are listed and linked below.  Happy crafting!


MFT Supplies Used:


A Happy Hello – CAS card with MFT Stamps

Print


It is that time of the year again where all card designers get pumped and excited for the 2018 Card Design Superstar contest by MFT Stamps.   I am completely bummed since I have just packed up my entire studio and shipped it back to my home in Orlando, FL about a month ago.  I kept a few dies and stamps with me to get by, until I get my shipment.  Needless to say, most of my MFT stamps are in the shipping container and I am left with 3 stamp sets and a few sentiments.  However, that will not stop me from joining the contest!   This card entry is for the Clean and Simple Genius category.


I started by stamping my image on some Neenah solar white card stock using MFT Stamps Black Licorice hybrid ink and colored him in with my Copic markers.  I fussy-cut this image using my precision-cut scissors.


IMG_9669


I die-cut the word “hello” a couple of times with some  white card stock using the  Hello There Die-namics by MFT stamps.  I cut another piece of some white card stock  with the Stitched Scallop Basic Edges Die-namics and adhered this piece onto my card base.  I also adhered the Hello die-cuts onto my card panel, as well as my colored image.


MFTDesignSuper2018CAS1A


To finish my design, I stamped the sentiment “A Happy Hello”.  Here’s a little close-up:


MFTDesignSuper2018CAS1B


I love creating Clean and Simple cards!  Sometimes less is really more!  I love how this card turned out!  Here’s one last look:


MFTDesignSuper2018CAS1C


I hope you like my card today!  THANK YOU SO MUCH MFT Stamps for this great opportunity!  Good luck to everyone playing along!  The supplies I used are listed and linked below.  Happy crafting!


MFT Supplies Used:

  •     A Happy Hello stamp set
  •     Black Licorice Hybrid Ink
  •     Hello There Die-namics
  •     Stitched Scallop Basic Edges Die-namics