Today’s card features my all-time favorite stamp so far, from Stampin’ Up! called Sheltering Tree. This stamp set is so versatile and you can use it for any occasion. I wanted to create a simple, yet elegant card for Father’s Day. The card that I designed today is really beautiful but it is also very easy to make. Please watch the video below and see for yourself. I have listed the supplies I used here on my Blog but for instructions to make the card, please refer to my YouTube video.
Supplies I used:
Sheltering Tree Stamp Set from Stampin’ Up! & Fahter’s Day Paper Pumpkin Stamp
Look Up to Father Stamp Set from Stampin Up
Whisper White card stock 1 piece of 8 1/2 x 11 card stock – cut at 5 1/2 (to get two pieces of 8 1/2 x 5 1/2)
Pistachio Pudding Designer Series Paper – 5 1/4 x 4
Whisper White card stock – 5 x 3 3/4
Labels Framelits
Wood grain embossing folder
Early Espresso Stampin Pad
Pistachio Pudding and Wild Wasabi Stampin Pads
Memento Tuxedo Black Stampin Pad
Created by Maria RussellCreated by Maria Russell
I hope you found the video helpful and hope to see what you create. Happy Father’s Day to all the amazing Dads out there, and happy crafting!
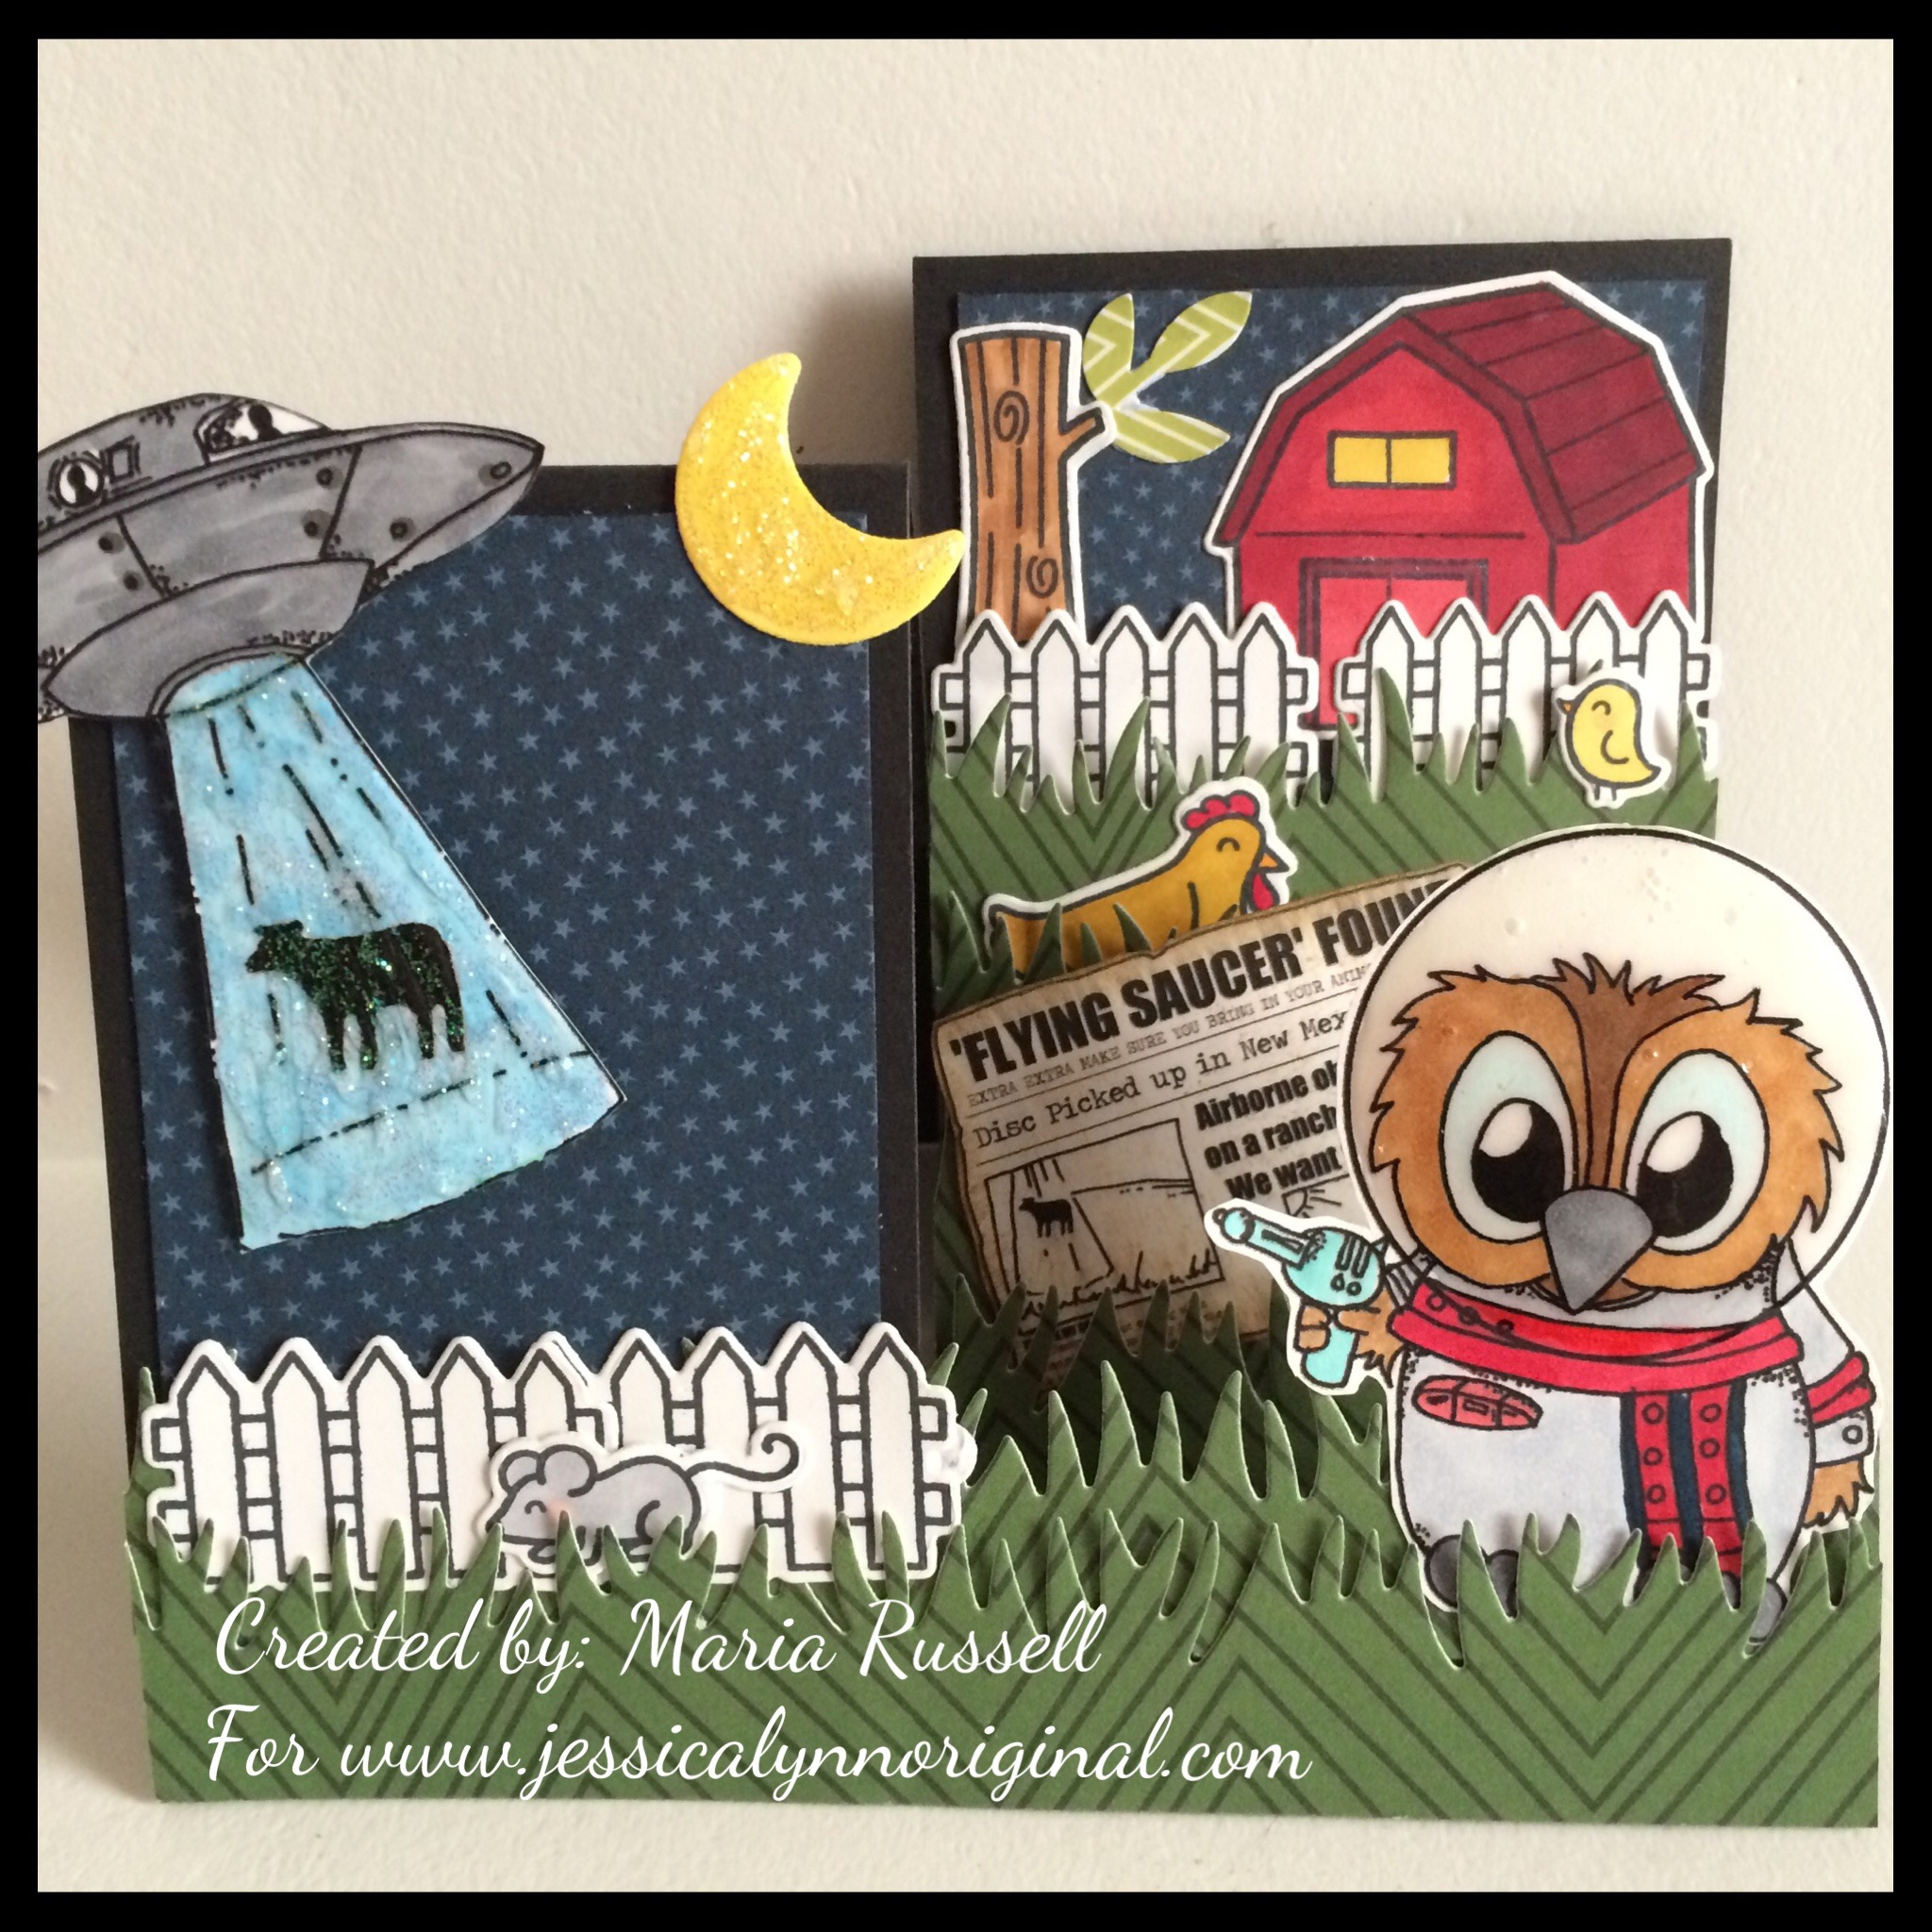
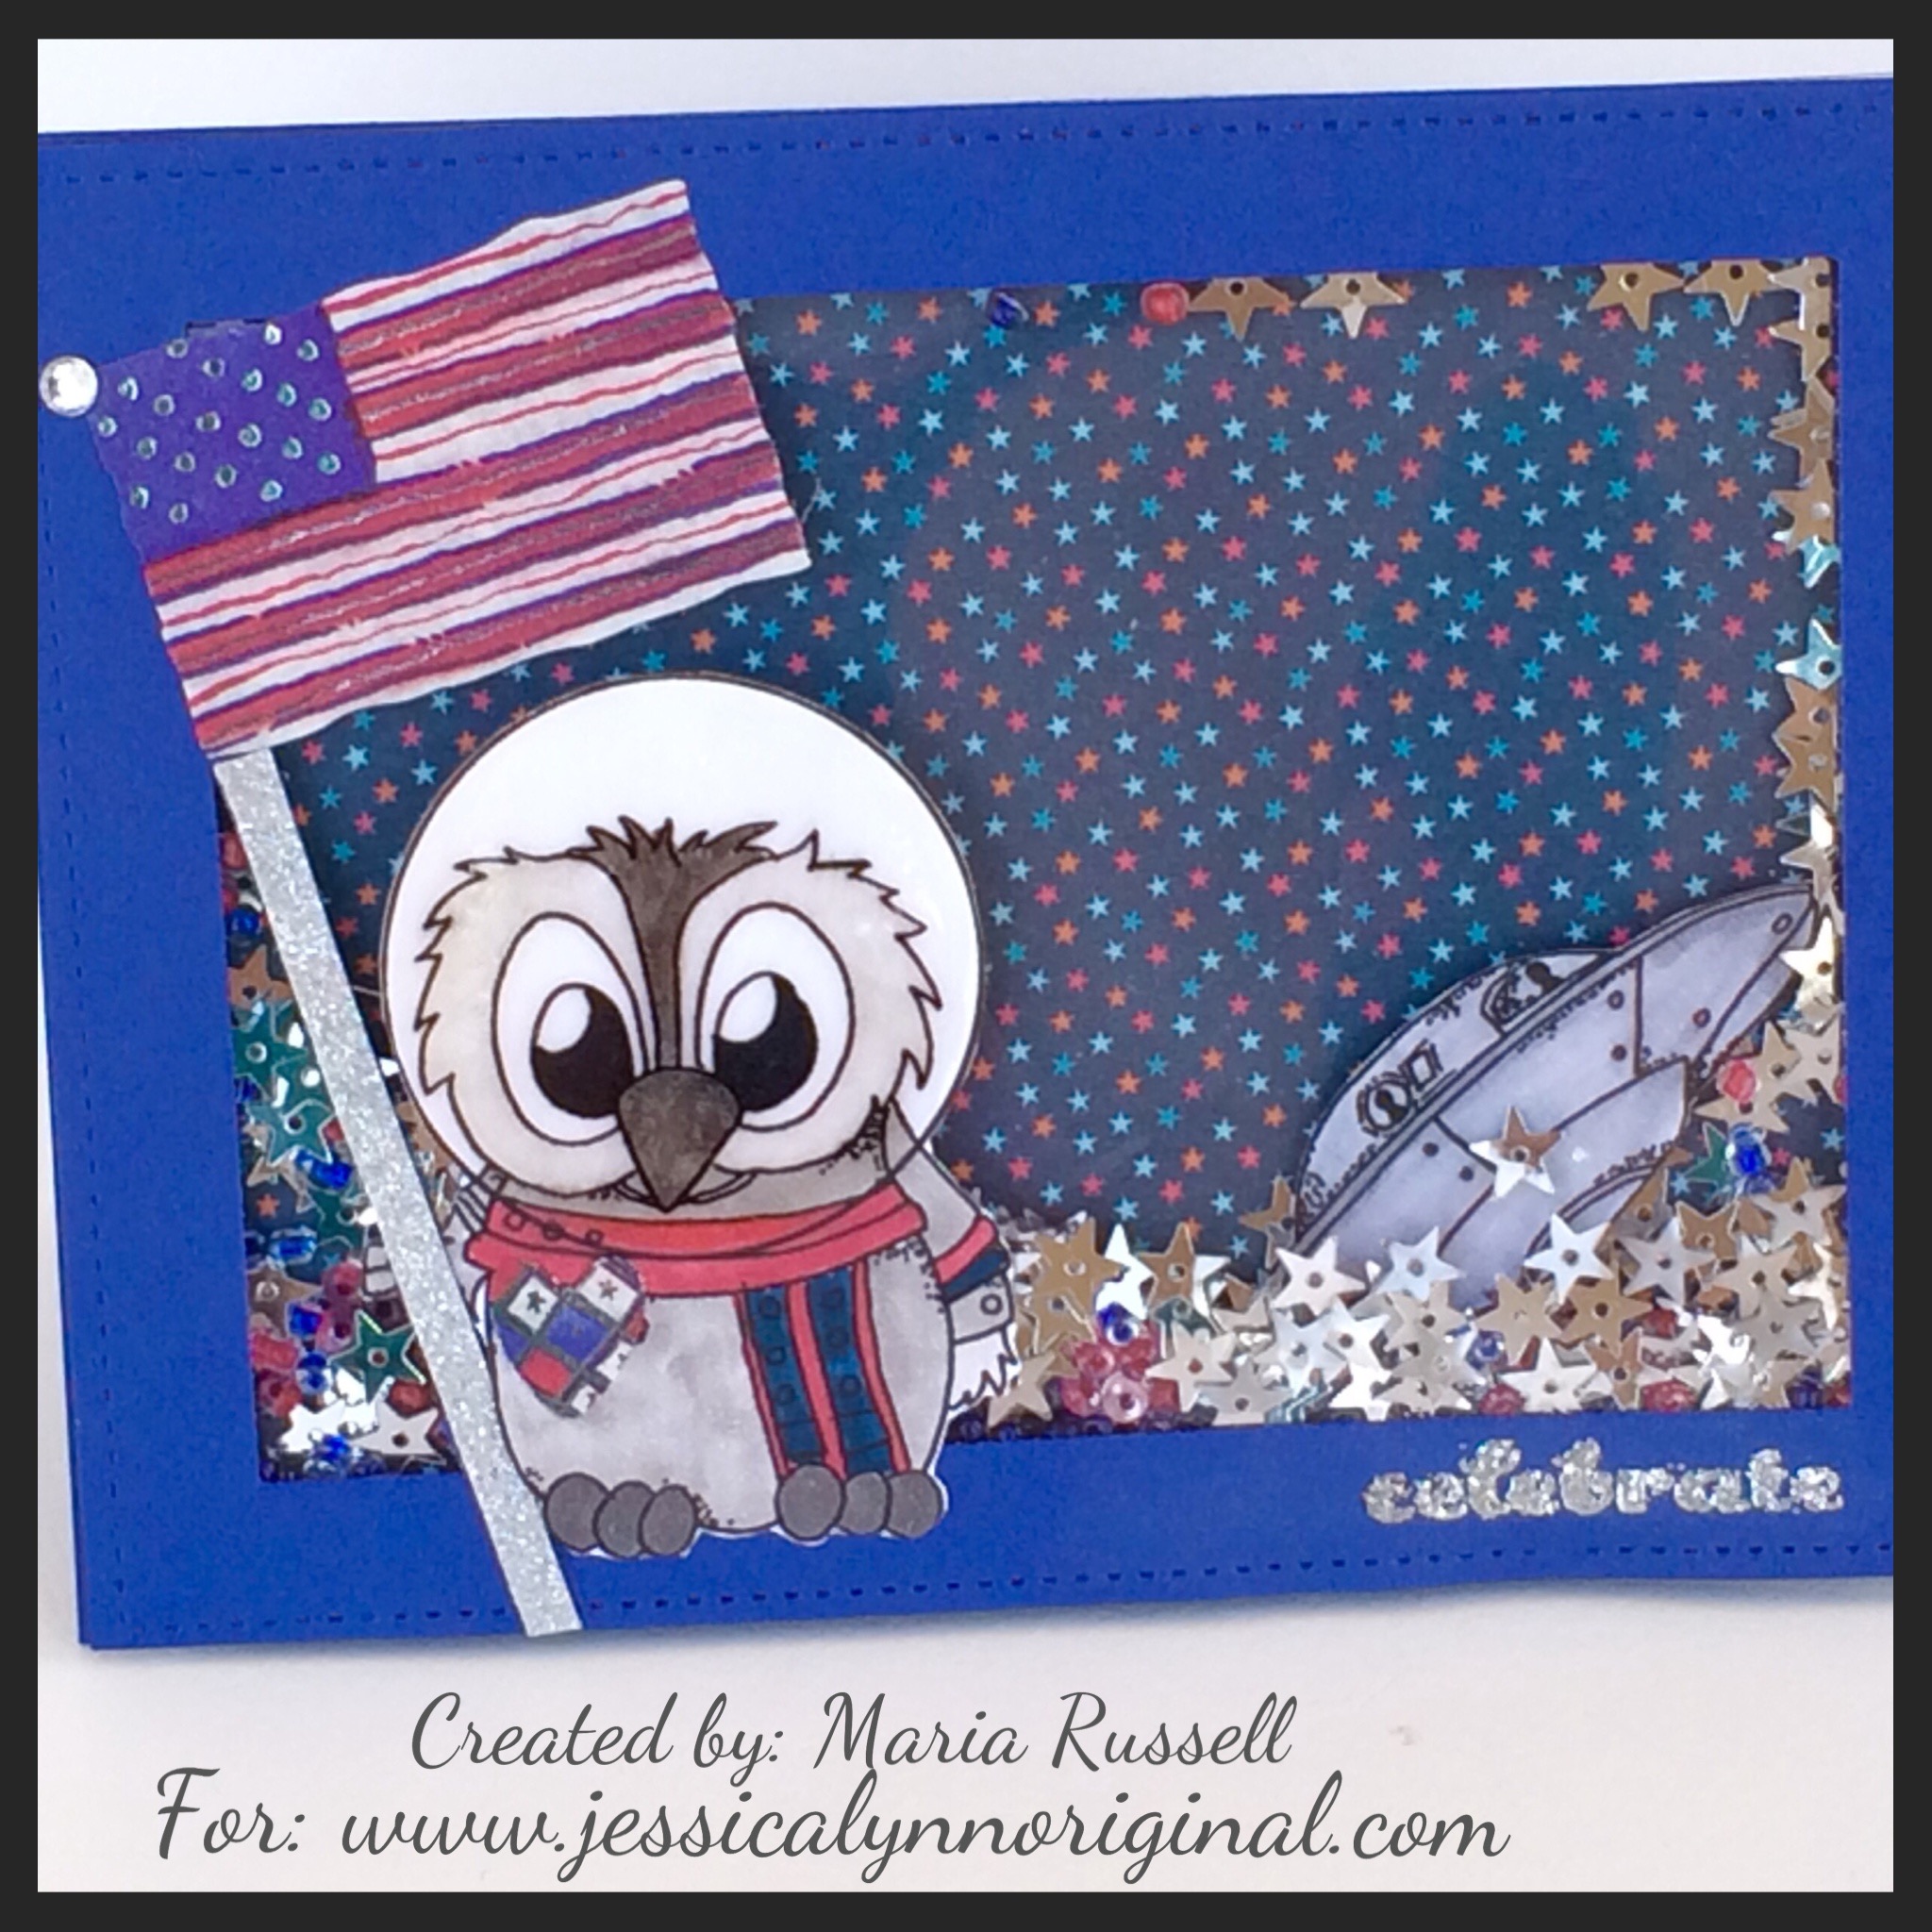
Today I am featuring two cards that I created using the new Stamp Set by http://www.jessicalynnoriginal.com called the “UFO Brentwood Owl”. I am super excited to share these cards with you today because I absolutely love the images that Jessica created for this set. If you would like to win this stamp set, please head on over and leave a comment on Jessica’s Blog post (http://jessicalynnoriginalstamps.blogspot.com). Jessica will choose a random winner and she will announce it on her Blog, so please stay tuned for that.
To start, this stamp set reminds me of my love for the 90’s TV show, “Roswell”. My children and I were addicted to Roswell, and Buffy The Vampire Slayer – two famous TV shows at the time when my children were still young. Since we live overseas, I always pre-recorded the shows so that after homework and dinner, the kids and I will have some quality time together watching the show. We even listened to the Roswell soundtrack in my car while I drove them to school.
The first card below is a side-step card. I always love creating interactive cards, and I thought that Brentwood needed to have more space so that I can highlight each of the stamp images in their own way, without it getting “lost”. I think I was able to capture this sense by making a farm-scene at night with the moon shining in the background.
I first colored Brentwood and the UFO images with my Copics. Then I put glossy accents on Brentwood’s helmet to achieve the look of glass, and make it look more realistic. While waiting for the glossy accents to dry, I then stamped the other images using some of the stamps I already have in my stash and preceded to die-cut the pieces. Once I had everything laid out, it was really easy to put the card together. I added stickles to the moon and the UFO beam to make it stand out a little.
The second card below is very patriotic. With the 4th of July coming up, I think this is a perfect project to make in time for our Independence Day. My original idea was to create a scene where Brentwood was holding the USA flag landing on the moon, but one of our design team members already made a card using a similar design. I was in Germany and Lithuania for a week and only came back yesterday, so I was a bit late creating these cards. However, I still wanted to create a scene in space, so I decided to create a shaker card. Brentwood is holding the USA flag, but with the UFO, stars confetti, blue and red seed beads as the shaker material. I also added glossy accents to Brentwood’s helmet but unfortunately it didn’t show through the photo. I had so much fun creating this card. What do you guys think? I will post a tutorial on my YouTube channel for these two cards.
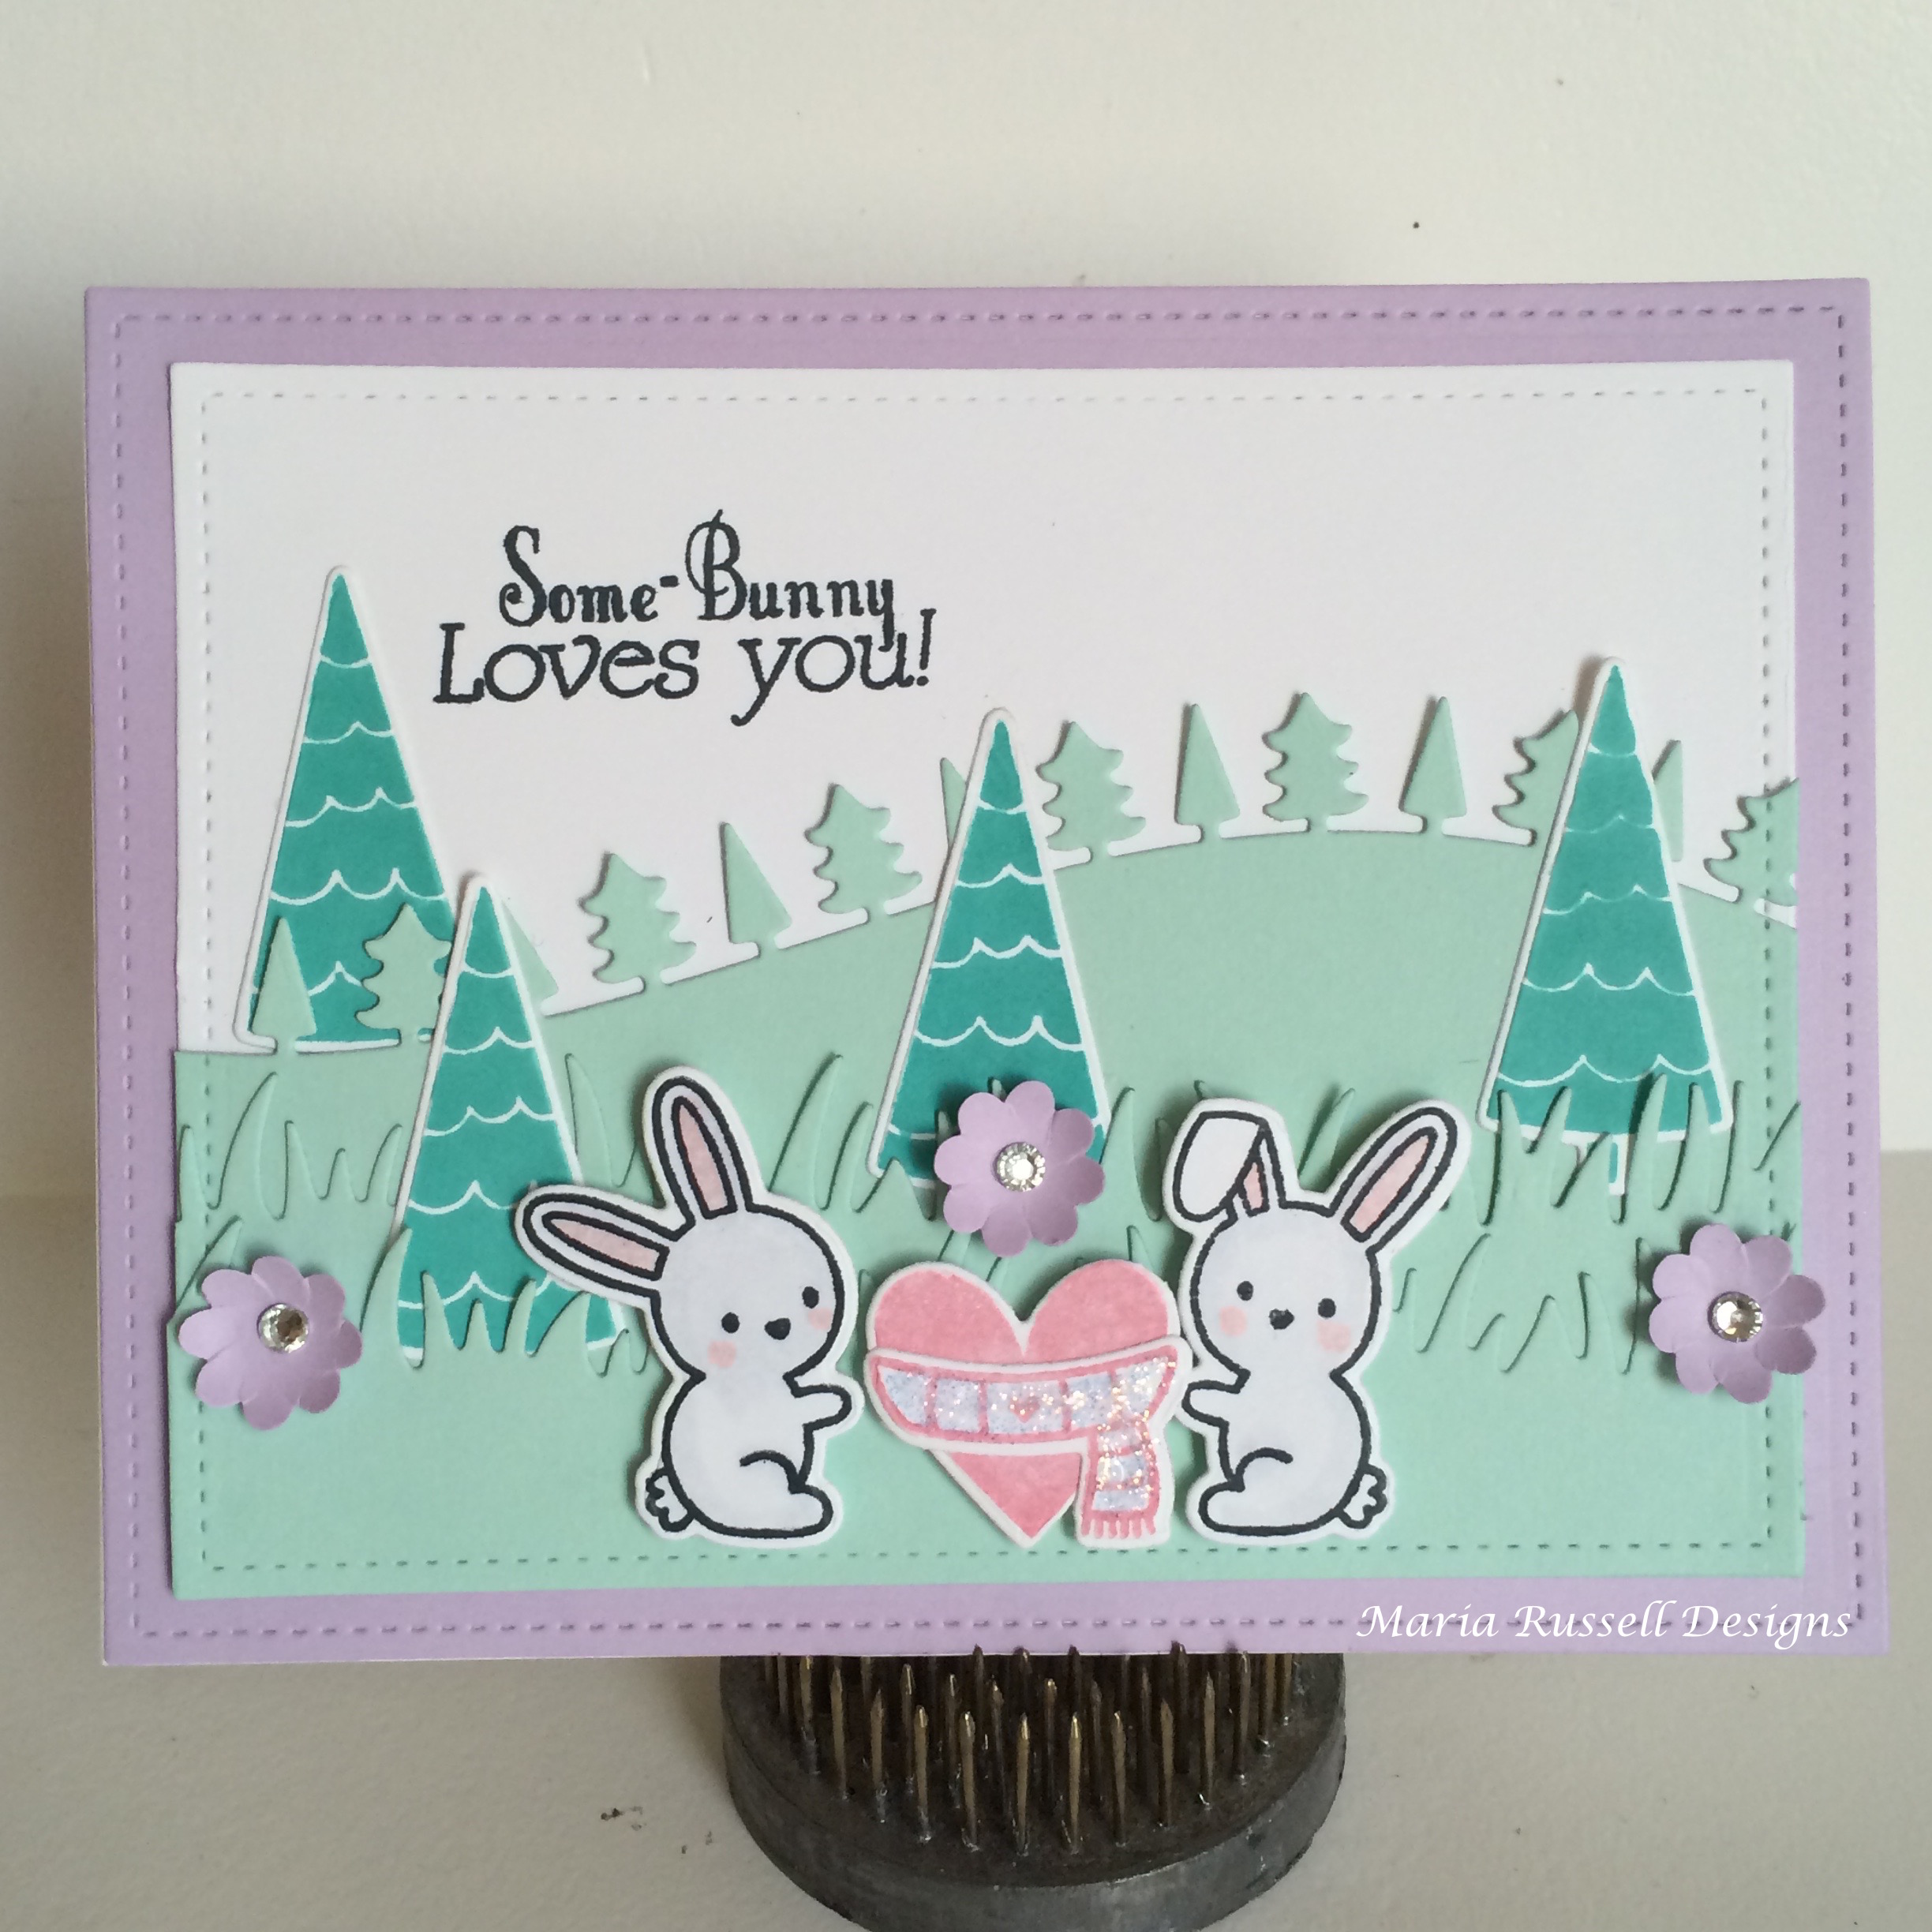
My creativity mojo is visiting today so I decided to take advantage and create this card using my cute stamp set from Lawn Fawn called Snow Day. This stamp set is so versatile and is just not meant for winter or Valentine-themed card. You can also use this for your spring-themed cards, or create a “Just-Because” card like this one.
The idea to make this card actually came to me while my daughter and I were having our little heart-to-heart talks. She is currently visiting for two weeks during her school break. I am really enjoying our time together. During one of our talks, I realized that the shy, little girl I once drove to school every day, has now turned into this beautiful, intelligent, amazing woman. It’s actually making me a bit emotional just writing this Blog, LOL! Wait, where was I going with this? Oh, right! During one of our “talks”, she mentioned to me that her boyfriend calls her “Bunny”. I don’t know about you but I think sometimes we, as crafters, get our crafting ideas out of the blue. I even have them while I’m in bed trying to get some sleep (note to self: put a little notebook by the bed stand). I thought about the stamp set that I recently purchased from Lawn Fawn and started crafting today.
My daughter’s favorite color is purple. I wanted this ‘just because” card to look really subtle but sweet at the same time. I think I’ve achieved this by combining the pinks and the lilac with a soft mint-green and a darker aquamarine ink to create the trees in the background. What do you guys think?
I hope I somehow inspired you to get your creative juices flowing and start crafting. Here’s to a great weekend!
This is a very easy tutorial to follow to create 2 box cards out of one 8 ½ x 11 card stock:
Materials Used:
One cardstock (8 ½ x 11) cut in half measuring 5 ½ x 8 1/2
2 pieces – Designer Series paper – cut at 1 ¾ X 5 ¼
6 pieces – Designer Series paper – cut at 1 ¾ X 2 ½
3 pieces – card stock cut at 3 X 1 ¼ (these pieces will go in the middle of your box card to hold the embellishments
Optional ~ 3 pieces of card stock cut at 2 inches wide using a decorative die or deco punch
Acetate sheets
Stickers and other ephemeras to decorate your box card
Double-sided tape or Tombow Glue
Mini Glue Dots
I am so happy to be chosen as one of the many talented monthly contributors for Diecut Crazy Magazine and this screen panel card below, is my first project submission. Our theme for the month of July is “Summer”. I have to admit that I was just a bit perplexed. I didn’t have any stamp sets with a summer theme. The majority of my dies are for Halloween, fall, Christmas and spring. I had to look back at some of my past projects and for some reason I couldn’t find any inspiration that would perfectly describe summer.
In my opinion, summer is all about spending quality time with my husband and kids, traveling around, barbecues, loving the longer daylight, playing with pinwheels, kites, picking flowers, bird-watching and just generally enjoying the great outdoors! So I decided to capture these moments and showcase it through this Screen/Panel Card. The sentiment that I used for this card is exactly what summer is all about ~ it doesn’t have to be perfect to be WONDERFUL!
Supplies and Tools I used:
Screen/Panel Card – 6 x 12 Card Stock (on the 12-inch side, score at 3 inches, 6 and 9). This will create the screen.
All Four Panels (Card Stock)
Bottom Layer: 2 3/4″ x 4 1/2″
Middle Layer: 2 1/2″ x 4 1/4″
Top Layer: 2 1/4″ x 4″
Stamp Sets – Perfect Pennants Stamp set, For the Birds Stamp set, Sweetie Pie Stamp set
Pinwheel sizzlit die
Decorative Punch (I used this punch to create the “legs” of the screen)
Petite petals punch
Banner Punch
Spellbinders Cherry Blossom Die
Fanciful Wings embosslits
Banners Framelits Dies
Grass Die (taken from the Garden Bench Pop it Ups Die)
Rhinestones
Brown Embossing Powder
Copic Markers
Bahama Breeze Memento Ink
Victorian Velvet Distress Ink
Xyron Sticker Maker (I used this to adhere the branch and grass die cuts to my project ~ it makes my life a lot easier!)
Glue dots and stampin dimensionals
This is a tutorial on how to make a “waterfall” card. I think this will be a unique card to give for Valentine’s day and the possibilities are endless. I think anyone who gets this card will be very glad and would think you made a lot of effort into making him or her feel special.
Materials Used:
Basic Black cardstock (Item No. 121045) — 2 pieces cut at 4 ¼ by 5 ½ (base and back cover), 1 piece cut at 1 by 4 ¼ for the band, 1 piece cut at 2 inches by 9, 4 pieces cut at 2 by 2.
Modern Medley DSP (Item No. 126926) — 1 piece at 4 inches by 5 ¼
Whisper White cardstock (Item No. 100730) — 4 pieces cut at 1 ¾ by 1 ¾
Glimmer Brads (Item No. 121003) — 2 pieces
Basic Black Stamp Ink (Item No. 126980)
Tombow liquid glue (Item No. 110755)
Sticky Strip (Item No. 104294)
1 inch. Circle punch to cut the tab (Item No. 119868)
Ribbon of your choice for the pull out tab
Expressions Thinlits Die (Item No. 132171) — used the word “LOVE”
I hope you enjoyed this video. If you have any questions, please feel free to send me a message.. Do some crafting and create some memories. Happy crafting!
This is a very easy card to make but it looks like you’ve made a lot of effort to put it together. I love making cards that is both elegant and unique. I also like the fact that you can mass produce these cards and each one will look different.
Materials used:
(All measurements in “Inches”)
Card Base:
Crumb Cake Card Stock – Item No. 120953
(Size used here on this video is: 5 ½ x 4 1/4)
1st Frame – leftover from Thanksful tablescape Kit
(Size used here is 5 3/8 X 4 1/8) – note: you can use any cardstock that
has an earthy color to go with our Fall theme
2nd Frame – Sweater Weather Designer Series Paper – Item No. 132184
2 Pieces of Silk Leaves (bought from Michael’s or the Dollar Store)
Whisper White Card Stock – Item No. 100730 – for the Happy Thanksgiving Sentiment (using Tags For You Stamp Set – Item No. 131823) punched with our Label Bracket Punch (Item No. 132153) or get it in a bundle that saves you 15%
Early Espresso Embossing Powder – Item No. 128980
Vellum Card Stock – Item No. 101856 – embossed the FallLeaf from the Wonderfall Stamp Set (Item No. 128087) – using Gold Embossing Powder (Item No. 109129
Stampin Dimensionals – 104430
Adhesives to adhere your card
I hope you enjoyed this video. If you have any questions, please feel free to send me a message.. Do some crafting and create some memories. Happy crafting!