NND June Release Day 2 – Summer Moments & Newton’s Seashell

It is the second day of the reveals by Newton’s Nook Designs.  I hope you were able to check out yesterday’s reveal.  You also have a chance to win the stamp set being revealed each day so please read through ’til the end of the blog post to find out more info.  [Just a little important note:  I know some of you had difficulties finding the comments section.  If you would like to leave a comment to participate in the giveaway, the “comments section” will only be ever visible when a single post on Word Press is being viewed. Please click on this particular blog post and you will be able to leave a comment below.  Thank you!]  

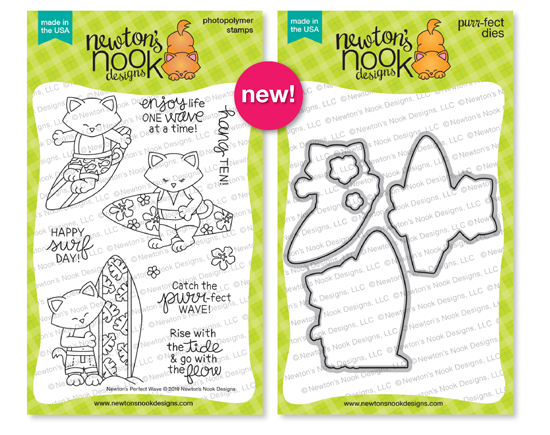
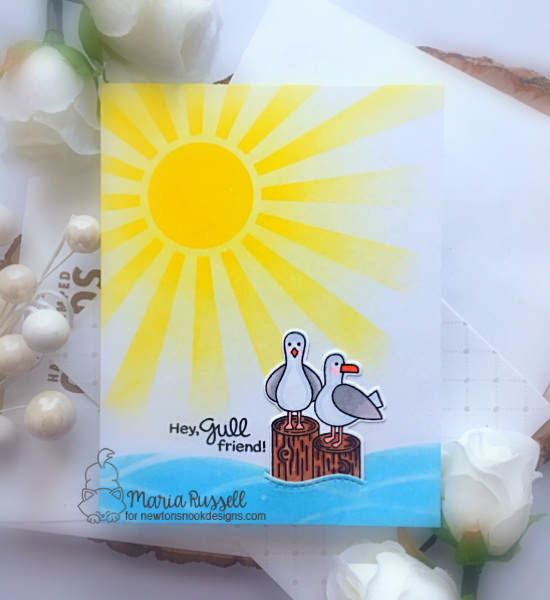
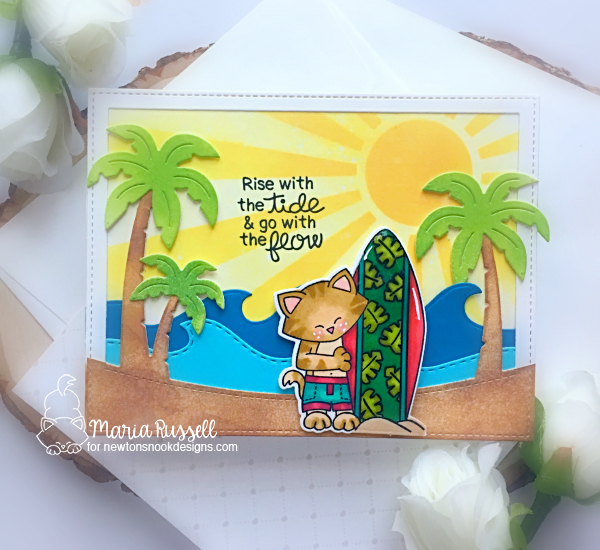
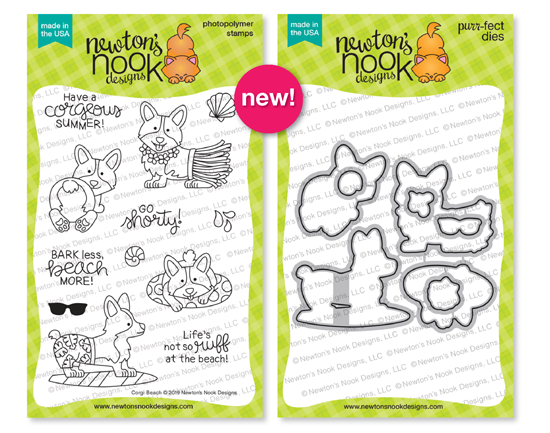
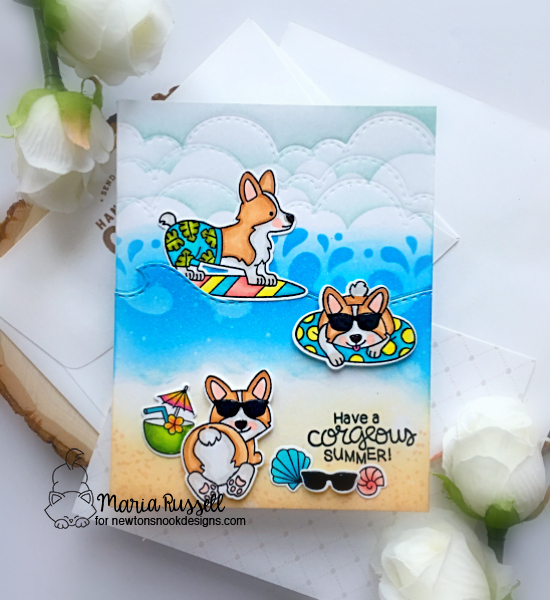
For Day 2, we are showcasing the Summer Moments and Newton’s Seashell stamp sets and their coordinating dies with the Retro Sun Stencil.

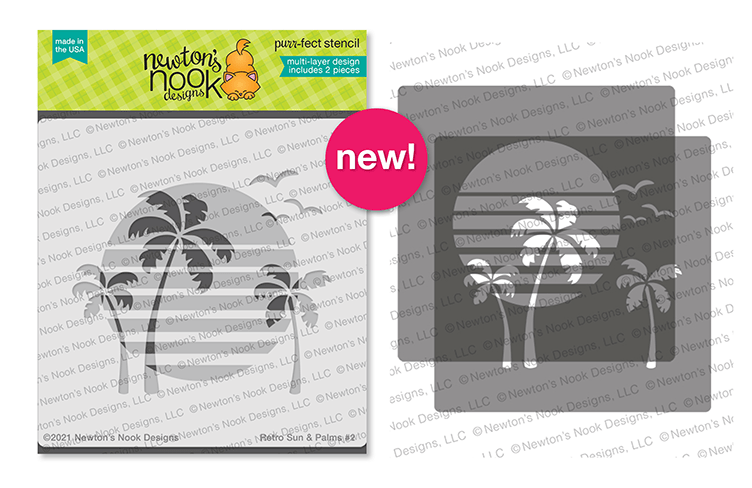
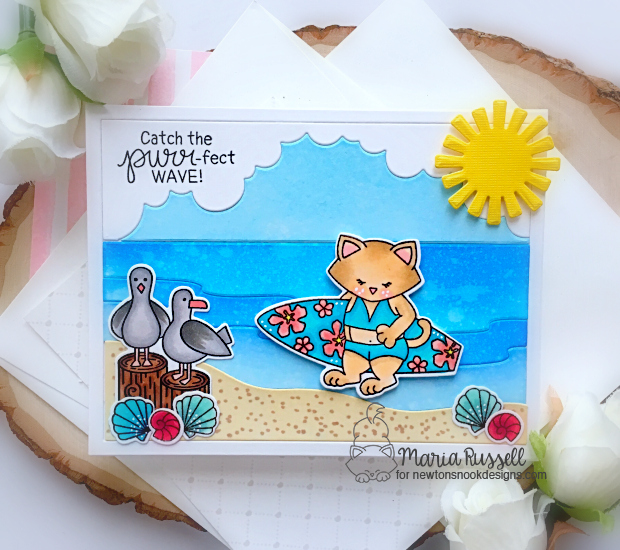
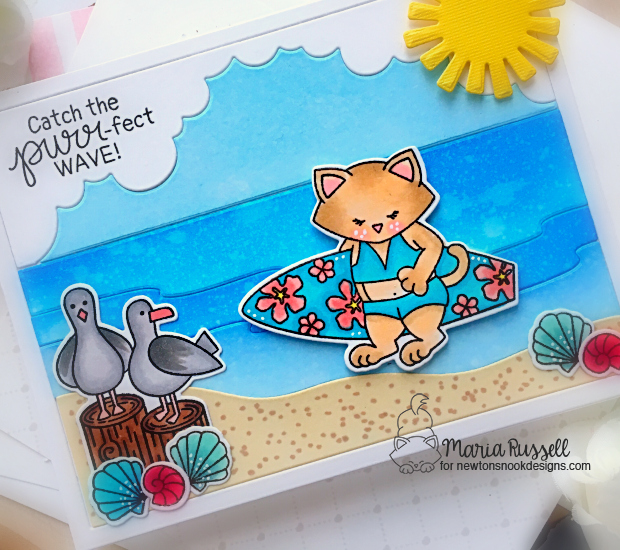
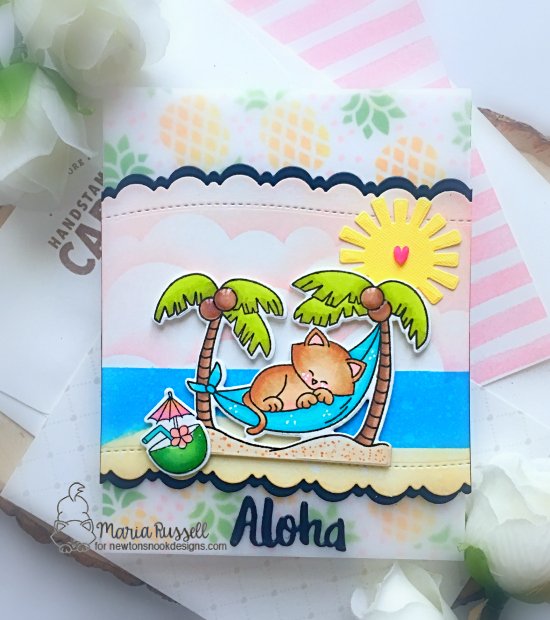
I started by creating the background panel by spraying some Pixie spray on the Retro Sun stencil number 1 and placed it on top of my Neenah solar white card stock. It just gave enough tack to adhere on my card stock.

Next, I used my palette knife to gather enough textured paste and spread it onto my craft mat. I dropped a few colors of my Carved Pumpkin distress oxide re-inker and mixed it together. Using the Stencil Pal from Therm-O-Web, I applied the textured paste onto the card panel. I removed the stencil and set this card panel aside to let it dry for about half an hour. Some of the paste kind of bled outside the lines but I didn’t really mind it. After all, this is “handmade” not hallmark (as per Jennifer Maguire).

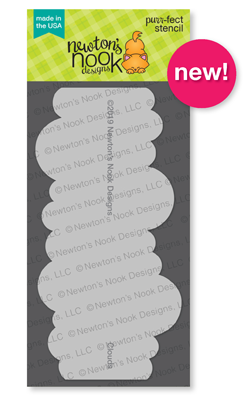
Once the card panel was dry, I used the Clouds stencil to add the sky.

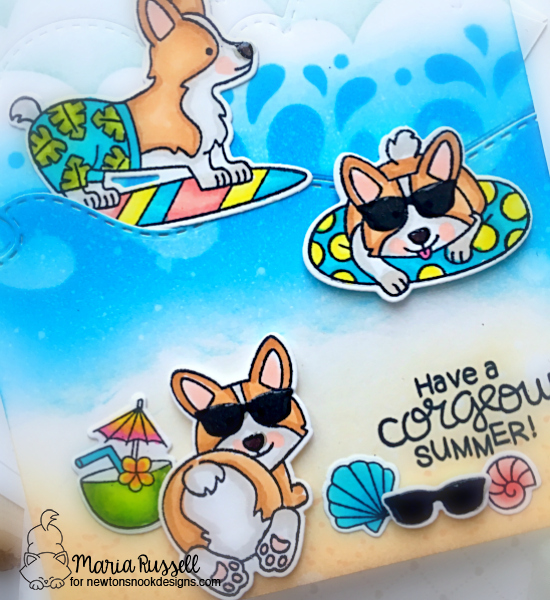
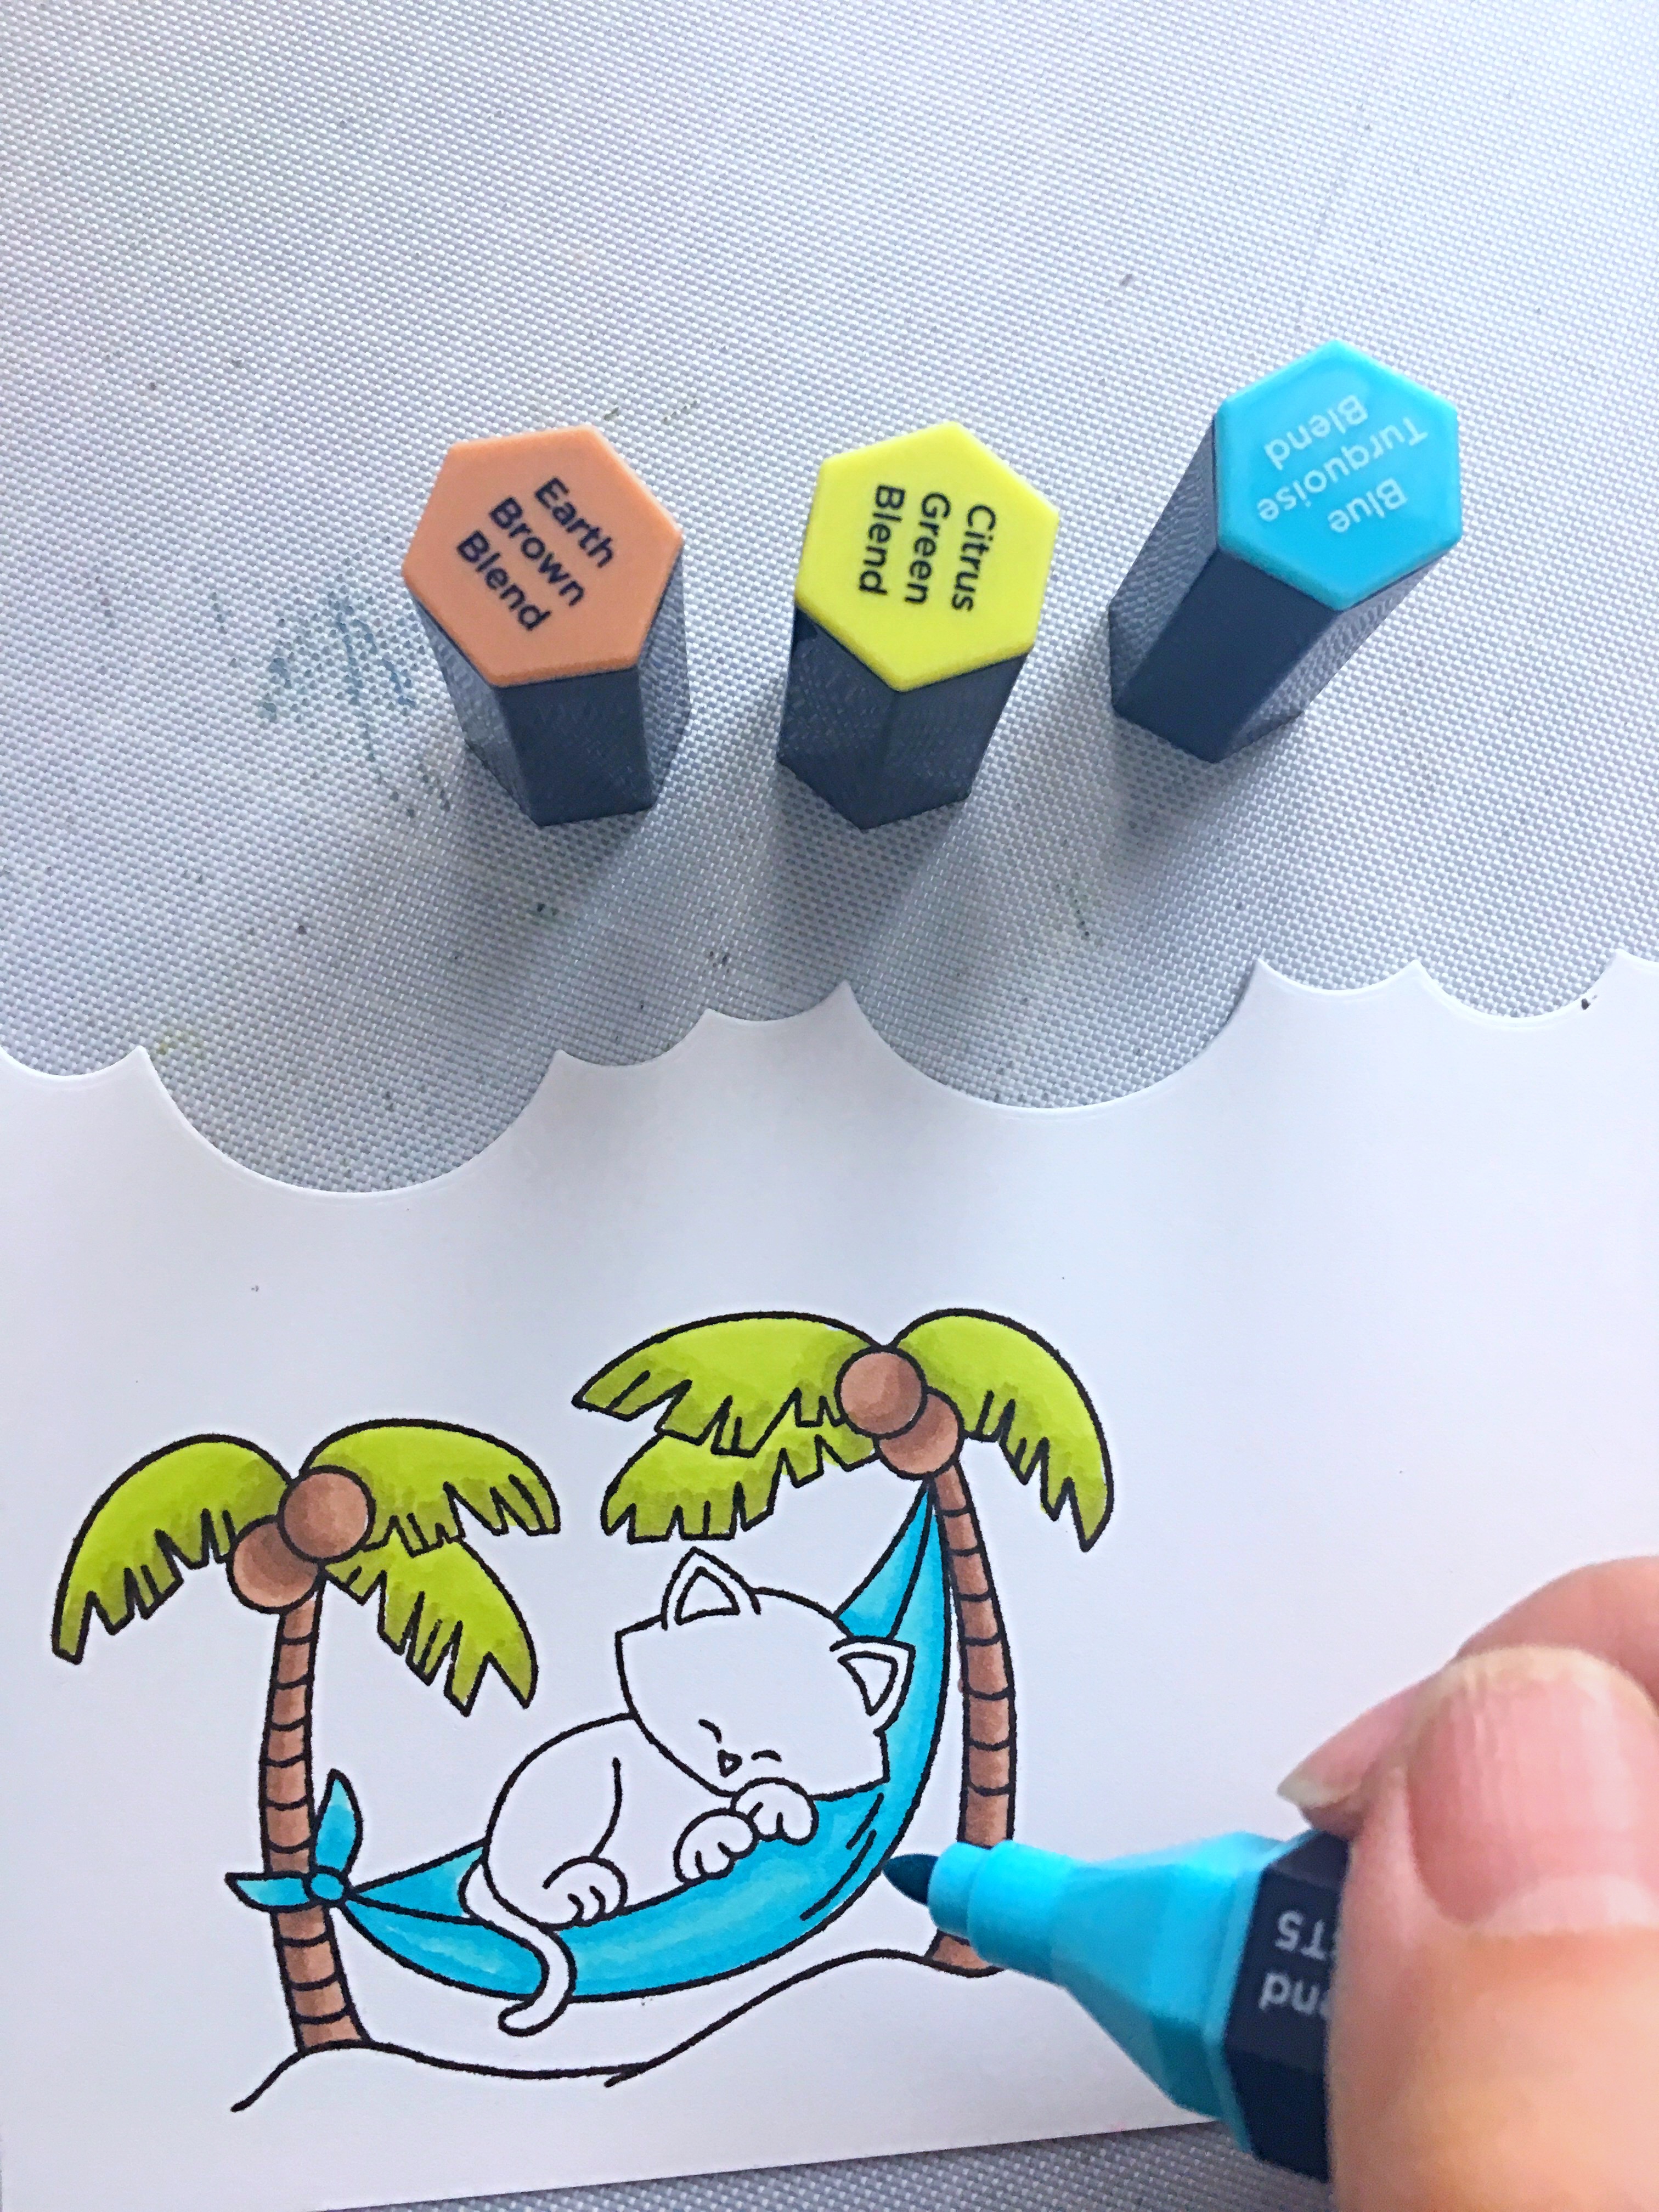
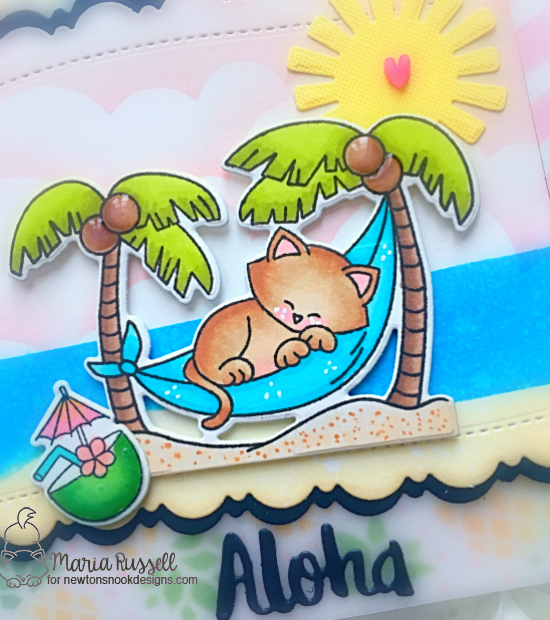
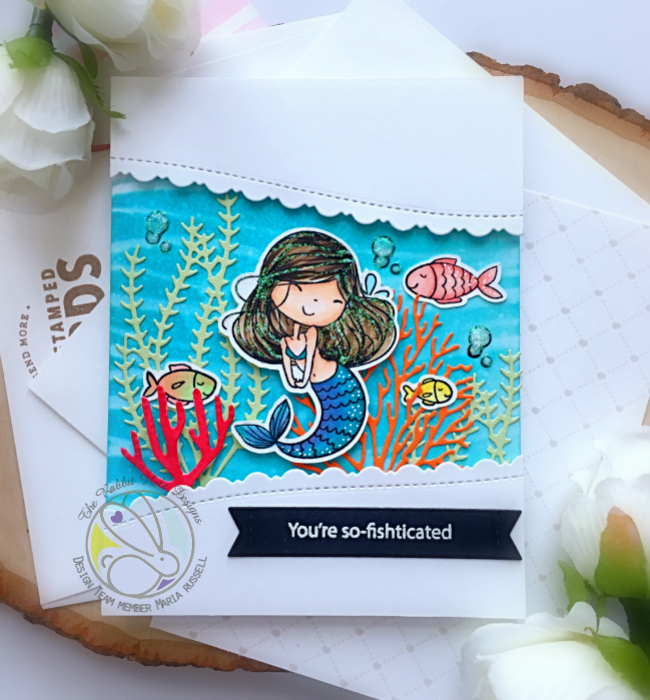
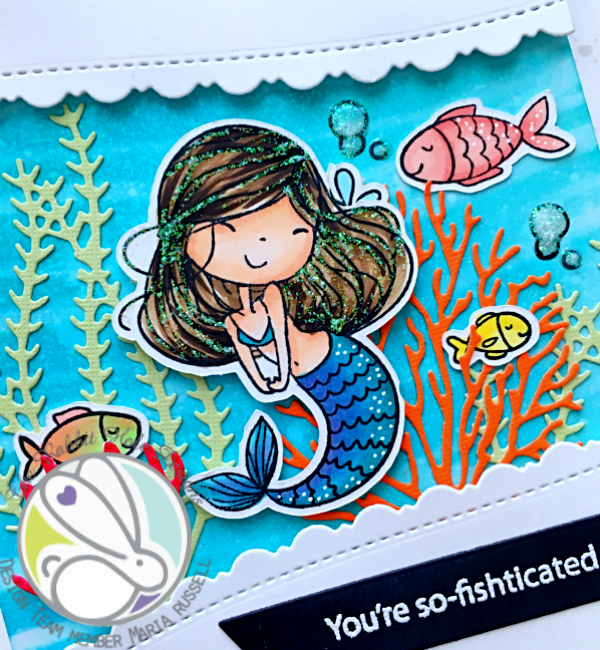
I stamped the images on some Neenah solar white card stock and colored the images in with Spectrum Noir TriBlend markers.  I used the coordinating die to cut them all out.

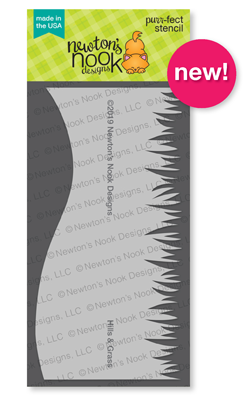
To create the sandbank, I used the Hills & Grass stencil with some light brown ink and blending brush to add color to my focal panel. I also used my alcohol marker to draw some dots randomly for added texture.

The last thing to do was to adhere my focal image and stamped the sentiment with some black ink. I used the Retro stencil again to add the birds. Here’s a closer look:

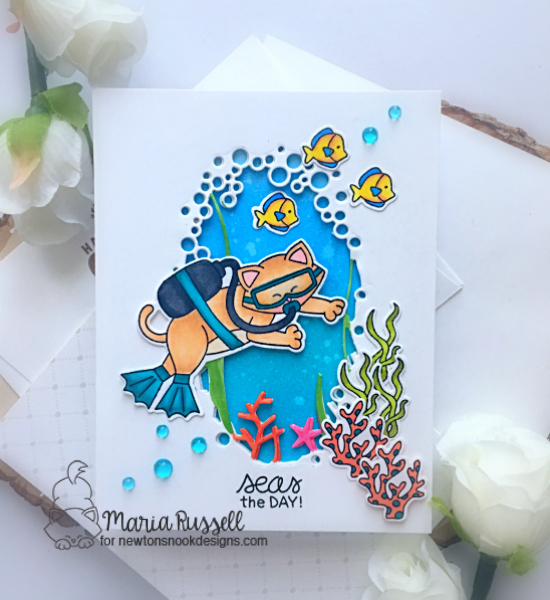
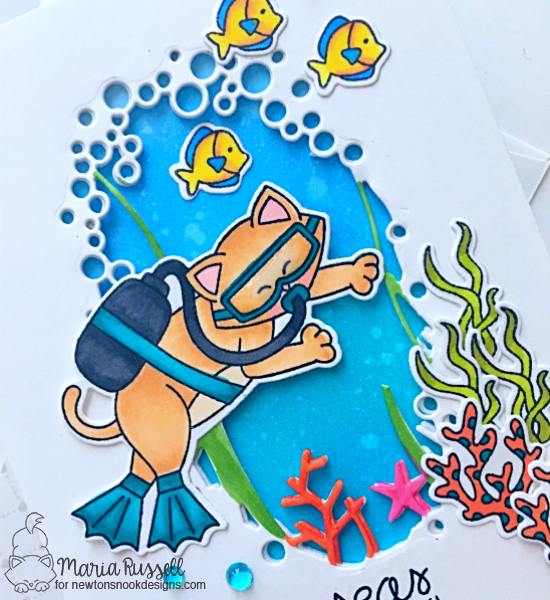
The next card is really simple. I pretty much did the same steps as mentioned above but this time, using the Waves & Splashes stencil, Petite Clouds stencil and one of my favorites, the Fancy Edges Tag Die Set.

I cut about half an inch off my A2-size card stock and adhered on some patterned paper that I added on white notecard. Adhering the tag on the card with liquid glue for added stability. Here’s a closer look:

Would you like to win the “Summer Moments stamp set”?  We will choose ONE lucky winner to win this set!

Here’s how to win: Comment on the NND blog and Design Team blogs (see list below)!  The winner will be chosen at random from the collective reveal posts. Make sure to check out each of their blogs and comment for your chance to win. You will not know which blog has been chosen so the more you comment on the better your chances are of winning!  You have until Thursday, June 17th at 9pm ET to comment  — winners will be announced on the blog post on Friday, June 18th. 

Check out all the awesome Design Team Blogs below to enter:

Newton’s Nook Designs

Ellen Haxelmans

Tina Herbeck

Larissa Heskett

Samantha Mann

Zsofia Molnar

Maria Russell (you are here)

Farhana Sarker

Tatiana Trafimovich

Samantha VanArnhem

Amanda Wilcox

———-SUPPLIES———

Catch the Purr-Fect Wave with Newton’s Nook Designs

Hello my crafty friends! I hope you are having a great week so far!  I’m back today to share with you another cute card, showcasing the new Newton’s Perfect Wave stamp set and coordinating dies with the Gull Friends stamp set and coordinating die.  Here’s what they look like:


I couldn’t really pick a favorite stamp set this month because I really love them all.  However, there’s something about this cute little kitty wearing a bikini/tankini with her surf board!  The images on this stamp set are just super adorable!  I do have a process video for you down below so I will keep this blog post short.  Here’s my card:


I think the Newton’s Perfect Wave and the Gull Friends stamp set work perfectly well together to create some cute scenes for a card.  Here’s a closer look:

Here’s my process video:

I hope you like my project today.  The supplies I used are listed and linked below.  Thank you again for joining me today and happy stamping!


————SUPPLIES————


Newton’s Nook Designs 6-Year Celebration – Day 4


I always get bummed during the last day of the reveals but don’t be sad because tomorrow, we will have a huge blog hop.   I hope you were able to check out the first three days of the reveal.  Which one is your favorite so far?  As I mentioned before, I can’t even pick a favorite this month!


You also have a chance to win a $20 store credit everyday during release week so check out the details I have indicated at the end of this blog post.  [Just a little important note:  I know some of you had difficulties finding the comments section.  If you would like to leave a comment to participate in the giveaway, the “comments section” will only be ever visible when a single post on Word Press is being viewed. Please click on this particular blog post and you will be able to leave a comment below.  Thank you!]  


For our projects today, the design team is showcasing quite a few stamp sets and coordinating dies so I will not have a step-by-step instruction.  I will only be showing you the photos and close-ups.  However, I will have a YouTube video sometime in the next coming weeks to show you some of the cards that I created today.  Be sure to subscribe to my YouTube channel if you haven’t already.  For today’s reveal we are showcasing the Lemon Twist, Gull Friend, Newton’s Melon and Shrimp Cocktails stamp set + coordinating dies.


Here’s my card showcasing the Lemon Twist stamp set.  I also used the Serene Stripes stencil and Tombow markers to color my images.


I added the sentiment “make lemonade” inside the card.


Here’s my card showcasing the Gull Friends stamp set.   I cannot even describe how much I just LOVE this cute stamp set:  I am just blown away on how Jennifer gets to design so many cute stamp set, dies and stencils.


I also used the Sunscape Stencil for my card and a small die from my stash to cut out the piece so I can insert the image.  I love, love, love this cutie!  Here’s a close-up:


Here’s my Newton’s Melon card.  I used the Speech Bubbles die set and ink-blended the card stock with some distress oxide ink to make it look like watermelon.  Clean and simple but I love how it turned out.


Here’s a closer look:


Last but not the least, here’s my Shrimp Cocktails card.  I used the Bubbly Stencil for my background with a some dye inks.  The bow is from the Pines & Holly die set.


This card just cracks me up!  I wanted to create my scene to make it look like they are hanging out and floating in a glass!  I love the shaker elements that I used for the card too.  Here’s a close-up:


Whew! What do you think?  Do you have a favorite?  I love, love, love all of the stamps, dies and stencils revealed this week.  Don’t forget to come back tomorrow because we are having a HUGE blog hop where Jennifer will be picking Six (6) lucky winners!


Would you like to win a $20 store credit to Newton’s Nook Designs?  ONE lucky comment will be chosen from each reveal day to win! 

Here’s how to win:

Comment on the NND blog and Design Team blogs (see list below)! The winner will be chosen at random from the collective reveal posts. Make sure to check out each of their blogs and comment for your chance to win. You will not know which blog has been chosen so the more you comment on the better your chances are of winning! You have until Thursday July 18th at 9pm EST to comment  — winners will be announced on the blog post on Friday, July 19th.

Check out all the awesome Design Team Blogs below to enter:

Newton’s Nook Designs

Amanda Bodine

Holly Endress

Ellen Haxelmans

Larissa Heskett

Samantha Mann

Zsofia Molnar

Naki Rager

Maria Russell (you are here)

Andrea Shell

Tatiana Trafimovich

————SUPPLIES—————


Newton’s Nook Designs 6-Year Celebration – Day 3


It is the third day of the July reveals by Newton’s Nook Designs.   I hope you were able to check out the first two days of the reveal.  You also have a chance to win a $20 store credit everyday during release week so check out the details I have indicated at the end of this blog post.  [Just a little important note:  I know some of you had difficulties finding the comments section.  If you would like to leave a comment to participate in the giveaway, the “comments section” will only be ever visible when a single post on Word Press is being viewed. Please click on this particular blog post and you will be able to leave a comment below.  Thank you!]  


For our projects today, the design team is showcasing Zoo Party and Tropical Fringe stamp sets and they coordinate really well with the previously released Frames Squared die set.


To begin, I stamped my images using Spectrum Noir Finesse Alcohol Proof Dye Ink in Rustic Brown and colored my images in with Spectrum Noir TriBlend and Copic Markers.  I die cut the square using the Squared Fames die set. I also die-cut some patterned paper and black card stock to ground my image, and adhered them on a square card base.


I used my B000 Copic marker to add some shadows to the images to give them more dimension.  I finished my design by adding some white dot details for added texture to the birthday hat and the cheeks.  I also used my black Copic multi-liner to add some eyelashes to some of the animals.  Here’s a closer look:


I did the same steps on my next card but added an image from the Aloha Newton stamp set.  This time, I adhered the Frame onto an A2 size card base and used a stitching die to add more texture on the card.


I finished my design by stamping the sentiment and colored the letters with Copic markers.  I also used my white gel pen to add more details to the pineapple and hibiscus.  Here’s a closer look:


Would you like to win a $20 store credit to Newton’s Nook Designs?  ONE lucky comment will be chosen from each reveal day to win! 

Here’s how to win:

Comment on the NND blog and Design Team blogs (see list below)! The winner will be chosen at random from the collective reveal posts. Make sure to check out each of their blogs and comment for your chance to win. You will not know which blog has been chosen so the more you comment on the better your chances are of winning! You have until Thursday July 18th at 9pm EST to comment  — winners will be announced on the blog post on Friday, July 19th.

Check out all the awesome Design Team Blogs below to enter:

Newton’s Nook Designs

Amanda Bodine

Holly Endress

Ellen Haxelmans

Larissa Heskett

Samantha Mann

Zsofia Molnar

Naki Rager

Maria Russell (you are here)

Andrea Shell

Tatiana Trafimovich

————SUPPLIES—————


Newton’s Nook Designs 6-Year Celebration – Day 2


It is the second day of the July reveals by Newton’s Nook Designs.   I hope you were able to check out yesterday’s reveal.  You also have a chance to win a $20 store credit everyday during release week so check out the details I have indicated at the end of this blog post.  [Just a little important note:  I know some of you had difficulties finding the comments section.  If you would like to leave a comment to participate in the giveaway, the “comments section” will only be ever visible when a single post on Word Press is being viewed. Please click on this particular blog post and you will be able to leave a comment below.  Thank you!]  


For our projects today, the design team is showcasing Newton’s Perfect Wave and Scuba Newton + coordinating dies:


I started with an A2-size Bristol smooth panel and used my Sunscape stencil and distress oxide ink to add the sun.  I die-cut different shades of blue card stock and used the Sea Borders die set to create the waves.  I also die-cut the Coconut trees and border frame from my stash to use for my scene and ink-blended them with distress oxide inks.


I stamped my image on smooth white card stock and colored him in with my Spectrum Noir Triblend markers.  I die-cut the image using the coordinating die.  I adhered my colored background to my card base and adhered the rest of the die-cuts with foam adhesive for added dimension.


I finished my design by adding glossy accents to Newton’s surfboard and stamped my sentiment on the card.  Here’s a closer look:


For my second card, I stamped and colored my images using my Copic markers and used the coordinating dies to die-cut them out.


I used a Sea-border die from my stash to use for my scene. I also ink-blended some Bristol smooth A2-size card stock with some distress oxide inks and sprayed them with water to make it look like bubbles.  I dabbed it with some paper towel, and adhered this piece on my card base.  I adhered the the rest of my elements to the card with foam adhesive to add some dimension and also used some liquid adhesive.


To finish my design, I added some blue enamel dots on the card for added interest and texture and used glossy accents to Newton’s goggles.  Here’s a closer look:


I absolutely LOVE creating “under-the-sea” and beach-themed cards!  You guys will be amazed on how many cute stamp sets we are revealing this week.  I can’t even pick a favorite!


Would you like to win a $20 store credit to Newton’s Nook Designs?  ONE lucky comment will be chosen from each reveal day to win! 

Here’s how to win:

Comment on the NND blog and Design Team blogs (see list below)! The winner will be chosen at random from the collective reveal posts. Make sure to check out each of their blogs and comment for your chance to win. You will not know which blog has been chosen so the more you comment on the better your chances are of winning! You have until Thursday July 18th at 9pm EST to comment  — winners will be announced on the blog post on Friday, July 19th.

Check out all the awesome Design Team Blogs below to enter:

Newton’s Nook Designs

Amanda Bodine

Holly Endress

Ellen Haxelmans

Larissa Heskett

Samantha Mann

Zsofia Molnar

Naki Rager

Maria Russell (you are here)

Andrea Shell

Tatiana Trafimovich

————SUPPLIES—————


Newton’s Nook Designs 6-Year Celebration – Day 1


It is that time of the month where the entire design team get so excited to show off the new stamps, dies and stencils by Newton’s Nook Designs.   This is a very special month because Newton’s Nook is celebrating 6 years! Yay!!!! You also have a chance to win a $20 store credit for each reveal day so please read through til the end of the blog post to find out more info.  [Just a little important note:  I know some of you had difficulties finding the comments section.  If you would like to leave a comment to participate in the giveaway, the “comments section” will only be ever visible when a single post on Word Press is being viewed. Please click on this particular blog post and you will be able to leave a comment below.  Thank you!]  


For the first day of the reveals, we are showcasing Corgi Beach + coordinating die with the Hibiscus and Pineapple Layering Stencils, PLUS three (3) new edge stencils.  Here’s what they look like:


I started out with an A2 size panel of Bristol smooth white card stock and ink blended this piece with some distress oxide inks.  I used the Waves edge stencil and the Clouds edge stencil to create the clouds and the water.


I stamped and colored my images on some Neenah solar white card stock and colored them in with my Spectrum Noir alcohol markers. I used the Sea Border and Sky Border dies to create more texture to my ink-blended panel.  I adhered this piece on an A2-size side-fold card base and adhered the images with liquid and foam adhesive.


The coconut drink next to the Corgi is from the Aloha Newton stamp set.  I love that you can mix and match the stamp sets available at the shop.  To finish my design, I added glossy accents to the sunglasses and noses for added interest.  Here’s a closer look:


For my second card, I stamped and colored my image from the Aloha Newton stamp set using Spectrum Noir Finesse Alcohol Proof Dye Ink and colored it in with my Spectrum Noir TriBlend markers.  I ink-blended some white card stock using the new Clouds and Hill Edge stencils and die cut this piece with a scalloped border die from my stash.


I used the new Pineapple Layering Stencil with some distress oxide inks to ink-blend a panel of Bristol smooth white card stock.  I used my Spectrum Noir TriBlend marker in Light Pink blend to add the dots.  I attached an A2 size vellum, and adhered my focal image on the front of the card.


To finish my design, I added the sun, the coconut drink and the “Aloha” sentiment from the Aloha Newton die set.  I also added glossy accents to the coconuts to add more texture and interest.   Here’s a closer look at the card:


Would you like to win a $20 store credit to Newton’s Nook Designs?  ONE lucky comment will be chosen from each reveal day to win! 

Here’s how to win:

Comment on the NND blog and Design Team blogs (see list below)! The winner will be chosen at random from the collective reveal posts. Make sure to check out each of their blogs and comment for your chance to win. You will not know which blog has been chosen so the more you comment on the better your chances are of winning! You have until Thursday July 18th at 9pm EST to comment  — winners will be announced on the blog post on Friday, July 19th.

Check out all the awesome Design Team Blogs below to enter:

Newton’s Nook Designs

Amanda Bodine

Holly Endress

Ellen Haxelmans

Larissa Heskett

Samantha Mann

Zsofia Molnar

Naki Rager

Maria Russell (you are here)

Andrea Shell

Tatiana Trafimovich

————SUPPLIES—————


Stalked Ya Til You Liked Me!

Hello The Rabbit Hole Designs fans!  I am back today with a super funny (or creepy?) card, showcasing the Beach Day and Sassy Sentiment stamp sets.


Here’s how I made the card:

  • stamp the images on Neenah solar white card stock and color the images in with Spectrum Noir alcohol markers (or any medium of your choice).
  • cut the images using Brother Scan N Cut 2.
  • to create the water, I used a scene building stamp.  I also used a clouds stencil to create the clouds on the background.
  • on another A2 size panel, use a die to cut the window.  Use an embossing folder to emboss this piece.
  • use a palm tree die to die-cut the coconut tree on smooth white card stock.  Color the pieces with Spectrum Noir markers.
  • stamp the sentiment from the Sassy Sentiments stamp set on a piece of black card stock with Versamark ink.  Sprinkle white embossing powder and heat-set using my heating tool.
  • assemble the card.
  • finish the design by adding the enamel dots on the coconut tree.


The Sassy Sentiments stamp set is one of my all-time favorites and when I saw the Beach Day stamp set, I knew I needed to create this card design.

Here’s a closer look:


I hope you like my card and got inspired.  The supplies I used are listed and linked below.  Have an amazing day and happy crafting!


For more inspiration, updates, and news make sure to check out these places.


———-SUPPLIES———–


The Rabbit Hole Designs June Release- Day 2 – By The Shore & Mermaid Hair

TRHDJuneIcon

Hello and welcome to the release hop.  We are so excited for you to join us as we present to you our June release. The whole design team will be sharing projects featuring the By the Shore and Mermaid Hair stamp set.   We also have a GIVEAWAY so please be sure to scroll at the end of this blog post to find out how you can WIN.  Don’t forget to visit the participating blogs (links are indicated below) and leave us some crafty love.

Here’s is my first card:

TRHDMermaidHair1A

Card recipe:

  • stamp the images on some Neenah classic crest solar white card stock and color the images in with alcohol markers (or any medium of your choice).
  • die-cut the image using Brother Scan N Cut 2
  • use a die from my stash to die-cut the Coral and seaweeds from colored card stock.
  • use distress oxide inks to ink up the die-cut.
  • spray the colored panel with some water using the distress sprayer and dab it dry with paper towel.
  • use the waves stencil on the colored background.
  • die-cut the two white panel using the fancy scalloped border dies.
  • adhere the colored background on an A2 size card base, and adhere the rest of the die-cut elements.
  • adhere the fancy scalloped die-cut white panel using foam adhesive.
  • adhere the mermaid image using foam adhesive.
  • use stardust stickles to add some glitter on the mermaid’s hair and the bubbles to finish the design.

Here’s a closer look:

TRHDMermaidHair1B

I think this mermaid is one of the cutest images I have ever seen!  So many possibilities using this set.  This will also be perfect to use on a mermaid-themed birthday card!

Here’s another simple card that I made using the stamp set:

TRHDMermaidHair2A

I masked my card stock using painter’s tape and used a Waves stencil with the make-up brushes to create the waves on the background.  I also used some stitched border dies to create the arrows and wonky stitched lines.

TRHDMermaidHair2B

GIVEAWAYS:
To celebrate day 2 of the release The Rabbit Hole Designs is giving away winners choice of either Mermaid Hair or By the Shore to One lucky winner. Winner will be chosen at random from the comments left on participating blogs, so make sure to visit each stop and leave a comment. Leave comments by 11:59 pm PST May 30, 2019 on all participating blogs. Winner will be announced on The Rabbit Hole Designs blog May 31, 2019.
Here’s the order of the hop:

For more inspiration, updates, and news make sure to check out these places.

———SUPPLIES———–