Toil and Troubled by Kat Scrappiness

Hello my crafty peeps!  I hope you are having a great day so far!  I am back today for Kat Scrappiness, showcasing the new Halloween Stamp Set called Toil and Troubled Layer stamp set, Cross-stitched Rectangle Dies, Spooky Sparkles Sequin Mix and the Waves Border Dies. Just a little heads up, I will have a haul video soon on my YouTube channel showing you a sneak peek of my huge giveaway coming up next month around Thanksgiving!  Please stay tuned for that announcement.  If you are not subscribed to my channel yet (www.youtube.com/rprmlr772), you need to head on over there because you wouldn’t want to miss new process videos of craft projects I have lined up, plus of course the giveaways I do regularly.

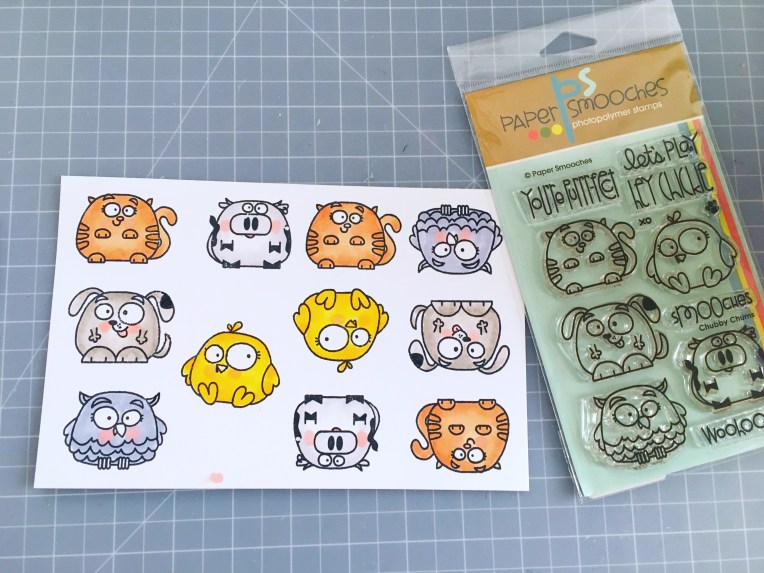
I started out by stamping the cat image with my stamping tool, using two light gray inks,  the Simon Says Stamp Fog Ink and Lawn Fawn Hippo Ink.  I have the coordinating die for the cat but I didn’t want a black border around it so I fuzzy-cut it with my precision tip scissors.

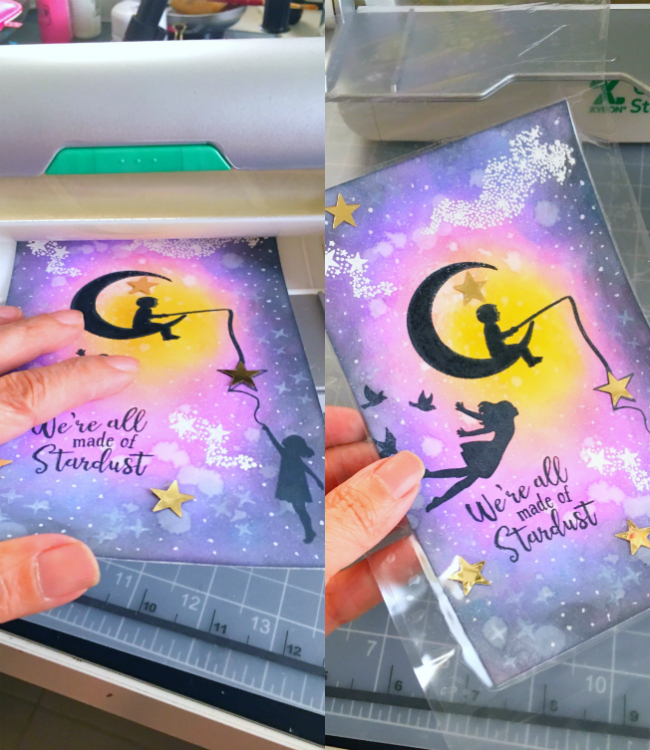
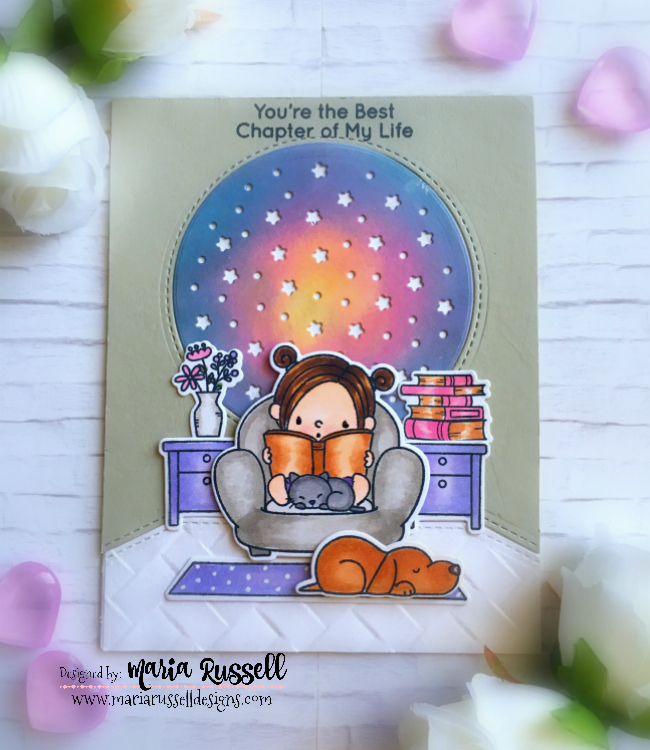
I used the biggest of the Cross-stitched rectangle die to die-cut my card front with a light gray card stock, and used a die from my stash to create the spooky window scene.  I wanted to do a fun shaker card and use one of my all-time favorite sequin mixes by Kat, called Spooky Sparkles Sequin Mix.   I covered my little spooky scene with the Dovecraft Heat-resistant Acetate sheets.

I die-cut my spider-web with the Lawn Fawn Spider Web die, adhering it with my Nuvo Deluxe Adhesive, and also adhered my Black Cat and the Waves Border Die.  I finished the design by adding the little ghosts from the Boo-tacular Sequin Mix and stamped the sentiment.  Here’s the card:

KatScrapBlackCat

I hope you like my card today and got inspired.  The supplies I used are listed and linked below. Have an amazing day!

————SUPPLIES————-


Newton’s Nook Designs Dreaming of a Pink Christmas

This is my second blog post for today.  I am up on the Newton’s Nook Designs blog with this Christmas card, showcasing the Festive Flamingos stamp set, Land Border Dies and the Pines and Holly Die Set.   I wanted to give you a little preview of what’s to come this month on Newton’s Nook.  You will absolutely love the new stamp sets coming out next week.  Please stay tuned.


I started out by stamping my images on Neenah Solar White card stock and colored the images in with my Comic markers.  I fuzzy-cut the images with my precision cut scissors. I also die-cut the other elements that I needed for the card.    This is a fairly simple card but I love how it turned out.  Here it is:


NNDFlamingo


I hope you like the card.  Have a wonderful day!


All Die-Cuts Halloween Card

Hello my crafty friends!  I hope you are having a wonderful day so far.  I am back with this All Die-Cuts Halloween card showcasing products available at www.katscrappiness.com.

To keep this blog post a bit short, I have a process video for you today to show you how I made this card.

Here is the card:

KatScrapWitch

Here is the process video:

I hope you like the card.  I have listed and linked the supplies I used below.  Happy crafting!

—————–SUPPLIES—————–


World Cardmaking Day Blog Hop with Kat Scrappiness

KatScrap Worldcardmaking Day Sale Image

Thank you so much for joining in on the World Cardmaking Day fun with KatScrappiness.com!  Today all of the designers are participating in a fun blog hop with their inspiration and take on the first Kat Scrappiness Mood Board Challenge!  There will be lots of prizes to be won and several chances to win. Make sure you comment on all the designers blog posts today for several chances to win and then make a card (or any project) inspired from our mood board and link up to the Kat Scrappiness blog before Monday October 9th for a chance at winning one of several prizes! All winners will be announced at the Kat Scrappiness blog on Tuesday October 10th, by Noon PST. Don’t forget you can get 15% off in the KatScrappiness.com shop today only! Use Code “IMAKECARDS” at checkout!

Here is the Mood Board that is a part of the challenge and what has inspired my projects today!

katScrap Worldcrdmking moodboard

For my card, I am showcasing products available at the shop.  The card that I created below is very simple and anyone can re-create it.  I know that some of you are just beginners, and don’t really have a lot of supplies.  I wanted to show you that you could create a beautiful card even with just using a patterned paper, and some die-cuts.

I started out by die-cutting my cute little witch using the Witch with Cat Die by Gina Marie Designs.   I also die-cut the Stitched Heart Tag Die and the Cross-Stitched Rectangle Dies for my card front.  I fuzzy-cut the tombstones and the Happy Halloween sentiment strip from the BOOtiful Night 6×6 Paper Pad by American Crafts.

I wanted a small shaker element on my card, without making it look too busy.  I used black fun-foam (instead of a foam adhesive) and run it through my Xyron Creative Station Lite with a Double Permanent Adhesive to create a sticker.  This will ensure that both sides of the fun foam will have edge-to-edge adhesive and your shaker elements will be completely secure!  I used some of my favorite Halloween sequin mixes, i.e. the Spooky Sparkles Sequin Mix and the Autumn Harvest sequin mix.   I adhered the tag on my card base.

To finish the design, I die-cut a stitched hill die from my stash, then adhered it onto the card front, with my cute little witch and the tombstones.  I stamped the spider web and the little spider using a stamp from Newton’s Nook Designs, and added some white dots with my Uni-ball Impact Bold Point White Gel Pen.

Here is the finished card and I hope you like it.

KatScrapWCMD17

I hope you have been inspired by my projects today! Below is the list of all the designers participating in the blog hop.

Kat Scrappiness Designers (Blog Hop Links)
Taniesa
Maria
Hannah
Heidi
Jess
Angeline

To go to the Kat Scrappiness Shop Click HERE and save 15% off your total purchase today (10/7/17) only!  To go to the Mood Board Challenge blog post click HERE and enter your card for a chance to win fabulous prizes!

————SUPPLIES————

Xyron and Paper Smooches Collaboration

Hello my crafty friends!  I am super excited because today, the Xyron Design Team is collaborating with Paper Smooches.  Thank you Paper Smooches for the goodies that you have sent us.


For my cards today, I am showcasing the Chubby Chums stamp set and the Bunny Card Die .  This set is so adorable!  Please visit www.papersmooches.com to purchase cute stamps and dies.


I started out by stamping my images on Neenah solar white card stock and colored the images in with my Copic markers.   I fuzzy-cut the images with my precision scissors.


IMG_5669


Halloween is fast-approaching and I wanted to show you that you can use any stamp set for pretty much any occasion.  I used a frame die from my stash for my little “chubbies” and used my favorite Xyron Mega Tape Runner to adhere it onto my card front.  I also used the tape runner to adhere the critters.


IMG_5671


Here’s the card:


XyronPaperSmooch1


Aren’t they adorable?  I added a cute witch’s hat to my Owl and a trick-or-treat bag to my cat.


Since I colored so many of the images I wanted to create a birthday card.  I used dies from my stash and to adhere the intricate bow on my card front, I used my Xyron 1.5 Inch Sticker Maker.  When I adhere intricate dies, I always use either my sticker maker or my Xyron Creative Station Lite.


IMG_5677


Here’s the birthday card:


XyronPaperSmooch2


Paper Smooches was very generous and also sent us the Bunny Card Die.  Here’s a little foldable treat bag that I made:


XyronPaperSmooch3


I hope you like my projects today.  Have a wonderful day!


Pumpkin Spice in my Latte

Hello my crafty friends.  I am up for Kat Scrappiness today to share with you a simple coffee-themed shaker tag, showcasing products available at the shop.

I started out by stamping my images using the Pumpkin Spice Stamp Set and Dies by Lawn Fawn on Neenah solar white with my Memento Tuxedo black ink.  I colored the images in with my Copic markers and die-cut them with its coordinating.

I wanted to create a cute shaker tag to use some new sequins from the shop, the Teal Woodgrain Flat and 6mm Orange AB Hallow Circle mix so I die-cut a medium tag using my Kat Scrappiness Stitched Scalloped Nesting Dies with the Lawn Fawn Perfectly Plaid Fall Collection Paper Pad.  I stamped my sentiment onto my tag, and assembled the shaker tag.

I hope you like my shaker tag.  I have also listed and linked the supplies I used below if you’re interested.  Please use my coupon code Maria10 for 10% off your order at the shop.  Have an amazing day!

KatScrapPumpkin1

Here’s a close-up:

KatScrapPumpkin2

———–SUPPLIES————-


Laminated Planner Insert with Xyron Creative Station Lite

Hello my crafty friends! I hope you are having a fabulous week so far. I’m back today for Xyron and I have a cute project to show you, using the Creative Station Lite, with a double-sided laminate cartridge.

I have always loved to decorate my planner. If my planner looks organized and beautiful, I get inspired to use it more. Write my thoughts down and update my schedule.

As soon as I open my planner, I would like to see something inspiring, something beautiful. Most of the times the cover that you get when you purchase your planner is plain and boring ~ so I decided to create my own planner insert.

I started out by cutting a Bristol Smooth white card stock measuring 4 ¼ by 6 ¾. I am using my favorite combination of distress oxide inks for galaxy backgrounds (i.e., fossilized amber, picked raspberry, wilted violet, broken china and black soot). Using my mini-ink blending tools, I started to sponge the fossilized amber in the middle, then blended the rest of the distress oxide colors onto my card stock.

XyronLaminate1

I used my distress sprayer to spray some water on my colored background to achieve the distress look, dabbing the excess water droplets with a paper towel. They look like stars in the sky!

XyronLaminate2

I stamped by images using a stamp set by Hero Arts onto my colored card stock with memento tuxedo black ink. To add the stars, I stamped them with versa mark ink and heat set it with white embossing powder. I also added the sentiment “We’re All Made of Stardust”. To finish the design, I added some gold star confetti.

Using my Creative Station Lite with a double-sided laminate cartridge, I inserted my decorated planner insert through the machine, cranked the handle, and cut it through using the trimmer on the other side. Here’s what it looks like once it’s fully laminated. I really love that you can use laminate projects using this machine without having to use heat or electricity.  I trimmed the excess with my scissors.

XyronLaminate3

I used my We R Memory Keepers Crop-A-Dile to punch the holes on my planner insert. Here’s what it looks like inside my travel planner.

XyronLaminate5

XyronLaminate4

Isn’t it beautiful? I absolutely love creating my own planner inserts to decorate my planner. What do you guys think? I hope you like my project today.  For more project inspiration using Xyron products, please visit the Xyron Facebook Group here (https://www.facebook.com/xyroninc/) or the website at www.xyron.com.   I have also listed and linked the supplies I used below.  Have an amazing day!

————-SUPPLIES————

Click on the link to go directly to the product. Where available, I used compensated affiliate links which means if you make a purchase I receive a small commission at no extra cost to you. Thanks for your support.


You’re The Best Chapter of My Life

MFT_Superstars2017_BlogBanner


I finally made another card for my third and final entry for the 2017 Card Design Superstar.   The card that you see below is my entry for the “Coloring Virtuoso” category.  I love MFT Stamps and for today’s card, I am showcasing a lot of these stamps and dies that I have been collecting over the years.  The products I used will be listed below, and they are all available at www.mftstamps.com.


I started out by stamping my images from the Our Story stamp set, with the Make Yourself At Home stamp set on white card stock with the MFT Stamps Black Licorice Hybrid Ink.  I thought these two stamp sets would be the perfect pair to create my card. I colored the images in with my Copic markers.  I have always loved coloring with my Copic markers!    I die-cut the images with the coordinating dies.


I wanted to give my little girl a nice starry, colorful window background so I used a combination of different inks to blend the colors on smooth white card stock.  I used the Die-namics Starry Circle to die-cut the background.  I also used the same die to die-cut my card front.  I wanted to inlay all of my die-cut elements on the card for my scene.  For the “flooring”, I dry-embossed my white card stock and die-cut it using the Die-namics Stitched Basic Edges 2.


Here’s my card:


MFTColoringVirtuoso


I hope you like my card.  Please visit http://www.mftstamps.com to purchase the supplies I used for the card.  Have an amazing day!


SUPPLIES:

BB Our Story Stamp Set

Die-namics BB Our Story

Make Yourself At Home Stamp Set

Die-namics LJD Make Yourself At Home

Die-namics Stitched Basic Edges 2

Die-namics Starry Circle


Happy Haunting with MFT Stamps

MFT_Superstars2017_BlogBanner

The MFT 2017 Card Design Superstar is here and I am super excited to participate.  The card that you see below is my entry for the “Innovation Master” category.  I have always loved MFT Stamps and for today’s card, I am showcasing a lot of these stamps and dies.  The products I used will be listed below, and they are all available at www.mftstamps.com.


I started out by stamping my images on white card stock with the MFT Stamps Black Licorice Hybrid Ink and colored the images in with my Copic markers.  I thought the new Happy Haunting stamp set would be the perfect pair with the Frightful Friends stamp set (released by MFT Stamps last year).  I die-cut the images with the coordinating dies.


I die-cut all of the elements I needed for my scene. For the frame, I used the Die-namics Blueprints No. 32, the Die-namics Stitched Clouds Edges, and the Die-namics Birch Trees.


I die-cut an A2 size Vellum card stock because I wanted to create a see-through scene so that I can also use this card to display on my Halloween mantle. I wanted to use an LED tea-light to give a spooky glow behind Mr. and Mrs. Frankenstein. I love how this card turned out.


Here’s the card without the LED tea-light behind it.


MFTHappyHaunting2


Here’s the card with the LED Tea-Light on!  Don’t you just love the moon peaking from behind the clouds and birch trees?


MFTHappyHaunting1


Here’s a close-up of the card with the LED Tea-light.  It looks so good on my Halloween mantle display.


MFTHappyHaunting3


I hope you like my card.  Please visit http://www.mftstamps.com to purchase the products I have listed below.  Have an amazing day!


Happy Haunting Stamp Set

Happy haunting Die-namics

Frightful Friends Stamp Set

Frightful Friends Die-namics

Die-namics Blueprints No. 32

Die-namics Stitched Clouds Edges

Die-namics Birch Trees

Die-namics Hillside Grassy Hills

MFT Stamps Black Licorice Hybrid Ink