Wake Up and Smell the Coffee – 2018 National Coffee Day Hop with Kat Scrappiness

Hello my crafty peeps!  Today is National Coffee Day and since I belong to 3 design teams, you will be getting 3 posts in relation to this.


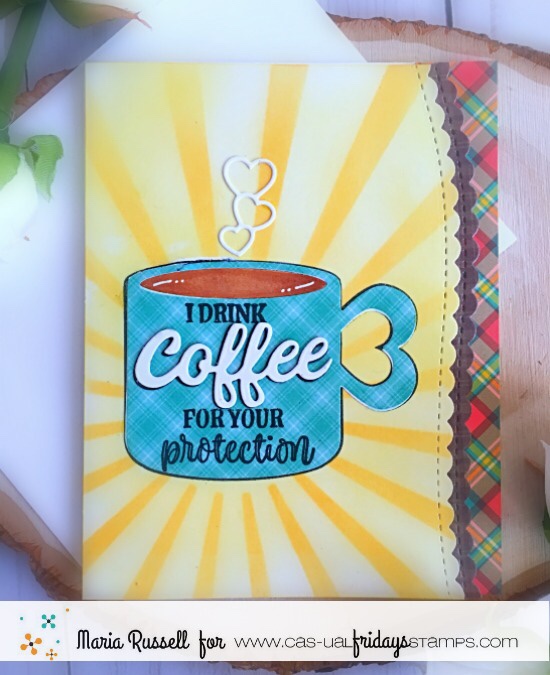
For my project today, I am showcasing the Let’s Get Caffeinated stamp set, with the Peacock Backdrop die and the double-stitched oval dies.  Kat Scrappiness is also giving away two $25.00 gift cards to Kat Scrappiness shop, as well as a SECRET coupon code!  Please go to http://www.katscrappinessblog.com to enter.


KatScrapCoffeeLoversSept181A


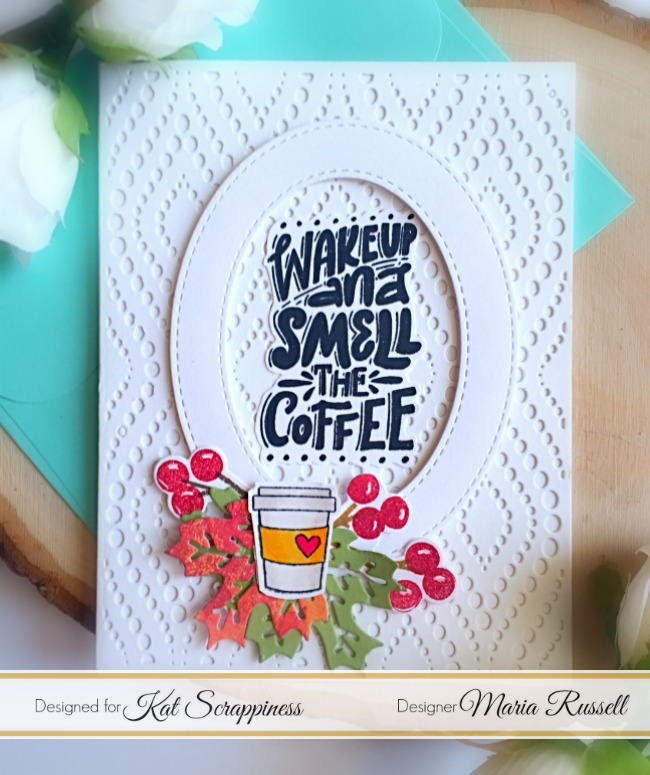
To enter the giveaway, simply leave a comment on the Kat Scrappiness blog post letting us know your favorite coffee related project from her blog post today as well as your favorite Coffee Related Product at Kat Scrappiness.  Kat Scrappiness will choose TWO winners who will each win a $25 gift card to Kat Scrappiness to spend as you’d like!  We will announce the two winners on Monday, October 8th right here on our blog!  Here’s another look:


KatScrapCoffeeLoversSept181C


Secret Coupon Code for Coffee Lovers!

Remember that secret coupon code I mentioned at the beginning of this post?  Here it is!  Save 15% on all Coffee related items at Kat ScrappinessWAIT A MINUTE! Let’s just make it 15% off EVERYTHING IN THE STORE!!!  Just Use coupon code:

“CoffeeDay”

Coupon is valid from 9/29 – 10/1 at http://KatScrappiness.com  Happy crafting!


I Drink Coffee For Your Protection – 2018 National Coffee Day with CAS-ual Fridays

CLBHSEPT29Photo


Today is National Coffee Day and we are doing a little blog hop at Cas-ual Fridays Stamps.  For my card today, I am showcasing the Coffee Cup Fri-Dies with the Coffee Talk stamp set and Cup of Coffee stamp set.


I started by stamping my coffee cup stamp onto some patterned paper. I used the Coffee cup fri-dies to die-cut the image.  I stamped my sentiment using the Coffee Talk stamp set and also used the “coffee script die to die-cut the coffee.  I adhered this piece on my coffee cup.


On a piece of Bristol smooth card stock, I used a sunburst stencil to color my background with some distress oxide inks.  Here is my card:


I really love how this card turned out.  I used my white gel pen to add some details to my card.  Here’s another look:


I hope you guys like my card today.  Please visit Car-ual Fridays stamp to purchase the stamps and dies I used today.  Don’t forget to use my coupon code below to get 15% off your order.


Birthday Fishes – Underwater Scene with Copic Markers

Print


Hello MFT fans!  I am back today with this underwater scene card using stamps by My Favorite Things for the 2018 Card Design Superstar contest.  I finally summoned up some courage to “freehand” my background and I thought I was going to hurl!  Haha!   I am so very thankful to MFT for this contest because they encourage us all to join and get out of our comfort zone, whether you are a beginner or an expert!  I am certainly a beginner when it comes to drawing/coloring my own scene.  I had second thoughts about joining since this is a tough competition.  Just looking at all the other entries make me nervous but I thought I’d go ahead and try anyway.


I only have a few MFT dies and stamps with me to get by since I have just packed up my entire studio and shipped it back to my home in Orlando, FL about a month ago.  However, that will not stop me from joining the contest!   This card entry is for the Coloring Virtuoso category.


I envisioned a design in my head and started drawing my background with different Copic markers on some Neenah 110 lb. white card stock.  I layered different colors of blue, blue green and lilac Copics to create my water scene.  I also drew some seaweeds with different green and yellow Copic markers and mixed it up a little with brown.  To draw the sand, I used Earth tones – E40, E41, E43, E44.


I stamped my images with MFT Black Licorice Hybrid ink using the BB Gill Friends stamp set and Beach Buds stamp set.  I colored them in with Copic markers and fussy-cut them with my precision scissors.  I adhered them onto my card base with liquid adhesive.


To finish my design, I used my Colorless blender to create bubbles on the water and stamped my sentiment with Versafine Onyx black ink.  I also used my Sakura white gel pen to add more details to the fishes.


MFTDesignSuperstarColor1A


I was so nervous creating this background but I absolutely LOVE how this card turned out!  The images on both stamp sets can be mixed and matched to create a wonderful scene.   Here’s another look:


MFTDesignSuperstarColor1B


Doesn’t this card make you want to go snorkeling in the Maldives?  That crab wearing the sunglasses is just adorable!


MFTDesignSuperstarColor1C


I hope you like my card today!  I’d like to take this moment to THANK MFT Stamps for this great opportunity and for keeping us motivated to get out of our comfort zone!  Good luck to everyone playing along!  The supplies I used are listed and linked below.  Happy crafting!


MFT Supplies Used:


A Happy Hello – CAS card with MFT Stamps

Print


It is that time of the year again where all card designers get pumped and excited for the 2018 Card Design Superstar contest by MFT Stamps.   I am completely bummed since I have just packed up my entire studio and shipped it back to my home in Orlando, FL about a month ago.  I kept a few dies and stamps with me to get by, until I get my shipment.  Needless to say, most of my MFT stamps are in the shipping container and I am left with 3 stamp sets and a few sentiments.  However, that will not stop me from joining the contest!   This card entry is for the Clean and Simple Genius category.


I started by stamping my image on some Neenah solar white card stock using MFT Stamps Black Licorice hybrid ink and colored him in with my Copic markers.  I fussy-cut this image using my precision-cut scissors.


IMG_9669


I die-cut the word “hello” a couple of times with some  white card stock using the  Hello There Die-namics by MFT stamps.  I cut another piece of some white card stock  with the Stitched Scallop Basic Edges Die-namics and adhered this piece onto my card base.  I also adhered the Hello die-cuts onto my card panel, as well as my colored image.


MFTDesignSuper2018CAS1A


To finish my design, I stamped the sentiment “A Happy Hello”.  Here’s a little close-up:


MFTDesignSuper2018CAS1B


I love creating Clean and Simple cards!  Sometimes less is really more!  I love how this card turned out!  Here’s one last look:


MFTDesignSuper2018CAS1C


I hope you like my card today!  THANK YOU SO MUCH MFT Stamps for this great opportunity!  Good luck to everyone playing along!  The supplies I used are listed and linked below.  Happy crafting!


MFT Supplies Used:

  •     A Happy Hello stamp set
  •     Black Licorice Hybrid Ink
  •     Hello There Die-namics
  •     Stitched Scallop Basic Edges Die-namics


I’ll Always Be Your Angel with Kindred Stamps

Hello Kindred fans!  Are you still swooning over the August stamp release or just in-love with everything that Kindred stamps has to offer?  To be honest, the stamp set that I used for this card is probably one of my top five favorites by Kindred.


For today’s project, I am showcasing the Slay stamp set.  I can’t even begin to express how much I LOVE this set.  When this stamp set was released in July, I was a bit bummed that it wasn’t assigned to me but of course there’s no stopping me from ordering this set.  I sent a couple of messages to Audra to reserve this stamp for me because I just NEED this in my life, haha!


I started out by stamping my images on some Copic friendly paper and colored them in with my Copic markers.  I had to color my Vampire with different gray inks to give him dimension because I knew that I was going to create a night scene and the background will mostly be black.   I fuzzy-cut my images using my precision cut scissors.


I cut an A2 size piece of some Bristol smooth white card stock, and inked it up with my Distress Oxide inks –> Black Soot, Seedless Preserves and Faded Jeans.  To add the stars in the sky, I used my Copic white paint and added some water, then used my watercolor brush to splatter it onto my colored background.  I also die-cut the other elements I needed to create my scene.


I adhered the die-cuts onto my colored background and added the big hill, then adhered this piece on my card base.  I used my powder tool to get rid of some static and stamped my sentiment onto the card with some white embossing powder and heat-set it with my heating tool.  I adhered my stamped images onto the card.  To finish the design, I used my black glazed pen to give the eye a little more dimension.


I really love that even though the background is quite busy, the images just managed to stand out!  Here’s a little close-up:


I just simply adore the stamp set.  It is definitely in my top five favorites by Kindred stamps.


What do you think?  I hope you like my card today and got inspired.  Please visit Kindred Stamps to purchase this stamp set.  I hope you have a wonderful day and happy crafting!


Simple Cards with Patterned Paper & Bold Sentiments Featuring “Be” stamp set

Hello CAS-ual Fridays fans!  I hope you are having a great week so far.  Maria here with you today sharing some very simple cards with pretty patterned papers and bold sentiments, showcasing my favorite stamp set called “Be”.  Here’s what I used for my projects today:

As paper crafters, I’m sure you can relate that we all have a bajillion collection of patterned papers!    Sometimes when I am not feeling all crafty especially when experiencing jet lag, I want to create some very simple but beautiful cards.  I always look at my collection of patterned papers and bold sentiments stamp set.  The “Be” stamp set is just what I needed today to create some encouraging cards.  This stamp set is a must-have!

Some of my non-crafty friends used to tell me that they just didn’t have any patience to make hand-made cards.  If you are a beginner and you don’t have a lot of supplies (or have no patience to color and die-cut), you can still make pretty cards by collecting some amazing stamp sets like the one that I used here and some beautiful patterned papers.

For my first card, I cut a patterned paper that I purchase from the craft store and adhered this piece to my card base.  I think the sentiment I used for my card below went perfectly well with the images on the paper.

To finish my card I simply added some white dot details to the images with my Sakura Gelli-Roll pen.

This card only took less than 2 minutes to make but I think it will definitely make someone’s day.  The bold sentiment complimented the busy background.  Here’s a close-up:

For my second card, I used a rainbow patterned paper and a die from my stash to die-cut the middle piece.  I adhered this piece onto my A2 size card base with some foam adhesive.  I stamped the sentiment in the middle.

To finish the design, I added the white die-cuts using the Jumping Jacks Fri-dies.  I also added some sparkling clear jewels.

Don’t you just love the simplicity of these two cards?  I hope you got inspired today.  Please visit CAS-ual Fridays stamps to purchase the supplies I used.  Don’t forget to use my coupon code below, for 15% off your order.  Have a wonderful day and happy crafting!

I Craft Therefore I Hoard

Hello my crafty friends! I hope you are all having a great week so far. Maria here with you today and I am back to share with you two card samples showcasing the new Crafter’s Gonna Craft stamp set, with the new Stitched Scalloped Collage Frame Die.

I have been super busy traveling for the last few weeks that I don’t have a step-by-step instruction for you.  I guess if you are a card maker or a scrapbooker, you would have figured out how I made the cards already but I apologize if you are a beginner.  Please know that once I am back on a regular schedule, I will have a step-by-step tutorial or even a YouTube video. I promise!  Here’s my first simple, one-layer card:


This new stamp set is a must-have for any paper crafter!  Here’s another look:


My second card just cracks me up!  If you are a crafter, I am sure you can relate with the sentiment.


Isn’t it true though?  I am such a hoarder.  I collect anything and everything that I can use for a future project, it drives my husband nuts!  I didn’t realize how much hoarding I’ve been doing until it was time to pack up most of my craft supplies to move it all back to my home in Florida.


I also LOVE the new sparkling jewels at the shop.  They come in different colors but my favorite is the clear, sparkling one that I used on my project.  I prefer adhering it flat-side up and I think it gives more shine.

I hope you like my projects today.  Please don’t forget to check out the August release by Kat Scrappiness.  The new dies are must-haves for sure!  Don’t forget to use my coupon code “MARIA10” for 10% off your order.  Also, don’t forget to check out the Lawn Fawn items that are currently on sale at the shop for 20% off by using code “LAWNFAWN”.  It is only valid until August 12th.  Have an amazing day and happy crafting!

——SUPPLIES—–


https://linkdeli.com/widget.js?1533216656914

I Put A Spell On You with Kindred Stamps

Hello Kindred Stamps fans!  I hope you are all having a great week so far.  Maria here with you and I am super excited to write my first blog post as a design team member of Kindred stamps.  I am so happy and honored to be working with these talented ladies and I hope you will also be inspired by my designs.   You will also find more of my work on my blog –> Maria Russell Designs.


For my project today, I am showcasing the Witch Sisters stamp set.  I love HALLOWEEN and if I can celebrate it all-year round, I definitely would.


I started by stamping my images on some Neenah Solar White Card Stock using Memento Tuxedo Black ink.  I colored my images in with my Copic markers and used by precision scissors to fuzzy cut the images.


I used an apartment die from my stash to die-cut the pieces I needed to create the “cottage” for my cute little witches.  I adhered the pieces onto a black card base and added the witches.


To finish my design, I fuzzy-cut a black cat image from the All Hallow’s Eve 6×6 paper pad collection by American Crafts.  I colored the cat’s eyes with my Green Copic marker.  I also stamped my sentiment on a scallop oval and added this piece on the awning.  Here’s my card:


I really love how this card turned out.  To add a little whimsical touch, I added some Stardust Stickles on the candle flame  Here’s another look:


I also added a small ghost on the sentiment:


I hope you got inspired today!  Please visit Kindred Stamps to purchase the Witch Sisters stamp set that I used today.  Have an amazing day and happy crafting!


Enjoy the Ride with Paper House Productions

Hello Paper House Productions fans!  I cannot believe that time flew by so fast and I am sad to say that this is my last blog post for Paper House Productions.  I have been so FORTUNATE to be able to work with the AMAZING products by PHP, the talented design team and of course, everyone at Paper House Productions.  It has been a great journey to be a part of this design team which is why I chose “Enjoy the Ride” theme for my project today.


For our final project, we were asked to pick out our FAVORITE product from the Paper House Productions.  Mind you, this wasn’t an easy task!   I LOVE the paper pads, the stickers, washi tape, traveler’s notebook, etc.   However if there’s one thing that I’ve been loving (and buying) the most even before I got on this design team, it’s always been the stickers!   Sometimes when I want to create a beautiful card without stamping or doing a lot of fancy stuff, I always make cards with stickers.  I also love adding stickers to my scrapbook layouts and planners.


To start, I stamped an A2 size card stock with my background stamp with a mint green ink and die-cut the same with my Stitched Wonky Die.  I also die-cut another piece of white card stock to create the frame.


I have been dying to use this Stickypix “It Takes Two Cardstock Multi-Pack” stickers because I absolutely love everything in this pack.  It has all of my favorite color combination – Mint Green, Light Blue, Red, Pink and Gold.  I picked the bicycle, stars and flowers on this pack.


IMG_8696 2


This card took about less than 10 minutes to make and can be easily mass-produced.   Here’s my card:


PHPStickerCard1


I just love the gold-foil details on the bicycle and the flowers.


PHPStickerCard1B


I also simply adore the little stars in the sticker pack.  I added a couple of them on my card.


PHPStickerCrd1A


It has been a great pleasure working with The Paper House Productions and the talented Design Team for Winter/Spring Term.  Thank you everyone for this amazing journey.  It really has been a great ride!


XOXO,

Maria


SUPPLIES:  Sticker Pix It Takes Two Cardstock Multi-Pack Stickers