Easy Thanksgiving Crafts with Xyron

I hope you are all having a great week so far.  All week long, the Xyron Design Team will be sharing easy Fall/Thanksgiving projects on the Xyron Facebook group.  For my projects today, I am making a bunch of treat bags to give to my guests for Thanksgiving.  I also made some place card holders and decorated a bunch of LED candles to decorate my table.


If you don’t have the supplies to create the treat bag, you can definitely buy some bags from the dollar store or craft stores, and decorate them with silk fall leaves or any other fall-themed embellishments, and fill them with surprise treats for your guests.


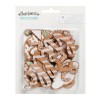
I started out by die-cutting some American Crafts card stock using my Mama Elephant Treat Bag die.  To decorate the bag, I die-cut the pumpkin with the Mama Elephant pumpkin add-on dies.  For my sentiment, I die-cut the “Thank You” script using my Kat Scrappiness Thank you script die.


XyronThanksgiving1


I assembled the bag using my Xyron Mega Runner.  I also used the mega runner to adhere the pumpkin.  To make things easier, I used my Xyron sticker maker to adhere the tiny pieces that goes with the pumpkin, as well as the Thank You Script sentiment.  I filled my bag with some treats.


IMG_5966IMG_5967


Here’s the treat bag:


XyronThanksgiving2


Since I have some leftover leaves that I die-cut from a previous project, I decided to make some place card holders, that will hold the utensils and a note pad for my guests to write what they are thankful for this year.  Here’s what it looks like:


XyronThanksgiving3


I also decorated some LED candles to decorate my table, using my Xyron sticker maker and Mega Runner.


XyronThanksgiving4


Xyron and Paper Smooches Collaboration

Hello my crafty friends!  I am super excited because today, the Xyron Design Team is collaborating with Paper Smooches.  Thank you Paper Smooches for the goodies that you have sent us.


For my cards today, I am showcasing the Chubby Chums stamp set and the Bunny Card Die .  This set is so adorable!  Please visit www.papersmooches.com to purchase cute stamps and dies.


I started out by stamping my images on Neenah solar white card stock and colored the images in with my Copic markers.   I fuzzy-cut the images with my precision scissors.


IMG_5669


Halloween is fast-approaching and I wanted to show you that you can use any stamp set for pretty much any occasion.  I used a frame die from my stash for my little “chubbies” and used my favorite Xyron Mega Tape Runner to adhere it onto my card front.  I also used the tape runner to adhere the critters.


IMG_5671


Here’s the card:


XyronPaperSmooch1


Aren’t they adorable?  I added a cute witch’s hat to my Owl and a trick-or-treat bag to my cat.


Since I colored so many of the images I wanted to create a birthday card.  I used dies from my stash and to adhere the intricate bow on my card front, I used my Xyron 1.5 Inch Sticker Maker.  When I adhere intricate dies, I always use either my sticker maker or my Xyron Creative Station Lite.


IMG_5677


Here’s the birthday card:


XyronPaperSmooch2


Paper Smooches was very generous and also sent us the Bunny Card Die.  Here’s a little foldable treat bag that I made:


XyronPaperSmooch3


I hope you like my projects today.  Have a wonderful day!


NND August Reveals – Day 4 – Autumn Newton

NNDAugust1

It is the last day of the August reveals at Newton’s Nook Designs.  You will absolutely love today’s stamp set because it features our beloved Newton. You also have a chance to win each stamp set during release week so check out the details I have indicated at the end of this blog post.

For today’s cards, I am showcasing the Autumn Newton stamp set and its coordinating dies.

The first card is really simple. I didn’t use traditional fall colors on my background for this card but I love how it turned out:

NNDFallCat1

For my second card, I wanted to create a fall shaker card and I used the leaves as my shaker element. I started out by using my distress oxide inks – worn lipstick and fossilized amber to distress my card stock. Here’s what it looks like:

NNDFallCat2

This “Autumn Newton” stamp set and coordinating dies will be available for purchase on Friday, August 18th, at 8:00 a.m. CST.

Would you like to win the “Autumn Newton” Stamp Set? This set will be given away to ONE lucky winner!

Here’s how to win: Comment on the NND blog and Design Team blogs (see list below)! The winner will be chosen at random from the collective reveal posts. Make sure to check out each of their blogs and comment for your chance to win. You will not know which blog has been chosen so the more you comment on the better your chances are of winning! You have until Thursday, August 17th at 9pm CST to comment — winners will be announced on the NND blog post on Friday, August 18th.


Check out all the awesome Design Team Blogs below to enter the giveaway:

Newton’s Nook Designs

Amanda Bodine

Holly Endress

Ellen Haxelmans

Larissa Heskett

Samantha Mann

Juliana Michaels

Naki Rager

Maria Russell (you are here)

Jennifer Timko

Tatiana Trafimovich

———-SUPPLIES———


Memo Board & Scrapbook Layout with 1Canoe2/American Crafts & Xyron

Hello my crafty friends! I am back today to share with you two projects that I recently created showcasing a collection of beautiful papers and ephemera from 1Canoe2 and American Crafts. A huge “thank you” to 1Canoe2American Crafts and Xyron for all of the amazing products we got to play with. They are extremely beautiful!

For my first project, I created a very simple (but useful) Dry-Erase Memo Board using an inexpensive frame from Ikea. Here are the items that I used:

IMG_4682

I started out by cutting the paper to fit inside the frame. I particularly chose this frame because it has a magnetic closure inside so I can change the paper/photo for each season.    To decorate the inside and the outside of the frame, I chose the word Hello, the arrow, butterfly and the flowers from the Hazelwood Collection Cork Die-cut shapes and ran it through my Xyron Creative Station Lite, using a repositionable adhesive. This is the best way to decorate a frame so that nothing is permanent and you can change the embellishments for every season.

To finish off the design, I decorated the outside of the frame using the washi tape and adhered the flowers. Here’s the first photo:

Xyron1Canoe2Proj2-2

Here’s when I wrote my note using a whiteboard marker:

Xyron1Canoe2Proj3

For my second project, I wanted to create a 12 x 12 page layout of my trip to The Maldives with my husband last July. I am showcasing the Sweet as Honey paper from the Hazelwood Collection, and my newly acquired Distress Oxide Inks.

IMG_4728

I started out by cutting pieces of the honeycomb with my precision scissors. Using a plain 12 x 12 card stock and my blending foam tool, I distressed my background with the Worn Lipstick and Spiced Marmalade distress oxide inks. I love this color combination on white background.

I used my watercolor brush to splatter some water on my card stock to get the distress look. Using a paper towel, I dabbed it onto the cardstock to lift the color. It turned out really beautiful! To add a little bit of whimsy and color, I used a stamp from my stash adding hot pink little dots to the distressed background.

To finish my design, I adhered the honeycomb paper to my layout with my Xyron mega tape runner. I then ran the cork embellishments through my Xyron Creative Station Lite using a permanent adhesive.  I love using Xyron adhesives to my scrapbook layout because they are acid-free.

Here’s my finished layout:

Xyron1Canoe2

I hope you got inspired today and like my projects. I have listed and linked the supplies that I have used below.  Please visit the 1Canoe2 website to shop for amazing products.   Here’s the link to their shop: https://1canoe2.com

—————-SUPPLIES—————–

Inky Paws Challenge No. 42 ~ Birthday

There’s a new Inky Paws Challenge on the blog (http://www.inkypawschallenge.com) and this time it is a birthday theme!

Here is the inspiration photo:

nndbday-challenge-42

I colored my image on Neenah solar white card stock with my Copic markers.  I also used my gel pens to add some whimsical touch to the “cake”.  There’s really nothing much more to it so I am just going to show you the card:

nndipc42

For more information about the inky paws challenge, please visit http://www.inkypawschallenge.com. You have two weeks to join.  Winner will get a $10 gift code for the Newton’s Nook Designs shop.

The supplies that I have used for today’s card are listed and linked below if you are interested. Have an amazing day!

———-SUPPLIES———