Love You Card with Newton’s Nook

Hello everyone! Since Valentine’s Day is fast approaching, I thought I’d make a simple card today, showcasing the Sweater Weather and Newton Dreams of Italy stamp sets with the Frames and Flags Dies and Land Border die to create a mask.

I started out by stamping my images on Neenah solar white card stock with my memento tuxedo black ink using my stamping tool.  I colored the images in with my Copic markers and cut them out with the coordinating dies using my Vagabond 2 die-cutting machine.

IMG_6605

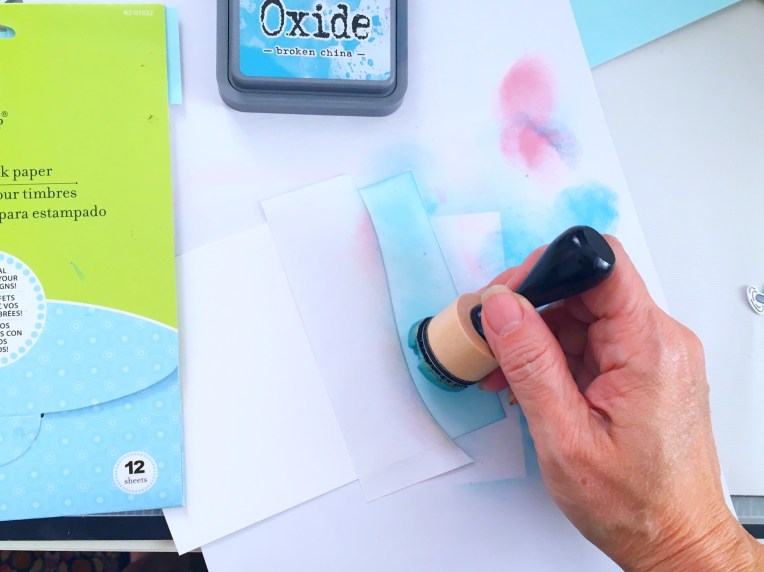
I die-cut another piece of mask with the land border dies and distressed my background using Broken China distress oxide ink with my mini ink blending tool.  I removed the mask and used a clouds stencil from my stash to create my pink sky.  I know it doesn’t look realistic but Valentine’s Day is all about pinks, reds and blues, haha!

IMG_6604

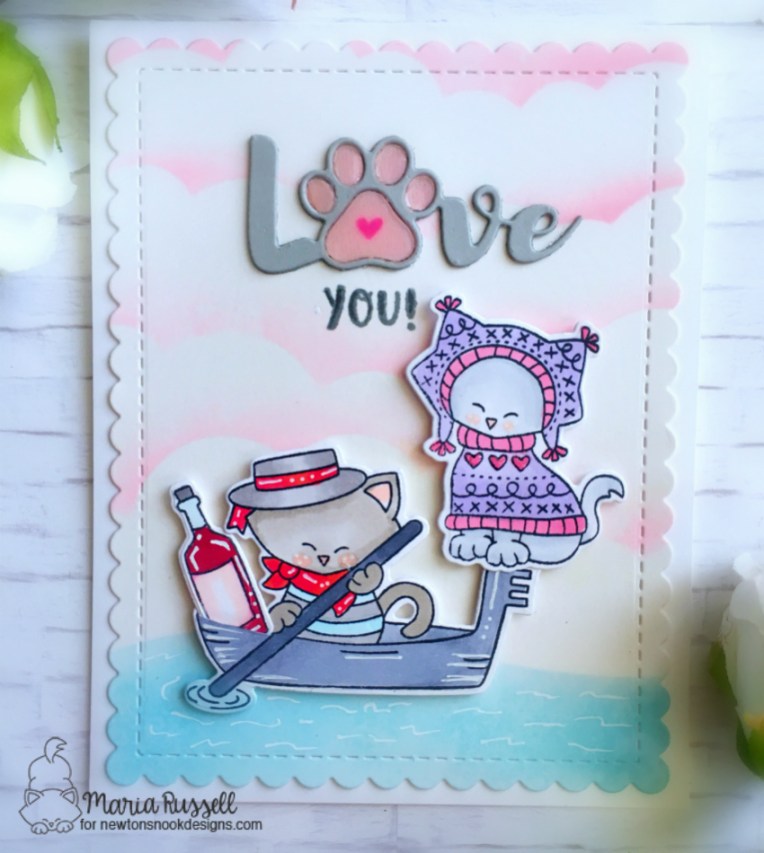
I die-cut my colored background using the Scallop Square included in the Tags and Flags dies and adhered it on my card base using my favorite Xyron Mega Tape Runner.  I adhered my little critters with foam tape to give it some dimension.  I used my favorite Sharpie White Pen to add some details to the water, the critters and the wine bottle.

I finished my design by using the Kat Scrappiness Pet Sentiments dies and adhered it onto my card, and used glossy accents to the paw to add some shine.

Here’s the card:

NNDLoveYou1

I hope you got inspired today. Thank you so much for stopping by. The supplies I used are listed and linked below. Have a great day!

Maria Russell Signature Logo

———-SUPPLIES——–


Valentine’s Day Card

Hello everyone! I’m back today to share with you a cute Valentine’s Card, showcasing products available at Kat Scrappiness, i.e. stamp sets by Lawn Fawn – Love Letters, Cheery Christmas and Mom & Me stamp sets, Stitched Fancy Scalloped Rectangle Dies, Inkadinkado masking paper and Gina Marie Designs ribbon bow dies. I apologize that I don’t have a process video today as I am currently traveling for a few days.

I wanted to create a very simple card with some masking technique.  I started out by die-cutting my watercolor card stock using the stitched fancy scalloped die. I stamped my two squirrels on Inkadinkado masking paper and fuzzy cut them with my precision scissors.

Using my stamping tool, I laid out my scene and stamped my squirrels twice with Versafine vintage sepia pigment ink.  I heat-set it with some clear embossing powder.  Using the mask I created, I covered the squirrels so I can stamp the wood stump on top of the squirrel. Removing the mask, I also set the tree stump with clear embossing powder.

I colored the images using my Zig clean color real brush markers.  I used my heating tool to dry them out a little, and covered the images with my mask.

I smudged some spun sugar and shaded lilac distress inks on a clear acrylic block, sprayed it with water, and used my flat watercolor brush to carefully start brushing the color onto the paper.  [Since the images are already covered with my masking paper, I was not afraid to do this technique.] I removed the mask and set it aside to dry.

I finished off the design by using a patterned paper by Crate Paper design, and die-cut a bow using a ribbon bow die by Gina Marie Designs.

Here is the final card:

img_3703

I hope you got inspired today. The supplies I have used are listed and linked below.  Thanks for stopping by and have an amazing day!

———SUPPLIES——–

Valentine’s Waterfall Card Tutorial

This is a tutorial on how to make a “waterfall” card. I think this will be a unique card to give for Valentine’s day and the possibilities are endless. I think anyone who gets this card will be very glad and would think you made a lot of effort into making him or her feel special.

Materials Used:

Basic Black cardstock (Item No. 121045) — 2 pieces cut at 4 ¼ by 5 ½ (base and back cover), 1 piece cut at 1 by 4 ¼ for the band, 1 piece cut at 2 inches by 9, 4 pieces cut at 2 by 2.

Modern Medley DSP (Item No. 126926) — 1 piece at 4 inches by 5 ¼

Whisper White cardstock (Item No. 100730) — 4 pieces cut at 1 ¾ by 1 ¾

Glimmer Brads (Item No. 121003) — 2 pieces

Basic Black Stamp Ink (Item No. 126980)

Tombow liquid glue (Item No. 110755)

Sticky Strip (Item No. 104294)

1 inch. Circle punch to cut the tab (Item No. 119868)

Ribbon of your choice for the pull out tab

Expressions Thinlits Die (Item No. 132171) — used the word “LOVE”

I hope you enjoyed this video. If you have any questions, please feel free to send me a message.. Do some crafting and create some memories. Happy crafting!