Newton’s Nook Designs January Release – Day 3 – Love Owl-ways

nndreleaseicon_jan19

It is the third day of the January reveals by Newton’s Nook Designs.   Were you able to check out the last two days of the reveal?   Which one is your favorite so far?  You have a chance to win each stamp set during release week so check out the details I have indicated at the end of this blog post.  [Just a little important note:  I know some of you had difficulties finding the comments section.  If you would like to leave a comment to participate in the giveaway, the “comments section” will only be ever visible when a single post on Word Press is being viewed. Please click on this particular blog post and you will be able to leave a comment below.  Thank you!]  

For the third day of the reveals, the design team is showcasing the Love Owl-ways stamp set and coordinating dies.  Here’s what it looks like:

nndjan19_loveowl-ways

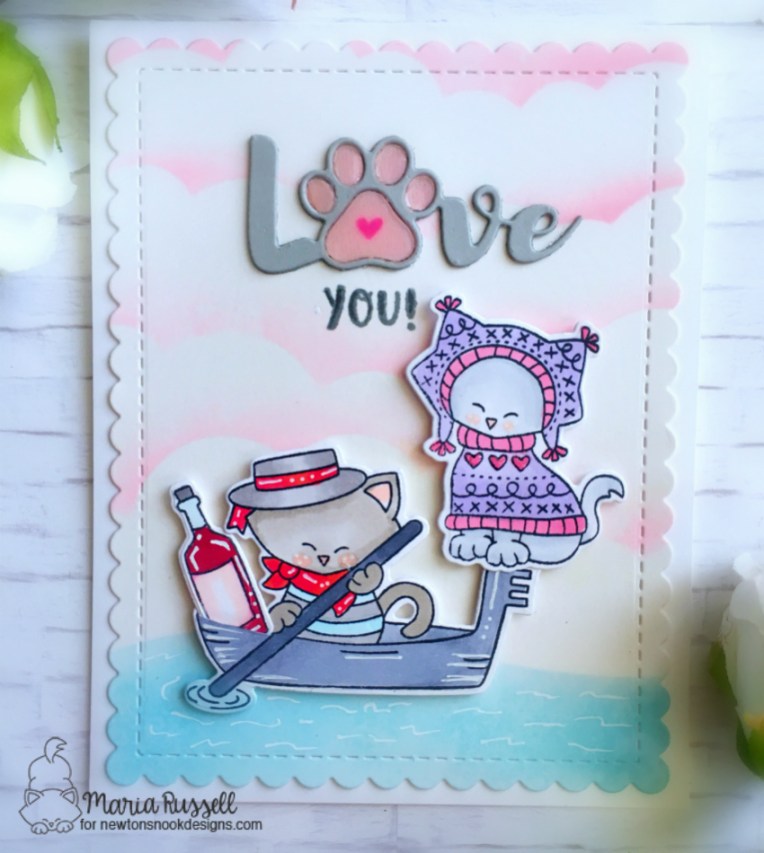
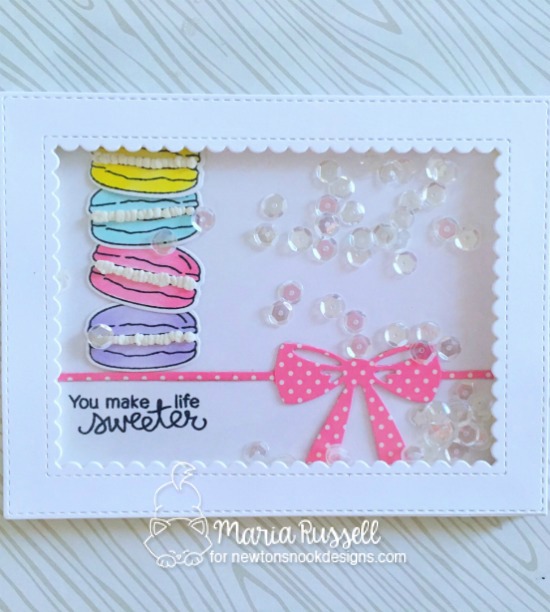
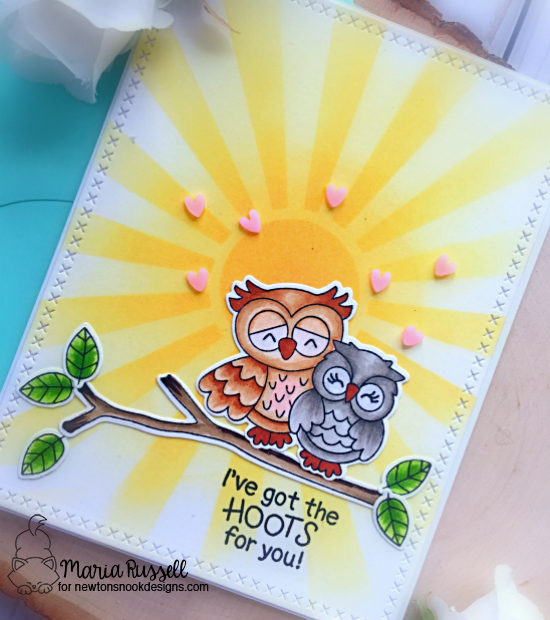
For my project today, I also used the “What A Hoot” stamp set and its coordinating dies with the Sunscape Stencil.  If you know me or have been following me for awhile, you know that I LOVE OWLS!  They are my spirit animal!  It is safe to say that this is my favorite stamp set of the month!  These images are so cute!

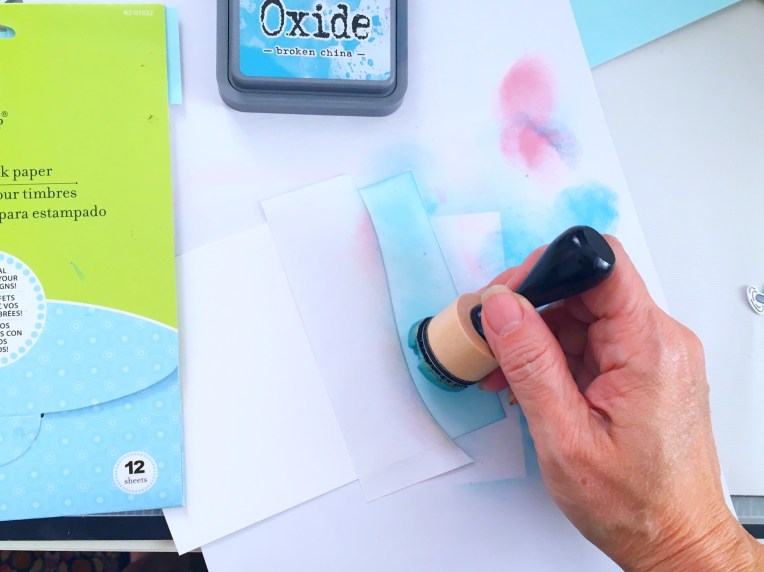
For my first card, I inked up my background with Squeezed Lemonade and Spiced Marmalade distress oxide inks.  I used the Sunscape stencil to add more details to the background.  I set this aside to dry.

I stamped my images on Neenah solar white card stock and die-cut the images using the coordinating dies.  The tree branch is from the What a Hoot stamp set.  I adhered the images onto my card.  Here’s what the first card look like:

nndloveowl-ways1a

To finish my design I also added the pink hearts using the Heart Sprinkles Embellishment mix by Kat Scrappiness.  Here’s a closer look:

nndloveowl-ways1b

I absolutely adore these images.  They re perfect for Valentine’s Day but you can also use this for any occasion.  The possibilities are endless using this set.

nndloveowl-ways1c

Would you like to win the “Love Owl-ways” Stamp Set?  We will choose ONE lucky winner to win this stamp set!

Here’s how to win:

Comment on the NND blog and Design Team blogs (see list below)! The winner will be chosen at random from the collective reveal posts. Make sure to check out each of their blogs and comment for your chance to win. You will not know which blog has been chosen so the more you comment on the better your chances are of winning! You have until Thursday January 17th at 9pm EST to comment  — winners will be announced on the blog post on Friday, January 18th.

Check out all the awesome Design Team Blogs below to enter:

Newton’s Nook Designs

Amanda Bodine

Holly Endress

Ellen Haxelmans

Larissa Heskett

Samantha Mann

Zsofia Molnar

Naki Rager

Maria Russell

Andrea Shell

Tatiana Trafimovich

————SUPPLIES————–


Chocolate Shaker Card with Kat Scrappiness

Are you looking for a simple Valentine’s Day card without all the hearts and romantic stuff? Or just a simple “just-because” card to brighten someone’s day?  For my project today, I am showcasing the Layered Chocolate Bar 6″ x 8″ stamp set, the Chocolate Lover’s Sentiment stamp set, Sparkling Manhattan sequin mix, Distressed Edge Rectangle dies and the Wonky Wavy Stitched Rectangle dies.

I started out by stamping the layered chocolate bar stamp using my Tim Holtz Tonic stamp platform with my memento tuxedo black ink.  I used my precision-cut scissors to fuzzy-cut the images.

IMG_6823

I also cut the little chocolate squares to add to my project.

IMG_6824

It has been awhile since I made a shaker card so I thought I’d make them today.  I die-cut my 110 lb. white card stock with the wonky wavy stitched dies.  I die-cut the middle using the second of the largest piece of the distressed edge rectangle dies to create the window.

I cut a piece of acetate to cover the window and adhered the chocolate bar at the bottom left side corner.  I added some 3M foam tape.  I decided to use my Cinnamon Swirl Mix sequins for my shaker element and the chocolate squares but since the sequin mix I used is not available anymore at the store, you can also use the Sparkling Manhattan sequin mix.  to finish the design, I stamped my sentiment using my Worn Lipstick Distress Oxide ink to give it a little bit of color.

Here’s the close-up of the card:

IMG_6821

I love this stamp set because the chocolate image looks so realistic!  There are so many possibilities using this stamp set.

KatScrapChocolate11

I hope you all got inspired to create this simple “Just-Because” card, or a “non-romantic” Valentine’s Day card that you can give to a friend to brighten up their day!  I have listed and linked the supplies I used below.  Thanks for stopping by today and have a wonderful day!

Maria Russell Signature Logo

—————SUPPLIES—————-


Love You Card with Newton’s Nook

Hello everyone! Since Valentine’s Day is fast approaching, I thought I’d make a simple card today, showcasing the Sweater Weather and Newton Dreams of Italy stamp sets with the Frames and Flags Dies and Land Border die to create a mask.

I started out by stamping my images on Neenah solar white card stock with my memento tuxedo black ink using my stamping tool.  I colored the images in with my Copic markers and cut them out with the coordinating dies using my Vagabond 2 die-cutting machine.

IMG_6605

I die-cut another piece of mask with the land border dies and distressed my background using Broken China distress oxide ink with my mini ink blending tool.  I removed the mask and used a clouds stencil from my stash to create my pink sky.  I know it doesn’t look realistic but Valentine’s Day is all about pinks, reds and blues, haha!

IMG_6604

I die-cut my colored background using the Scallop Square included in the Tags and Flags dies and adhered it on my card base using my favorite Xyron Mega Tape Runner.  I adhered my little critters with foam tape to give it some dimension.  I used my favorite Sharpie White Pen to add some details to the water, the critters and the wine bottle.

I finished my design by using the Kat Scrappiness Pet Sentiments dies and adhered it onto my card, and used glossy accents to the paw to add some shine.

Here’s the card:

NNDLoveYou1

I hope you got inspired today. Thank you so much for stopping by. The supplies I used are listed and linked below. Have a great day!

Maria Russell Signature Logo

———-SUPPLIES——–


Valentine’s Day Card

Hello everyone! I’m back today to share with you a cute Valentine’s Card, showcasing products available at Kat Scrappiness, i.e. stamp sets by Lawn Fawn – Love Letters, Cheery Christmas and Mom & Me stamp sets, Stitched Fancy Scalloped Rectangle Dies, Inkadinkado masking paper and Gina Marie Designs ribbon bow dies. I apologize that I don’t have a process video today as I am currently traveling for a few days.

I wanted to create a very simple card with some masking technique.  I started out by die-cutting my watercolor card stock using the stitched fancy scalloped die. I stamped my two squirrels on Inkadinkado masking paper and fuzzy cut them with my precision scissors.

Using my stamping tool, I laid out my scene and stamped my squirrels twice with Versafine vintage sepia pigment ink.  I heat-set it with some clear embossing powder.  Using the mask I created, I covered the squirrels so I can stamp the wood stump on top of the squirrel. Removing the mask, I also set the tree stump with clear embossing powder.

I colored the images using my Zig clean color real brush markers.  I used my heating tool to dry them out a little, and covered the images with my mask.

I smudged some spun sugar and shaded lilac distress inks on a clear acrylic block, sprayed it with water, and used my flat watercolor brush to carefully start brushing the color onto the paper.  [Since the images are already covered with my masking paper, I was not afraid to do this technique.] I removed the mask and set it aside to dry.

I finished off the design by using a patterned paper by Crate Paper design, and die-cut a bow using a ribbon bow die by Gina Marie Designs.

Here is the final card:

img_3703

I hope you got inspired today. The supplies I have used are listed and linked below.  Thanks for stopping by and have an amazing day!

———SUPPLIES——–

Kissing Birds Shaker Card

Hello crafty peeps! I am back for Craftin Desert Divas and today, I am sharing with you this adorable kissing birds shaker card.

I started out by printing the kissing birds digital stamp by CDD with Neenah solar white card stock on my laser printer.  I wanted this image to pop so I adjusted the size to make it slightly bigger.  I fuzzy-cut the image with my cutter-bee precision scissors  and set it aside.  I stamped my card panel with some images from another CDD stamp and distressed the background with my spun sugar distress ink.

To create the sentiment, I used the Flag Banner dies and stamped “Love You” showcasing the Elegant brush script stamp set.  This set is a must-have for any stamper.

To create the shaker part of the card, I die-cut the tag using my Banner Dies from CDD with my doodlebug paper, with the acetate sheet and foam adhesive.  For my shaker element, I used my new favorite, shimmer sequins also available at the shop.  They are so sparkly and beautiful!  I also added the red and white twine to finish the design. Here is my card.

cddfebruarymoodboard2

I hope you all got inspired today.  The supplies I have used are listed and linked below if you’re interested. Please do join us on the CDD Facebook Gallery page.  We have a challenge every month that you can participate in and you can win some amazing prizes.  Here is the link: https://www.facebook.com/groups/1428163220758119/

——-SUPPLIES——-

(Affiliate links may have been used at no additional cost to you)

Newton’s Nook Designs – January Release Day 2 – Love & Chocolate

nnd_releasejan17


Hello stampers and crafters! Thank you for stopping by.  Today is release day (Day 2) at Newton’s Nook Designs.  If you haven’t checked out yesterday’s post, please do so to see the amazing projects created by our design team members.  Please also check out our Instagram photos to get more inspiration.

For my card below, I stamped my images on Neenah solar white card stock with my memento tuxedo black ink. I colored the images using my Copic markers (I opted for pastel colors), and die-cut my stamped images with its coordinating dies.   To give my macaroons a little bit more detail, I used my liquid appliqué and heating tool to puff up the white liquid and make it look like icing.

At this point, I decided to make this a shaker card. I used my 3M Scotch foam adhesive to adhere it on my card stock to create my window panel for the card. I wanted the macaroons to be the main focal point on this card so I created a white on white background, and used some clear sparkling sequins for my shaker element.

nnd_macaroon

I also used this stamp set for my planner layout this week.  I really love stretching my stamps and using them to decorate my planner.

nndplanner3

nndplanner4

I hope you like my card and my planner layout and somehow got inspired today. This Love & Chocolate stamp set and Love & Chocolate Dies will be available for purchase on January 20 at 8:00 a.m. CST.

Would you like to win this “Love & Chocolate” stamp set?  This stamp set will be given away to ONE (1) lucky winner!

Here’s how to win: 

Comment on the NND blog and Design Team blogs (see list below)!  The winner will be chosen at random from the collective reveal posts. Make sure to check out each of their blogs and comment for your chance to win. You will not know which blog has been chosen so the more you comment on the better your chances are of winning!  You have until Thursday January 19th at 9pm CST to comment  — winners will be announced on the Newton’s Nook Designs blog post on Friday, January 20th.


Check out all the awesome Design Team Blogs below to enter:

Newton’s Nook Designs

Amanda Bodine

Holly Endress

Ellen Haxelmans

Larissa Heskett

Samantha Mann

Juliana Michaels

Naki Rager

Maria Russell (you’re here)

Jennifer Timko

Tatiana Trafimovich


Newton’s Nook Designs January Release Day 1 – Woodland Duo

nnd_releasejan17


Hello stampers and crafters.  I’m super excited to share this blog post as today is release day (Day 1) at Newton’s Nook Designs.  I have created a Valentine’s Day card, showcasing the new Woodland Duos stamp set. This stamp set coordinates with the previously released, Darling Hearts Die set. You will absolutely love the images on this stamp set!


I started out by stamping my images on Neenah solar white card stock with my memento tuxedo black ink. I colored the images using my Copic markers, and die-cut my stamped images with its coordinating dies.   I wanted to do some inlaid technique to show off the beautiful images in one card without the bulk.


For my card below, I decided to use the foxes and the raccoons, with one of the small hearts included in the set. (I have made another card with the Owl images, which I will later share on a different post with a process video.)


nnd_darling-duo2


I finished off the design by using three different patterned papers, and added the tiny red bow. What do you guys think? I hope you like it as much as I do. This stamp set will be available for purchase on January 20 at 8:00 a.m. CST.


20170101_woodlandduos_pkg


Would you like to win this “Woodland Duos” stamp set?  This set will be given away to ONE lucky winner.


Here’s how to win: 


Comment on the NND blog and Design Team blogs (see list below)!  The winner will be chosen at random from the collective reveal posts. Make sure to check out each of their blogs and comment for your chance to win. You will not know which blog has been chosen so the more you comment on the better your chances are of winning!  You have until Thursday January 19th at 9pm CST to comment  — winners will be announced on the Newton’s Nook Designs blog post on Friday, January 20th.


Check out all the awesome Design Team Blogs below to enter:


Newton’s Nook Designs

Amanda Bodine

Holly Endress

Ellen Haxelmans

Larissa Heskett

Samantha Mann

Juliana Michaels

Naki Rager

Maria Russell (you’re here)

Jennifer Timko

Tatiana Trafimovich


Valentine Pop-Up Card Tutorial

If you would like to order the products shown on this video and avail the discounted rate through a demonstrator website (also earn some stampin’ rewards and free stuff), please click on the link above.

The tutorial on this video is just to show you how to create an A2 size Pop-Up card that fits in a regular A2 envelope; but you can decorate it according to your own taste and style.   The possibilities are endless!

Materials used:

Main card — Card Stock is cut at 9 inches by 5 ½ inches
(on the 9 inches side — score your card stock at 2 1/8, 4 ¼, 6 3/8 and 8 ½
(on the 5 ½ inches side — score your card stock at 2 ¾ inches)

Tabs in the middle of the card:

Card stock cut at 3 1/8 by 3 1/8 score at ½ inch and 2 5/8 — (We will cut this in half as I showed on the video to create the middle tabs in the card and these will hold your decoration).

Fold the scored tabs and put sticky strip and insert and adhere to your basic card.

Mini Glue Dots (Item No. 103683)

Sticky Strip

Acetate sheets

I hope you enjoyed this video. If you have any questions, please feel free to send me a message.. Craft with your loved ones and create some memories. Happy crafting!