Tree-Rex and Mistletoads with Trinity Stamps

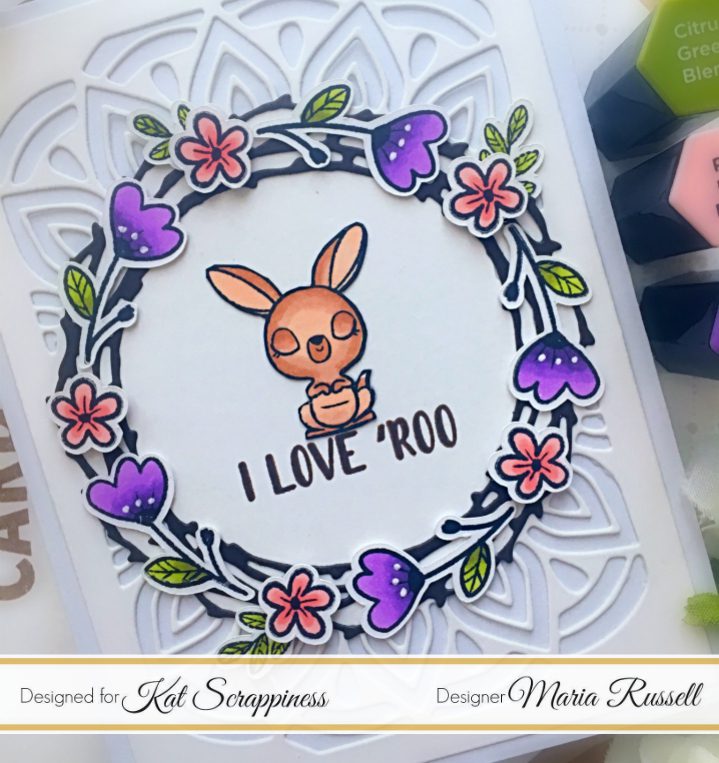
Hello and thanks for stopping by! I am so excited to share my projects today, showcasing some very cute stamp sets and dies by Trinity Stamps.

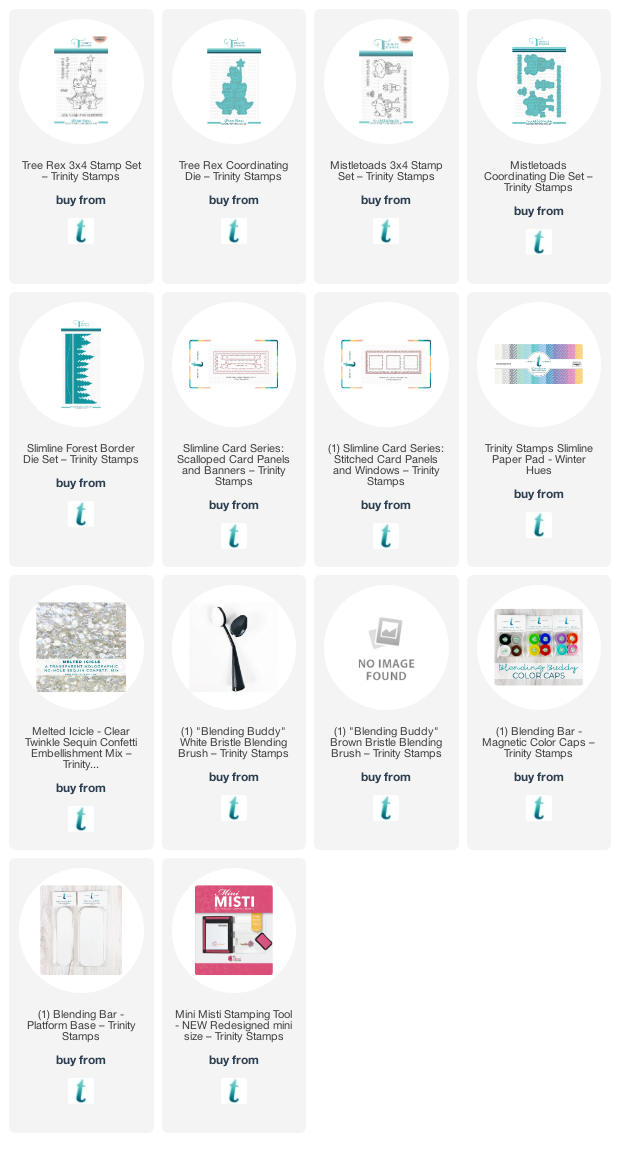
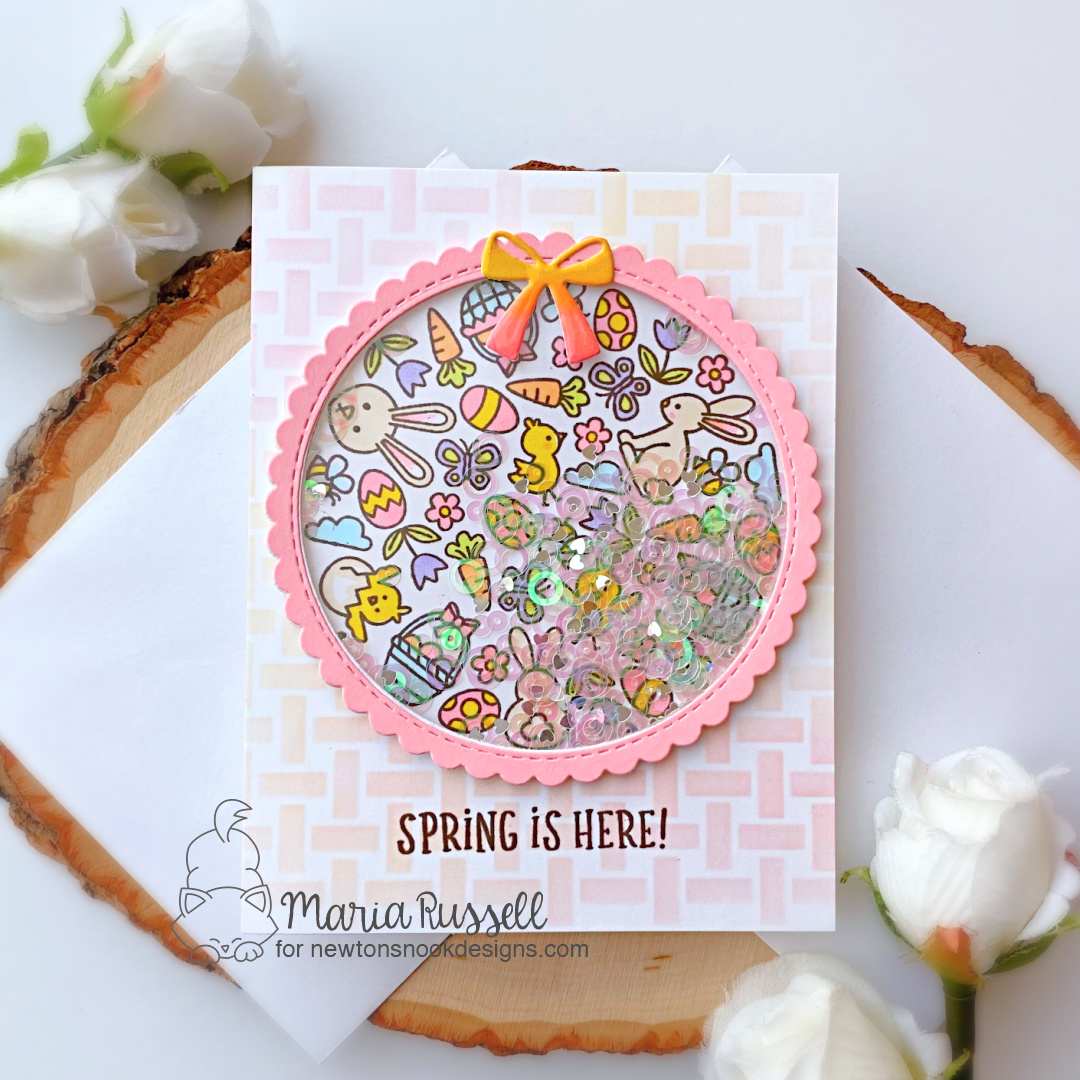
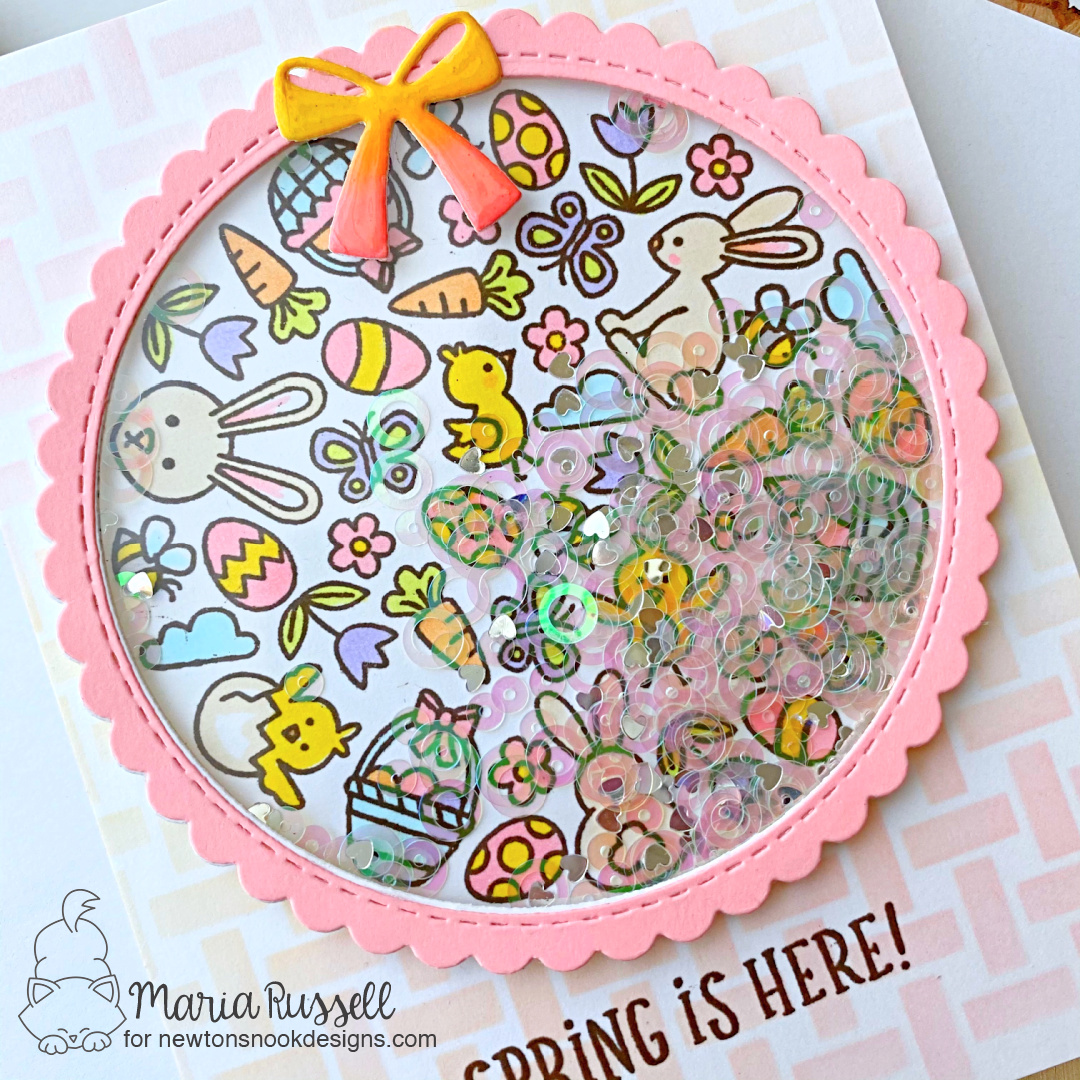
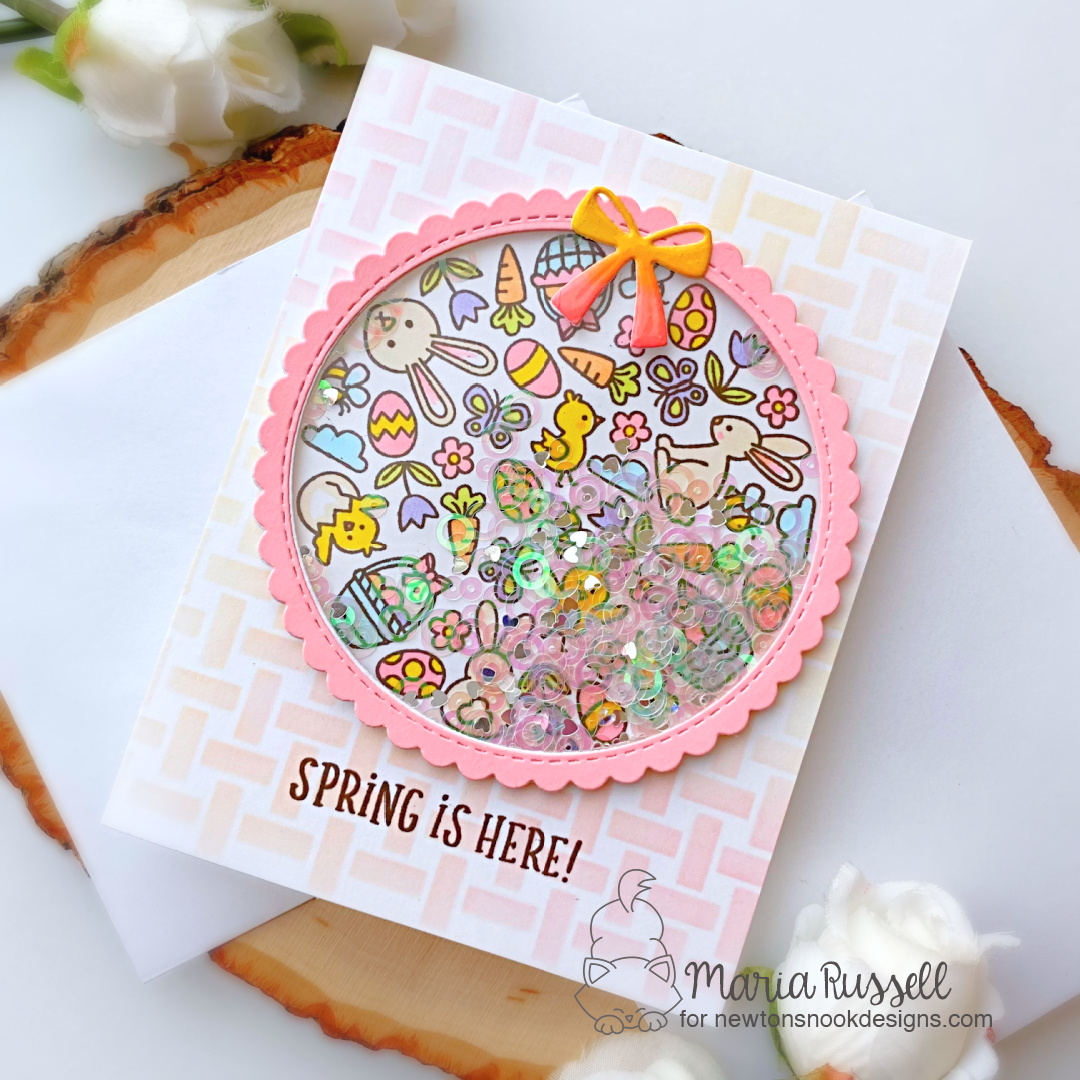
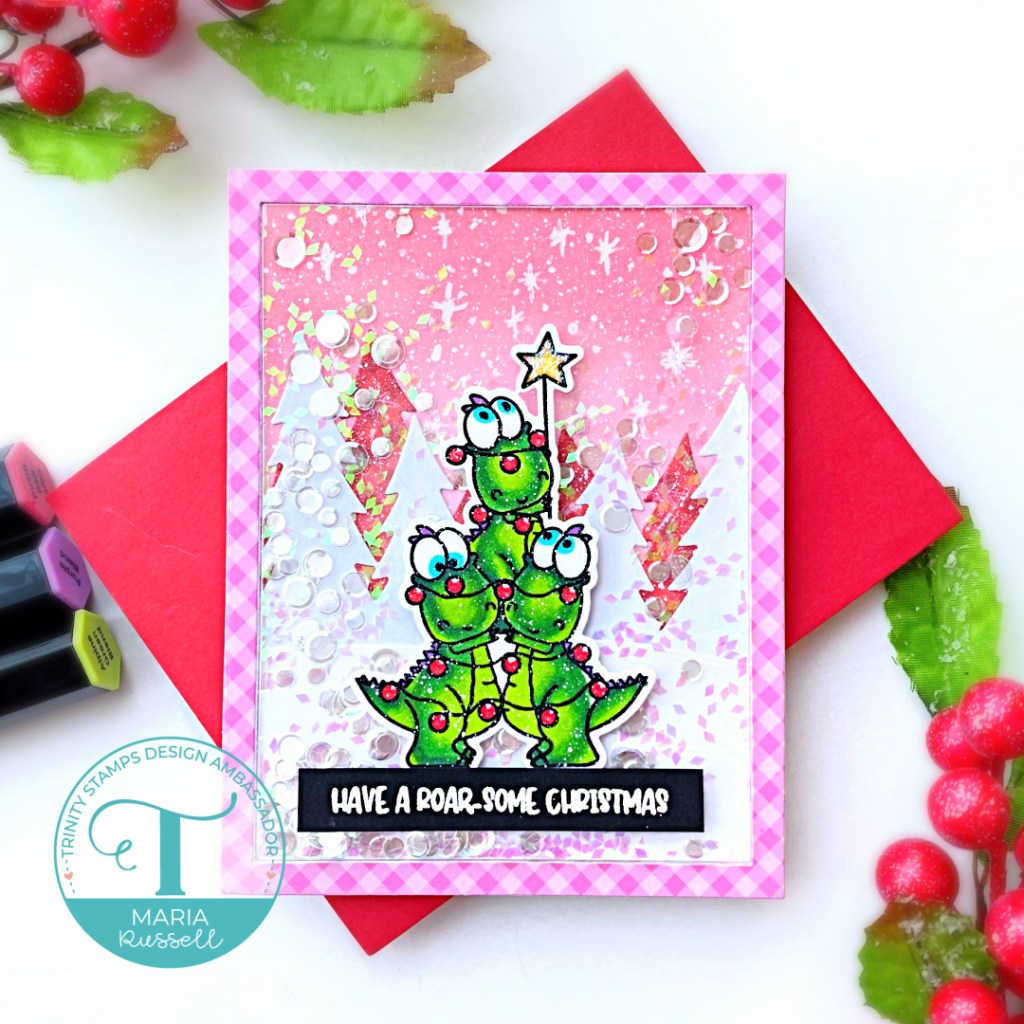
For my first card, I am showcasing the Tree Rex 3×4 Stamp Set and Tree Rex Coordinating Die with the Slimline Forest Border Die Set and Melted Icicle Clear Twinkle Sequin Confetti as my shaker element.

Here’s how I made this card:

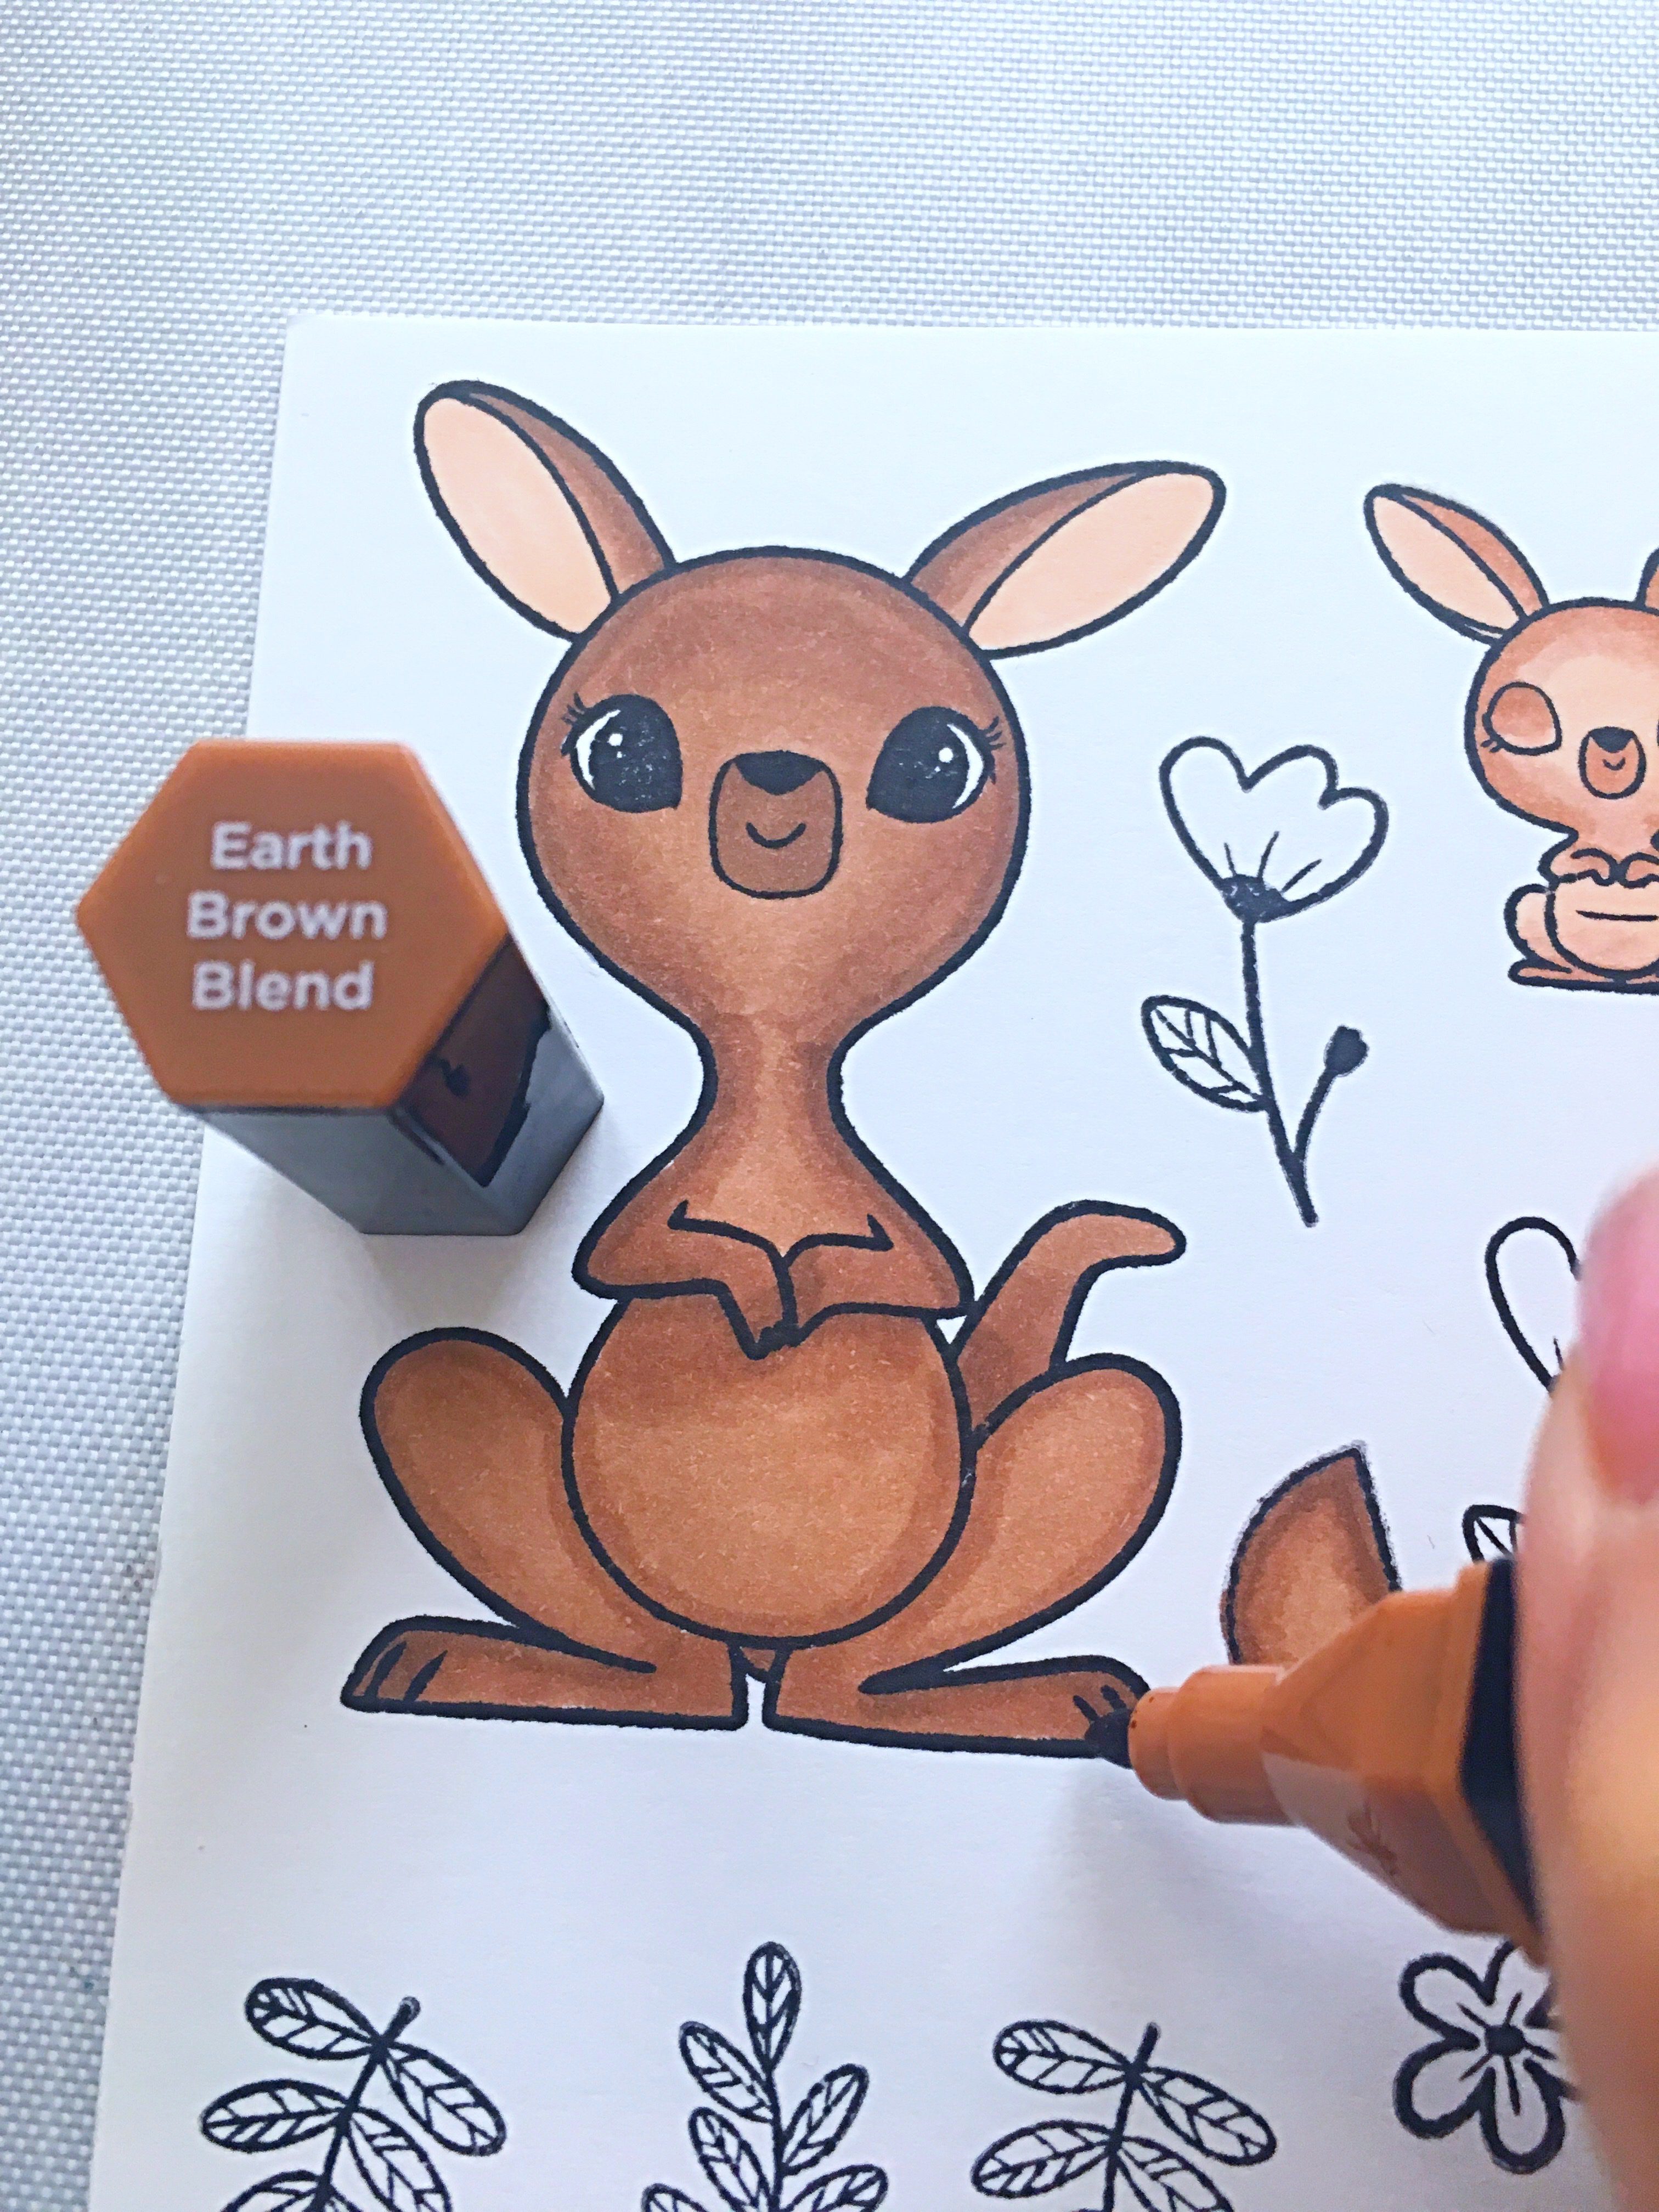
  • Stamp the Tree Rex on some Neenah solar white card stock and color the images in with alcohol markers.
  • Die-cut the images using the Tree Rex Coordinating Die.
  • Ink-blend an A2 size panel of Bristol Smooth white card stock using Worn Lipstick and Spun Sugar Distress Oxide ink.
  • Use distress sprayer to add some splatters to the background and pick up the excess water with some paper towel.
  • Use white gel pen to add stars and dots for added interest.
  • Die-cut the trees and snowbanks using the Slimline Forest Border Die Set on some white card stock and patterned paper.
  • Adhere the die-cuts on the card panel with liquid glue.
  • Create the shaker well with acetate and foam adhesive.
  • Add the Melted Icicle Clear Sequin Confetti as the shaker element and adhere onto the card panel to close the shaker.
  • Adhere the pattern paper border on the card panel.
  • Add the focal image with liquid glue.
  • Stamp the sentiment on some black card stock with Versamark ink, sprinkle some white embossing powder and heat-set with the heating tool.
  • Adhere the sentiment on the card.

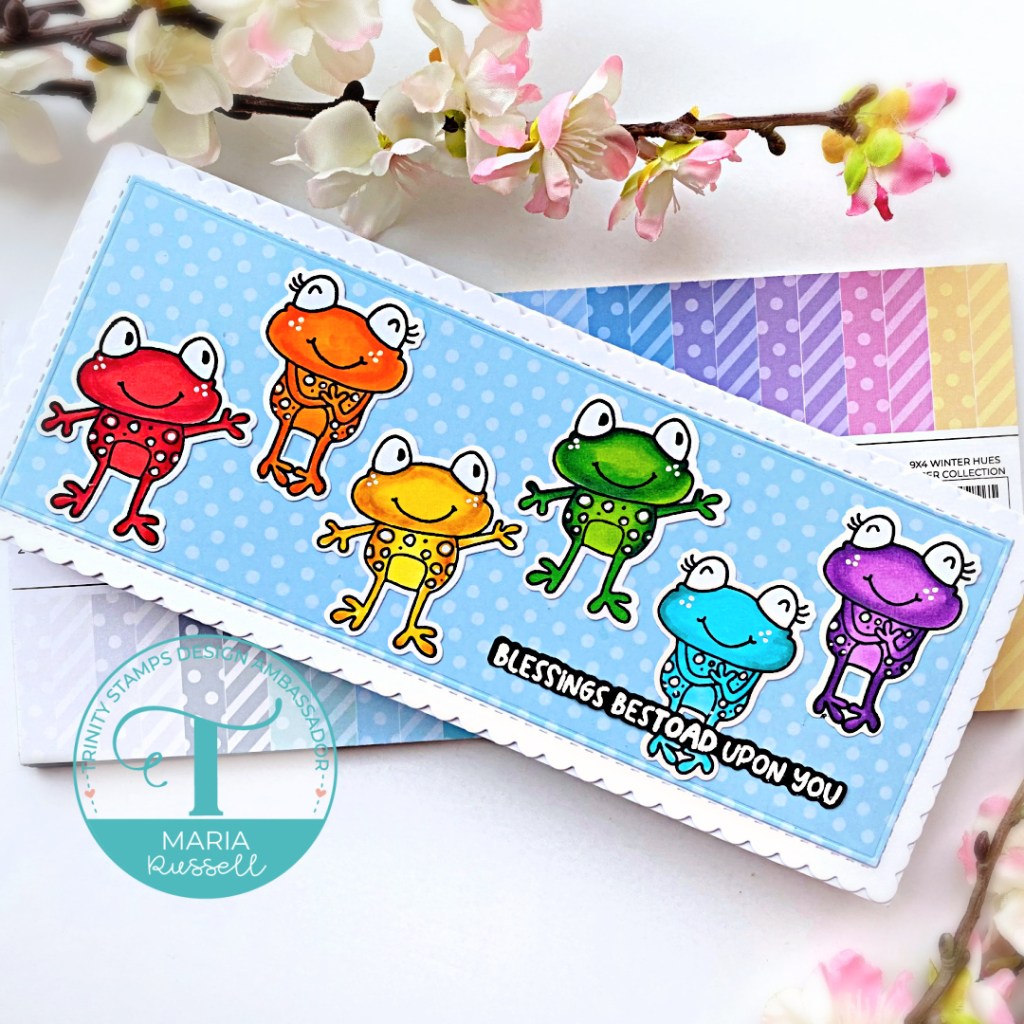
My next project is easy, peasy! Who wouldn’t want to see rainbow toads, right?! I know I would! I know this stamp set is meant for Christmas but I would like for you to think outside the box and stretch your supplie.

For this card below, I am showcasing the Mistletoads 3×4 stamp set and Mistletoads Coordinating Dies with the Slimline Scalloped Card Panels and Banners die set, Modern Embossed Panels Die Set and Slimline Winter Hues Paper Pad.

  • Die cut the slimline scallop using the
  • Die-cut the blue pattern paper from the Winter Hues Paper Pad using the second biggest die from the Modern Embossed Panels Die Set.
  • Adhere the pieces together with liquid glue and add on a slimline card base.
  • Adhere the focal images onto the card panel.
  • Stamp the sentiment on some black card stock and sprinkle some white embossing powder. Heat-set with heating tool.
  • Die-cut the sentiment using the coordinating die.
  • Finish the design by using white gel pen to add some dots to the toads.

Aren’t they ADORABLE? Which one is your favorite? I can’t really choose because both cards are so cute!

I hope I have given you some inspiration today to stretch your supplies. Everything I used is listed and linked below. Thanks for stopping by and happy stamping!
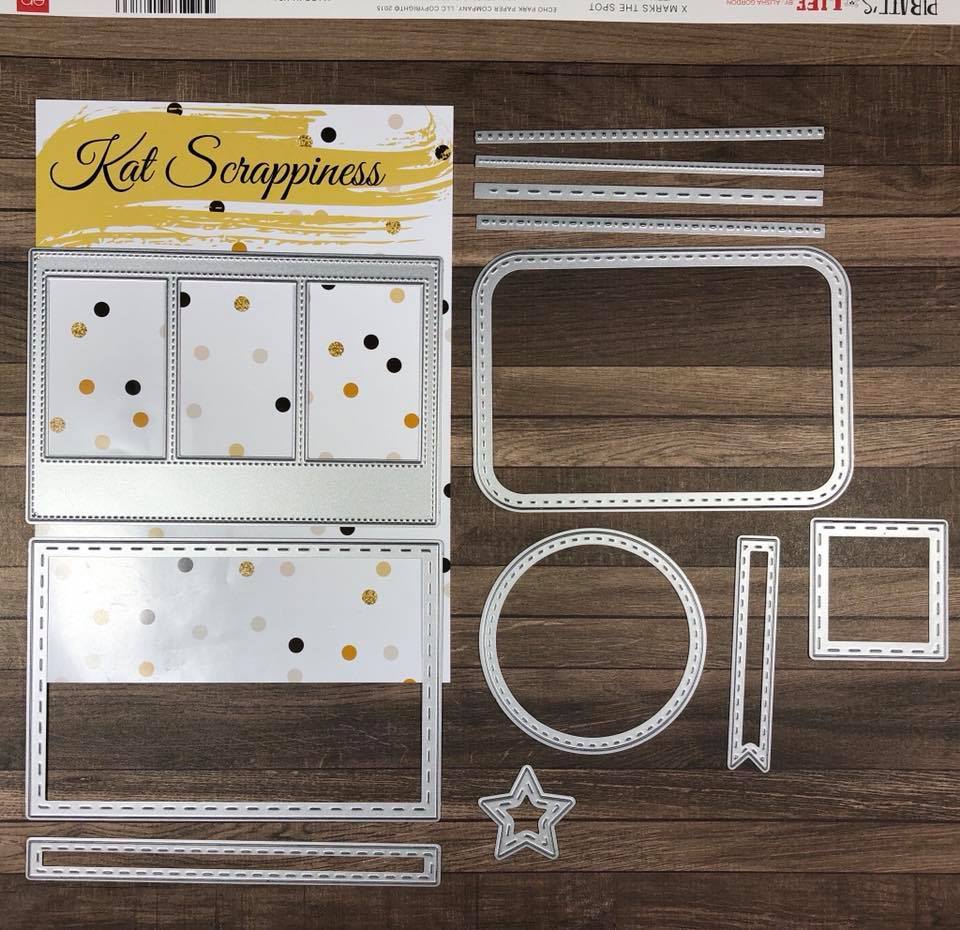
———–SUPPLIES———

NND February Release Day 1 – Spring Roundabout & Two New Stencils


It is that time of the month where the entire design team get so excited to show off the new stamps, dies and/or stencils by Newton’s Nook Designs.  You also have a chance to win the stamp set being revealed each day so please read through til the end of the blog post to find out more info.  [Just a little important note:  I know some of you had difficulties finding the comments section.  If you would like to leave a comment to participate in the giveaway, the “comments section” will only be ever visible when a single post on Word Press is being viewed. Please click on this particular blog post and you will be able to leave a comment below.  Thank you!]  

For the first day of the reveals we are featuring the Spring Roundabout Stamp Set that coordinates with the Circle Frame Dies and Banner Trio die, along with the Basketweave and Bunny Tail Stencils.

It’s all about Spring colors today guys!

I started by cutting an A2-size panel of some Bristol smooth white card stock.  I sprayed my Basketweave stencil with some Pixie Spray and temporarily adhered it on the panel.  I used my blending brushes and some pink and peach dye inks to add the basketweave details on the background.

Next, I stamped the images on some Neenah solar white card stock with Memento Rich Cocoa ink and colored the images in with Spectrum Noir “Hint of Collection” alcohol markers.  I used the Circle Frame die to die-cut the image.  I also used the same circle frame die to die-cut a few pieces of white and pink card stock to create my shaker card.  I adhered the pieces together with some liquid glue to create my shaker well.  I added some iridescent sequins  as my shaker element.

To close the shaker portion, I adhered some acetate sheet to the pink die-cut and added some liquid glue.  I put some big acrylic blocks on this and waited for about half an hour until it was completely dry.

I die-cut from the Bitty Bibs die set and added some color to this piece.  I also added some glossy accents to give it more texture and dimension.  I waited for this piece to dry for about 30 minutes.

Next, I added my shaker to the ink-blended panel with some liquid glue and also added the little bow.  I finished my design by adhering this panel to an A2-size notecard and stamped the sentiment with Memento Rich Cocoa ink.  Here’s another look at the finished card:


Would you like to win the “Spring Roundabout” Stamp Set?  This stamp set will be given away to ONE lucky winner!


Here’s how to win:  Comment on the NND blog and Design Team blogs (see list below)! The winner will be chosen at random from the collective reveal posts. Make sure to check out each of their blogs and comment for your chance to win. You will not know which blog has been chosen so the more you comment on the better your chances are of winning! You have until Thursday February 18th at 9pm EST to comment  — winners will be announced on the blog post on Friday, February 19th.


Check out all the awesome Design Team Blogs below to enter:


Newton’s Nook Designs

Ellen Haxelmans

Tina Herbeck

Larissa Heskett

Samantha Mann

Zsofia Molnar

Maria Russell (you are here)

Farhana Sarker

Tatiana Trafimovich

Samantha VanArnhem

Amanda Wilcox

———-SUPPLIES———


would You Like Some Bubbly?

Hello my crafty peeps!  I’m back for Cas-ual Fridays Stamps today to share this cute shaker card, showcasing some of my favorites from the last release called Pop, Fizz Clink stamp set with the Champagne Flute dies and the Bubbly Stencil.  Incidentally, all stencils are on sale right now so grab your faves!
To make the card, I temporarily adhered the Bubbly Stencil on some  Neenah Solar white card stock and added some color with dye inks using some blending brushes.   I adhered this piece on an A2 size card base.
Next, I die-cut the Champagne Flutes a couple of times using some gold and white card stock, as well as some acetate sheets.  Instead of using foam adhesives, I adhered the pieces together to create my shaker well.  I also added the acetate sheet on one end, then added my shaker element to the well.  I closed my shaker by adding another piece of acetate sheet on top, making my champagne flute see-through.

I stamped my sentiment on my focal panel with some Versafine Onyx black ink.  I finished my design by adhering both champagne flutes on my card.  Here’s another look:

I absolutely LOVE how this card turned out!  Here are the supplies if you’re interested:

All stencils are currently on SALE at the shop.  Use my coupon code below for 15% off your order!  Thanks for stopping by and have a great weekend!

Happy Valentine’s Day Card with Cas-ual Fridays

Hello CFS fans! Maria here on the blog with you today, sharing a Valentine’s Day shaker card, showcasing the Hearts A2 Panel Fri-die and the sentiment is from the Love Notes stamp set.

To begin, I started off ink-blending a rainbow background on Bristol smooth white card stock with Distress Oxide inks in Mustard Seed, Ripe Persimmon, Worn Lipstick, Peacock Feathers and Seedless Preserves.

I die-cut my ink-blended panel with the Hearts A2 Panel Fri-die.  I adhered some acetate sheet on this piece and added foam adhesive to create my shaker panel.

I added some rainbow confetti dots as my shaker element and adhered the panel on top of an A2-size black card base.

I stamped the sentiment on a black strip with versamark ink and sprinkled some white embossing powder.  I used my heating tool to heat emboss the sentiment and adhered this piece on my card with my tape runner.  Here’s what it looks like:

The black background just made the rainbow panel pop.  Here’s a closer look:

I hope you like my project today.  The supplies I used are listed and linked below.  Please use my coupon code below for an additional 15% off your order at Cas-ual Fridays.  Thanks for stopping by and happy stamping!

—————SUPPLIES——————

Today’s Good Mood Sponsored by Coffee with Kat Scrappiness

It’s that time of the year again and I am so excited to be participating in the “Fall/Winter Coffee Lover’s Blog Hop”.  I’d like to take this opportunity to thank Amy Tsuruta and the rest of her team responsible for facilitating this great hop!  I don’t know how you guys do it but you all absolutely rock!


Today I have made a card showcasing products from the #KatScrappiness store.   Kat Scrappiness is a super sponsor for the Coffee Lovers Blog Hop and she is having a site-wide sale from today until November 8th, 2019.  All orders over $50 will also receive a free die!  Use coupon code “COFFEE2019” for 15% off your order.  KAT SCRAPPINESS IS ALSO GIVING AWAY A $50 PRIZE PACK.  Please pop on over to the Kat Scrappiness Blog to find out how you can win.


For my project today, I am showcasing the Embossed edge rectangle dies, Layered Coffee Cup die, the Got Coffee? sentiment die, Hot Cocoa sequin mix, the Holly Leaves and Berries die set and the Acetate Sheet 25-pack.


To begin, I die-cut an A2 size panel of Neenah solar white card stock using the embossed edge rectangle die  then used the layered coffee cup die to die cut the window.   I also die-cut some patterned paper using the rest of the coffee cup pieces so that I can assemble them later.


I die-cut the holly leaves and berries on some green and red card stock.


To create the shaker portion of my card, I adhered some acetate sheet on the back of my card panel and used fun foam to create my well.  I added the hot coca sequin mix as my shaker element and adhered this piece on an A2 size white card base.


I stamped some small snowflakes on my card front and also stamped my sentiment using some Lawn Fawn lobster ink.  Here’s my card:


I love creating shaker cards!  I think this card design is super simple but I love how it turned out.  Here’s a closer look:


I hope you like my shaker card today.  The supplies I used are listed and linked below.  Thanks so much for stopping by and happy stamping!


———-SUPPLIES————


Newton’s Nook Designs & Therm-O-Web Collaboration Week


This week Newton’s Nook Designs and Therm O Web are partnering for fabulous Fall, Halloween and Christmas inspiration! All week long both design teams will be sharing ways to use Therm O Web products with Newton’s Nook Designs stamps!  We also have  GIVEAWAY so please make sure to read at the end of this post to find out how you can WIN.


I went NND and TMW crazy and created three projects for you today!  I am showcasing (one of my all-time favorite stamp set from Newton’s Nook)  the Sweater Weather stamp set and its coordinating dies with the Happy Howl-Oween stamp set and coordinating dies.  I am also showcasing a LOT of products provided to us by Therm O Web, which you will be able to see if you watch my YouTube video below.  I also would like to take this opportunity to thank Therm O Web for spoiling the NND Design Team with your amazing products.


For my first project, I die-cut a masking paper with a circle die and masked my Bristol smooth white card stock.  I inked up my background with some distress oxide inks.  I sprayed my inked background with some water to get the oxidize effect and dabbed it with paper towel to dry.  I used the Deco Foil Transfer Gel and Newton’s Nook Cascading Stars Stencil to create the stars on my background.  I set this piece aside to dry for about 40 minutes and ran it through my laminator with some Deco Foil Ocean Blue Transfer Sheets.  I removed my mask and colored the moon a little bit with my B000 copic marker.


To create my scene for my trick-or-treaters, I used a house die from my stash and TMW Flock transfer sheets in Purple Punch, Sunshine Yellow, Black Velvet and White Latte to create my spooky house.  I also die-cut the grass using the Land Borders die set.


I stamped my image using the Happy Howl-Oween stamp set and colored the images in with my Spectrum Noir alcohol markers.  I die-cut the image using the coordinating die.  Now that I have all of my elements, I started building up my scene.


I used a white pigment ink and a blending brush to highlight the grass.  By doing so, this gave it a more realistic effect since I have a HUGE moon shining over everything!  I finished my design by stamping the bats.  I also stamped my sentiment in Versamark ink and sprinkled some white embossing powder.  I used my Wagner heating tool to heat set the sentiment.  Here’s a closer look at the card:


For my second project, I wanted to use the flock transfer sheets and my embossing folder  to create a winter scene for my critters from the Sweater Weather stamp set.  I have a process video for you for the two Christmas cards.  Here’s the first one:


For the second Christmas card, I used the Oh Christmas Tree Designer Toner Sheets , the White Latte Flock Transfer Sheet and the Gina K Designs for TMW Red Velvet Deco Foil to create a fun shaker card:


Here’s my YouTube process video:


I hope you like my projects today.  I would be so grateful if you could visit my YouTube channel and subscribe if you haven’t already!  The supplies I used are listed and linked below (affiliate links may have been used for some of the items at no additional cost to you).

There are more amazing projects today over on the Therm O Web blog so pop over there for more inspiration!


GIVEAWAY DETAILS:
Time for prizes! Would you like to win a $25 store credit at Therm O Web or to Newton’s Nook Designs?  Both companies will be giving away a prize this week!  Visit the Newton’s Nook Designs blog and the Therm O Web Blog  to enter for a chance to win!  Have an amazing day and happy stamping!

————SUPPLIES————


You Make Me Jump For Joy and I Love ‘Roo cards with Kat scrappiness

Hello Kat Scrappiness fans!  I have some fun projects for you today showcasing A LOT of products available at the shop.


Before I start with the post, I just want you guys to know that there is a 20% site-wide sale going on and you can use the coupon code mentioned below.  Take advantage of this sale and get your favorite products while you can:


For my project today, I am showcasing the Hoppy For you stamp set, along with the Yellow Star Sprinkles, Pink Flower Sprinkles, Wood Grain Frame Die, Stitched Cloud Backdrop die and the Mandala Frame die.


I started out by stamping the images on Spectrum Noir Ulta Smooth Premium White card stock using Spectrum Noir Finesse Alcohol-Proof Black ink.  I colored the images in with my Spectrum Noir TriBlend alcohol markers.  I die-cut the images using my Scan N Cut machine.


I adhered some Pink Flower Sprinkles on the mommy Kangaroo and layered the baby kangaroo inside the mommy’s pouch with liquid and foam adhesive.


The A2 size panel was die-cut using the Stitched Cloud Backdrop die and ink blended with Bubblegum, Soft Lilac and Butter Ink using some blending brushes and my Clouds stencil die.  I know you can hardly see the clouds because of the shaker elements but It’s important to me to have all those details in creating my card.  I also die-cut the frame using the Wood Grain Frame Die.


I adhered some acetate sheet and foam adhesive on the Wood Gran Frame Die and added the Yellow Star Sprinkles with Fairy Dust confetti mix for my shaker element.


I die-cut some black card stock using the Stitched Flag die and stamped the sentiment with Versamark ink.  I sprinkled white embossing powder and heat-set this with my heating tool.  I finished my design by adhering the kangaroo on the front panel.  Here’s my card:


I always LOVE making shaker cards and with the new sprinkles and sequin mixes available at the shop, it’s hard not to make them all the time.  They are super fun to make!  Here’s a closer look:


For my next card, I also used the Mandala Frame die and created a very simple, white-on white card.  The “wreath” was die-cut using a die from Hero Arts that I bought from Kat Scrappiness years ago.  I layered the flowers I colored earlier with liquid and foam adhesive.


To finish my design, I used my white gel pen to add some interest and texture on the flowers.  Here’s a closer look:


I hope you got inspired today.  The supplies I used are listed and linked below.  Have an amazing day and happy crafting!


———-SUPPLIES———-


Newton’s Nook and Therm-O-Web Inspiration Week

NNDTOW_Nov18_Holiday

This week Newton’s Nook Designs and Therm O Web are partnering for a fabulous inspiration week!  All week long both design teams will be sharing ways to add fun foils and more to your cards using Therm O Web products with Newton’s Nook Designs stamps! There are prizes too!  Read all the way to the end of this post to find out how you can win!  I would like to take this opportunity to thank Therm O Web for sending us some amazing products!

For my project below, I am showcasing the Deco Foil Rose Gold Transfer Sheet, the Wilderness Clear Designer Toner Sheet, the Hedgehog Hollow Stamp Set and Hedgehog Hollow die set, with some Merry-Go-Round sequin mix by Kat Scrappiness.  The supplies I used will be listed and linked below.

I started by stamping my hedgehog with some Memento Tuxedo black ink and colored them in with my Copic markers.  I die-cut the images with the coordinating dies.  I cut another piece of Bristol Smooth white card stock and inked up my background with distress oxide inks.

I used my Deco Foil Rose Gold Transfer Sheet and my laminator to foil the Wilderness Clear Designer Toner Sheet.

IMG_9936

Here’s what it looks like when it’s completely foiled.  They are amazing!

IMG_9923

Since the background is already busy, I wanted to create a more “clean” look so I die-cut my inked background with some dies and adhered the foiled sheet to create my window panel.

IMG_9935

I added the Merry-Go-Round sequin mix by Kat Scrappiness.  They kind of look like fall leaves, don’t they?

IMG_9934

I used the Land Border dies for my grass and inked it up with distress oxide inks.

IMG_9937

Here’s my shaker card:

NNDThermoCollab20181A

To finish my design, I added some white lines to the hedgehogs and die-cut the orange bow from the Pines & Holly die set.   Here’s a little close-up:

NNDThermoCollab20181B

I just absolutely LOVE the Thermo O Web products I got to play with.   The foil is so pretty and I couldn’t throw it away so I created another card with the negative piece.

NNDThermoWebCollab20182A

Here’s a little close-up:

NNDThermoWebCollab20182B

There are more amazing projects today over on the Therm O Web blog so pop over there for more inspiration!

Would you like to win a prize pack including a $25 store credit to Therm O Web AND a $25 store credit to Newton’s Nook Designs?

Here’s how to win: Leave comments on the NND & Design Team blog posts using Therm O Web products all week (November 5-9) to enter. One winner will be randomly chosen from blog posts throughout the week so the more posts you leave comments on the better your chances are of winning! You have until Friday November 9th at midnight CST to comment. The winner will be announced on the NND blog post on Monday, November 12th.
Want another chance to win?  Therm O Web will also be giving away a prize pack! Visit the Therm O Web blog each day this week for more inspiration and leave comments there for another chance to win!  Today is the last day of the collaboration so make sure you leave a comment.

———SUPPLIES———–


Crafter’s Essentials 1 Die Set by Kat Scrappiness

Hello my crafty friends! I hope you are all having a great week so far! Maria here with you today sharing some cards, showcasing the new Crafter’s Essentials 1 die set and a lot of products available at the shop.  This Crafter’s Essentials 1die-set is a must-have!  This set contains 12 steel-rule dies that you can use for all of your paper crafting projects!  Here’s what it looks like:

For my first card today, I stamped some images on some white card stock with my Lawn Fawn Jet black ink using my Tim Holtz Stamping Platform tool.  I colored the images in with my Copic markers and die-cut them using the coordinating dies.

I also die-cut another piece of white card stock using the storybook die from the set.  I wanted to create a birthday card.  I stamped the small images on the card stock and assembled my card.

I really love how this card turned out.  There are so many possibilities using this Crafter’s Essentials 1 die-set.  I also love all of the stitching details! Here another look:


For my second card below I wanted to use some new sequin and confetti mixes from the Shop and some Nuvo crystal drops.  I also used the new My Tribe stamp set by Honey Bee Stamps.   Here’s my shaker card:

This shaker card is actually going to a friend of mine who is also crazy about crafting!  I am so thankful that she is a part of my tribe!

I hope you got inspired today.  The Crafter’s Essentials 1die set is sold out at the moment but more are coming in the next 7 days or so.  You can RESERVE the dies so you don’t miss out again.  The supplies I used are listed and linked below.  Have an amazing day and happy crafting!

————-SUPPLIES————-