Halloween Card with Newton’s Perfect Pumpkin

Hello Newton’s Nook fans! It’s been super HOT here at home and I have been dreaming about sweater weather, and anything pumpkin related.  This is my inspiration for today’s card.  Although when this post actually goes live, hubby and I will be in South Africa enjoying their winter weather; at least for about a week or so!  If you follow me on instagram, you might be able to see some photos of my trip.


For my project today, I am showcasing Newton’s Perfect Pumpkin stamp set, and I paired it with a lot of images from Pick-A-Pumpkin with Newton’s Boo-tiful night, and my sentiment is from the Creepy Cameos stamp set.  The birch tree is from the Forest scene Builder die set and the grass is from the Land Border die set.


To begin, I stamped and colored my images on some Spectrum Noir Ultra Smooth Premium white card stock.  This card stock is perfect for coloring with alcohol markers. I fussy-cut the images with my precision-cut scissors.


The background is ink-blended with different distress oxide inks.  I spritzed this with water using my distress sprayer and dabbed it with my paper towel to dry to get more texture.  I also die-cut the birch trees and the grass a couple of times with some black card stock.


I stamped the moon and stars from Newton’s Boo-tiful Night stamp set on my colored background with Versamark ink.  I sprinkled this with some white embossing powder, and heat-set using my Wagner heating tool.  I did the same thing for my sentiment.  I assembled the card by adhering the birch trees first, followed by the grass.  I foam-mounted some of the trees and Newton to create more dimension on my scene.


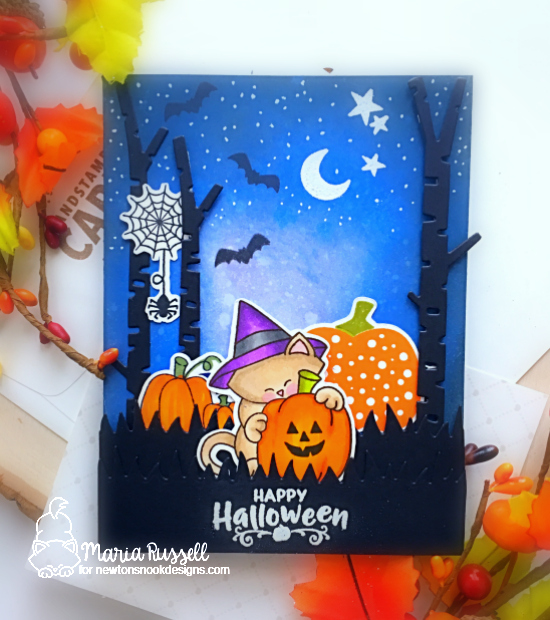
To finish my design, I stamped the black bats and added the white dots using my Sakura white gel pen.  I also adhered the spider web using liquid glue.  Here’s a closer look:


I know it’s too early to create Halloween projects since it’s only August but I love Halloween and creating Halloween cards is one of my favorite thing to do!


I hope you like my card today.  The supplies I used are listed and linked below.  Thank you for stopping by and have an amazing day!  Happy stamping!

Happy Meow-oween & Pawsome Birthday

Hello Newton’s Nook fans!  Are you ready for more inspiration from last week’s August release?  For today’s projects, I am showcasing a LOT of Newton’s Nook products.   I’m featuring the Halloween Trio stamp set and coordinating dies, Fabulous Frenchies stamp set and coordinating dies, with an older stamp set Newton’s Perfect Pumpkin. I also used the Land Border Dies, Sky Border dies with the Framework die set.

For my first card, I inked up my background with distress oxide inks —> Wilted Violet, Picked Raspberry and Fossilized Amber to create my night sky.  I sprayed it with water using my distress sprayer and dabbed it with my paper towel.

IMG_9269

I stamped my image on some Neenah solar white card stock and colored them in with my Copic markers.  I die-cut the image with the coordinating die.  I die-cut the grass with the land borders die on some black card stock, as well as the picket fence and the clouds, using the Sky Border dies.  I adhered the die-cuts and the images on my colored background.

To finish my design I added the pumpkins, spider web and the spider with the black bats using the Newton’s Perfect Pumpkin stamp set.  I also stamped the sentiment with versa mark ink and heat embossed it with white embossing powder.

IMG_9270

Here’s the Happy Meow-oween card!

NNDHappy Meow-oween1A

I added some white details to the pumpkins and the noses of the critters.

NNDHappyMeow-oween1C

For my second card, I stamped my images on some white card stock and colored them in with my Copic markers.  I die-cut the images with the coordinating dies.

IMG_9259

I die-cut an A2 size smooth white card stock and dry-embossed it with the biggest die using the Framework die set.  I cut the window using the smallest die of the same set.  I covered the window with acetate and also added my foam adhesive to create the well for my shaker card.  I used some white and purple star confetti as my shaker element and adhered this piece on my card base.

IMG_9258

I inked up the bottom of my card front with some Antique Linen distress oxide ink and adhered my little Frenchies on my card.  I also adhered the balloon and stamped my sentiment onto the card.

NNDFabulousFrenchies2A

To finish my design I added glossy accents to the balloon and the little Frenchies to make their noses pop.

NNDFabulousFrenchies2B

I hope you like my projects today.  If you haven’t checked out the August stamp, dies and stencil release please visit Newton’s Nook Designs.  The products I used are also listed and linked below.  Have a wonderful day and happy crafting!

————SUPPLIES————-