NND NOVEMBER Release Day 1 – TIME FOR COFFEE + coffee house stories paper pad

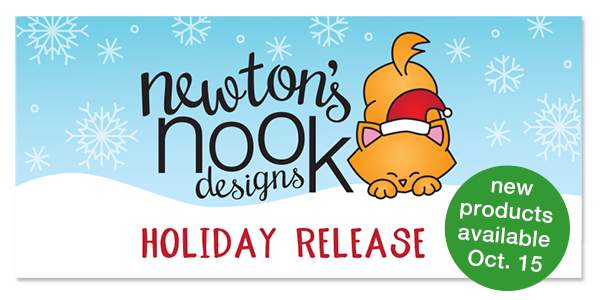
Hello and Welcome to the Newton’s Nook November Release. I am so excited to show off the new products by Newton’s Nook Designs.  You also have a chance to win the stamp set being revealed each day so please read through til the end of the blog post to find out more info.  [Just a little important note:  I know some of you had difficulties finding the comments section.  If you would like to leave a comment to participate in the giveaway, the “comments section” will only be ever visible when a single post on Word Press is being viewed. Please click on this particular blog post and you will be able to leave a comment below.  Thank you!]  

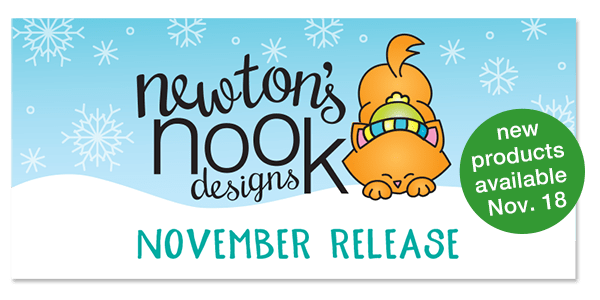
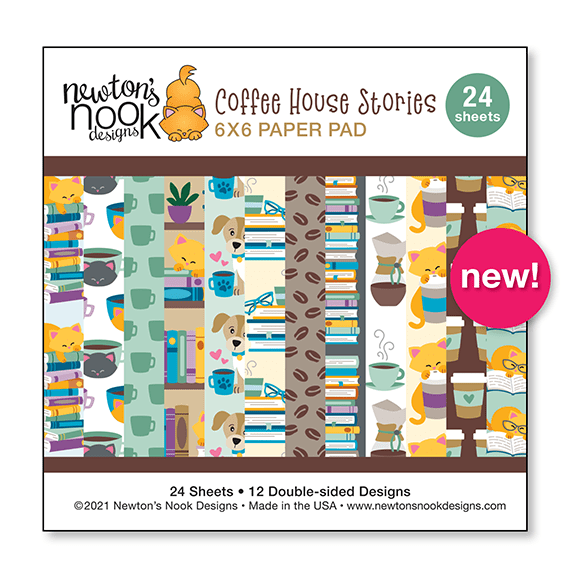
For the first day of the reveals, we are showcasing the Time For Coffee Stamp Set + Coordinating Dies with the Coffee House Stories 6×6 Paper Pad!

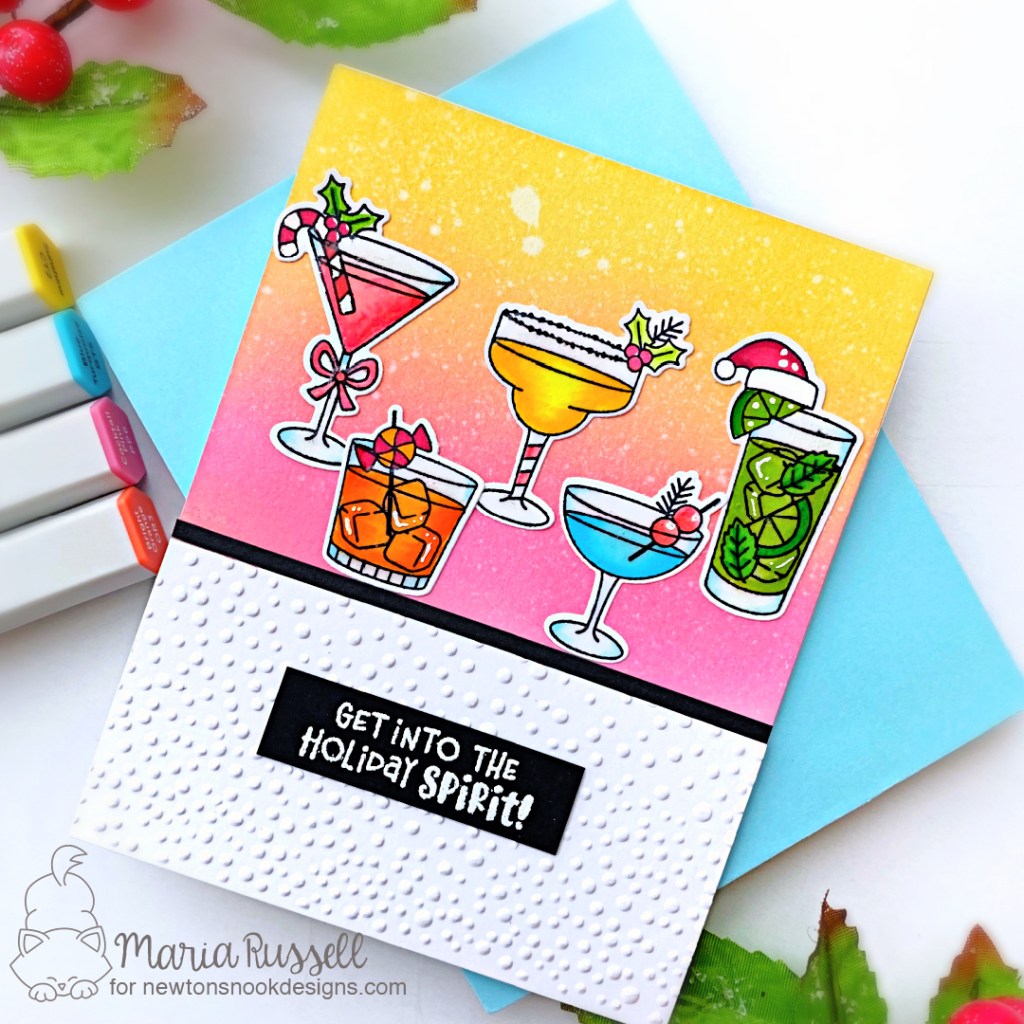
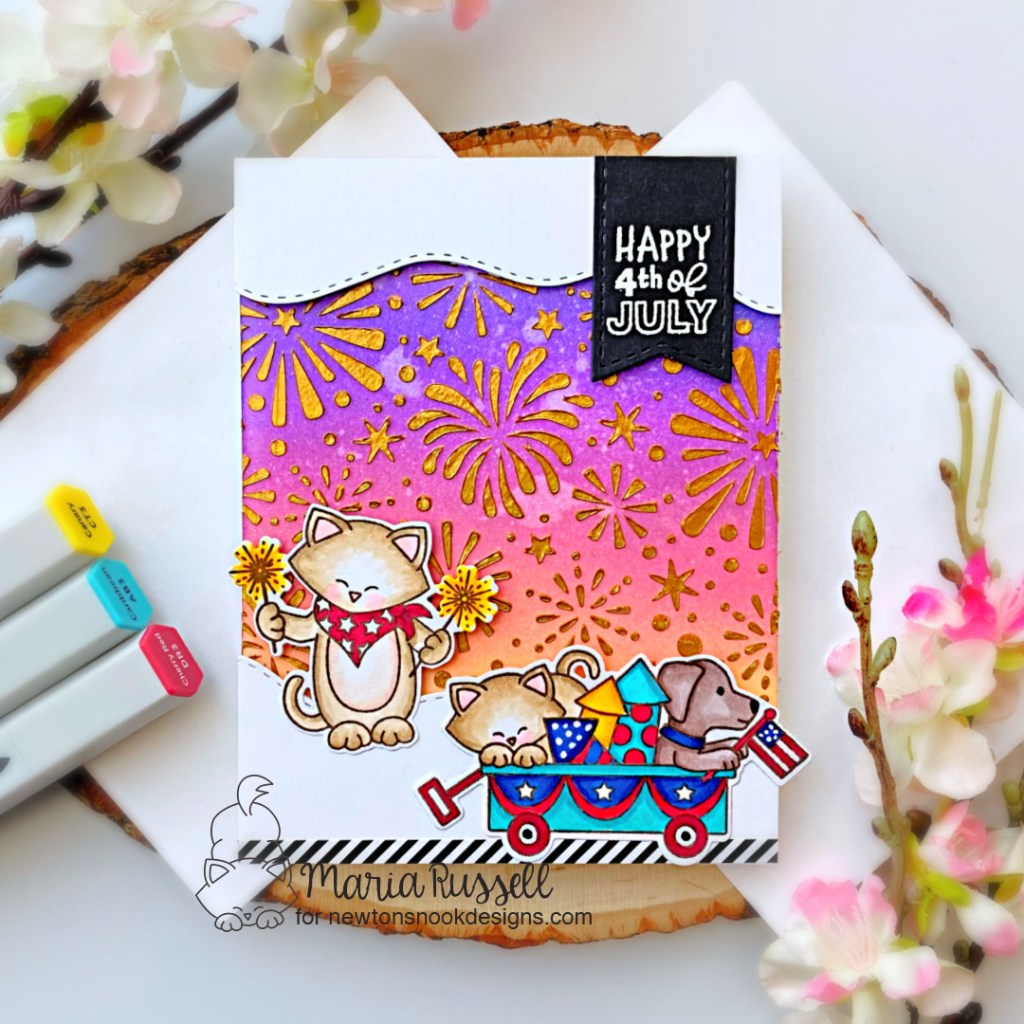
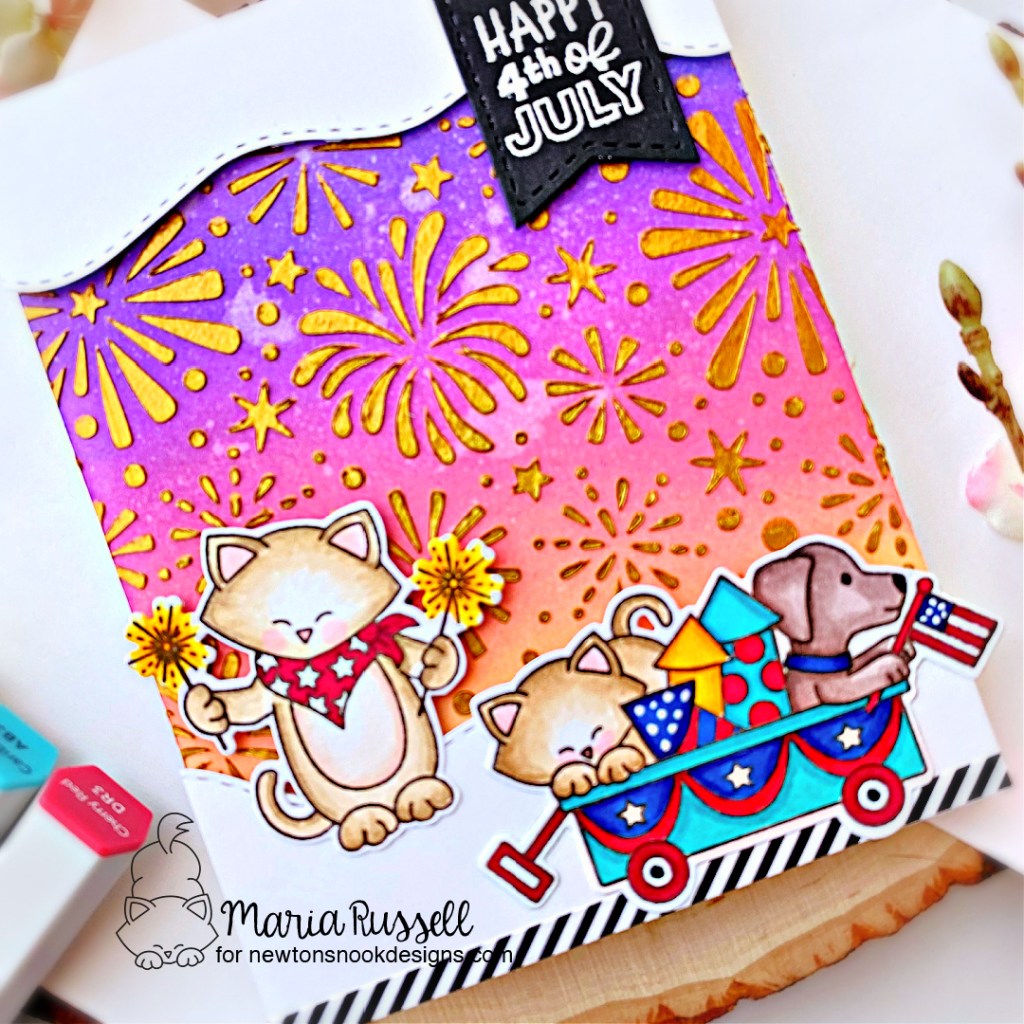
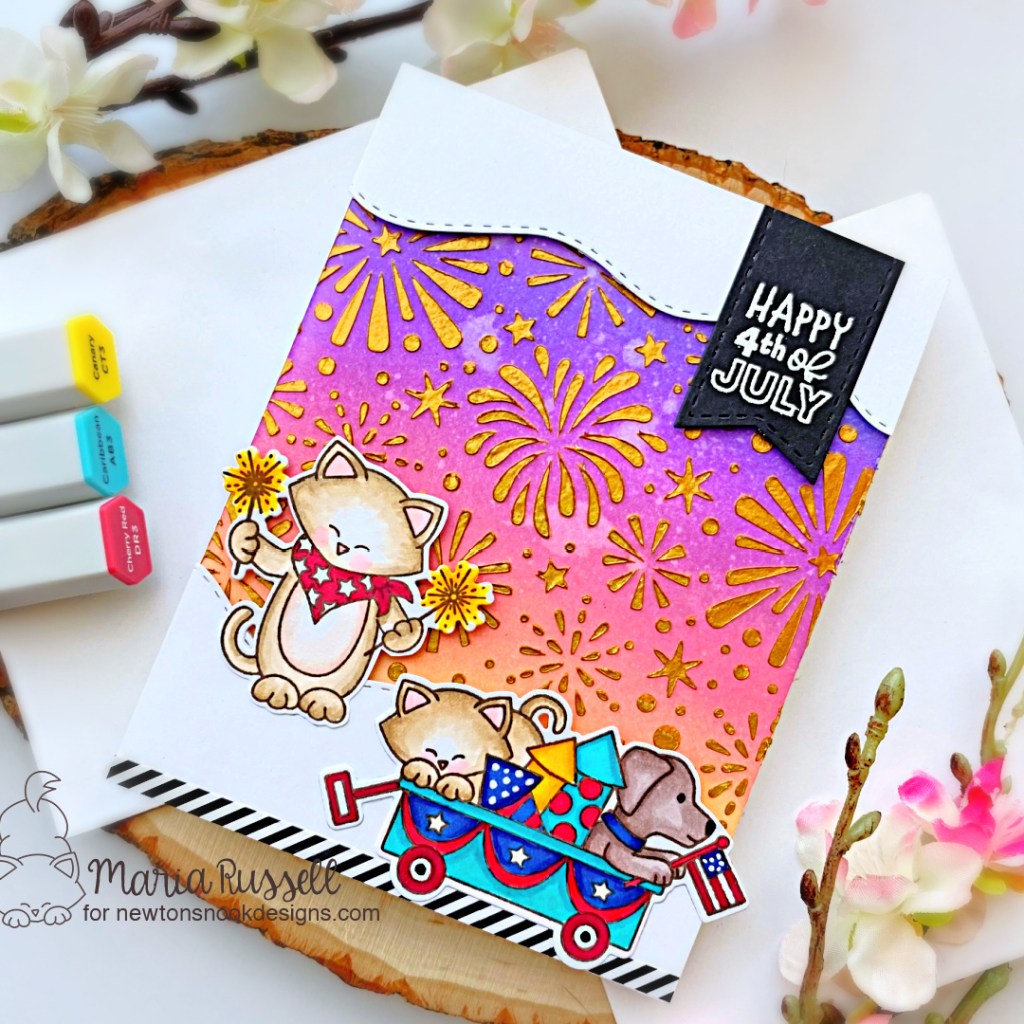
For my first project, I started by stamping the images from the Time for Coffee Stamp Set on some Espresso Car Stock with Versamark ink. I sprinkled some white embossing powder to this and used my heating tool to heat-set the images.

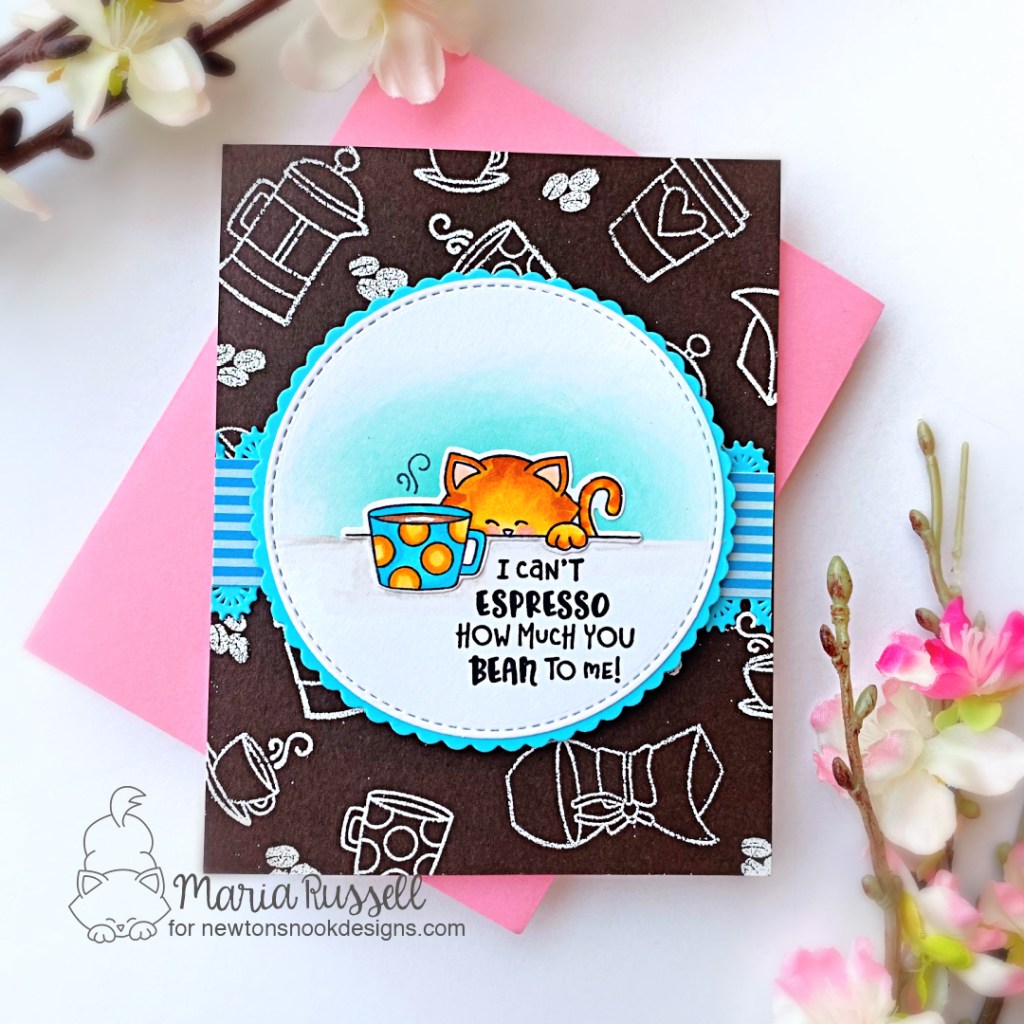
Next, I die-cut a circle scallop using a die from my collection on some Light Blue Card Stock. I also die-cut another circle on Neenah solar white which I ink-blended using Salvaged Patina Distress Oxide Ink. I adhered both pieces with liquid glue.

I stamped the image from the Newton Loves Coffee Stamp Set and colored the images in with Spectrum Noir Alcohol markers. I used the coordinating die to die-cut the image and adhered this image on the ink-blended circle panel.

Next, I cut abut 1 1/4 inches of patterned paper from the Coffee House Stories Paper pad and adhered a scalloped decorative edge on both sides for added texture and interest. I adhered this on the dark brown panel that was previously heat-embossed and added on an A2-size notecard.

I finished the design by foam-mounting my focal panel on t he card for added dimension, and stamped the sentiment using Versafine Clair Nocturne ink. This is my go-to ink for stamping sentiments on white card stock.

The next project is really simple. To create the tag, I used the Fancy Edges Tag Die-set and die-cut some patterned paper from the Coffee House Stories 6×6 paper pad. I also used the same die on Espresso and Mint Green Card Stock. I adhered them all together to create the beautiful tags. This is honestly one of my favorite tag die-set ever!

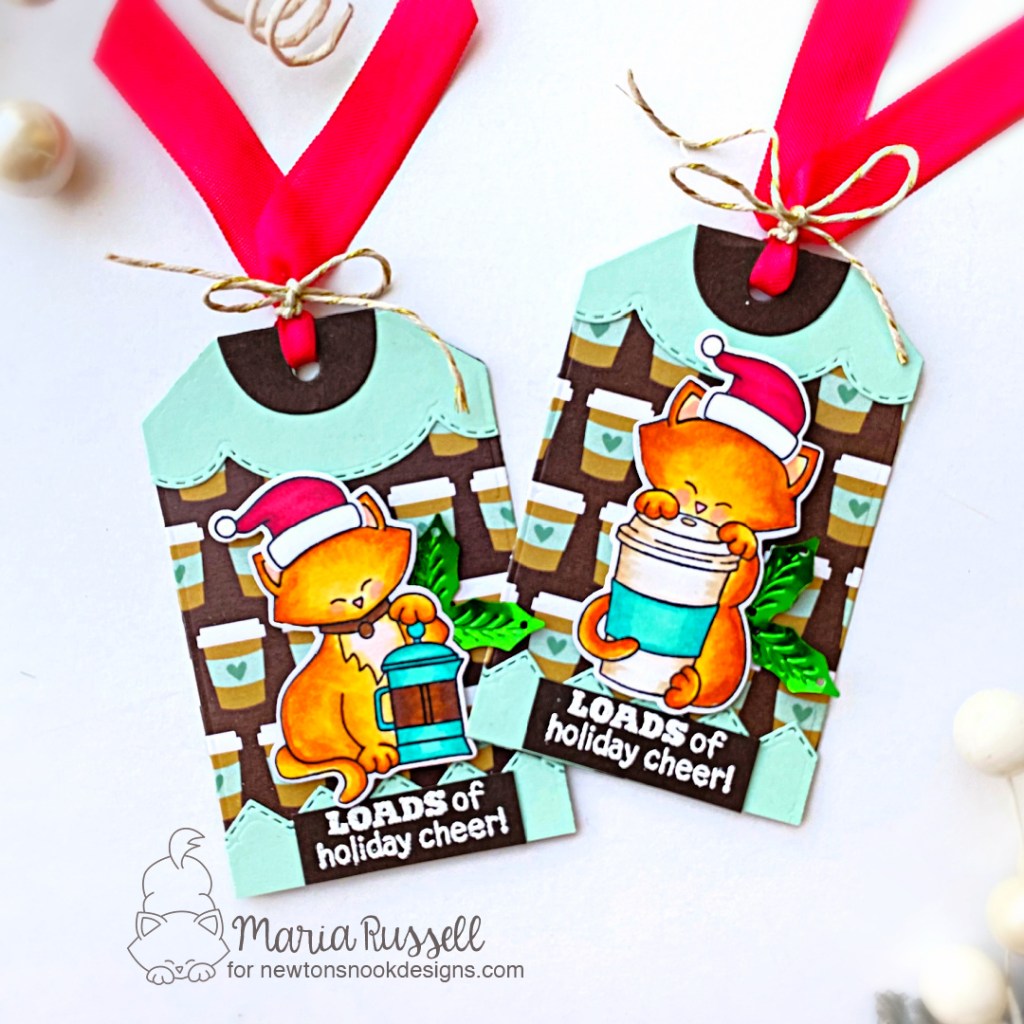
Next, I stamped the images from Newton Loves Coffee Stamp Set and colored the images in with my alcohol markers. I used the coordinating die to cut them out and foam-mounted to the tags for added dimension.

I finished the tags by adding the sentiment and the holly with a matching red ribbon and gold twine for that festive touch. Here’s a closer look:

Would you like to win the “Time for Coffee” Stamp Set?  This stamp set will be given away to ONE lucky winner!

Here’s how to win: Comment on the NND blog and Design Team blogs (see list below)! The winner will be chosen at random from the collective reveal posts. Make sure to check out each of their blogs and comment for your chance to win. You will not know which blog has been chosen so the more you comment on the better your chances are of winning! You have until Wednesday November 17th at 9pm ET to comment  — winners will be announced on the blog post on Thursday, November 18th. 

Check out all the awesome Design Team Blogs below to enter:

Newton’s Nook Designs

Ellen Haxelmans

Tina Herbeck

Larissa Heskett

Samantha Mann

Zsofia Molnar

Maria Russell (you are here)

Farhana Sarker

Tatiana Trafimovich

Samantha VanArnhem

Amanda Wilcox

———–SUPPLIES———

NND OCTOBER Release Day 4 – PREHISTORIC CHRISTMAS, ChRISTMAS PHEASANT & HEARTFELT HOLIDAYS

It’s the last day of the reveals by Newton’s Nook Designs and we are featuring three products today. If you haven’t hopped along with us yet, now is a great time to catch up. You have a chance to win the stamp set being revealed each day so please read through ’til the end of the blog post to find out more info.  [Just a little important note:  I know some of you had difficulties finding the comments section.  If you would like to leave a comment to participate in the giveaway, the “comments section” will only be ever visible when a single post on WordPress is being viewed. Please click on this particular blog post and you will be able to leave a comment below.  Thank you!]  

For Day 4, we are showcasing the Prehistoric Christmas Stamp & Dies, Christmas Pheasant Stamp & Dies with the Heartfelt Holidays that coordinates with the previously released Heart Frames & Banner Trio Dies.

The first card is clean and simple. I die-cut the scallop frame from the Frames & Flags Die Set and used masking tape to mask off the card stock. I ink-blended this panel with some Seedless Preserves, Picked Raspberry, Carved Pumpkin and Mustard Seed distress oxide inks.

I sprayed the panel with water and picked up the excess with some paper towel, and adhered this on an A2-size white notecard.

Next, I stamped the images on some Neenah solar white card stock and colored the images in with alcohol markers. I used the coordinating die to cut them out. I added the images on the card using liquid glue. I finished the design by adding the sentiment, and glittery stars to give it a whimsical touch.

I am starting to really LOVE creating clean and simple card so the next project is another easy one. A one-layer card is a the way to go!

I basically repeated the steps that I did above with the ink-blending and coloring the images. I also stamped the trees from the Festive Forest Stamp Set and used the coordinating dies to cut them out.

I popped-up the first tree with foam adhesive and added the other two with liquid glue. I also foam-mounted the focal image to make it stand out, finishing the design by stamping the sentiment with Versafine Onyx Black Ink.

And last but not the least is the Heartfelt Holidays project. For all you coloring people out there, this is another must-have!

For a cohesive look, I only used some variations of green and red! Nothing too busy here! I just LOVE the simplicity of this stamp set and I am so happy that Newton’s Nook is adding more stamp set to match the Heart Frames Die Set.

I finished my card design by stamping the sentiment on some red card stock and used the Banner Trio Die Set to cut it out. I foam-mounted this onto the card for added dimension.

So there you have it folks! If you hopped along with us throughout this week, I’d LOVE to hear what your favorites are! I hope you have been inspired by the design team all week long! The products will be available tomorrow so grab your favorites first thing before they sell out!

Would you like to win the “Prehistoric Christmas” or the “Heartfelt Holidays”  Stamp Set?  We will choose ONE lucky winner for each stamp set!

Here’s how to win: Comment on the NND blog and Design Team blogs (see list below)!  The winner will be chosen at random from the collective reveal posts. Make sure to check out each of their blogs and comment for your chance to win. You will not know which blog has been chosen so the more you comment on the better your chances are of winning! You have until Thursday, October 14th at 9pm ET to comment  — winners will be announced on the blog post on Friday, October 15th

Check out all the awesome Design Team Blogs below to enter:

Newton’s Nook Designs

Ellen Haxelmans

Tina Herbeck

Larissa Heskett

Samantha Mann

Zsofia Molnar

Maria Russell (you are here)

Farhana Sarker

Tatiana Trafimovich

Samantha VanArnhem

Amanda Wilcox

———-SUPPLIES———

NND OCTOBER Release Day 3 – CHRISTMAS COCKTAILS & DAIRY CHRISTMAS

It is the third day of the reveals by Newton’s Nook Designs.  Were you able to hop along with us for the last two days? You have a chance to win the stamp set being revealed each day so please read through ’til the end of the blog post to find out more info.  [Just a little important note:  I know some of you had difficulties finding the comments section.  If you would like to leave a comment to participate in the giveaway, the “comments section” will only be ever visible when a single post on WordPress is being viewed. Please click on this particular blog post and you will be able to leave a comment below.  Thank you!]  

For Day 3, we are showcasing the Christmas Cocktails Stamp Set and Dies with the Dairy Christmas Stamp Set and Dies.

Let me just say that I can’t even pick a favorite product from this Holiday Release. I LOVE THEM ALL! I am sure the rest of the team would agree that we all got super inspired creating the projects we are showing you this week. This Christmas Cocktails stamp set is so ADORABLE it was hard for me to choose which ones to feature on my card.

I stamped the images on some Neenah solar white card stock and colored them in with my alcohol markers. I used the coordinating dies to cut the images out. I know you can really see it, but I added glossy accents to the images to make them look like real glass.

While I was waiting for the images to dry, I inked up the background panel with distress oxide inks. I wanted to have a warmer tone behind the glasses so I used Picked Raspberry, Carved Pumpkin and Mustard Seed inks. I sprayed the background with water and picked up the excess with some paper towel.

Next, I cut some Neenah solar white card stock and used embossing folder to dry-emboss this panel. I adhered this on an A2-size notecard and also added a strip of black card stock to ground the images.

I adhered the images on the card with liquid glue and finished my design by adding the sentiment that I stamped with Versamark ink on some black card stock.

For my second card, I decided to create a clean and simple design. I die-cut the scallop panel on some Neenah solar white card stock using the Scallop from the Frames & Flags Die Set. I also used a circle die to create the window, and ink-blended the positive cut with some Salvaged Patina Distress Oxide ink.

Next, I foam-mounted the scallop panel on some A2-size notecard and adhered the ink-blended circle die-cut. I stamped the images and colored them in with alcohol markers. I used teh coordinating die to cut it out.

I foam-mounted the focal image for added dimension and finished my design by stamping the sentiment on some black card stock and heat-setting with my heating tool. Easy, peasy for this one!

Would you like to win the “Christmas Cocktails” or the “Dairy Christmas”  Stamp Set?  We will choose ONE lucky winner for each stamp set!

Here’s how to win: Comment on the NND blog and Design Team blogs (see list below)!  The winner will be chosen at random from the collective reveal posts. Make sure to check out each of their blogs and comment for your chance to win. You will not know which blog has been chosen so the more you comment on the better your chances are of winning! You have until Thursday, October 14th at 9pm ET to comment  — winners will be announced on the blog post on Friday, October 15th

Check out all the awesome Design Team Blogs below to enter:

Newton’s Nook Designs

Ellen Haxelmans

Tina Herbeck

Larissa Heskett

Samantha Mann

Zsofia Molnar

Maria Russell (you are here)

Farhana Sarker

Tatiana Trafimovich

Samantha VanArnhem

Amanda Wilcox

———-SUPPLIES———-

NND OCTOBER Release Day 2 – Holiday Home + Christmas Cactus

It is Day 2 of the October reveals by Newton’s Nook Designs.  I hope you were able to check out yesterday’s reveal.  You also have a chance to win the stamp set being revealed each day so please read through ’til the end of the blog post to find out more info.  [Just a little important note:  I know some of you had difficulties finding the comments section.  If you would like to leave a comment to participate in the giveaway, the “comments section” will only be ever visible when a single post on Word Press is being viewed. Please click on this particular blog post and you will be able to leave a comment below.  Thank you!]  

For today’s reveals, we are showcasing the Holiday Home Stamp Set and Coordinating Dies with the Christmas Cactus Stamp Set and Dies.

When I first saw this Holiday Home Stamp Set, I immediately thought of this design in my head. I knew wanted to create a storybook scene to capture this magical Christmas evening. I paired it up with the Snow Globe Scenes stamp set.

I started by creating the background panel by ink-blending the background with distress oxide inks on some Bristol Smooth white card stock. I sprayed it with water and picked up the excess with paper towel.

Next, I stamped the images from the Holiday Home Stamp Set and Snow Globe Scenes on some Neenah solar white card stock and colored the images in with Spectrum Noir alcohol markers.  I used the coordinating die to die-cut them all out.

To create the snowbanks, I die-cut some Neenah solar white card stock using the Land Border Dies and the Sea Border Dies. I colored the edges with my alcohol markers in blue and used the blender to soften the edges.

Having all of the components on hand, I started to assemble the card. The background panel was adhered on some A2-size white notecard. I foam-mounted the first snowbank for added dimension and added the second one with liquid glue. I adhered the colored images on the card panel with either foam or liquid adhesive.

I stamped the sentiment on the foreground with Memento Tuxedo black ink and colored the letters with the same markers I used to color the images, for a more cohesive look. I finished my card design by adding Stickles to the “snowy” trees and the hats.

The next card is Clean & Simple. I stamped the images a few times on some Bristol smooth white card stock with Versafine ink in Onyx Black. I colored the images in with Zig Clean Color Real Brush markers.

I adhered the colored panel on some A2-size white notecard.

I finished the card design by stamping the sentiment on some black card stock with Versamark ink. I sprinkled some white embossing powder to this and heat-set with my heating tool. I fussy-cut the sentiment and adhered on the card with liquid glue.

Would you like to win the “Holiday Home” or the “Christmas Cactus”  Stamp Set?  We will choose ONE lucky winner for each stamp set!

Here’s how to win: Comment on the NND blog and Design Team blogs (see list below)!  The winner will be chosen at random from the collective reveal posts. Make sure to check out each of their blogs and comment for your chance to win. You will not know which blog has been chosen so the more you comment on the better your chances are of winning! You have until Thursday, October 14th at 9pm ET to comment  — winners will be announced on the blog post on Friday, October 15th

Check out all the awesome Design Team Blogs below to enter:

Newton’s Nook Designs

Ellen Haxelmans

Tina Herbeck

Larissa Heskett

Samantha Mann

Zsofia Molnar

Maria Russell (you are here)

Farhana Sarker

Tatiana Trafimovich

Samantha VanArnhem

Amanda Wilcox

———-SUPPLIES———

NND OCTOBER Release Day 1 – SNOW MUCH CHEER & NEWTON’S STOCKING + MEOWY CHRISTMAS PAPER PACK

Hello and Welcome to the Newton’s Nook October Release. I am so excited to show off the new holiday-themed products by Newton’s Nook Designs.  You also have a chance to win the stamp set being revealed each day so please read through til the end of the blog post to find out more info.  [Just a little important note:  I know some of you had difficulties finding the comments section.  If you would like to leave a comment to participate in the giveaway, the “comments section” will only be ever visible when a single post on Word Press is being viewed. Please click on this particular blog post and you will be able to leave a comment below.  Thank you!]  

For the first day of the reveals, we are showcasing the Snow Much Cheer Stamp Set & Coordinating Dies, Newton’s Stocking Stamp Set and Coordinating Dies along with the ADORABLE Meowy Christmas Paper Pack!

For my first project, I started by stamping my images from the Newton’s Stocking stamp set on Neenah solar white card stock and colored the images in with my alcohol markers. I used the coordinating dies to die-cut the image. I also stamped the sentiment with Versamark Ink and heat-set with my heating tool.

To add some festive touch to this design, I added stickles to Newton’s hat and the stocking. I set this image aside to let it dry while I work on the background.

The background was very simple to create. I die-cut some white card stock using a rectangle frame from my collection. I cut this piece and used an embossing folder to create dimension. I adhered this on an A2-size white notecard. I also used the same frame to die-cut a few pieces of the pattern paper from the Meowy Christmas Paper Pack as well as some black strip. I must admit, this Meowy Christmas Paper Pack is just so pretty, it was really hard for me to cut them out. I feel like the images should just be framed!

I wanted my focal point to stand out so I die-cut the scallop frame from the Framework Die Set. I covered the back with vellum and foam-mounted this on my card front. I adhered some pine needles that I die-cut from the Pines & Holly Die Set and added Newton in the middle of the frame with liquid glue.

For my next card, I repeated the process I just mentioned above, coloring the images and die-cutting them out. I opted for some light colors to color them in.

Next, I die-cut the all the components to create my scene –> Pine trees from the Forest Scene Builder Die Set using the Meowy Christmas Paper Pack, snowbank using the Land Border and Sea Border Die Set, with the red bow from the Baby Bib Die Set. I also ink-blended the background with some distress oxide ink and adhered this panel on some A2-size notecard.

I assembled the card by adding the circle frame panel with some foam adhesive for added dimension. I also added the trees, then the colored images with either foam adhesive or liquid glue.

I finished my card design by stamping the sentiment “Let It Snow” using some Spectrum Noir quick Dry Dye Ink in Midnight and colored the snowflakes and “Snow” with some light blue alcohol marker. I’ve added some white pearls for more texture.

Would you like to win the “Snow Much Cheer” or the “Newton’s Stocking” Stamp Set?  We will choose ONE lucky winner for each stamp set!

Here’s how to win: Comment on the NND blog and Design Team blogs (see list below)! The winner will be chosen at random from the collective reveal posts. Make sure to check out each of their blogs and comment for your chance to win. You will not know which blog has been chosen so the more you comment on the better your chances are of winning! You have until Thursday, October 14th at 9pm ET to comment  — winners will be announced on the blog post on Friday, October 15th

Check out all the awesome Design Team Blogs below to enter:

Newton’s Nook Designs

Ellen Haxelmans

Tina Herbeck

Larissa Heskett

Samantha Mann

Zsofia Molnar

Maria Russell (you are here)

Farhana Sarker

Tatiana Trafimovich

Samantha VanArnhem

Amanda Wilcox

———-SUPPLIES———

I love Fall with Newton’s Nook Designs

It’s time for some fall inspiration on my blog today. Sometimes when the stamp set is so pretty, you don’t really need to add anything else, don’t you agree?

For my card today, I am showcasing the Fall Friends stamp set with its coordinating dies along with the Sunscape 6×6 Stencil by Newton’s Nook.

I started by stamping the images on some Neenah solar white card stock with Memento Rich Cocoa ink. I colored the images in with alcohol markers. I also stamped the image on some masking paper and fussy-cut with my precision snips. I covered the colored image with the masking paper.

Next, I used the Sunscape Stencil with some Light Blue Quick Dry Dye ink to add some texture to the background. I removed the stencil and adhered the foreground to an A2-size black notecard.

I finished my design by die-cutting the “I love fall” on some white card stock. I adhered the letters on black card stock and fussy cut to create a black shadow for added dimension. I adhered the sentiment on the card with liquid glue. I also added some glossy accents to the heart to make it stand out. Here’s another look:

This card makes me want to snuggle up with my little kitty and drink some hot cocoa! I hope you love this card as much as I do! The supplies I used are listed and linked below. Thanks for joining me today!

——-SUPPLIES——–

Cheers, Witches! With Newton’s Nook Designs

Hello Newton’s Nook fans! I am so glad you joined me today and I am also up on the Newton’s Nook blog, sharing this cute Halloween card from the new August product release. I didn’t get to join in the fun because I was traveling but rest assured that you will be seeing a lot more throughout the month.

It is so much fun to mix and match a couple of stamp sets and for today’s project, I am showcasing the Brooms & Boos stamp set and dies, Count Newton stamp set and dies, along with the Spooky Street Stamp set.

Step-by Step Instructions:

  • Stamp images on Neenah solar white card stock with alcohol-friendly ink and color the images in with alcohol markers.
  • Die-cut colored images using coordinating dies.
  • Die cut some extra elements on black card stock to create the spooky scene, using the land borders die set and extra tombstone from the Count Newton die set.
  • Apply some Unicorn ink on the edges of the tombstone, land and grass borders for added texture.
  • Use a circle die to die-cut some masking paper and adhere to an A2-size panel of Bristol smooth white card stock.
  • Ink-blend this panel with distress oxide ink.
  • Use distress sprayer to add water droplets to the ink-blended panel for added texture and interest.
  • Pick up excess water with some paper towel and remove the mask.
  • Stamp the spooky tree, bats and sentiment using black ink.
  • Adhere the hill and grass border on the card using tape runner.
  • Use white gel pen to add some detail to the black tombstone.
  • Adhere the rest of the elements to finish the scene.

I really LOVE creating halloween cards and this will be the first of many halloween cards I’ll be posting on this blog. Here’s a closer look:

The white pigment ink on the tombstone, hill and grass border added more texture and interest to this spooky scene, don’t you think?

That is all for today! I hope this spooky card will entice you to start thinking about Halloween! The supplies are listed and linked below for your reference*. Thanks so much for stopping by today, and happy crafting!

Love,

——–supplies——

DISCLOSURE. *I belong to a few design teams with affiliate programs and link these supplies at the end of each blog post. If you click on my affiliate link, I will receive a small commission at no additional cost to you. I use these funds to pay for the cost of running this blog. If you like what I do, please consider supporting me by clicking on these links. Thank you so much!

8th-Year Birthday Celebration, a Mini Release + Sale & a Giveaway!

Today I am excited to be part of  the 8-year anniversary celebration with Newton’s Nook Designs!  To celebrate this awesome milestone, Newton’s Nook Designs has released adorable new cupcake themed products, which I will be sharing on my projects today. THERE ARE PRIZES TOO! Read all the way to the end of this post to find out how you can win! YAY!

For today’s festivities, the design team is showcasing the Cupcakes Layering Stencils with Newton’s Cupcake stamp set and coordinating dies. Here’s what they look like:

I stamped the images twice on some Neenah solar white card stock with some Memento Rich Cocoa ink. I colored the images in with Spectrum Noir alcohol markers and used the coordinating die to die-cut both images.

Next, the scallop die from the Frames & Flags die set was die-cut with some Bristol smooth white card stock. I ink-blended this panel using the Cupcakes Layering stencils with different colors of dye inks. I set this panel aside to let it dry while I work on my focal point.

I used the reverse scallop die from the Framework Die Set to die-cut some hot-pink card stock. Since this is a birthday card, I wanted to add some fun elements to this to add the shaker components. I adhered some vellum on the reverse scallop die-cut and added some foam adhesive to create the well. I added some sprinkles as my shaker element and adhered this on the ink-blended panel.

I matted the focal background panel on another pink card stock before adhering to an A2 size white notecard. I finished my design by adhering the colored image on the card. For added dimension, I adhered the sprinkles on the frosting with some liquid glue. Here’s another look:

The second card is a lot easier since I already had another colored image to use. The focal panel was made by using the Sunscape Stencil with some dye ink. I used the Cascading Stars Stencil with some texture paste to add texture and dimension to this panel. I set this aside to let it dry for about half an hour.

Once the panel was dry, I matted this onto some blue card stock before adhering to an A-2 size note card.

I finished the card design by using my white gel pen to add some details to the frosting and adhered the image with liquid glue.

I hope you like the cards I made today. The supplies I used are listed and linked below. Don’t forget to use the coupon code “8YEARS” to get 15% off your order.

Would you like to win a $50 store credit to the Newton’s Nook Designs Online Shop? We will choose TWO lucky winners! Here’s how to win: 

Comment on the NND blog and Design Team blogs! (see list below) The winner will be chosen at random from the collective posts. Make sure to check out each of their blogs and comment for your chance to win. You will not know which blog has been chosen so the more you comment on the better your chances are of winning!  You have until Monday, July 19th at 9pm ET to comment  –> winners will be announced on the blog post on Tuesday, July 20th.

Check out all the awesome Design Team Blogs below to enter:

Newton’s Nook Designs

Tina Herbeck

Larissa Heskett

Samantha Mann

Zsofia Molnar

Maria Russell (you are here)

Farhana Sarker

Tatiana Trafimovich

Samantha VanArnhem

Amanda Wilcox

———-SUPPLIES——–


Happy 4th of July Card with Newton’s Nook

Hello Newton’s Nook Designs fans! I hope you’re having a wonderful week so far! Who is excited for the 4th of July weekend? That is my inspiration for today’s post.

I am back today to share with you this 4th of July card, showcasing products from the June release called Newton’s 4th of July stamp set & dies, along with the Fireworks stencil.

To make the card, I started by stamping my images on some Neenah solar white card stock and colored the images in with Spectrum Noir Illustrator markers and Copic markers. I used the coordinating dies to cut them all out.

The colorful background was made by ink-blending some Bristol smooth white card stock with my favorite Distress oxide blends –> Faded Jeans, Wilted Violet, Picked Raspberry and Dried Marigold. I didn’t bother to color the bottom of the card stock since I knew they will be covered anyway. I sprayed this with water and picked up the excess with paper towel.

Next, I used the Fireworks stencil and Therm O Web Metallix Gel in Gold to add texture to my ink-blended background. The gel was evenly spread on teh card stock with the help of TOW Stencil Pal. I set this panel aside to let it dry for about half an hour, before adhering to an A2 size notecard.

I used the Sea Border Die Set to die-cut two strips of white card stock and foam mounted both pieces onto my card.

I cut a strip of black & white pattern paper and adhered at the bottom with liquid glue. I also adhered both images on the card using both liquid & foam adhesive for added dimension.

Lastly, I stamped the sentiment on some black card stock that was die-cut using one of the dies from the Frames & Flags Die set. I foam mounted this onto my card to give it stability. Here’s another look:

I hope you like card today. The supplies I use are listed and linked below. Thanks for stopping by and have an amazing day!

———SUPPLIES——–