Seas the Day with Fairy Hugs Stamps

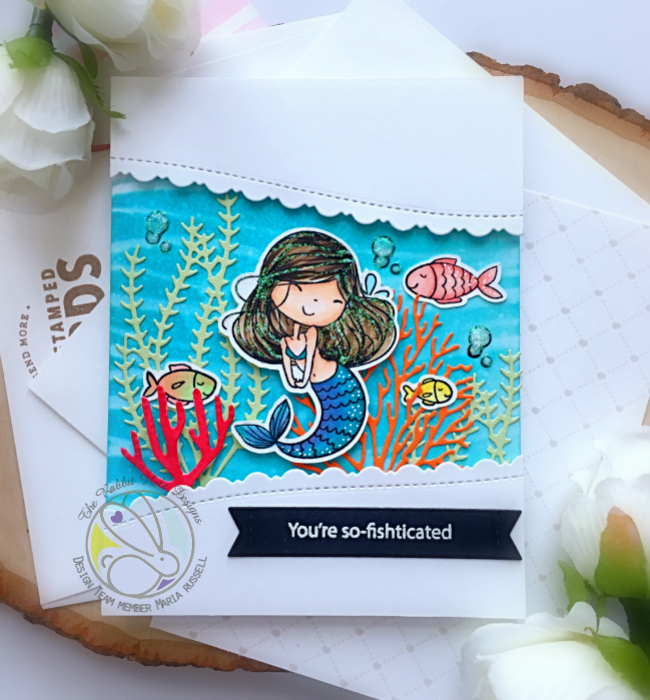
Hello my crafty friends! I hope you are all doing well. I have a fun “mermaid-themed” card to share with you today, showcasing the new Malila Stamp Set (FHS-152) by The Fairy Stamper.

I wanted a rainbow-themed background for my lovely mermaid. Who said the ocean can’t be in rainbow colors, right?!

I started by inking up some Bristol smooth white card stock with distress oxide inks in Kitsch Flamingo, Ripe Persimmon, Mustard Seed and Peacock Feathers. I sprayed this background with water and picked up the excess with some paper towel.

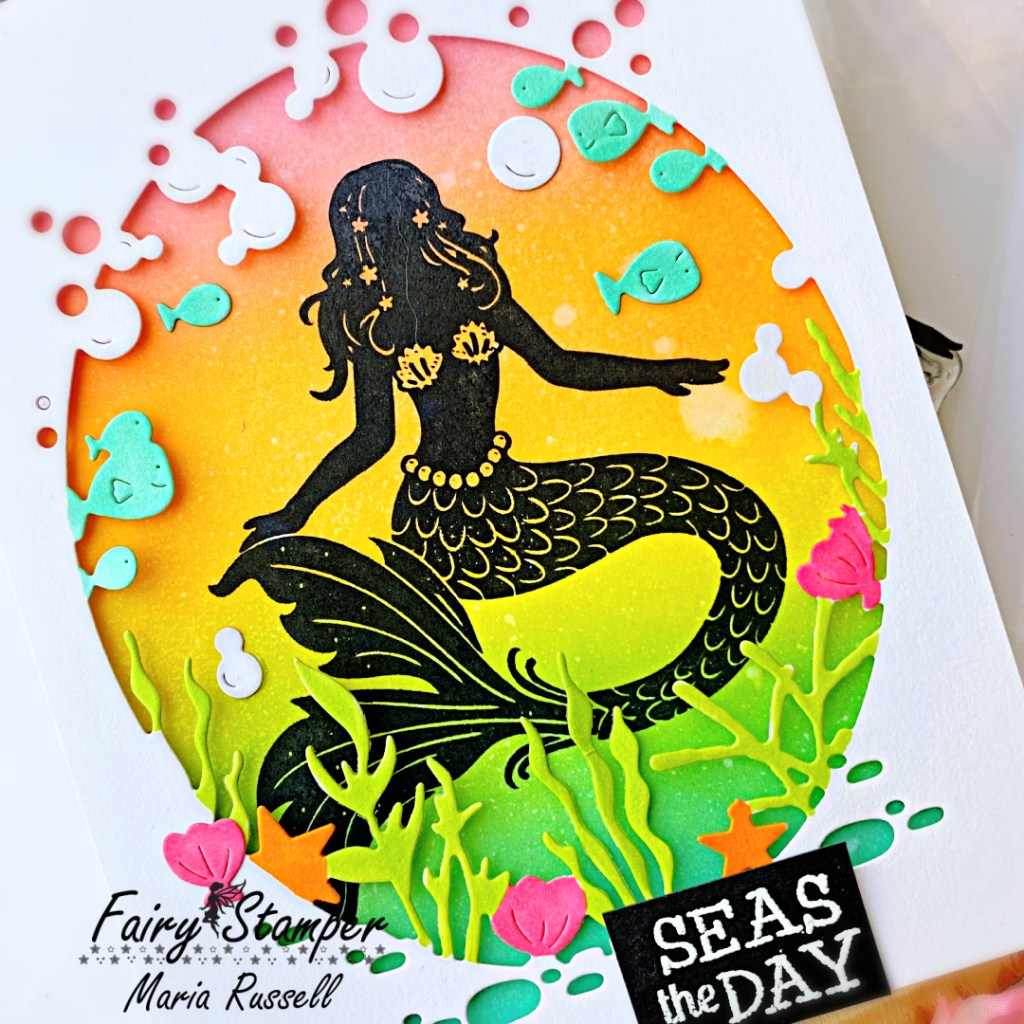
Next, I stamped Malila using some Versafine Clair Ink in Nocturne. I love the intensity of the black against the colorful background.

To create the window panel, I die-cut some Neenah solar white card stock using a die from my collection. I colored the die-cuts with my alcohol markers and foam-mounted this piece on the card.

The last thing now is to add the sentiment. I wanted the sentiment to stand out so I stamped it on some black card stock with Versamark ink and sprinkled some white embossing powder. I heat-set the sentiment with my heating tool and adhered on my card. Here’s another look:

I hope you like my card today. The supplies I use are listed and linked below. Thanks for stopping by, and have an amazing day!

——-SUPPLIES——-

I’m Done Adulting. Let’s Be Mermaids!

Hello my crafty peeps! Maria here on the blog with you today sharing two summer-themed cards, showcasing one of my favorite stamp sets from the summer release called “Mermaid Treasures“, along with the Under the SeaOcean Waves and Mermaid Shimmer stencils.

For my under the sea card on the left, I started by inking up the background with my blending brushes and Ocean Waves and Under the Sea stencils using a combination of the Marina MadnessTropical Sea and Four Leaf hybrid inks.  I used the same stencil and some glitter glitz gel to add more texture to the school of fishies.  I also die-cut two borders using the By The Sea border die and foam-mounted these pieces onto the colored panel.  I adhered this to an A2 size card base.

Next, I stamped the images on some Neenah solar white card stock and colored them in with my alcohol markers.  I used the coordinating dies to die-cut them out and adhered them using either some foam or liquid adhesive for added dimension.

Lastly, I adhered some Sparkling Clear Droplets to my card for added texture.  Don’t they just look like bubbles?  Here’s another look:

Since I colored a lot of images, I decided to make another card.  I used some low-tack tape to mask both sides of my A2-size card panel.  I used my blending brushes with the Mermaid Shimmer stencil, and colored the background mixing the Fandango and Tangerine Dream hybrid inks.  

I used my glitter glitz gel to add more texture to the background.  I love the glittery effect it gave on the card.  I die-cut two strips of black card stock and adhered it both sides.  I also cut some strips of the patterned paper from the Seaside paper pack.

I foam-mounted my focal image and used my shimmer pen to add some highlights to her hair.

To finish my design, I stamped the sentiment with watermark ink and sprinkled some white embossing powder.  I used my heating tool to heat-set the sentiment and die-cut using the Sentiment Stack die.  I adhered this piece with some foam adhesive.  Here’s another look:

This card is really simple but I love the textured background!  

Don’t you just love the mermaid images on the Mermaid Treasures stamp set?  They are beyond adorable!  I also LOVE, love, love the new stencils!  I can’t really pick a favorite!  LDRS Creative has an amazing line of stencils that you can use to create a wonderful scene on your projects. 

I hope I have given you some great inspiration today.  The supplies I use are listed and linked below.  Thank you for stopping by the happy stamping!

———–SUPPLIES———–

The Rabbit Hole Designs June Release- Day 2 – By The Shore & Mermaid Hair

TRHDJuneIcon

Hello and welcome to the release hop.  We are so excited for you to join us as we present to you our June release. The whole design team will be sharing projects featuring the By the Shore and Mermaid Hair stamp set.   We also have a GIVEAWAY so please be sure to scroll at the end of this blog post to find out how you can WIN.  Don’t forget to visit the participating blogs (links are indicated below) and leave us some crafty love.

Here’s is my first card:

TRHDMermaidHair1A

Card recipe:

  • stamp the images on some Neenah classic crest solar white card stock and color the images in with alcohol markers (or any medium of your choice).
  • die-cut the image using Brother Scan N Cut 2
  • use a die from my stash to die-cut the Coral and seaweeds from colored card stock.
  • use distress oxide inks to ink up the die-cut.
  • spray the colored panel with some water using the distress sprayer and dab it dry with paper towel.
  • use the waves stencil on the colored background.
  • die-cut the two white panel using the fancy scalloped border dies.
  • adhere the colored background on an A2 size card base, and adhere the rest of the die-cut elements.
  • adhere the fancy scalloped die-cut white panel using foam adhesive.
  • adhere the mermaid image using foam adhesive.
  • use stardust stickles to add some glitter on the mermaid’s hair and the bubbles to finish the design.

Here’s a closer look:

TRHDMermaidHair1B

I think this mermaid is one of the cutest images I have ever seen!  So many possibilities using this set.  This will also be perfect to use on a mermaid-themed birthday card!

Here’s another simple card that I made using the stamp set:

TRHDMermaidHair2A

I masked my card stock using painter’s tape and used a Waves stencil with the make-up brushes to create the waves on the background.  I also used some stitched border dies to create the arrows and wonky stitched lines.

TRHDMermaidHair2B

GIVEAWAYS:
To celebrate day 2 of the release The Rabbit Hole Designs is giving away winners choice of either Mermaid Hair or By the Shore to One lucky winner. Winner will be chosen at random from the comments left on participating blogs, so make sure to visit each stop and leave a comment. Leave comments by 11:59 pm PST May 30, 2019 on all participating blogs. Winner will be announced on The Rabbit Hole Designs blog May 31, 2019.
Here’s the order of the hop:

For more inspiration, updates, and news make sure to check out these places.

———SUPPLIES———–

Newtons Nook Designs 5 Year Anniversary Blog Hop

NNDJuly18_5yr


It’s Newton’s Nook Designs 5-year anniversary and we are celebrating with a HUGE bog hop.  Five (5) winners will be selected to win a $25 Store Credit so please read through til the end to find out more info.  [Just a little important note:  I know some of you had difficulties finding the comments section.  If you would like to leave a comment to participate in the giveaway, the “comments section” will only be ever visible when a single post on Word Press is being viewed. Please click on this particular blog post and you will be able to leave a comment below.  Thank you!]  

NND2018_SALE_JulyMiniStamps_550


For my one-layer card, I am showcasing the Purr-maid Newton stamp set.  There’s nothing cuter than these cat merman and mermaid so I wanted to use them again.  I also combined my project with the Tranquil Tides stamp set.


I started out by inking up some Bristol smooth white card stock with distress oxide inks and my mini ink blending tools.  For the sand, I used a combination of Antique Linen and Vintage Photo.  For the sea, I used Mermaid Lagoon, Peacock Feathers and Shaded Lilac.  I sprayed water on my colored background and dabbed it with a paper towel.


I stamped the coral images with Faded Jeans distress oxide.  I love this effect because it made it look more realistic!


I stamped the images on some Neenah solar white card stock and colored them in with my Copic markers.  I have coordinating dies for these images but I chose to fuzzy-cut them this time.


IMG_9088


I adhered my images onto the foreground and stamped little bubbles here and there.  I also stamped other images to complete my scene and finished my design by adding glossy accents to the bubbles, and stamped my sentiment.   Here’s my card:


NND5YrCelebHop


I love this sentiment so much and those mermaid/merman images are so cute!  Here’s a little close-up:


NND5YrCelebHop1A


Oh, I also added some stardust stickles to the mermaid seashell bra to give it a whimsical look.


NND5YrCelebHop1B


I hope you like my card today and got inspired.  Celebrate with us and enter to win!


To celebrate 5 years, Newton’s Nook Designs is giving away a $25 store credit to spend in their online shop to 5 lucky winners!

Here’s how to win:

Comment on the NND Design Team and Special Guest blogs (see list below)! The winner will be chosen at random from the collective blog hop posts. Make sure to check out each of their blogs and comment for your chance to win. You will not know which blog has been chosen so the more you comment on the better your chances are of winning! You have until Sunday, July 22 at 9pm EST to comment. Winners will be announced on NND blog post on Monday, July 23 and will need to contact us to claim their prize so make sure you check back to see if you’ve won!

Special Guests:

Jess Gerstner

Stephanie Muzzulin

Kimberly Rendino

Jenn Shurkus

Newton’s Nook Design Team:

Newton’s Nook Designs

Amanda Bodine

Holly Endress

Ellen Haxelmans

Larissa Heskett

Samantha Mann

Juliana Michaels

Zsofia Molnar

Naki Rager

Maria Russell

Tatiana Trafimovich

A Happy Hello Featuring Crafter’s Essentials 2 Die

I’m so excited to share today’s post because we are launching a new product at Kat Scrappiness called Crafter’s Essentials 2 die set.   This set includes 8 steel rule dies.  You can also pair them up with the Crafter’s Essentials 1 die set and you will have endless design possibilities.  Here’s what it looks like:

I made two cards today to showcase the Crafter’s Essentials 2 die set and I have a process video for the mermaid card that you will see below.

For my first card, I used an older stamp set from my stash and made a simple card.   I love the stitching details  on the banner and the bigger dies.

I also used the Everyday Brush Strokes stamp set for my sentiment.  Don’t you just love the chevron pattern on the big die?   Here’s another look:

I added some black dots on the card base to give it a little bit more dimension.  Here’s a little close-up:

For my second card, I wanted to create a happy, summer-themed card.  I used a stamp set that I recently purchased with this cute cat mermaid.  I also used the Sunscape stencil die by Newton’s Nook Designs.

I started out by inking up some Bristol smooth white card stock with Squeezed Lemonadeand Spiced Marmalade distress oxide inkwith my mini ink blending tool.  Since I have a process video for this card, I will keep this blog post short.

I inlaid the little chevron pieces on my card.  I also added the Sparkling Clear Jewels to make them look like bubbles.  Here’s a little close-up:

This card makes me happy.  I love the colors that I used and this die-set is a must-have!  Here’s another look:

Here’s my process video:

I hope you got inspired today.  The supplies I used are listed and linked below.  I’d be so grateful if you can also subscribe to my YouTube channel.  Please don’t forget to use my coupon code “MARIA10” for 10% off your order.   Have a nice day and happy crafting!

————-SUPPLIES————-