You Octopi My Heart

Hello crafters! It’s Maria Russell here with you again today to share with you a cute Valentine’s card, showcasing the Stitched Fancy Scalloped Rectangle Dies, Stitched Rectangle Dies, Lawn Fawn Octopi My Heart stamp set and dies, and a LOT of products available now at Kat Scrappiness.


I wanted to record a process video earlier to show you how I made this shaker card but I am still recovering from laryngitis and it was so hard for me to talk and craft at the same time. I apologize if I don’t have a process video for you today.


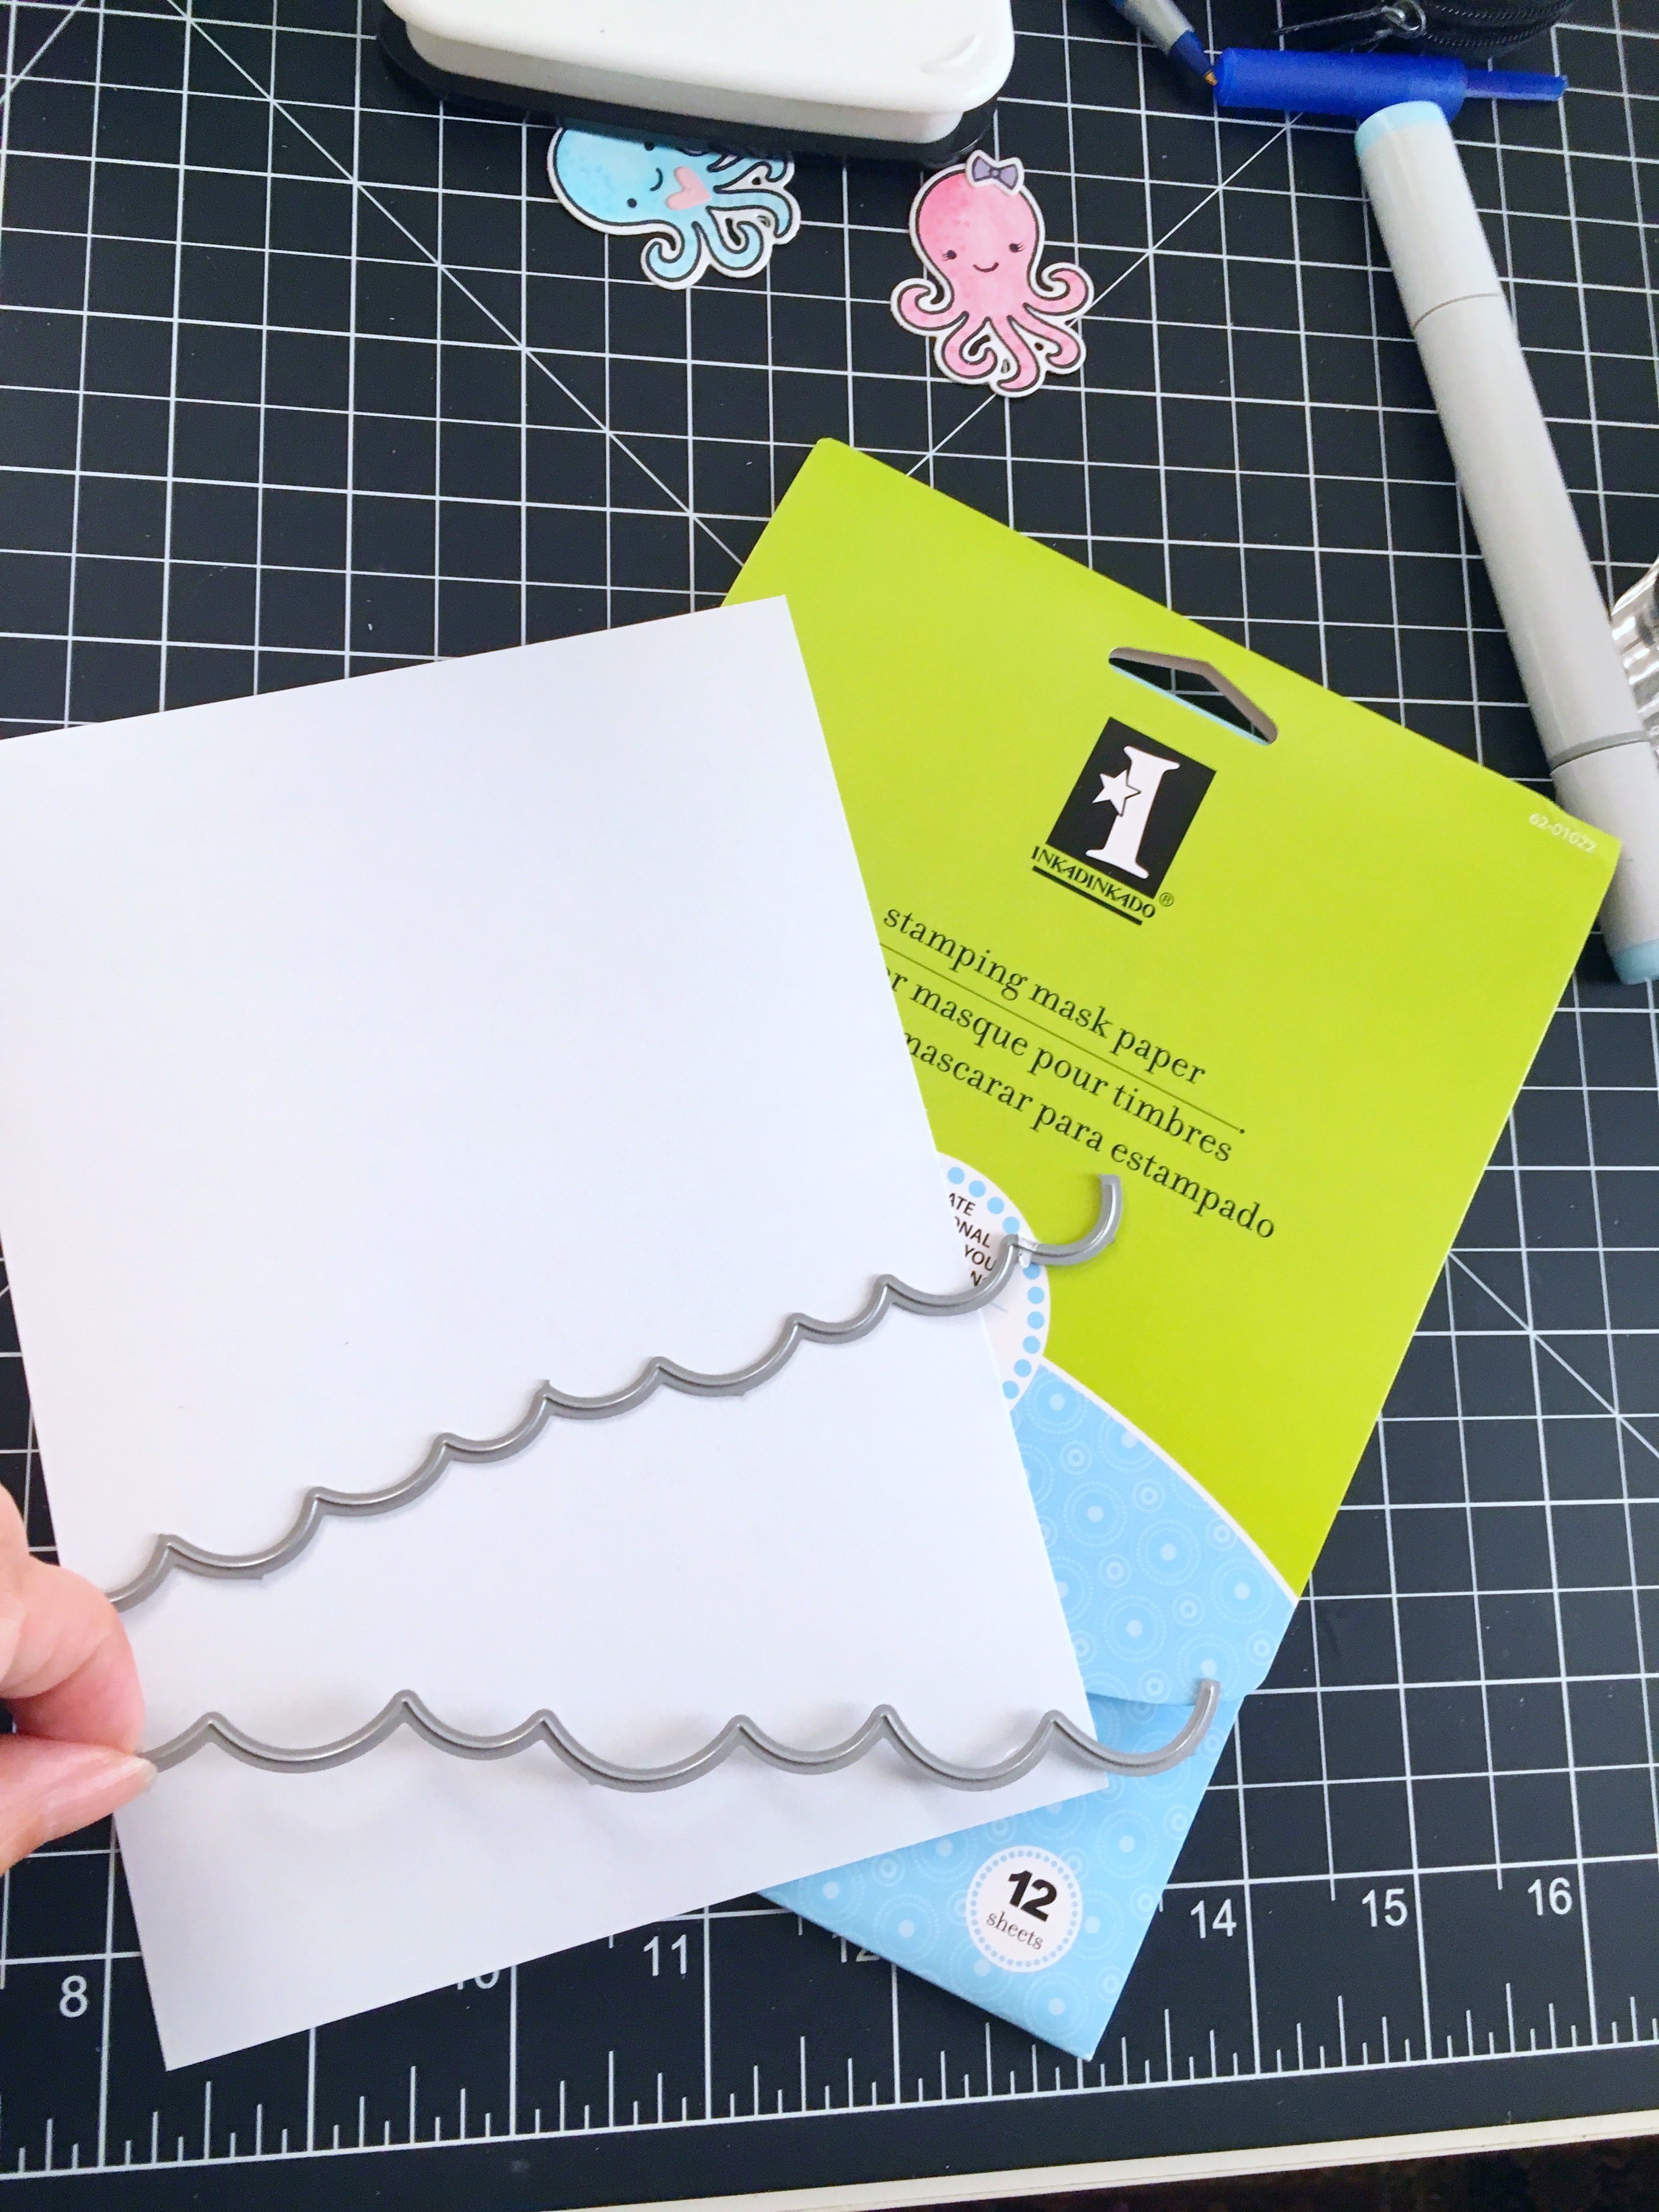
I started out by die-cutting my shaker panel using the new Stitched Fancy Scalloped Rectangle Dies, with the Stitched Rectangle dies. I also used my acetate sheet to adhere to the panel to create the window for my shaker card. I stamped my images on Neenah solar white card stock and colored my Octopi with my Copic markers. I also stamped the coral images from an older Lawn Fawn Mermaid For You stamp set. I die-cut the images using the coordinating dies.


img_3461


I wanted to color my card stock using the stitched wave border dies to create some waves, so I used the Inkadinkado Masking paper to cut out my mask. I used my distress inks to color the background. I splattered some water using my watercolor brush to create “bubbles”. Somehow it didn’t look like I had enough bubbles so I used my Copic White Opaque paint and splattered some white paint all over my background. This made it look more realistic!

img_3460 img_3459


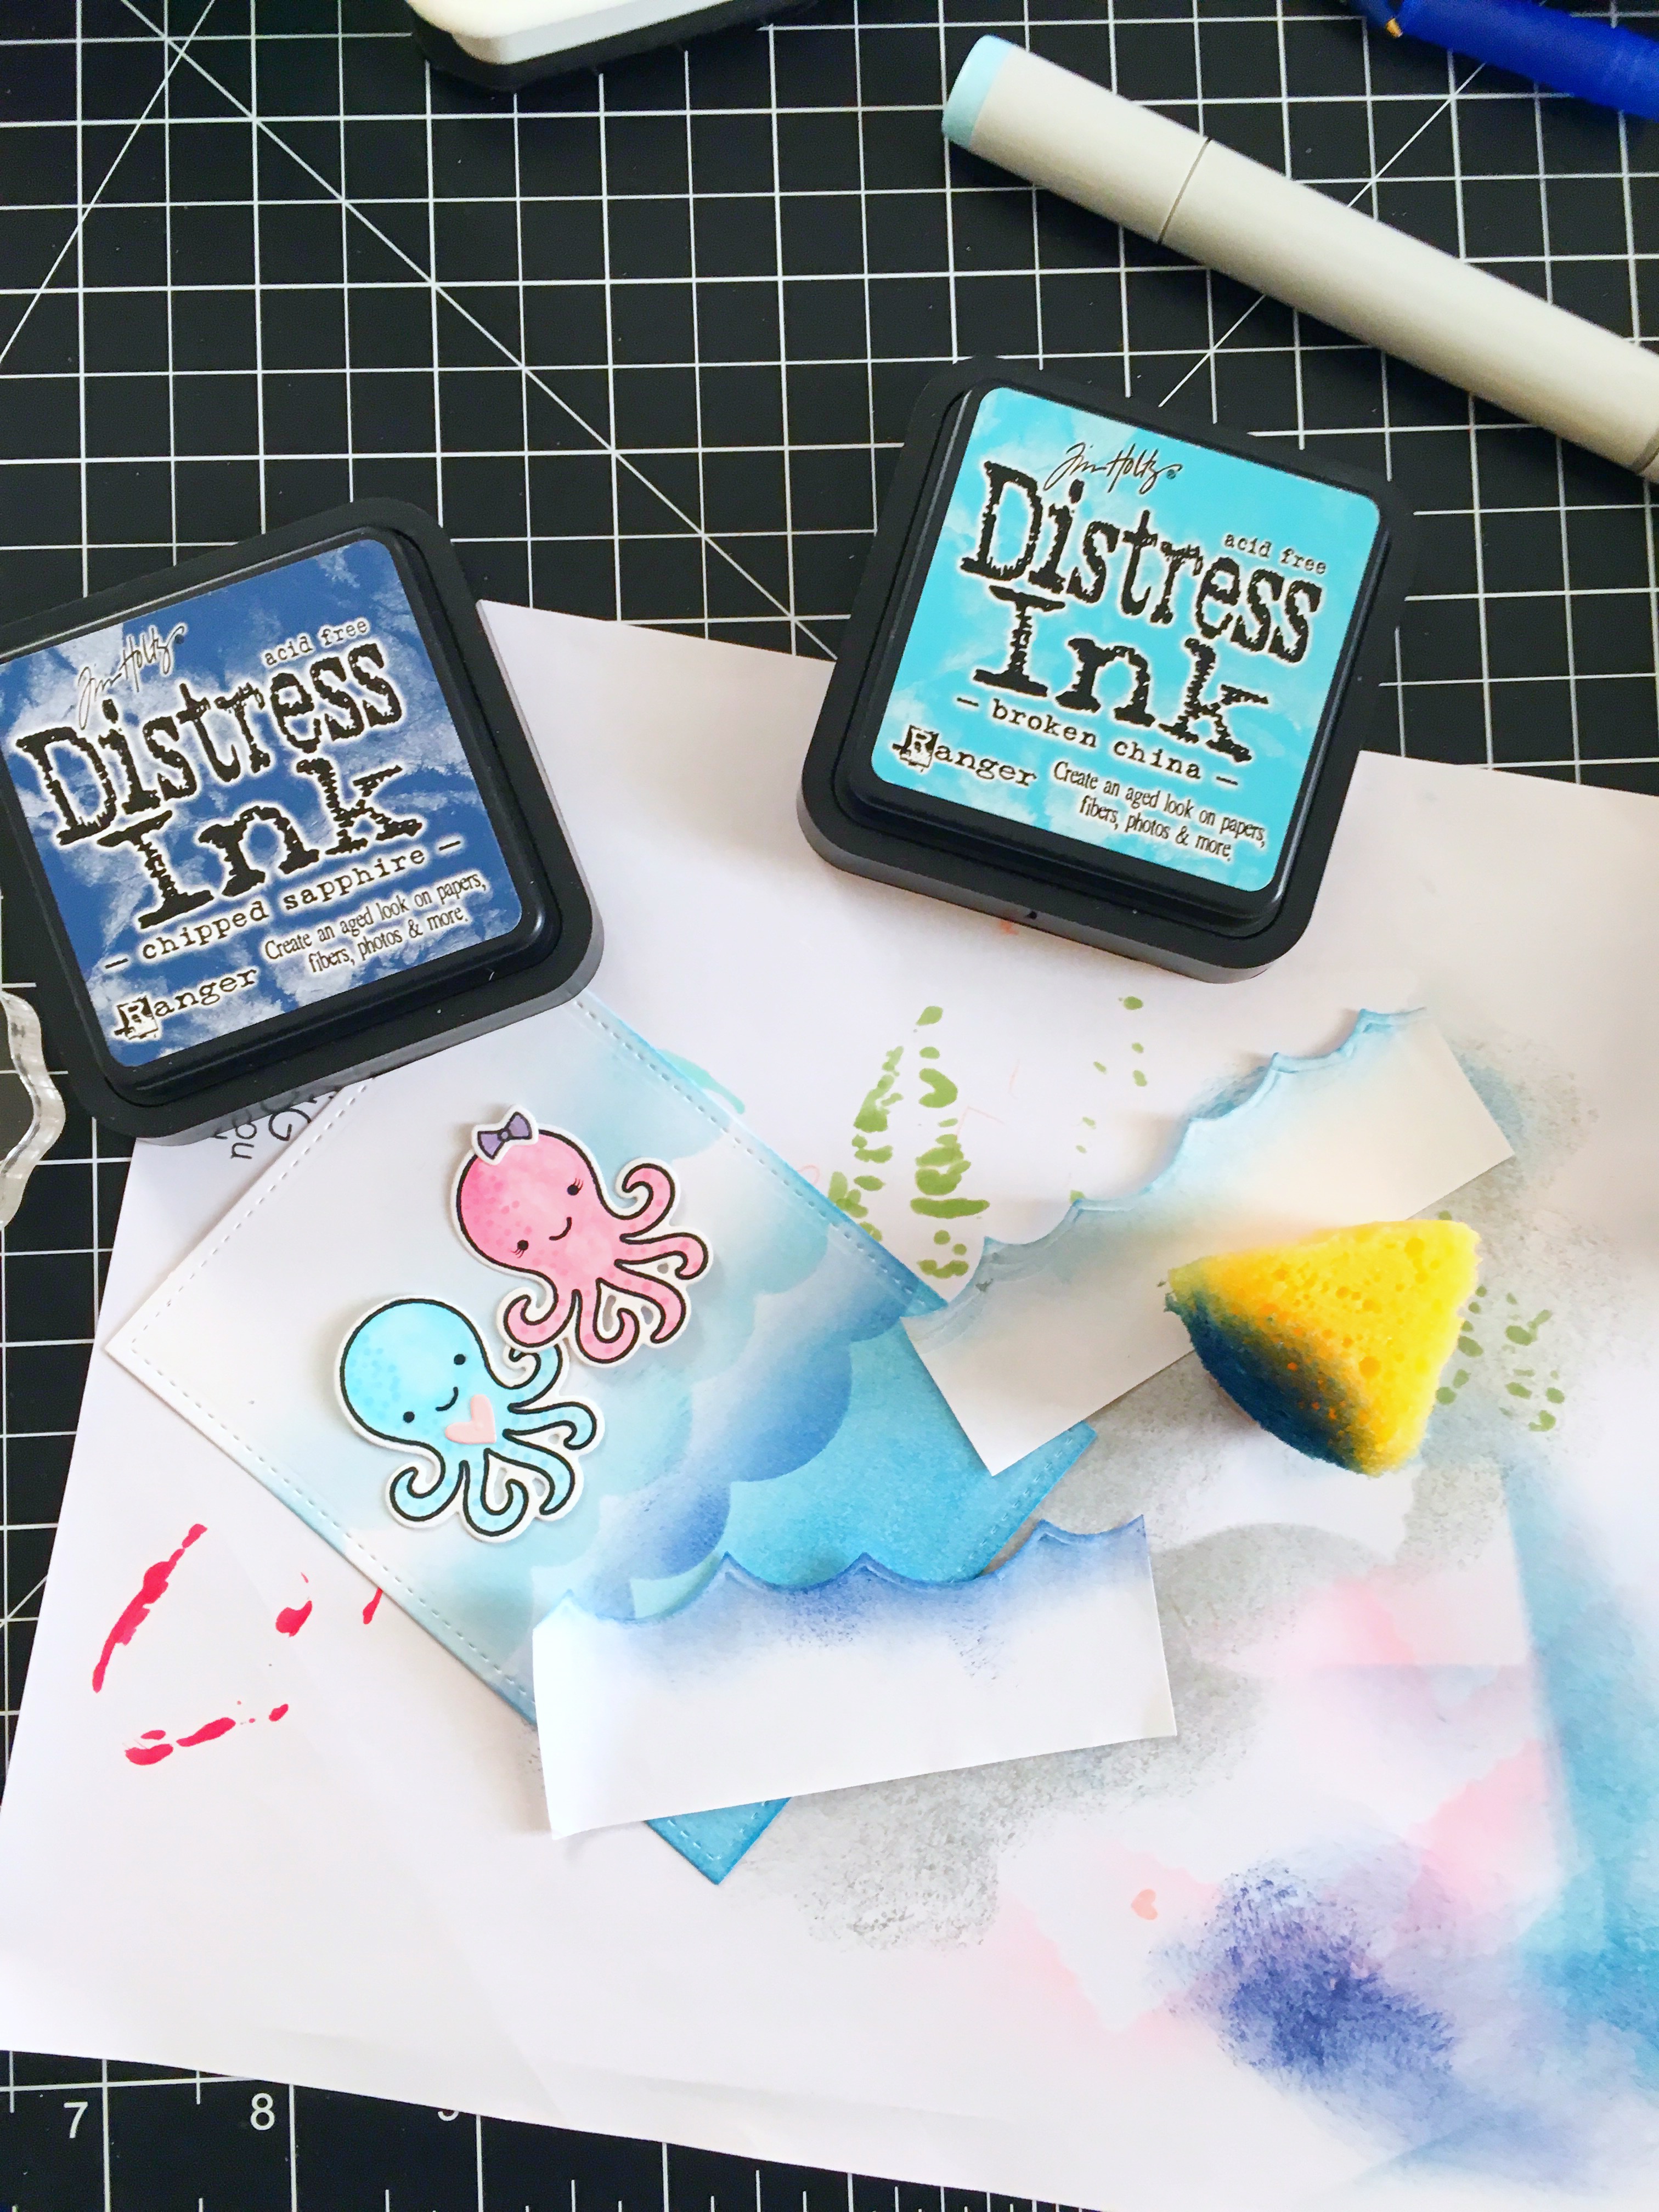
I finished off the design of the card by using some beautiful sequin mixes from Kat Scrappiness for my shaker element. I used 6mm Metallic Grape, 6mm Sparkling Snow Sequin Mix, White Diamond Sequin Mix and some green seed beads I had from my stash.


Here is my card:

img_3458

I hope you got inspired today.  Thank you so much for stopping by.  Have an amazing day!

———–SUPPLIES——————–

https://static.inlinkz.com/ppr.js

Woodland-themed Christmas Card

It’s Maria Russell here today and I am back today to share with you a Christmas card that I have made showcasing the Christmas tree die by Kat Scrappiness. Unfortunately I wouldn’t have a process video this time, as I am currently home in Orlando, celebrating Thanksgiving weekend with my family.

I started out by die-cutting my card stock using the die, and coloring the pieces with my Tombow colored pencils. Once I was happy with the colors, I used my tombow liquid glue to adhere the pieces together and set it aside to dry.


img_2657-1

img_2656

img_2655

I proceeded to cut my card base, and used the Kat Scrappiness Stitched rectangle die to die-cut my patterned paper. I also used this die to die-cut another white cardstock so I can use my Lawn Fawn stitched border dies to create the snow.

Since I was going to decorate my card with cardinals, I went ahead and used a magnolia die from my stash to add the stitching detail to the front panel of my card.


img_2654

I finished the design by adding white diamonds sequins from Kat Scrappiness, Enamel dots from Doodlebug Design and adding the peppermint twine.  Here is the card. I have also listed the supplies that I’ve used below. I hope you like it and somehow got inspired today. Have an amazing day!

final-1


https://static.inlinkz.com/ppr.js

Angel Inspirational Card

I finally had the chance to sit down, turn on my music, light some candles and start creating a card that is just simply for a friend, and not design-team related.

I recently ordered these cute Angel stamp set by Sunny Studio and I couldn’t wait to play with them. I had this design idea in my head for quite sometime now and decided to create a see-through card.  Here’s a step-by-step instruction below. It seems like a lot of work but I promise you, it’s really easy!

  1. Cut the white card-base at 4 ¼ by 11 and score at 5 ½.
  2. Trim the front panel at 4 ½, leaving the front of the card with an inch.
  3. Cut an acetate sheet measuring to 4 ¼ by 5 ½
  4. Adhere the acetate sheet behind the 1-inch flap. This will create the window part of the card.
  5. Using the leftover card stock that I just trimmed from the front card-panel, I used my Clouds border die to cut 3 different clouds pieces to create my “clouds”.
  6. Using my sponge, I distressed the clouds with Tim Holtz Spun Sugar and Shaded Lilac distressed inks. I wanted the card to have a unique pink and purple color.
  7. I then adhered the clouds on the front panel of the card. One cloud on top, and two at the bottom.
  8. I cut another white card stock measuring 4 1/8 by 5 3/8. Using my sponge again, I distressed the card stock with the same colors that I used for my clouds.
  9. I adhered this card stock on the inside of my card (I wanted to use the same colors that I used for my clouds for the inside of the card).
  10. Using my Memento Tuxedo Black Ink, I stamped the angels, cloud and lantern images on Neenah solar white card stock.
  11. I used my Copic markers to color the images.
  12. img_2551
  13. Using the coordinating dies for the angels, I die-cut the images with my big shot machine.
  14. I used my ATG tape runner to adhere the Angels on the front panel.
  15. I used my mini-glue dots to adhere the lantern on the Angels’ hands.
  16. Using my Ranger Multi-Medium Matte adhesive, I adhered the little purple star sequins by Kat Scrappiness to decorate my card further.
  17. I stamped the sentiment inside the card, using my Lawn Fawn Hippo Ink.


Here are the photos of the finished card. I inserted an LED tea light so that my friend can also use this to display in her craft room.


img_2556

img_2557

img_2558


I really love how this card turned out. Would you give it a try? I would love to see your version of my design.

The supplies I have used are listed and linked below. Thanks so much for stopping by and have an amazing day!

SUPPLIES:

Lawn Fawn Winter Unicorn

Let’s get into the holiday spirit and create some Christmas projects today.  I am back to share with you some design team projects for http://www.not2shabbyshop.com showcasing the cutest Lawn Fawn’s Winter Unicorn stamp set and die, with MFT Stamps LJD Peek-A-Boo Die-namics and Lawn Fawn Tiny Tags sayings.

lf-unicorn

I’ve shared a process video if you would like to see how I made the card and one of the tags.

Supplies:

World’s Best Dad~A Father’s Day Card

Father’s Day is just around the corner. My daughter is staying with us for the summer and as she discuss her plans of making my husband his favorite coconut cream pie on Sunday, I decided that this is the perfect time for me to make him a Father’s Day card.


I recently went crazy with my Lawn Fawn Summer release order and I have been dying to use the Dad & Me stamp set. I wanted to create a scene with snow-capped mountains in the background. It reminds me of our summer trip in Washington in 2003. We stayed at Silver Lake Resort. The cabin was pretty basic but the view was just breathtaking. The card I made below represents my husband, my son and my daughter fishing in the lake.


My husband taught my children how to fish. He also taught me, but fishing is not my cup of tea! Just the whole process of putting bait on the hook creeps me out so I sit there and watch while they all fish. I was the sunscreen police! They can fish for hours! I can close my eyes right now and still see their cute little faces light up when their little fishing line starts to wiggle!


Here is the card. I decided to make a shaker card because I wanted the little fishes to move around below with the blue cotton candy sequins from http://www.katscrappiness.com/?aff=21.   I think shaker cards are so much fun!


Supplies Used:


Lawn Fawn Dad & Me stamp set and coordinating dies

Lawn Fawn Hello Sunshine Lawn Cuts

Lawn Fawn Puffy Clouds Lawn Cuts

Mama Elephant Snow-capped mountain die

MFT Stamps Grassy Hillside Border die-namics

Copic Markers W0, W1, W3, W5, V22, BG13, R29, YR17

Hero Arts Bubblegum Ink Pad

Lawn Fawn Noble Fir Ink Pad

Stampin Up Baked Brown Ink Pad

Sequins – 4 mm Blue Cotton Candy from KatScrappiness

Acetate

Fun Foam

White Card Stock for the Card base

Blue Card stock

Baked Brown Sugar Card Stock

Mint Card Stock

Daffodil Delight Card Stock

Dazzling Diamonds Card Stock

Spectrum Noir Sparkle Brush Marker in Clear

Tombow Mono-Dot Adhesive


IMG_1164


I hope I have given you some inspiration to create something wonderful for your father, grandfather, husband or partner. Have an amazing day!

Sparkle It Up Lawnscaping Challenge #130

To celebrate the new Lawn Fawn summer release and also participate in the current Lawnscaping Challenge # 130, Sparkle It Up, I made an over-the-top birthday card for a little girl, using the Lawn Fawn Fairy Friends Stamp Set and Dies, with the Stitched Cloud Border Dies.


Here is my rendition for the current challenge. I used Stickles, Wink of Stella, Glitter, Star Confetti, Glitter Card Stock and Gold Card Stock to make my card sparkle, shimmer and shine.  The little fairy inside is popped up with an acetate sheet to make her look like she’s hovering on top of the carriage.


“Little girls dreams are of magical things”


img_0955
Front of the card
img_0956
Inside the card

Here is the photo of the current challenge, and the link if you would like to participate http://lawnscaping.blogspot.com/2016/05/lawnscaping-challenge-sparkle-it-up.html

12391019_10208140514496435_4066071782680543841_n

I hope you like the card that I created.  Have an amazing day!

Mother’s Day Card~Pretty Pink Posh

I am back from traveling and I couldn’t wait to start playing with my new Pretty Pink Posh stamp set. The images on this stamp set are extremely cute. As soon as I looked at this set, I knew I wanted to create a cute Mother’s Day card.


I first stamped the images using my mini-Misti stamping tool, then colored the images using my Copic markers. For the “mom” – I used R000, R00 and R01 for the body and YR07 for the beak and legs. For their bellies, I used Y11. The same goes with the tiny little chick in the middle of the trio. For the male chicks, I used BG000 and BG00, and for the rosy cheeks I used R20.


Using the coordinated dies, I run it through my die-cutting machine to cut out the images. To create the scene for my card, I used my Spellbinders Cherry Blossom die for the branch, and the little bow was using the Pretty Pink Posh Twine and Bows die.


The background paper is from Doodlebug, Sweet Cakes paper pad. To create the shaker card, I used Mama Elephant’s All Prettied Up die set. This die-set is one of my favorites in creating shakers. The scallop and stitched details are so dainty it is perfect for a feminine card.


For my shaker material, I used Pretty Pink Posh sparkling clear 6 mm sequins, with 4mm blush and watermelon sequins and some dark pink star confetti. Here is a detailed list of what I’ve used.


Mini-Mist Stamping Tool

Card Base – Recollection 110 lb. white card stock

Patterned Paper – Doodlebug Sweet Cakes 6×6 paper pad

Window Sheet

8 mm Fun Foam

Pretty Pink Posh – Birdie Friends Stamps and Die Sets

Pretty Pink Posh – 6 mm sparkling clear sequins

Pretty Pink Posh – 4 mm Blush and Watermelon sequins

Cartwright Flower Sequins in Blush

Pretty Pink Posh – Twine and Bows Die

Martha Stewart – Star Confetti in Dark Pink

Mama Elephant – All Prettied Up Die Set

Lawn Fawn – Mom and Me Stamp Set

Tombow – permanent tape runner adhesive

Mini Glue dots

Spellbinders – Cherry Blossom dies

Copic Markers – R000, R00, R01, Y11, YR07, BG000and BG 00, R20

Memento Tuxedo Black Ink

Mama Elephant – Bubblegum Dye Ink

Lawn Fawn – Hippo Dye Ink

Sakura Gel Pen – White

Sakura Glazed Pen – Black

Stampin’ Up – Gemstones


I hope you like the card below. Have an amazing weekend!


IMG_9642

Happy Haunting ~ Lawnscaping Challenge No. 112 ~ Embossing

Good morning crafters!  I wanted to start my Halloween cards early this year so when I checked my emails and received a notification for another Lawnscaping Challenge, I just couldn’t resist.

For my card today, I am using the Lawn Fawn Spooktacular stamp set, Sweater Weather stampset and their coordinating dies, Grass Border and Stitched Rectangle dies. These stamp sets and dies are so much fun and so versatile; you can mix and match them for any occasion.

Happy Haunting
Happy Haunting

I first stamped all the images that I needed for the card on white card stock and colored them using my copic markers. Then I cut my card base, and black card stock as well as the vellum using the stitched rectangle die. I didn’t really have any design in mind at this point. I knew I wanted a round moon, so I cut it using my circle die, and dry-embossed it with my dots embossing folder. I then sponged the edges of my moon using my yellow inkpad to add a little bit of color. I proceeded to die-cut the trees with black card stock using the sweater weather dies, then went ahead to die-cut the rest of the stamped images and the grass border. I also used my bridge dies to create a cute little scene for my cat. Now that I had everything laid out in front of me, I started to create my card. The last thing that I did was to stamp the sentiment “happy haunting” using my white embossing powder on some dark purple card stock, then I adhered it to the front of my card. Oh, of course I had to use my wink of stella to give the moon some glittery effect, as well as the pumpkins, the witch’s hat and the leaves.

What do you guys think? I hope you like my card today.  Happy Crafting and Happy Haunting!