Kat Scrappiness Blog Hop For the Benefit of Coffee Oasis Youth Program

Hello and welcome to the Kat Scrappiness Charity Blog Hop to Benefit Coffee Oasis!  The blog hop begins today, Friday, December 7 and will remain open through Monday, December 10th.  The theme of our blog hop is “WINTER”.   (There is more information about Coffee Oasis and how you can help at the end of my blog post .)

Simply click on the first photo in the list below to visit the blogs of those who are participating.  Each blog will have the same list of links on their blogs and you just follow them in order to go to the next blog!

And to make it more fun we have many prizes to give away!  There are two ways to participate and win in this blog hop.

  • Option One:  Create a winter themed card and enter it into the blog hop.  If you are entering your card to the blog hop, just click on “Add Your Link” at the bottom of the list and follow the instructions, it’s quick and easy!   If you have any questions on how to enter the blog hop, please contact us and we will be happy to help.
  • Option Two:  Leave a comment on the blogs and YouTube channels participating in the hop!

At the end of the hop, (on December 13th) we will randomly choose the winners and they will win fabulous prizes from our sponsors. (Prizes listed below)  All Winners names will be posted on our blog and we will attempt to contact everyone who leaves their contact information.  If prizes are not claimed within 7 days, another winner will be chosen.

If you are participating in the hop, please post your card/project on social media and use the following tags:


THANK YOU TO ALL OF OUR MEGA SPONSORS!

The following sponsors have agreed to donate a portion of their sales during this hop to the Coffee Oasis.  Please visit them and remember that if you place an order, you will be donating and supporting Coffee Oasis as well!  These sponsors are also providing prizes to the hoppers as well!

Kat Scrappiness is offering 15% off EVERYTHING IN THE STORE and is donating 15% of all sales during this blog hop to Coffee Oasis!  Use coupon code:  COFFEEOASIS to save!  We are also giving away gift packages!  To look at all the amazing prizes, please visit this link –> http://katscrappinessblog.com/charity-blog-hop/

katscrapcoffeeoasissponsor

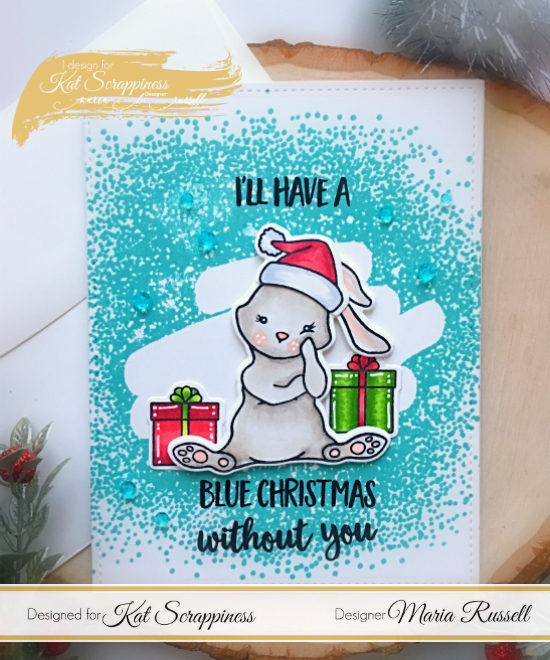
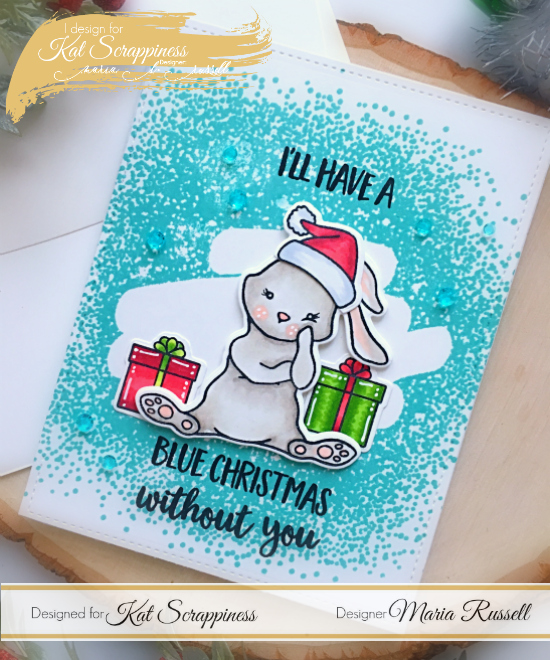
Now let’s get on to my project.  For my card today, I am showcasing the Blah Humbunny stamp set and coordinating dies by Honey Bee, the All That Glitters stamp set by Picket Fence Studios, the stitched rectangle dies by Kat Scrappiness, and a bunch of other supplies available at the shop.


I started by stamping the background stamp by the Picket Fence Studios called All That Glitters onto my Neenah Solar Classic Crest 100 lb. card stock using my Tim Holtz Stamp Platform.   I also stamped the images from the Blah Humbunny stamp set and colored my images in with my Copic markers.  I die-cut the images using the coordinating dies.


I adhered the presents using my Nuvo liquid adhesive onto my stamped background, and also adhered the bunny with foam adhesives.   To finish my design, I used my white gel pen to add some details to the images and also added some crystal jewels on my background.

KatScrapCoffeeOasia1A


I also added the eyelashes to my cute little bunny using my 0.3 Copic multi-liner pen.  Here’s a little close-up:

KatScrapCoffeeOasia1B


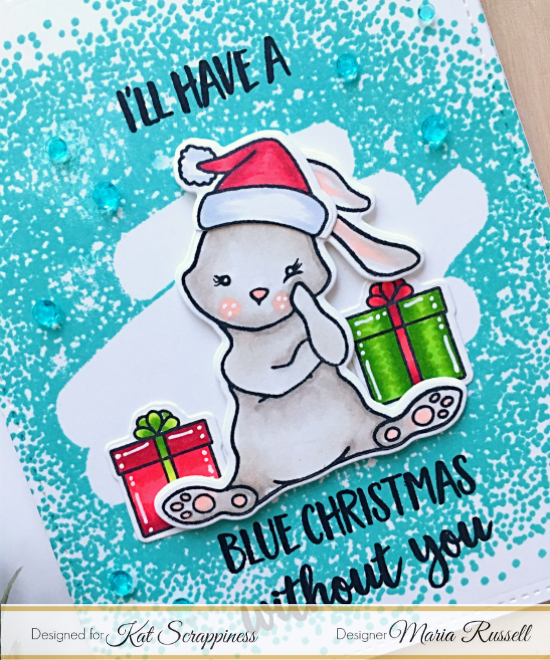
I used my Versafine Onyx Black ink to stamp the sentiment on my card.   Here’s another look:

KatScrapCoffeeOasia1C

I hope you like my card today.  Please visit http://katscrappinessblog.com/charity-blog-hop/ to find our more info about this hop.   Click on the inlinkz button below to hop along with us and leave us a comment.  The supplies I used are listed and linked below.  Have a wonderful day.

———–SUPPLIES————


Learn more about Coffee Oasis:

Coffee Oasis is a coffee shop/organization located in Washington State that provides help for our youth including programs for drug abuse, homelessness, violence and poverty.  (You can read more about their programs here:  https://thecoffeeoasis.com/youth-programs/. )

How you can help Coffee Oasis

We are hoping that this blog hop will bring awareness to organizations such as Coffee Oasis and that we can raise a little money and support or them!  Kat Scrappiness has pledged to donate 15% of all sales proceeds to Coffee Oasis and our other sponsors have all donated prizes to give away to all of you blog and youtube hoppers!  So please visit them and show some support.  You can also donate directly to Coffee Oasis here: http://kskat.com/donate.  Even if you can only donate $1 or $5, it doesn’t matter. Every little bit will help a kid in need.

Donate to Coffee Oasis Today!


Let’s get hopping and spread the word to see how much we can help this wonderful organization.

This is the sign up for bloggers/youtubers who are participating in the Kat Scrappiness Charity Blog Hop to Benefit Coffee Oasis.  Click to view and add your links:

Honey Bee Stamps – Message in a Bottle

HBunderthesea

I am so psyched to share with you today’s project because this week, Honey Bee Stamps is releasing the new Under the Sea stamps, dies and embellishments.  Wait ’til you “sea” the new products that are going to be featured this week.  Today is the first day and I am showcasing the super cute “Message in a Bottle” Stamp set.

I have to apologize that I will not be able to participate in the blog hop on Friday, July 14th.  I had to travel for a family emergency concerning my father-in-law and will not be available for the month of July.  Please check out the design team’s projects this week for more inspiration.

I started out by stamping my images on Neenah Solar White card stock and colored the images in with my Copic markers.  I did not have the coordinating dies just yet for this set and since I wanted to make a shaker tag, I decided to use my Exacto knife to cut out the middle portion of the bottle, and then covered both sides with acetate sheet.

HBmessage1

HBMessage2

I used a tag die from my stash to die-cut the tags.  I tore the card stock and sponged it with my distress ink to create the look of sand.  I adhered the shaker element using my Xyron mega tape runner and foam tape.  To finish my design, I stamped the sentiment, added the sun, and the cloud.  Here is what it looks like:

HBMessage4

Here’s another look:

HBMessage5

You are all going to absolutely love the new stamp sets and dies for the July release.  The stamps, dies and embellishments will be available for purchase on Friday, July 14th.  Please stay tuned for more project inspiration from the design team this week.  Have an amazing day!

You Are Bee-youtiful and Kind

Hello my crafty peeps! It’s Maria here and I am back with you today to share this cheerful see-through card that I have made, showcasing the Bee Hive Card Honey Cuts, Honey Bee Hive Stencil and Mask, the Bee-You-Tiful sentiments with the Build-A-Bee stamp set and Build-A-Bee Honey Cuts.

I wanted to challenge myself and create a unique card.  I started out by stamping my images on Bristol smooth card stock with my memento tuxedo black ink and colored the images in with my Copic markers. I also added some glitter to the wings using my Spectrum Noir clear brush marker.  I die-cut the images using the coordinating dies.

HBBeehive5

I die-cut a piece of acetate sheet using the Bee-Hive Card Honey cuts die as my card base. I also die-cut a piece of white card stock with a yellow patterned paper to use for the inside of my card.

HBBeehive6

I used the stencil to add some definition to my yellow patterned paper with the fossilized Amber distress oxide ink. I adhered the white card stock behind the acetate and adhered the patterned paper inside my see-through card base. I stamped the sentiment for my card, and adhered my little bees on the front panel to finish my design.

HBBeehive4

Wouldn’t this card make someone’s day?  Here’s what it looks like when the card is closed.

HBBeehive1

Here’s another look when the flap is open.  I inserted the battery-operated tea light.

HBBeehive2

HBBeehive3

Here’s another simple card that I made. I used the Hexagon Layering Background Stencils and the A2 Double-Stitched Frames:

HBBeehive7

I hope I have inspired you today.  The supplies I used are listed and linked below. Have a Bee-You-Tiful day!

Maria HoneyBee Watermark


Hello Card with Honey Bee Stamps

I am super excited to share with you my first project as a design team member for Honey Bee Stamps.  I am showcasing the Hello Gorgeous 6×8 stamp set and Hello Gorgeous Honey Cuts coordinating dies.

I started out by stamping my images on Neenah Solar White card stock and colored the images in with my Copic markers. I die-cut the image with its coordinating die.

IMG_5054

I cut another Neenah solar white card stock, measuring 4 1/4 by 5 1/2 for my card front.  Using a sponge, I started applying color to the card stock with my worn lipstick distress ink, then adding and blending it with cracked pistachio.  Using my wet watercolor brush, I put some gold watercolor on my acrylic block and started splattering watercolor on the front of the card.

IMG_5053

I used a die from my stash and adhered the “hello” script sentiment on my card panel.

IMG_5051

I adhered the flowers I colored from the Hello Gorgeous stamp set and also added some Crystal Mix Dew Drops to finish my design.  Here is a close-up of the card:

HBCloseupHello

I hope you like my card today and got inspired.  This stamp set is a must-have.

HBHelloCard.jpg

The supplies I used are listed and linked below in case you would like to purchase them.  Have an amazing week!

Maria HoneyBee Watermark


https://linkdeli.com/widget.js