Make the Moose Out of Life with Newton’s Nook Designs

Have you seen last week’s November release by Newton’s Nook Designs?  Did you take advantage of the Black Friday sales?  I hope you all had a great Thanksgiving!  Since hubby and I are currently in Abu Dhabi, we didn’t get to roast our own turkey which made me a bit sad.  However, the most important thing is that we’re together and that’s all that matters!

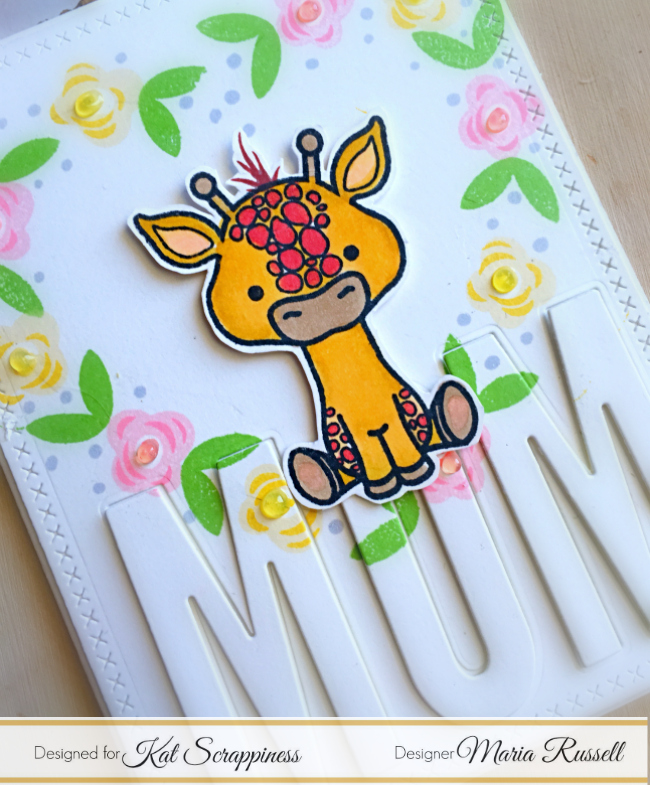
For my project today, I am showcasing the Moose Mountain stamp set and coordinating dies with the Forest Scene Builder dies and the sky borders die.

I stamped my image on Neenah solar white card stock and colored him in with my Copic markers.  I used the coordinating die to cut the image.  I used the birch tree from the Forest Scene builder dies and the sky border dies to die cut my trees and the clouds.  I also cut an A2-size card base, and trimmed the front flap so that I can layer my clouds and snowbanks with vellum.   I wanted the patterned paper inside to show through but not overwhelm my design.

IMG_0186 2

To finish my design I adhered the image on my foreground and also added some berries.  Here’s what it looks like:

IMG_0207

This is an old card design of mine but I keep going back to this because it is such a great design.  When you open the card, you can see through what’s inside.

IMG_0208

I really love how this card turned out!  Here’s another look:

IMG_0209

I hope you like my project today.  The supplies I used are listed and linked below.  Happy crafting!

———–SUPPLIES———–


Kindred Stamps – Magic Show

Welcome to the August release by Kindred Stamps! I am so lucky to be a part of this blog hop.  For my projects today, I am showcasing the Magic Show stamp set.

We have six new stamp sets, new shaker packs, and a couple new stencils coming out Friday, August 24th at Kindred Stamps, that we think you’ll fall in-love with as much as we have! Come join us on our team’s blog hop for a chance to win a $10 store credit; make sure you leave comments on each blog to be entered. Join our Facebook Fan Club to be kept in the loop about giveaways, share your projects, and see all of ours!

For my first card, I stamped the images on some Neenah solar white card stock and colored them in with my Copic markers.  I die-cut the images using my Scan N Cut 2 Machine.  I die-cut my Stitched Scalloped Collage die with some black card stock and adhered this to my card base.  I adhered my images and stamped the sentiment.  Here’s my first card:

KindredMagic1A

I also added some white dots on the card with my Sakura Gelli-roll pen.  This stamp set is so adorable!

KindredMagic1B

My second card is very simple.  I did a little bit of masking so that the girl can stand up on the small table.  Here’s my second card:

KindredMagic2A

Here’s a little close-up:

KindredMagic2B

Here’s the order of the hop:

Thanks for joining us today.  Have an amazing day!

Crafter’s Essentials 1 Die Set by Kat Scrappiness

Hello my crafty friends! I hope you are all having a great week so far! Maria here with you today sharing some cards, showcasing the new Crafter’s Essentials 1 die set and a lot of products available at the shop.  This Crafter’s Essentials 1die-set is a must-have!  This set contains 12 steel-rule dies that you can use for all of your paper crafting projects!  Here’s what it looks like:

For my first card today, I stamped some images on some white card stock with my Lawn Fawn Jet black ink using my Tim Holtz Stamping Platform tool.  I colored the images in with my Copic markers and die-cut them using the coordinating dies.

I also die-cut another piece of white card stock using the storybook die from the set.  I wanted to create a birthday card.  I stamped the small images on the card stock and assembled my card.

I really love how this card turned out.  There are so many possibilities using this Crafter’s Essentials 1 die-set.  I also love all of the stitching details! Here another look:


For my second card below I wanted to use some new sequin and confetti mixes from the Shop and some Nuvo crystal drops.  I also used the new My Tribe stamp set by Honey Bee Stamps.   Here’s my shaker card:

This shaker card is actually going to a friend of mine who is also crazy about crafting!  I am so thankful that she is a part of my tribe!

I hope you got inspired today.  The Crafter’s Essentials 1die set is sold out at the moment but more are coming in the next 7 days or so.  You can RESERVE the dies so you don’t miss out again.  The supplies I used are listed and linked below.  Have an amazing day and happy crafting!

————-SUPPLIES————-


Enjoy the Ride with Paper House Productions

Hello Paper House Productions fans!  I cannot believe that time flew by so fast and I am sad to say that this is my last blog post for Paper House Productions.  I have been so FORTUNATE to be able to work with the AMAZING products by PHP, the talented design team and of course, everyone at Paper House Productions.  It has been a great journey to be a part of this design team which is why I chose “Enjoy the Ride” theme for my project today.


For our final project, we were asked to pick out our FAVORITE product from the Paper House Productions.  Mind you, this wasn’t an easy task!   I LOVE the paper pads, the stickers, washi tape, traveler’s notebook, etc.   However if there’s one thing that I’ve been loving (and buying) the most even before I got on this design team, it’s always been the stickers!   Sometimes when I want to create a beautiful card without stamping or doing a lot of fancy stuff, I always make cards with stickers.  I also love adding stickers to my scrapbook layouts and planners.


To start, I stamped an A2 size card stock with my background stamp with a mint green ink and die-cut the same with my Stitched Wonky Die.  I also die-cut another piece of white card stock to create the frame.


I have been dying to use this Stickypix “It Takes Two Cardstock Multi-Pack” stickers because I absolutely love everything in this pack.  It has all of my favorite color combination – Mint Green, Light Blue, Red, Pink and Gold.  I picked the bicycle, stars and flowers on this pack.


IMG_8696 2


This card took about less than 10 minutes to make and can be easily mass-produced.   Here’s my card:


PHPStickerCard1


I just love the gold-foil details on the bicycle and the flowers.


PHPStickerCard1B


I also simply adore the little stars in the sticker pack.  I added a couple of them on my card.


PHPStickerCrd1A


It has been a great pleasure working with The Paper House Productions and the talented Design Team for Winter/Spring Term.  Thank you everyone for this amazing journey.  It really has been a great ride!


XOXO,

Maria


SUPPLIES:  Sticker Pix It Takes Two Cardstock Multi-Pack Stickers

We’ve Moved Card with Newton’s Nook

Hello Newton’s Nook fans!  I hope you guys were able to join us last week for the May stamps and dies release by Newton’s Nook Designs.  I am back today to share with you a simple card, showcasing the Newton Loves Boxes stamp set and coordinating dies.

I started out by stamping my images on Neenah solar white card stock and colored them in with my Copic markers.  I die-cut another piece of white card stock and dry-embossed it with the new Framework Die set.   I used another die from my stash to die-cut the window.  I adhered my image inside the window and finished the design by adding the stamp from the In Slow Motion stamp set.  Also added the flowers from the the Deer Friend stamp set.    Here’s my card:

NNDNewtonLovesBoxes3

I just absolutely love the simplicity for this card.

NNDNewtonLovesBoxes3A

This card is going to be massed-produced since hubby and I will be moving location soon.

NNDNewtonLovesBoxes3B

I hope you got inspired today.  The stamps and dies for the May release are now available for purchase.  The supplies I used are listed and linked below.  Have a wonderful day!

————–SUPPLIES————–


Pinterest-Inspired Cards Using Washi Tapes by Paper House Productions

I have been looking for some inspiration on Pinterest and decided to make some super easy and quick cards with some beautiful Washi tapes from the Paper House Productions!  Have you all checked them out yet at the shop? Holy, moly those Washis are so beautiful!   I feel like they need to be showcased more than just adding it to decorate your planners and notebooks.

I am so fortunate to be a design team member of Paper House Productions because not only to they make beautiful paper pads and stickers, these Washi Tapes are to die for!  Look at how beautiful those prints really are, and with foiling!  Love, love, love them all!  Here’s what I got to play with:

IMG_7889

For my first card, I started out by cutting my smooth white card stock to 5 1/2 X 4 1/4.  I layered the StickyPix Stargazer Washi Tape with the Wine Washi Tape set and die cut the card stock with the Wonky Stitched Rectangle Frames Die.   I also used my Bow punch to punch out the pieces to create my bow with a gold-foiled card stock to match the washi.

IMG_7890

I adhered my front panel onto the card base with my Xyron Tape Runner first, then adhered the gold bow on the foreground using a bit of hot glue.  I finished my card design by stamping the sentiment onto the card.

IMG_7891

Here’s my first card:

PHPWashiCard2

The stargazer washi tape set is one of my favorites.  I just love the gold foil details and the color is just simply beautiful!  Here’s a little close-up of the card:

PHPWashiCard2A

I wanted to create a birthday card for my second project with the same design.  This time, I used the Wine Washi Tape Set which is going to go perfectly with the sentiment.  A friend of mine is turning 60 and she’s a bit bummed about it.  This card will hopefully cheer her up!

PHPWashiCard1

Isn’t this hilarious?  I just LOVE this Wine Washi Tape Set and I think adhering it on a white card stock made the images pop!

PHPWashiCard1A

I hope you all got inspired today to create some super simple and quick cards using some beautiful Washi Tapes.  The supplies I used are listed and linked.  Have a wonderful day!

 ———–SUPPLIES———–


Mother’s Day Card with Matching Envelope

Hello my crafty peeps! I hope you are all enjoying your Sunday and getting some much-needed quality time with the family before the start of the work week again, which is the much-dreaded Monday, haha!

Since Mother’s Day is fast approaching, I figured I’d better get started on my Mother’s Day card.  For today’s project, I am showcasing the Lola the Giraffe 3×4 stamp set, Giraffe Envelope Art stamp set, Uppercase Condensed Alphabet Dies,  Cross-stitched Rectangle dies, and a bunch of other supplies available at the shop.

I have a process video for you today if you would like to see how I created the card and the matching envelope.  Please click on the link below:


Here are some photos of the finished project:

KatScrapGiraffeCard1


Close-up:

KatScrapGiraffeCard1A


Here’s the matching envelope:

KatScrapGiraffeCardEnv

I hope you like the projects.  The supplies are listed and linked below.  Have a wonderful day!

———————SUPPLIES————————-


2018 Stamping for Autism Awareness Blog Hop

Autism Awareness Blog Hop Image

Today the Newton’s Nook Designs Team is proud to be hopping along for the 2018 Stamping for Autism Awareness Blog hop!

We are joining Veronica Zalis and tons of other amazing stampers to help raise autism awareness!  We hope you will help us spread the word and follow along with us.  There are going to be TONS of fun prizes too – including a $25 store credit from Newton’s Nook Designs!  To learn more about this hop and see a complete list of sponsors and prizes, please visit this blog post by Veronica Zalis here.

For my project below, I am showcasing the Once Upon a Princess stamp set with the Uplifting Wishes stamp set.   I also used the blue foil by Therm-O-Web.

I started out by searching Autism awareness images on google.  I found the one that looked like a puzzle piece in black.  I saved the image in my computer and printed it out on Neenah 80 lb. card stock using my laser printer.   Since blue is the color for Autism Awareness, I wanted to foil this piece and make it look like a balloon.  I run it through my laminating machine with the foil.


I stamped my Princess and the little frog prince with Memento Tuxedo black ink and colored them in with my Copic markers. I die-cut the images using the coordinating dies.

I cut a 4 1/4 X 5 1/2 piece of Bristol smooth white card stock and used my handmade stencil using the Sky border dies to create my sky.  Since I am already using too much blue in this card, I wanted the sky to look different and sort of ethereal.  I used my Antique Linen and Tattered Rose distress Oxides for the sky.  I die-cut a piece of mint green card stock for the grass using the sky border dies as well.  I drew the balloon and confetti strings with my Micron Pens.  I finished the design by adding a heart enamel sticker on the puzzle and stamped my sentiment.

NNDAutism1

Here’s a little close-up:

NNDAutism1A

I just love the simplicity of this card!  I hope you got inspired today.  I have also listed and linked the supplies I used below.

Would you like to win a $25 store credit to Newton’s Nook Designs Online Shop?

Here’s how to win: To win this bonus prize, comment on the NND blog and Design Team blogs (see list below)!  The winner will be chosen at random from the posts linked below.  Make sure to check out each of their blogs and comment for your chance to win.  You will not know which blog has been chosen so the more you comment on the better your chances are of winning!  You have until Sunday April 8th at 11:55 pm EST to comment  —  winners will be announced on the blog post on Tuesday April 10th. 


—————-SUPPLIES—————


I Put My Faith To You O’Lord

Hello my crafty friends! I hope you all had an amazing weekend!  I’m back today with a very special card. It is the start of the Holy Week and this is the perfect time to reflect.   Don’t get me wrong; this isn’t the only time to show our faith. I think everyday we open our eyes, we should start thanking the Lord for all the blessings that we have in our lives. I’ve always been religious in my own way. However, I am not going to go into all the details of what I do to show my faith.

Today’s card features a stamp set that is very new to me. I was searching for a stained glass stamp set because I have this design that I’ve had in my head for a card. I found the perfect stamp set through YouTube. This stamp set is called Layered Stained Glass by Maymay Made It.

I started out by stamping the image on Neenah solar white card stock with Memento Tuxedo Black Ink. Then I stamped the layers using Ballet Slippers, Minty Fresh and Fresh Lavender inks by Lawn Fawn with my Tim Holtz stamp platform.

I used a die from my stash to create the mantelpiece and also used a leaf punch to cut the greenery. To finish my design, I used my “Faith” die from Simon Says Stamp and also stamped the sentiment “Therefore, do not worry about tomorrow, for tomorrow will worry about itself”. Here’s the card:


IMG_7614


I absolutely love this scripture!   Here’s a little close-up below!  Can you see the details on the mantelpiece?  I embossed it with my embossing folder to make it look like concrete.  I have visited a LOT of churches in Europe and it is spot on!

FaithCard1A


I wanted to add glossy accents to make it look like real glass so I’ll probably add it later on.  For now, here’s the card:

FaithCard

I hope you got inspired today.  I have listed and linked the supplies I used below.  Have a great holy week!

—————SUPPLIES—————