Good morning crafters! I wanted to start my Halloween cards early this year so when I checked my emails and received a notification for another Lawnscaping Challenge, I just couldn’t resist.
For my card today, I am using the Lawn Fawn Spooktacular stamp set, Sweater Weather stampset and their coordinating dies, Grass Border and Stitched Rectangle dies. These stamp sets and dies are so much fun and so versatile; you can mix and match them for any occasion.
Happy Haunting
I first stamped all the images that I needed for the card on white card stock and colored them using my copic markers. Then I cut my card base, and black card stock as well as the vellum using the stitched rectangle die. I didn’t really have any design in mind at this point. I knew I wanted a round moon, so I cut it using my circle die, and dry-embossed it with my dots embossing folder. I then sponged the edges of my moon using my yellow inkpad to add a little bit of color. I proceeded to die-cut the trees with black card stock using the sweater weather dies, then went ahead to die-cut the rest of the stamped images and the grass border. I also used my bridge dies to create a cute little scene for my cat. Now that I had everything laid out in front of me, I started to create my card. The last thing that I did was to stamp the sentiment “happy haunting” using my white embossing powder on some dark purple card stock, then I adhered it to the front of my card. Oh, of course I had to use my wink of stella to give the moon some glittery effect, as well as the pumpkins, the witch’s hat and the leaves.
What do you guys think? I hope you like my card today. Happy Crafting and Happy Haunting!
There is something about Lawn Fawn stamps that just makes me happy. It’s whimsical, fun and brings out the inner child in me. I found Lawn Fawn stamps two years ago, but it was only the recent 6 months that I started getting obsessed with it. I watch Lawn Fawn’s YouTube videos constantly, especially when I don’t feel crafty. I somehow get my mojo back just watching people create with Lawn Fawn stamps.
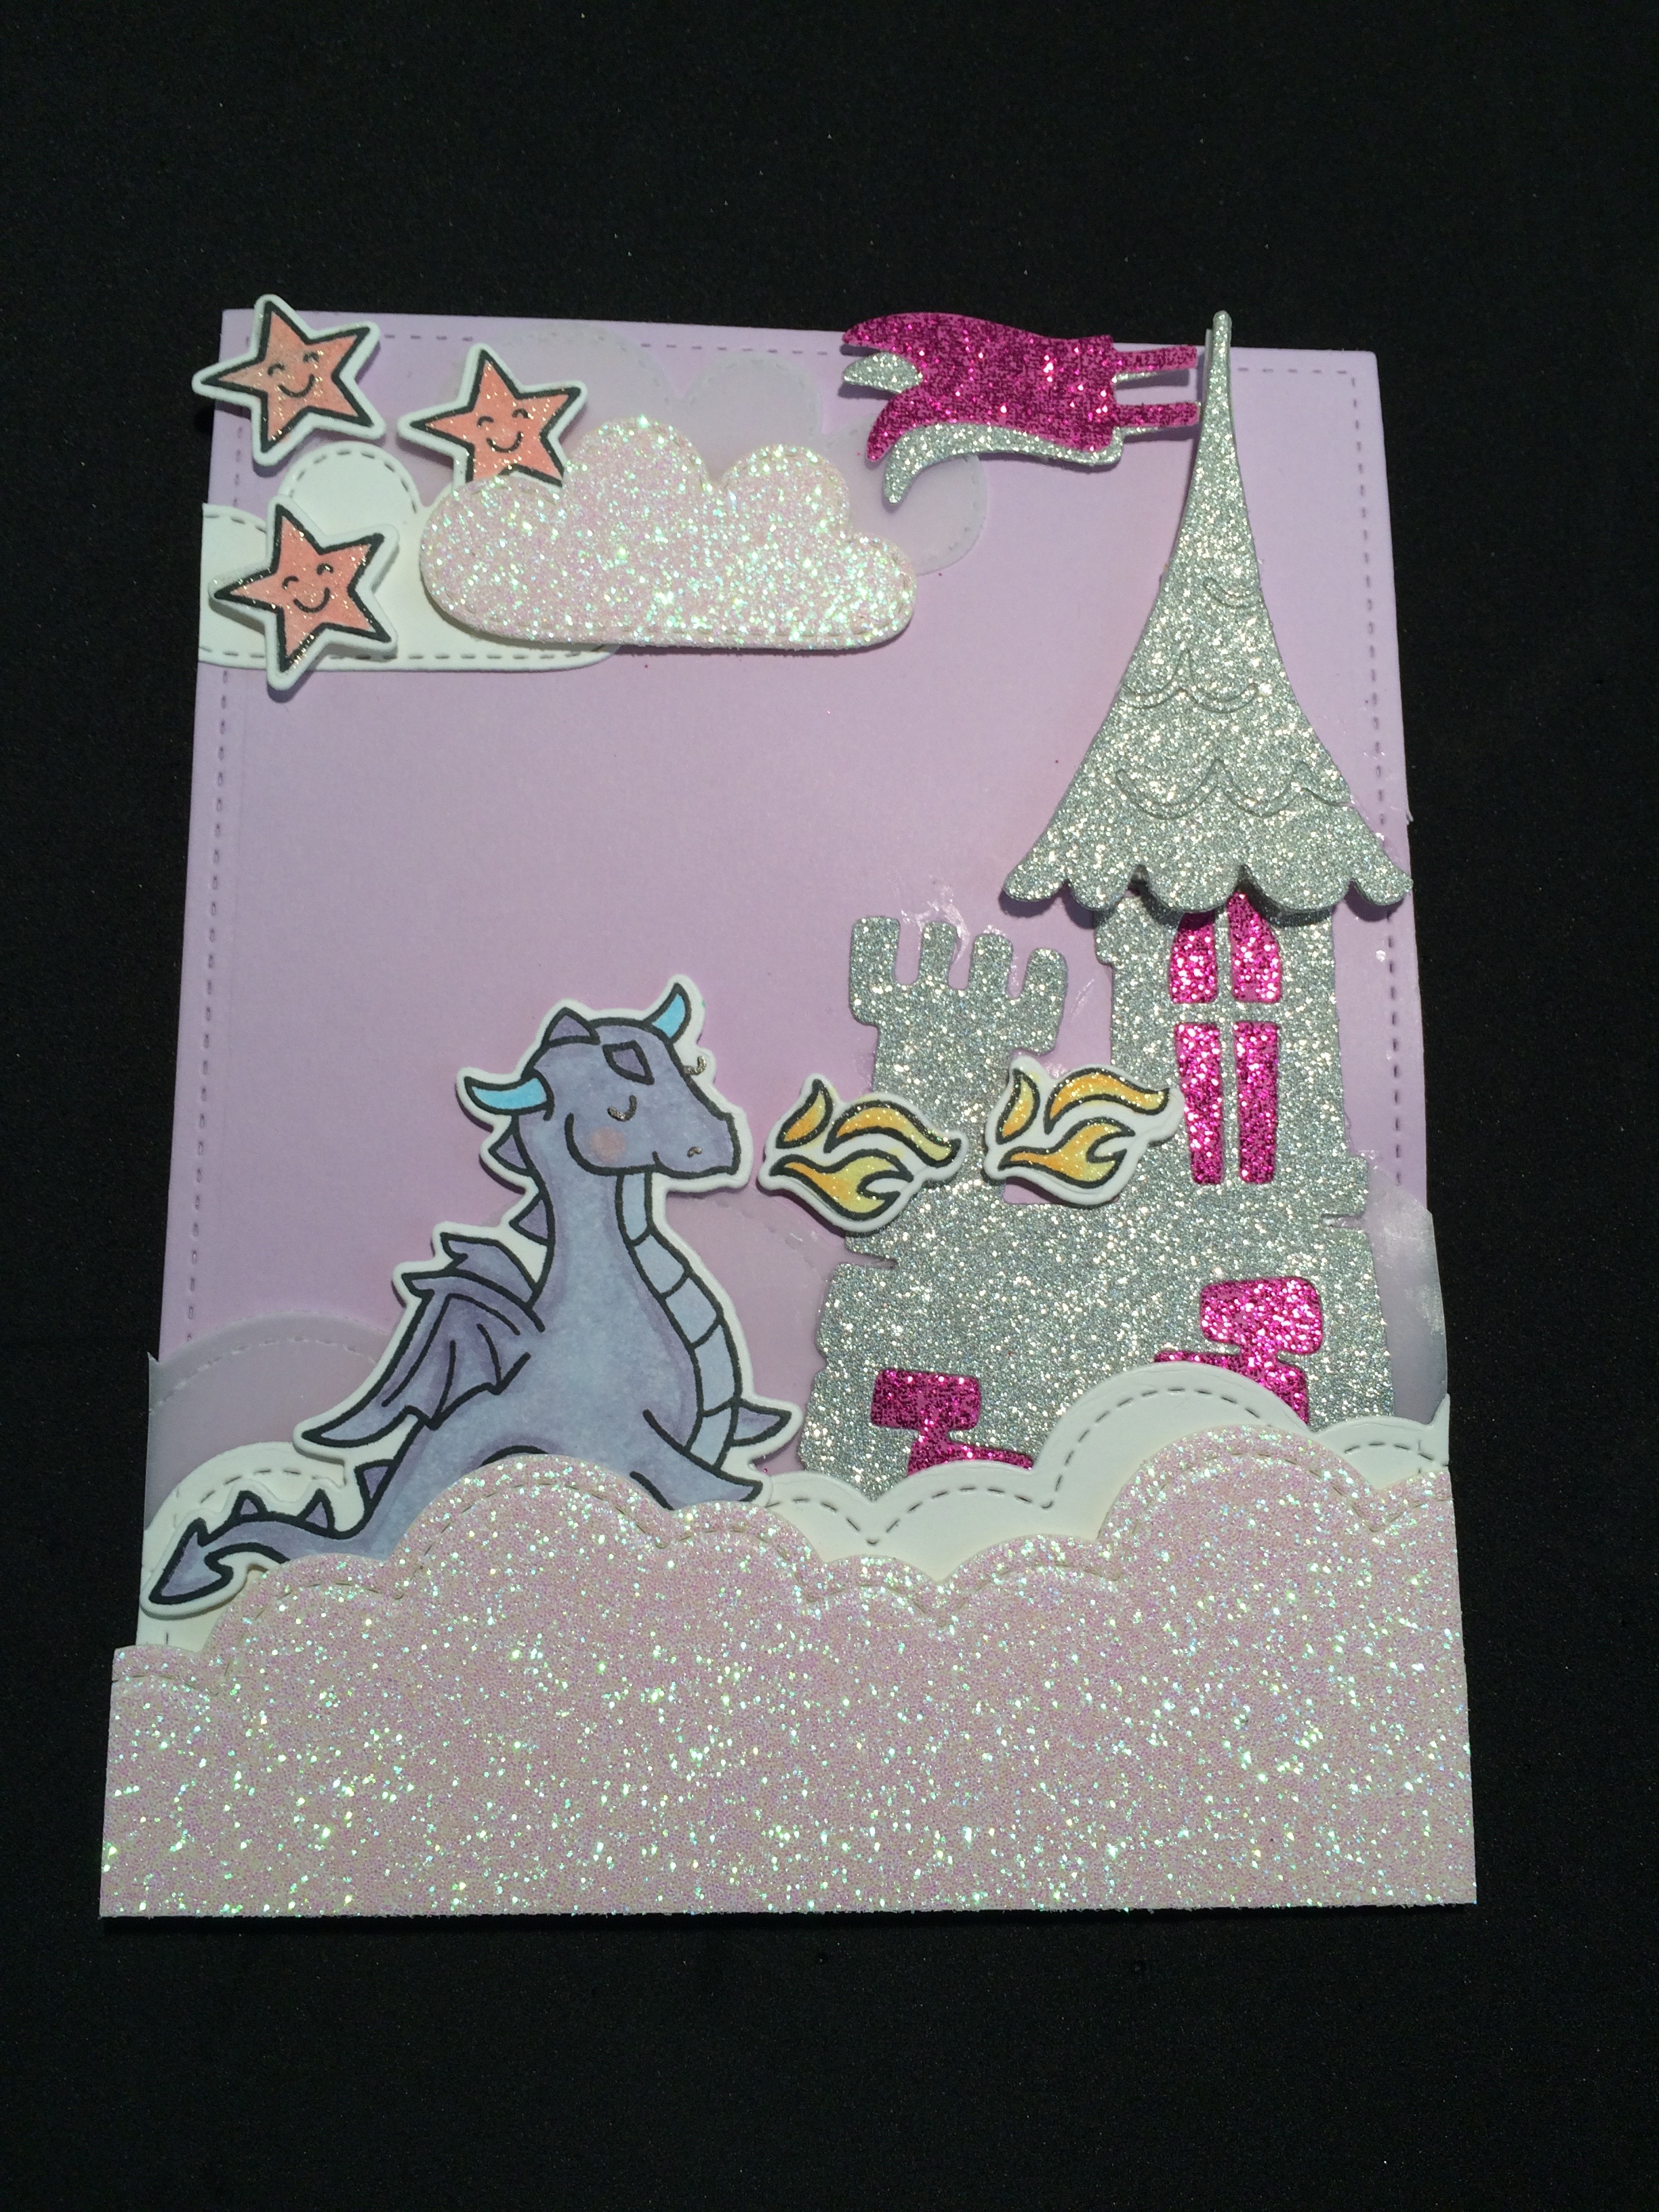
I am entering this card for the Lawnscaping Challenge called Sparkle and Shine. The card below is one of my all-time favorite stamps – the Critters Ever After! As a child, I was very sickly and most of the time I was stuck indoors looking at my sisters and other kids play in the yard. I wasn’t allowed to go out so I always pretended I was a princess stuck in a castle. A little cliché but true! So when I saw the stamp set, I was immediately hooked! They didn’t have the coordinating dies then so I bought the stamps first and when the dies came out, of course I had to get them too. Who likes fuzzy-cutting?! Definitely not me!
It took me a couple of hours to create the card below. I’ve put on some music and just let my imagination run wild. I wanted it to look girly, whimsical and glittery. This is the reason why I used a lot of glitter paper on this card, vellum and stickles. In my memory as a child, this is how the dragon looked like ~ cute, friendly, glittery and purple! I used my Wink of Stella clear glitter pen on the dragon but unfortunately, my camera and the lighting didn’t catch the glitz and shine.
The unicorn and the frog prince are also one of my favorites, so I decided to do a pop-up card to show them off. I didn’t want them left out!
I hope you guys like this card and please let me know what you think. Happy crafting!
Today’s card features this versatile stamp set called True Love. This stamp set is perfect for a Just-Because card, Wedding, Valentine’s Day or Anniversary. This stamp set is great alone, or used with the other cute Brentwood Owl stamps or just about any other stamps you can pair it with. The possibilities are endless!
If you came here from Jeanette’s blog, then you’re in the right place.
I used the digital version of this True Love stamp set. I didn’t receive my stamps in time before this blog hop, because I live overseas (at least 10 months out of the year!). I am a novice when it comes to digital stamps so I couldn’t get the size right! I had to call my friend in Canada to help me figure it out. Her advice was to just use what I have printed so far and make it work. Such a great advice! I decided to just use my imagination and have fun. I really did! In fact, I had so much fun I got carried away!
Supply List:
True Love Stamp Set (I used the Banner image and resized it so I can fit Ruby inside)
Ruby and a Martini Stamp Set (I cut-out the martini glass)
Memento Tuxedo Black Ink
Copic Markers to color the banner, Ruby and the ladybug
Sahara Sand Card Stock
Sahara Sand Stamp Pad
Wood Stamp for the background
Grass Die
Flower Punches
Bow Punch
Stylus to give the flowers some dimension
Glossy Accents to make Ruby’s eyes pop
Rhinestones and Pearl
Adhesive (also used foam adhesive to pop Ruby up)
This first card below is super detailed. I used my punches and other dies to create a scene for Ruby, the Owl. I stamped my sahara sand card base with the woodgrain stamp using sahara sand ink for a tone-on-tone look. I stamped Ruby using my Memento Tuxedo Black Ink and colored her using my Copics. I also used glossy accents to make her eyes pop. The photo didn’t do justice on how beautiful the colors really are. I then colored the banner image also using my Copics, but the ink smudged a little on the pink flower images. It must have been because of my inkjet printer or because I didn’t have any Copic-friendly card stock. This was challenging! To fix this problem, I decided to add punched flowers to create more dimension. I think it turned out so beautiful!
The second card is very simple, but creates a huge impact in my opinion. I just love the sentiments that Jessica has included in this stamp set. I wanted to highlight it in a way that it stands out! Sometimes less is more!
I gathered all of my card stock and cut the pieces using the dies to create my scene for the sentiment. Once I had everything laid out, I dry-embossed my card base using the Brick wall TIEF. I positioned the sentiment on the die-cut window piece and purposely covered the word “love” in the beginning of the sentiment, so I can use the LOVE die-cut piece that I highlighted with Diamond Stickles to make it pop.
I adhered the picket fence, and then proceeded to adhere the window, followed by the planter and the flowers. I thought it needed some sort of greenery so I decided to die-cut the leaf flourish and adhered it to the card. What do guys think? Do you like the first or the second card?
PRIZES!!!!!! Leave a comment on each blog on the hop and be eligible to win a $10 gift certificate to Jessicalynnoriginal.com!
Hello and Welcome to the Start of the Summer Design Team Showcase Blog Hop created by the JessicaLynnOriginal June 2015 – January 2016 Design Team! I am pleased to announce that I am one of the designers for JessicaLynnOriginal.Com.
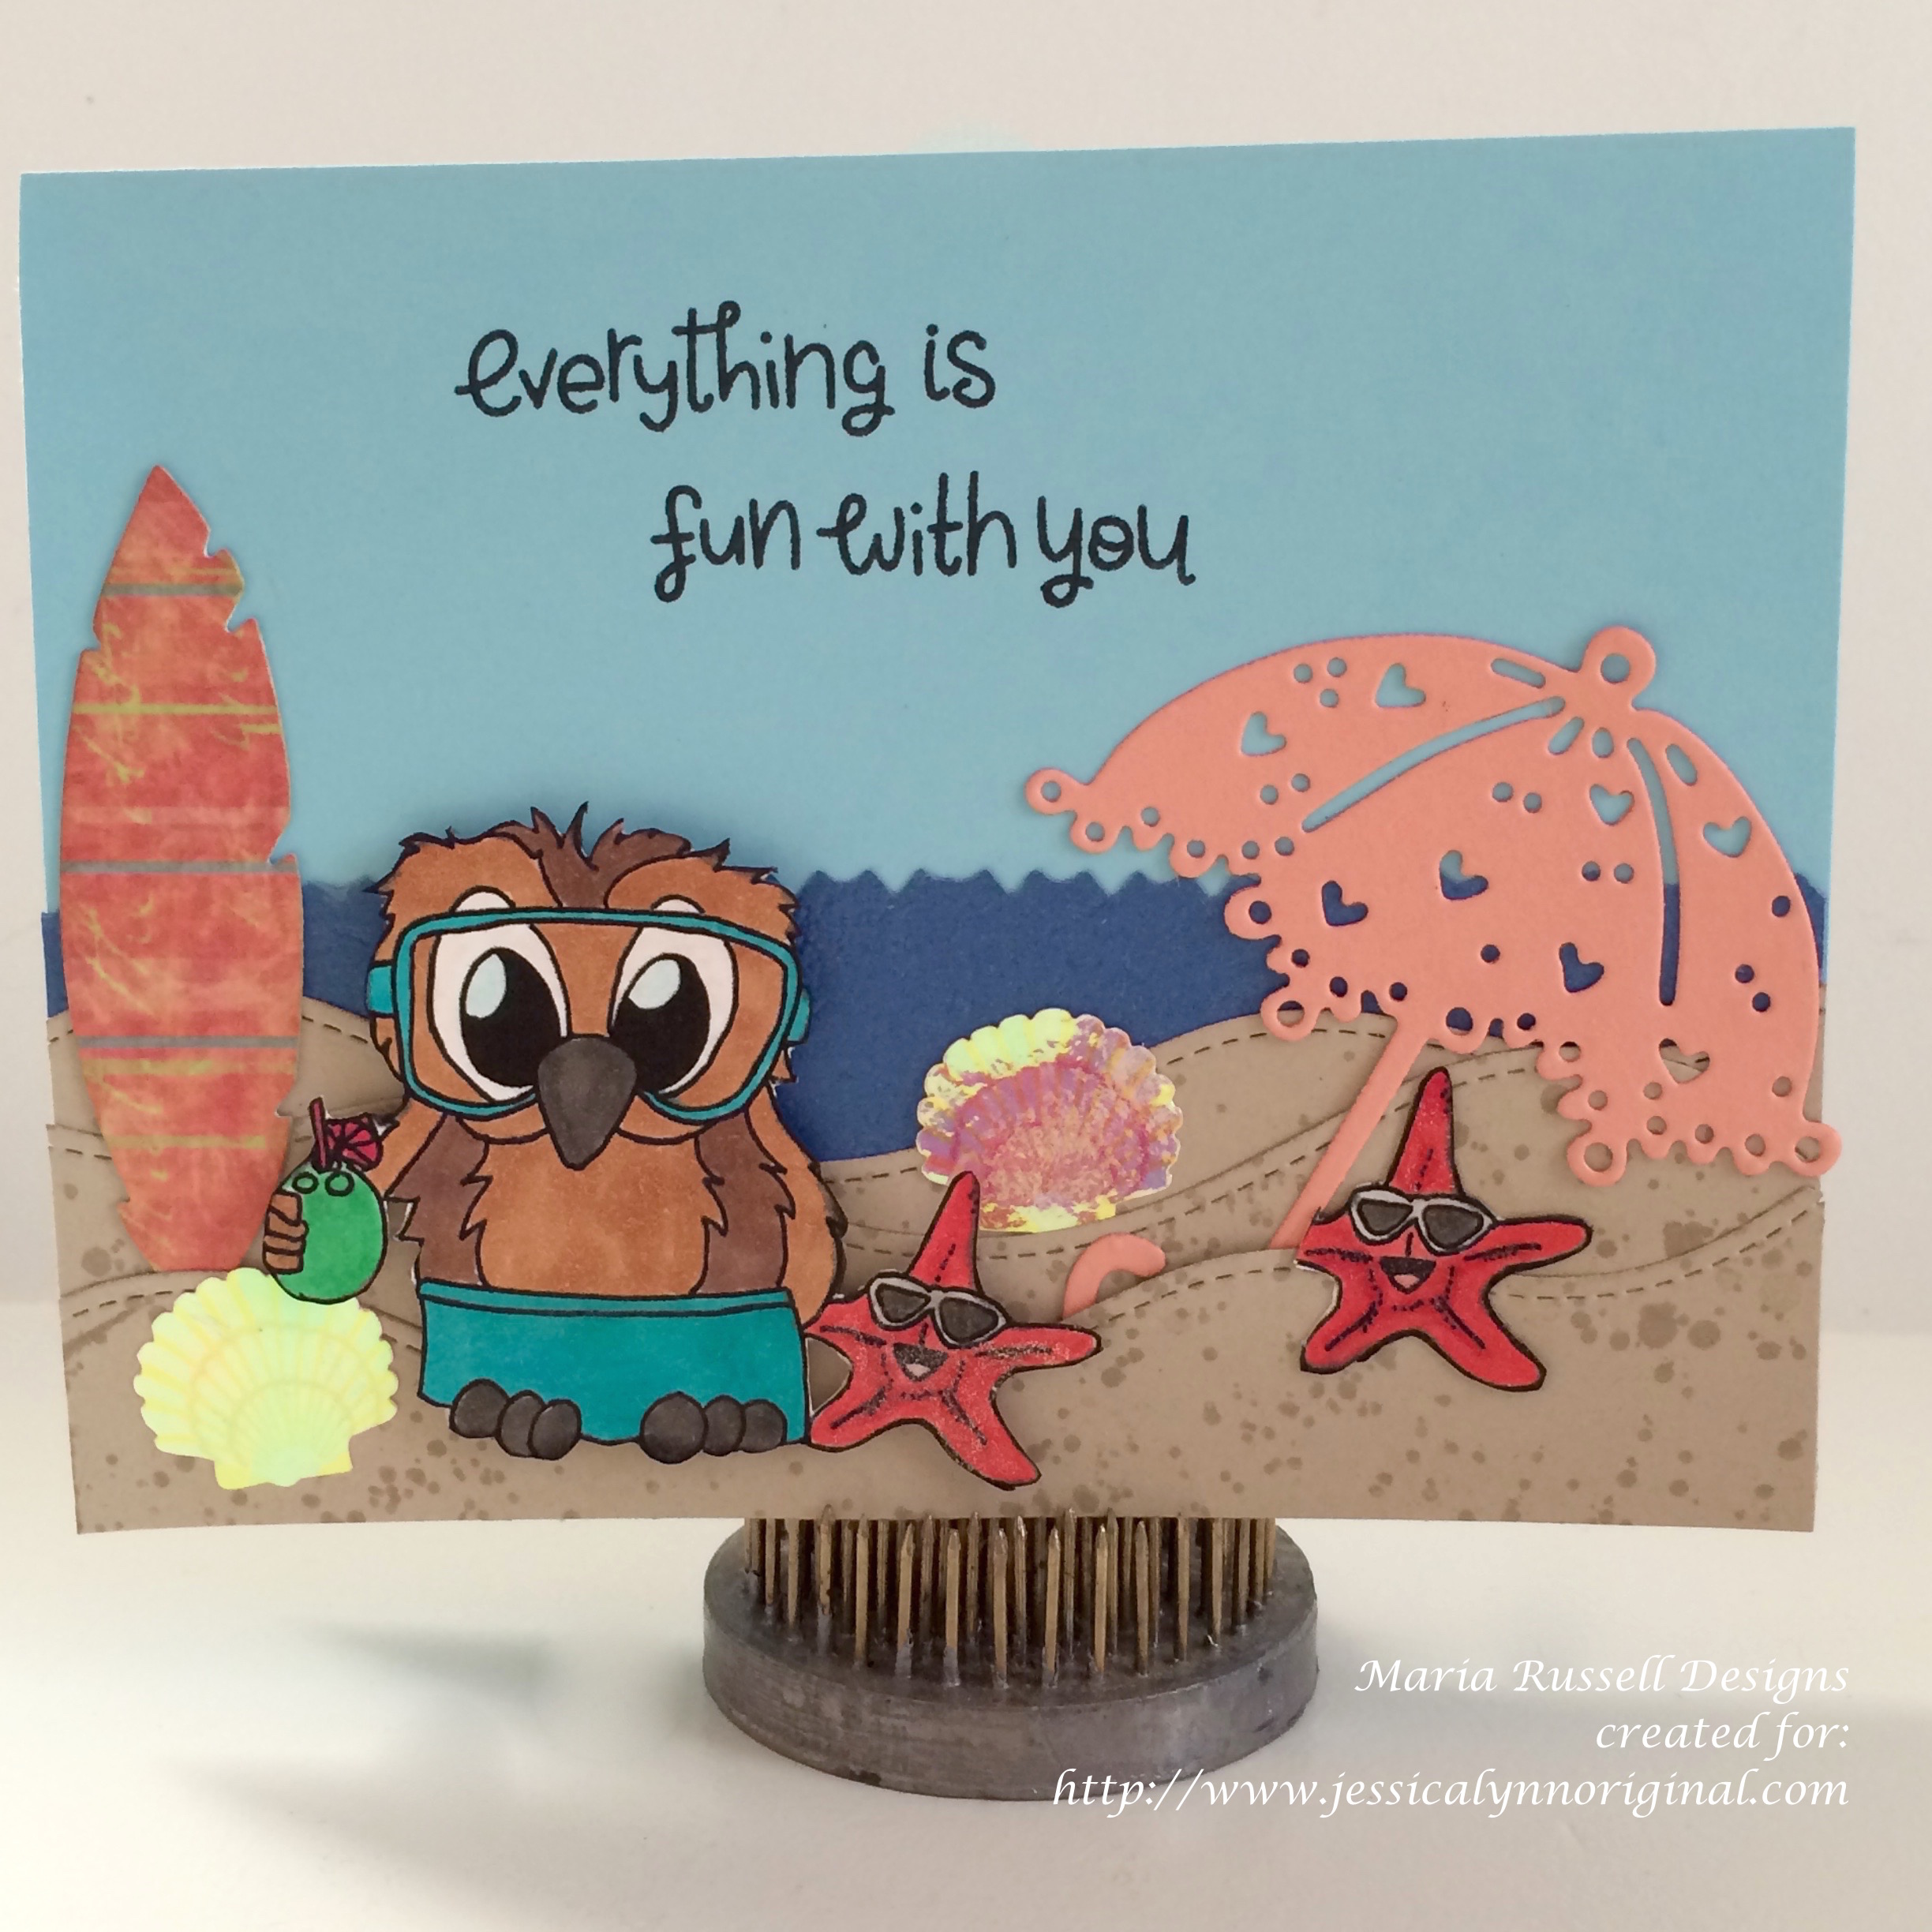
Today we are featuring projects using the Brentwood at the Beach Digi Stamp that really showcase and introduce our talented design team members! This fun stamp captures that summer vacation and can be used in many ways. This card kind of reminds me of my son when we were on a holiday in The Maldives. He loves surfing and scuba diving but most importantly, he loves to just hang out by the shore, collect shells and play with hermit crabs. Put your feet up and grab a cool drink to sip as you travel along the hop, getting inspired by the different takes from each of our designers. If you are coming from Jessica’s blog, then you’re in the right place.
Here is the card:
If you’d like to see a video on how I created this card please watch it here:
Brentwood at the Beach Digital Stamp
Card base – Light Blue Card Stock (8 1/2 by 5 1/2, scored at 4 1/4)
Dark Blue Card Stock – 4 1/4 by 5 1/2 to create the water background
Tan Colored Card Stock – Used to die-cut and create the “Sand”
Designer Series Paper – Used to cut the Surf Board
Orange Card Stock – used to die-cut the umbrella
Dies – Umbrella Die, Stitched hillside border die, feather framelits
Copic Markers Used for the Owl ~ E25 and E35 blended with Dark Chocolate Brown Alcohol Marker (main body). I also used R000 and B00 for the eyes.
The shorts were colored using Coastal Cabana Alcohol Markers.
Copic Markers Used for the Starfish – R24 and R29
Copic Marker Used for the Coconut – G05
Hologram Shell Stickers
Win a prize! Please let me know what you think in the comments below. Comment on each of the blogs in the hop and you will be eligible to win a $25 gift certificate towards anything at JessicaLynnOriginal.com! After the hop, Jessica will randomly select a winner and announce the lucky person on her blog on Sunday, May 24th. Here is the link to Jessica’s Blog ~ http://jessicalynnoriginalstamps.blogspot.com.
This treat holder is so cute, you can basically create this for any occasion. I love the new Scallop Tag Topper Punch but if you don’t have the punches that I have on this video, please use what you have. This is just an example and you can use other punches to create a decorative edge to your card stock. I have used my decorative label punch, scallop punch and even my blossom punch. You just need to insert the edge of your card stock to your punch, line it up slowly to make sure the card stock is in the middle of the image, then punch! Easy, peasy!
Materials used:
Blushing Bride Card stock (Item No. 131198)
Cut at 2 inches by 11 inches (base)
Cut at 3 ½ by 3 ½ (middle piece that will hold the egg securely)
Daffodil Delight Card Stock — 119683 – Used to punch the bird and the wing
Pistachio Pudding Card Stock (Item No. 130020) — used for the leaves
Chocolate Chip Card Stock — Item No. 102128 — for the branch
Scallop Tag topper Punch — Item No. 133324
Bird Builder Punch — Item No. 117191
1 ¼ circle punch – Item No. 119861
Extra Large Oval Punch — Item No. 119859
Scissors
Score Board
Red Rose Ribbon
Baker’s Twine
I hope you enjoyed this video. If you have any questions, please feel free to send me a message.. Craft with your loved ones and create some memories. Happy crafting!