Happy Meow-oween & Pawsome Birthday

Hello Newton’s Nook fans!  Are you ready for more inspiration from last week’s August release?  For today’s projects, I am showcasing a LOT of Newton’s Nook products.   I’m featuring the Halloween Trio stamp set and coordinating dies, Fabulous Frenchies stamp set and coordinating dies, with an older stamp set Newton’s Perfect Pumpkin. I also used the Land Border Dies, Sky Border dies with the Framework die set.

For my first card, I inked up my background with distress oxide inks —> Wilted Violet, Picked Raspberry and Fossilized Amber to create my night sky.  I sprayed it with water using my distress sprayer and dabbed it with my paper towel.

IMG_9269

I stamped my image on some Neenah solar white card stock and colored them in with my Copic markers.  I die-cut the image with the coordinating die.  I die-cut the grass with the land borders die on some black card stock, as well as the picket fence and the clouds, using the Sky Border dies.  I adhered the die-cuts and the images on my colored background.

To finish my design I added the pumpkins, spider web and the spider with the black bats using the Newton’s Perfect Pumpkin stamp set.  I also stamped the sentiment with versa mark ink and heat embossed it with white embossing powder.

IMG_9270

Here’s the Happy Meow-oween card!

NNDHappy Meow-oween1A

I added some white details to the pumpkins and the noses of the critters.

NNDHappyMeow-oween1C

For my second card, I stamped my images on some white card stock and colored them in with my Copic markers.  I die-cut the images with the coordinating dies.

IMG_9259

I die-cut an A2 size smooth white card stock and dry-embossed it with the biggest die using the Framework die set.  I cut the window using the smallest die of the same set.  I covered the window with acetate and also added my foam adhesive to create the well for my shaker card.  I used some white and purple star confetti as my shaker element and adhered this piece on my card base.

IMG_9258

I inked up the bottom of my card front with some Antique Linen distress oxide ink and adhered my little Frenchies on my card.  I also adhered the balloon and stamped my sentiment onto the card.

NNDFabulousFrenchies2A

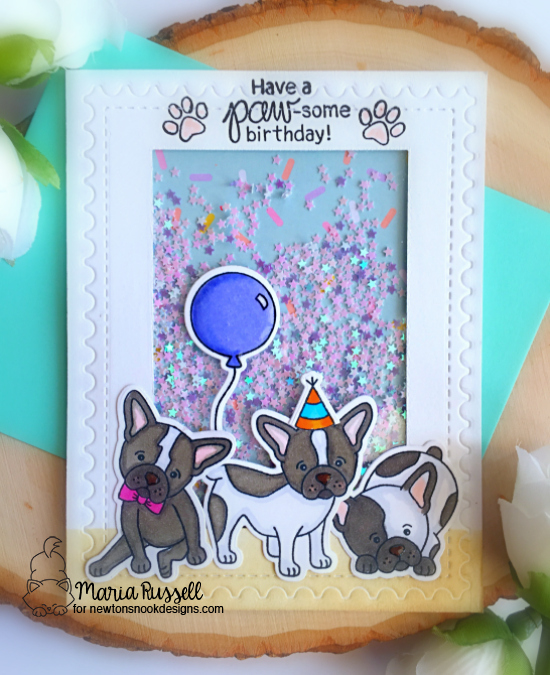
To finish my design I added glossy accents to the balloon and the little Frenchies to make their noses pop.

NNDFabulousFrenchies2B

I hope you like my projects today.  If you haven’t checked out the August stamp, dies and stencil release please visit Newton’s Nook Designs.  The products I used are also listed and linked below.  Have a wonderful day and happy crafting!

————SUPPLIES————-


Easy Thanksgiving Crafts with Xyron

I hope you are all having a great week so far.  All week long, the Xyron Design Team will be sharing easy Fall/Thanksgiving projects on the Xyron Facebook group.  For my projects today, I am making a bunch of treat bags to give to my guests for Thanksgiving.  I also made some place card holders and decorated a bunch of LED candles to decorate my table.


If you don’t have the supplies to create the treat bag, you can definitely buy some bags from the dollar store or craft stores, and decorate them with silk fall leaves or any other fall-themed embellishments, and fill them with surprise treats for your guests.


I started out by die-cutting some American Crafts card stock using my Mama Elephant Treat Bag die.  To decorate the bag, I die-cut the pumpkin with the Mama Elephant pumpkin add-on dies.  For my sentiment, I die-cut the “Thank You” script using my Kat Scrappiness Thank you script die.


XyronThanksgiving1


I assembled the bag using my Xyron Mega Runner.  I also used the mega runner to adhere the pumpkin.  To make things easier, I used my Xyron sticker maker to adhere the tiny pieces that goes with the pumpkin, as well as the Thank You Script sentiment.  I filled my bag with some treats.


IMG_5966IMG_5967


Here’s the treat bag:


XyronThanksgiving2


Since I have some leftover leaves that I die-cut from a previous project, I decided to make some place card holders, that will hold the utensils and a note pad for my guests to write what they are thankful for this year.  Here’s what it looks like:


XyronThanksgiving3


I also decorated some LED candles to decorate my table, using my Xyron sticker maker and Mega Runner.


XyronThanksgiving4


Launch of Toy and Working Dog Breed Stamp Sets by JessicaLynnOriginal

I am really excited to share today’s blog post. We are launching two wonderful new stamp sets at Jessica Lynn Original called “Toy and Working Breed”. I have always loved dogs! I grew up with them and I can’t imagine not having a dog in my life. They are amazing, loving, funny, faithful – truly a man’s best friend!

The toy breed stamp set is very special to me. The Chihuahua image that Jessica has for this set had a striking resemblance to my beloved pet, Chi-Chi. Chi-Chi was my constant companion and I took her everywhere with me. She was very stylish and had outfits for every occasion. She was super spoiled! I lost Chi-Chi in 2013 and I was really sad for a long time that I still couldn’t bring myself to getting another Chihuahua.

IMG_1085

When I first received the stamp set, I really had a hard time trying to think about card designs. I’ve always loved stamping, but I’ve never had stamp images that are so life-like, it was honestly hard to get creative. I am a novice with Copic markers so it was really hard for me to color the images and make it look realistic.

I decided to stamp and color a couple of the images on white card stock. I then fuzzy-cut the images and gathered my card supplies but when it came to putting the card together I was just stumped! I made one mistake after another.  I just couldn’t get creative! I left it alone for a few days and decided to look at Chi-Chi’s old photographs! For some reason, I had a light-bulb moment and got my crafty mojo back. I started with a simple card below, but then since I had all the other images already cut and colored, the ideas just kept coming. I guess it’s obvious since this is the very first time I actually have 4 card samples and one Doggie Treat bag for the launch.   You can tell I had so much fun playing around with the stamp images, I used a lot of my dies to “dress-up” the dogs.

I am not going to list all of the dies that I used for the cards because I would like to eventually post a YouTube video showing you how I made some of the cards, as well as the doggie treat bag.

Please let me know what you think about the cards or if you would like to see a tutorial for any of the cards I’ve shown today. Which one is your favorite? To order your sets, here is the link to the toy dogs stamp set: http://www.jessicalynnoriginal.com/jessicalynnoriginal-akc…/ and the link to the working breed stamp set: http://www.jessicalynnoriginal.com/jessicalynnoriginal-akc…/

Have a great weekend and happy crafting!

Created by Maria Russell for http://www.jessicalynnoriginal.com
Processed with Moldiv
Birthday Pop-Up Card by Maria Russell for http://www.jessicalynnoriginal.com
Created by Maria Russell for http://www.jessicalynnoriginal.com
Processed with Moldiv
Created by Maria Russell for http://www.jessicalynnoriginal.com
Doggie Treat Bag Created by Maria Russell for http://www.jessicalynnoriginal.com

Start of the Summer Design Team Showcase Featuring Brentwood at the Beach – Win a Prize!

JessicaLynnOriginalDTLogo

Hello and Welcome to the Start of the Summer Design Team Showcase Blog Hop created by the JessicaLynnOriginal June 2015 – January 2016 Design Team! I am pleased to announce that I am one of the designers for JessicaLynnOriginal.Com.

Today we are featuring projects using the Brentwood at the Beach Digi Stamp that really showcase and introduce our talented design team members! This fun stamp captures that summer vacation and can be used in many ways. This card kind of reminds me of my son when we were on a holiday in The Maldives. He loves surfing and scuba diving but most importantly, he loves to just hang out by the shore, collect shells and play with hermit crabs. Put your feet up and grab a cool drink to sip as you travel along the hop, getting inspired by the different takes from each of our designers. If you are coming from Jessica’s blog, then you’re in the right place.

Here is the card:

IMG_7544 (2)

If you’d like to see a video on how I created this card please watch it here:

This digi-stamp is available free for download today (May 23, 2015 at 0800 CST) so please hurry and check out the website (http://www.jessicalynnoriginal.com/free-digital-brentwood-owl-summertime-fun-stamp-2015/). While you’re there, please check out the other stamps available for purchase as well. My favorite is the Brentwood Owl.

Supplies I’ve used:

Brentwood at the Beach Digital Stamp
Card base – Light Blue Card Stock (8 1/2 by 5 1/2, scored at 4 1/4)
Dark Blue Card Stock – 4 1/4 by 5 1/2 to create the water background
Tan Colored Card Stock – Used to die-cut and create the “Sand”
Designer Series Paper – Used to cut the Surf Board
Orange Card Stock – used to die-cut the umbrella
Dies – Umbrella Die, Stitched hillside border die, feather framelits
Copic Markers Used for the Owl ~ E25 and E35 blended with Dark Chocolate Brown Alcohol Marker (main body). I also used R000 and B00 for the eyes.
The shorts were colored using Coastal Cabana Alcohol Markers.
Copic Markers Used for the Starfish – R24 and R29
Copic Marker Used for the Coconut – G05
Hologram Shell Stickers

Win a prize! Please let me know what you think in the comments below. Comment on each of the blogs in the hop and you will be eligible to win a $25 gift certificate towards anything at JessicaLynnOriginal.com! After the hop, Jessica will randomly select a winner and announce the lucky person on her blog on Sunday, May 24th. Here is the link to Jessica’s Blog ~ http://jessicalynnoriginalstamps.blogspot.com.

Next on the hop is Vickie Yearly ~ http://stuffbyvickie.blogspot.com/2015/05/welcome-to-start-of-summer-blog-hop.html blog!

If you got lost along the way, or if a link doesn’t work, please click here to see the link for everyone’s Blog (http://jessicalynnoriginalstamps.blogspot.com/2012/05/got-lost-along-this-hop.html)

Thanks for stopping by! Happy crafting!

THE GRINCH PILLS

If you would like to order the products shown on this video and avail the discounted rate through a demonstrator website (also earn some stampin rewards and free stuff), please click on the link above and it’ll take you to my Stampin’ Up! Online store.

Materials Used:

Card Base is Whisper White Card Stock – Item No. 100730 – 4 1/4 X 5/12
Border – Cherry Cobler – Item No. 119685 – 4 1/8 x 5 3/8 (2 pieces)
Seasons of style Designer Paper Stack – Item No. 132181 – 3 7/8 X 5 1/4

The Grinch Punch Art is made out of XL Oval Punches, Scallop Punch, Owl Builder Punch. (If you would like to see a tutorial on how I made the Grinch Punch Art, please send me a message and I will be glad to film a video tutorial.

Sweet Treat Cups – Item No. 116802
Red Ribbon
Stampin Dimensionals – 104430

I hope you enjoyed this video. If you have any questions, please feel free to send me a message.. Do some crafting and create some memories. Happy crafting!

Halloween Card – Flying Witch

This card was inspired by a fellow demonstrator, Tami White. Although our cards are done differently, the design is the same. I thought of sharing this because the card is so easy to make – plus it is very unique in a way because this is not the typical orange and black Halloween colors. I really love this card and I hope you do as well.

Halloween Treat Box Using Stampin Up’s Owl Punch

Now that Fall is almost here, it’s time to get decorating and crafting so by the time Halloween comes, you’re ready to sit back and enjoy it. One of the things I love to do is to make Halloween treats. On this video, I am sharing on how I created this treat box. I’m not exactly sure where I got the box measurements, but the topper is what made it cute. I used the Stampin’ Up!’s Owl Punch. I never thought I would get a lot of use for this punch but ever since I got it, I’ve been using it almost everyday with all of my crafting projects.

I hope you all enjoy this video.