Sweet Treats Blog Hop ~ Message in a Bottle & Paper Coffee Mug Treat Holder

nndsweettreatsbloghop

Hello stampers and crafters! Thank you for stopping by my blog. Welcome to the sweet treats blog hop hosted by Newton’s Nook Designs. I have a special treat for you today. I am sharing two Valentine’s D.I.Y projects.

The first project is a unique holder for your love letter. I call it, Message in a Bottle. I made this project a few years ago and posted it on my YouTube channel.  Back then, I wanted to give my husband something unique on Valentine’s Day so I made this cute, shabby chic message in a bottle project that housed a music sheet by Led Zeppelin, called “Thank You”. This was the very first song that my husband played for me on the guitar when we were still dating many, many years ago. However, the Message in a Bottle project that you see below is a lot simpler. If you are looking for a unique project this Valentine’s Day, the possibilities are endless using this idea!

I started out by cleaning up a small empty wine bottle and set it aside to dry. For my example below, I used a music sheet patterned paper  (Note: You can write your own love letter instead)   I rolled the patterned paper using a pencil to make it easier for me, then tied it with a bow.


nndmessage1

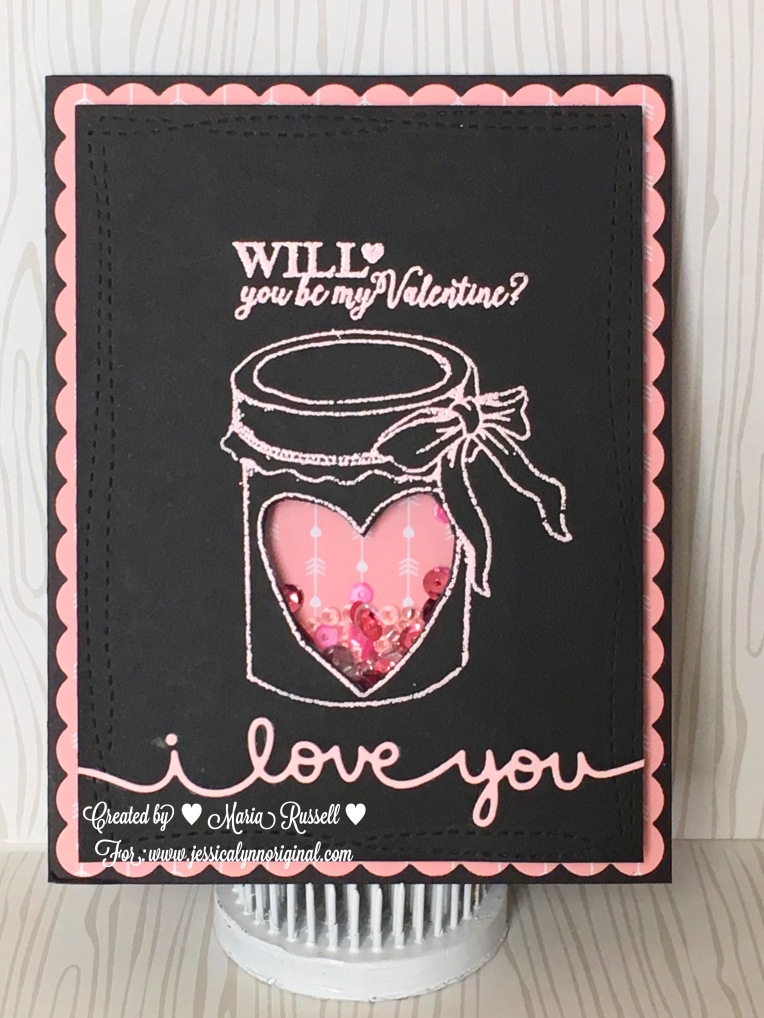
To add interest to the message holder, I added the love die-cuts using Newton’s Nook Designs Darling Hearts Die. There is a small “love” script die that is included in this set and is perfect for this project. I also used some of my favorite sequin mixes to further decorate the bottle.


nndmessage3

This is like a shaker card, without having to use foam adhesive. I think it turned out so cute!  To finish off the design, I die-cut the heart tag using the Darling Hearts Die on pink patterned paper. I used the sentiment and the heart from the Holiday Smooches stamp set. I used my crop-a-dile to turn the die-cut into a tag. I tied it on the bottle with my silver twine. Don’t you just love this unique love letter holder?


nndmessage4


The second project is an adorable paper mug treat holder idea, using the We R Memory Keepers Punch Board. This Punch Board is one of my all-time favorite crafting tools because of its versatility. You can make your own envelopes, treat boxes and treat holders.

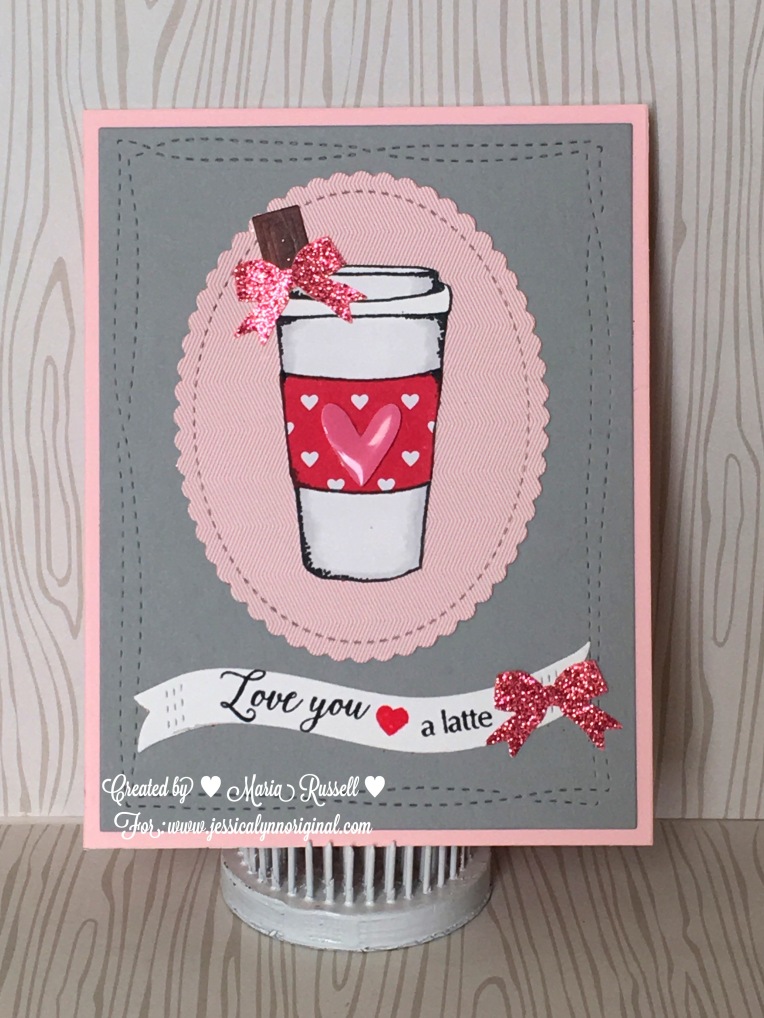
I followed a video tutorial on YouTube on how to create this Paper Coffee Mug. Since this project is for Valentine’s Day, I wanted to use White, Pink and Gold for my project. I used a beautiful patterned paper that I got from Michael’s to decorate my paper mug.


nndcoffee1

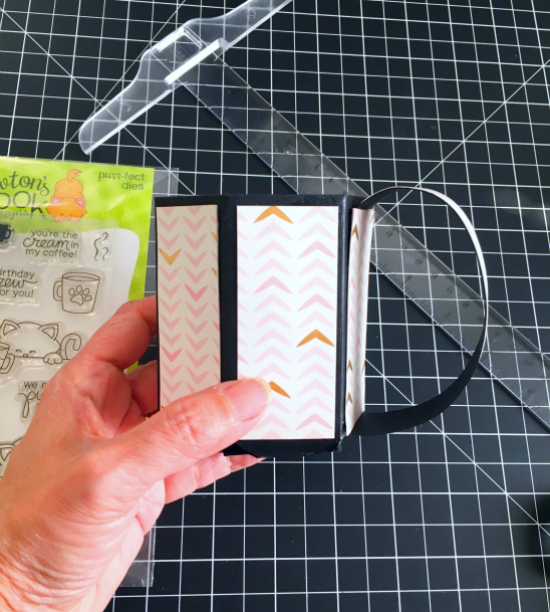
I then stamped this cute Newton image (from the Newton Loves Coffee stamp set) on Neenah solar white card stock and colored him in with my Copic markers. I used the coordinating dies to die-cut the image and adhered him to a pink circle card stock. I die-cut the scallop circle with my stitched fancy scalloped circle die to further decorate my tag. I love the pink and gold color combination.


nndcoffee2

I bought some of my favorite Keurig coffee pods and I put them inside this clear cellophane bag.  To finish wrapping up my package, I used my sweetheart twine to close the bag, and stamped my sentiment on this pink heart tag die, and tied a bow. I love this paper mug treat holder to package up some favorite coffee pods.

nndcoffee3


Here is the paper coffee mug treat holder:


nndcoffee4


Would you like to win a $10 store credit to Newton’s Nook Designs online shop?  We are giving them out to TWO lucky winners!

Here’s how to win:
Comment on the NND blog and Design Team blogs (see list below)!  The winner will be chosen at random from the collective reveal posts. Make sure to check out each of their blogs and comment for your chance to win.  You will not know which blog has been chosen so the more you comment on the better your chances are of winning!  You have until Monday, February 6th at 9pm CST to comment — winners will be announced on the NND blog on Tuesday, February 7th.

Check out all the awesome Design Team Blogs below to enter:


———-SUPPLIES———–

https://static.inlinkz.com/ppr.js

Newton’s Nook Designs January Release Day 1 – Woodland Duo

nnd_releasejan17


Hello stampers and crafters.  I’m super excited to share this blog post as today is release day (Day 1) at Newton’s Nook Designs.  I have created a Valentine’s Day card, showcasing the new Woodland Duos stamp set. This stamp set coordinates with the previously released, Darling Hearts Die set. You will absolutely love the images on this stamp set!


I started out by stamping my images on Neenah solar white card stock with my memento tuxedo black ink. I colored the images using my Copic markers, and die-cut my stamped images with its coordinating dies.   I wanted to do some inlaid technique to show off the beautiful images in one card without the bulk.


For my card below, I decided to use the foxes and the raccoons, with one of the small hearts included in the set. (I have made another card with the Owl images, which I will later share on a different post with a process video.)


nnd_darling-duo2


I finished off the design by using three different patterned papers, and added the tiny red bow. What do you guys think? I hope you like it as much as I do. This stamp set will be available for purchase on January 20 at 8:00 a.m. CST.


20170101_woodlandduos_pkg


Would you like to win this “Woodland Duos” stamp set?  This set will be given away to ONE lucky winner.


Here’s how to win: 


Comment on the NND blog and Design Team blogs (see list below)!  The winner will be chosen at random from the collective reveal posts. Make sure to check out each of their blogs and comment for your chance to win. You will not know which blog has been chosen so the more you comment on the better your chances are of winning!  You have until Thursday January 19th at 9pm CST to comment  — winners will be announced on the Newton’s Nook Designs blog post on Friday, January 20th.


Check out all the awesome Design Team Blogs below to enter:


Newton’s Nook Designs

Amanda Bodine

Holly Endress

Ellen Haxelmans

Larissa Heskett

Samantha Mann

Juliana Michaels

Naki Rager

Maria Russell (you’re here)

Jennifer Timko

Tatiana Trafimovich


Every Year I Fall For You

I am super excited to share this post today because it is my first post as a design team member for Newton’s Nook Designs (“NND”).

Since Valentine’s Day is just around the corner, I decided to start my projects early.  I wasn’t really sure in the beginning what images I wanted to use for the card so I had stamped out a couple of NND images on Neenah solar white card stock, using my stamping tool and colored the images using my Copic markers. I ended up not using the other images I colored and I have set it aside for a future project in mind. I die-cut the images with my die-cutting machine using the coordinating dies.


img_3315


For my card, I am showcasing the “What A Hoot stamp set and What A Hoot Die Set” and for my sentiment, I used “Fall-ing For You stamp set“. I did a little bit of masking so that I only use the words “every year, I fall for you”. I think it turned out perfectly!


img_3326


Here is the card. The supplies I have used are listed and linked below. I hope you like my card and somehow got inspired to create something beautiful today.  For cute stamp set and dies, please visit http://www.newtonsnookdesigns.com, and share your creations with us on Instagram (using hashtags, #newtonsnookdesigns, #NND) or share it on NND’s Facebook Group (https://www.facebook.com/groups/NewtonsNookDesigns/).

Have an amazing day!


nnd_whatahoot_blog


———SUPPLIES————-

https://static.inlinkz.com/ppr.js

MFT Stamps ~ Grateful For You

I am back today to share with you a card that I made as my third and final entry for the MFT Stamps 2016 Card Design Superstar.   It has been a wonderful, scary and intimidating experience thus far. As I write this blog post, there are almost 400 entries! Scary, huh?
Today’s card is a simple thank you card for my best friend, who lives in Washington, D.C. I am a little sad that we are not going to be able to spend Thanksgiving together again this year. I made this card to let her know that she means so much to me, and I am grateful to have her in my life!


img_2161
Grateful For You – Card Design by Maria Russell


I started out by stamping the images on Neenah solar white card stock using MFT stamps Black Licorice hybrid ink. I used Copic markers to color the images. Since I didn’t have the coordinating dies, I had to fuzzy cut all of the images using my precision scissors.


For my card scene, I had to think outside the box again to create a larger window for my critters so I decided to use the gift box cover up die. I think it turned out perfectly.


For the awning, I used the new Stitched Scallop Basic Edges. I love these dies so much it cuts like butter!


Here is the complete list of the supplies I’ve used for the card. They are all from MFT Stamps.


Happy Hedgehogs

Harvest Buddies

Grateful For You stamp set and coordinating die-namics

Die-namics Stitched Scallop Basic Edges

Die-namics Gift Box Cover Up

Sweet Celebration 6×6 Paper Pad (from the birthday card kit)


To finish off the card, I used my black gel pen to give the eyes more dimension, my white gel pen to highlight the cheeks and the leaves, and also used glossy accents on the acorns.


Wish me luck and thank you for stopping by!

World’s Best Dad~A Father’s Day Card

Father’s Day is just around the corner. My daughter is staying with us for the summer and as she discuss her plans of making my husband his favorite coconut cream pie on Sunday, I decided that this is the perfect time for me to make him a Father’s Day card.


I recently went crazy with my Lawn Fawn Summer release order and I have been dying to use the Dad & Me stamp set. I wanted to create a scene with snow-capped mountains in the background. It reminds me of our summer trip in Washington in 2003. We stayed at Silver Lake Resort. The cabin was pretty basic but the view was just breathtaking. The card I made below represents my husband, my son and my daughter fishing in the lake.


My husband taught my children how to fish. He also taught me, but fishing is not my cup of tea! Just the whole process of putting bait on the hook creeps me out so I sit there and watch while they all fish. I was the sunscreen police! They can fish for hours! I can close my eyes right now and still see their cute little faces light up when their little fishing line starts to wiggle!


Here is the card. I decided to make a shaker card because I wanted the little fishes to move around below with the blue cotton candy sequins from http://www.katscrappiness.com/?aff=21.   I think shaker cards are so much fun!


Supplies Used:


Lawn Fawn Dad & Me stamp set and coordinating dies

Lawn Fawn Hello Sunshine Lawn Cuts

Lawn Fawn Puffy Clouds Lawn Cuts

Mama Elephant Snow-capped mountain die

MFT Stamps Grassy Hillside Border die-namics

Copic Markers W0, W1, W3, W5, V22, BG13, R29, YR17

Hero Arts Bubblegum Ink Pad

Lawn Fawn Noble Fir Ink Pad

Stampin Up Baked Brown Ink Pad

Sequins – 4 mm Blue Cotton Candy from KatScrappiness

Acetate

Fun Foam

White Card Stock for the Card base

Blue Card stock

Baked Brown Sugar Card Stock

Mint Card Stock

Daffodil Delight Card Stock

Dazzling Diamonds Card Stock

Spectrum Noir Sparkle Brush Marker in Clear

Tombow Mono-Dot Adhesive


IMG_1164


I hope I have given you some inspiration to create something wonderful for your father, grandfather, husband or partner. Have an amazing day!

Fairy Friends with Tombow Dot Runner Adhesive

I recently ordered some very cute stamp sets from Lawn Fawn and I have been dying to play around with them before I travel in the next few days. I also received the new Tombow Dot Runner Adhesive. I have never used this adhesive before so I thought this Blog post will also serve as a review on how the adhesive worked.

I first stamped my images and colored them using my markers. I then lined up my images with the coordinating dies and run it through my die-cutting machine. Since I have made hundreds of these box cards, that you see on the photo below, I was able to put the box together in less than a minute, because I even have the dimensions memorized. (Note to self, I need to get a life)  I know that sounds really weird but it’s true! I wanted to create a cute scene for my fairies and so I also had to die-cut some grass to create my garden.

I used the Tombow Dot Stamp Runner for the first time to adhere all of my die-cut pieces and let me just tell you, I just fell in love with this adhesive.  It was sliding through so smoothly on the card stock and I didn’t have any issues at all!  Since it is also a dot-adhesive, I was able to reposition my die-cut pieces without tearing the paper but once you press it on, it adheres really well.

IMG_9550

IMG_9552

IMG_9551

Now comes the part where I have to use an acetate sheet to make one of my fairies look like she’s floating in the air. I normally use a mini-glue dot for this task but I decided to use the “stamp runner”. Holding it down and stamping it to the acetate, I was able to put enough adhesive to adhere my fairy.

I think the photos are self-explanatory so I will leave you all to enjoy looking at the photos. Overall, I’M IN LOVE WITH THE TOMBOW DOT RUNNER ADHESIVE!  I can say that this is now my all-time favorite tape runner and will purchase more in the future.

IMG_9553

I hope you like this project and have an amazing day!

IMG_9559IMG_9561IMG_9562


A Latte Love for Valentine’s Day & Planner Stamp

The day has finally arrived to introduce to you, two brand new sets from Jessica Lynn Original stamps ~ Jam & Coffee Rubber Stamp and the new All Season Planner Stamps. These two stamp sets can be purchased as a bundle at a discounted price, plus free shipping, We only have 30 sets so if you like them, please go to Jessica’s online store or click on this link before you miss this deal: http://www.jessicalynnoriginal.com/february-bundle-deal-calendar-planner-jam-and-coffee-rubber-stamp-set/


I am the last person on this blog hop.  I hope we inspired you today to start creating with JLO stamps.


Here are the photos of the cards I made and a YouTube video link so you all can see the planner stamps as well. Have a great Valentine’s weekend!

IMG_9304IMG_9305IMG_9306


Valentine’s Card Challenge with Pretty Pink Posh

I was browsing through Pretty Pink Posh’s Facebook page today and came across a Valentine’s Card challenge. I got so excited because I love Pretty Pink Posh! If you guys would like to participate, please check out Pretty Pink Posh’s blog. Here is the link to the challenge:  http://www.prettypinkposh.com/2016/02/valentine-challenge.html

And here is the inspiration photo from her very talented Design Team:

valentinechallenge-1-e1454138677112


When my kids were a lot younger, I always tell them “I love You More Than the Stars in the Sky” before I kiss them good night and put them to bed. This card reminds me of those moments! This card will go to my daughter.


I love the Pretty Pink Posh Scallop Die. This is an exclusive die that you can purchase only from their website. The sequins and the new confetti are so beautiful; it’s to die for!  I wanted to use my all-time favorite sparkling clear, Watermelon, and Blush sequins, mixed with the new stars confetti.  The colors mixed together are so amazing!

Here is the card:

IMG_9357
Card Created by Maria Russell for Pretty Pink Posh Valentine Card Challenge


I hope you all have an amazing weekend!


Masking with Tombow Removable Adhesive

As you all know, Valentine’s Day is on Sunday, and I needed to make a cute treat holder to house my husband’s favorite chocolates. I have an empty Mason jar but I wanted to amp it up a little and spray paint it to create a cute heart design in the front. I could have used stickers to decorate the jar but I wanted something more “handmade”.


I didn’t have any masking paper so I decided to die-cut the heart using my heart die, and used Tombow Removable adhesive to create my “mask” before spray-painting the Mason jar.


I was so impressed with how well the adhesive held on to the glass jar. I gave the jar two coats of paint and it didn’t budge at all. When I removed the “mask”, I got a really nice impression of the heart. The die-cut mask is still sticky enough that I can use it for another project. Just simply amazing!


I also made a heart rosette and a tag to go with my treat jar. After I assembled the heart rosette using hot glue, I used Tombow permanent adhesive to attach the small heart to decorate the front of the rosette. Attaching the rosette to the tag using the permanent adhesive, I thought it needed a little bit more. I then proceeded to die-cut the “love” script sentiment using one of my dies, and attached it to the tag using my all-time favorite, Tombow mono liquid glue. The tip of this glue is perfect to use for intricate dies like the one that you see on the photo.


IMG_9338IMG_9337

This was a very quick and inexpensive project to make for Valentine’s Day. I hope you like this simple project and have an amazing day!