Today’s card features my all-time favorite stamp so far, from Stampin’ Up! called Sheltering Tree. This stamp set is so versatile and you can use it for any occasion. I wanted to create a simple, yet elegant card for Father’s Day. The card that I designed today is really beautiful but it is also very easy to make. Please watch the video below and see for yourself. I have listed the supplies I used here on my Blog but for instructions to make the card, please refer to my YouTube video.
Supplies I used:
Sheltering Tree Stamp Set from Stampin’ Up! & Fahter’s Day Paper Pumpkin Stamp
Look Up to Father Stamp Set from Stampin Up
Whisper White card stock 1 piece of 8 1/2 x 11 card stock – cut at 5 1/2 (to get two pieces of 8 1/2 x 5 1/2)
Pistachio Pudding Designer Series Paper – 5 1/4 x 4
Whisper White card stock – 5 x 3 3/4
Labels Framelits
Wood grain embossing folder
Early Espresso Stampin Pad
Pistachio Pudding and Wild Wasabi Stampin Pads
Memento Tuxedo Black Stampin Pad
Created by Maria RussellCreated by Maria Russell
I hope you found the video helpful and hope to see what you create. Happy Father’s Day to all the amazing Dads out there, and happy crafting!
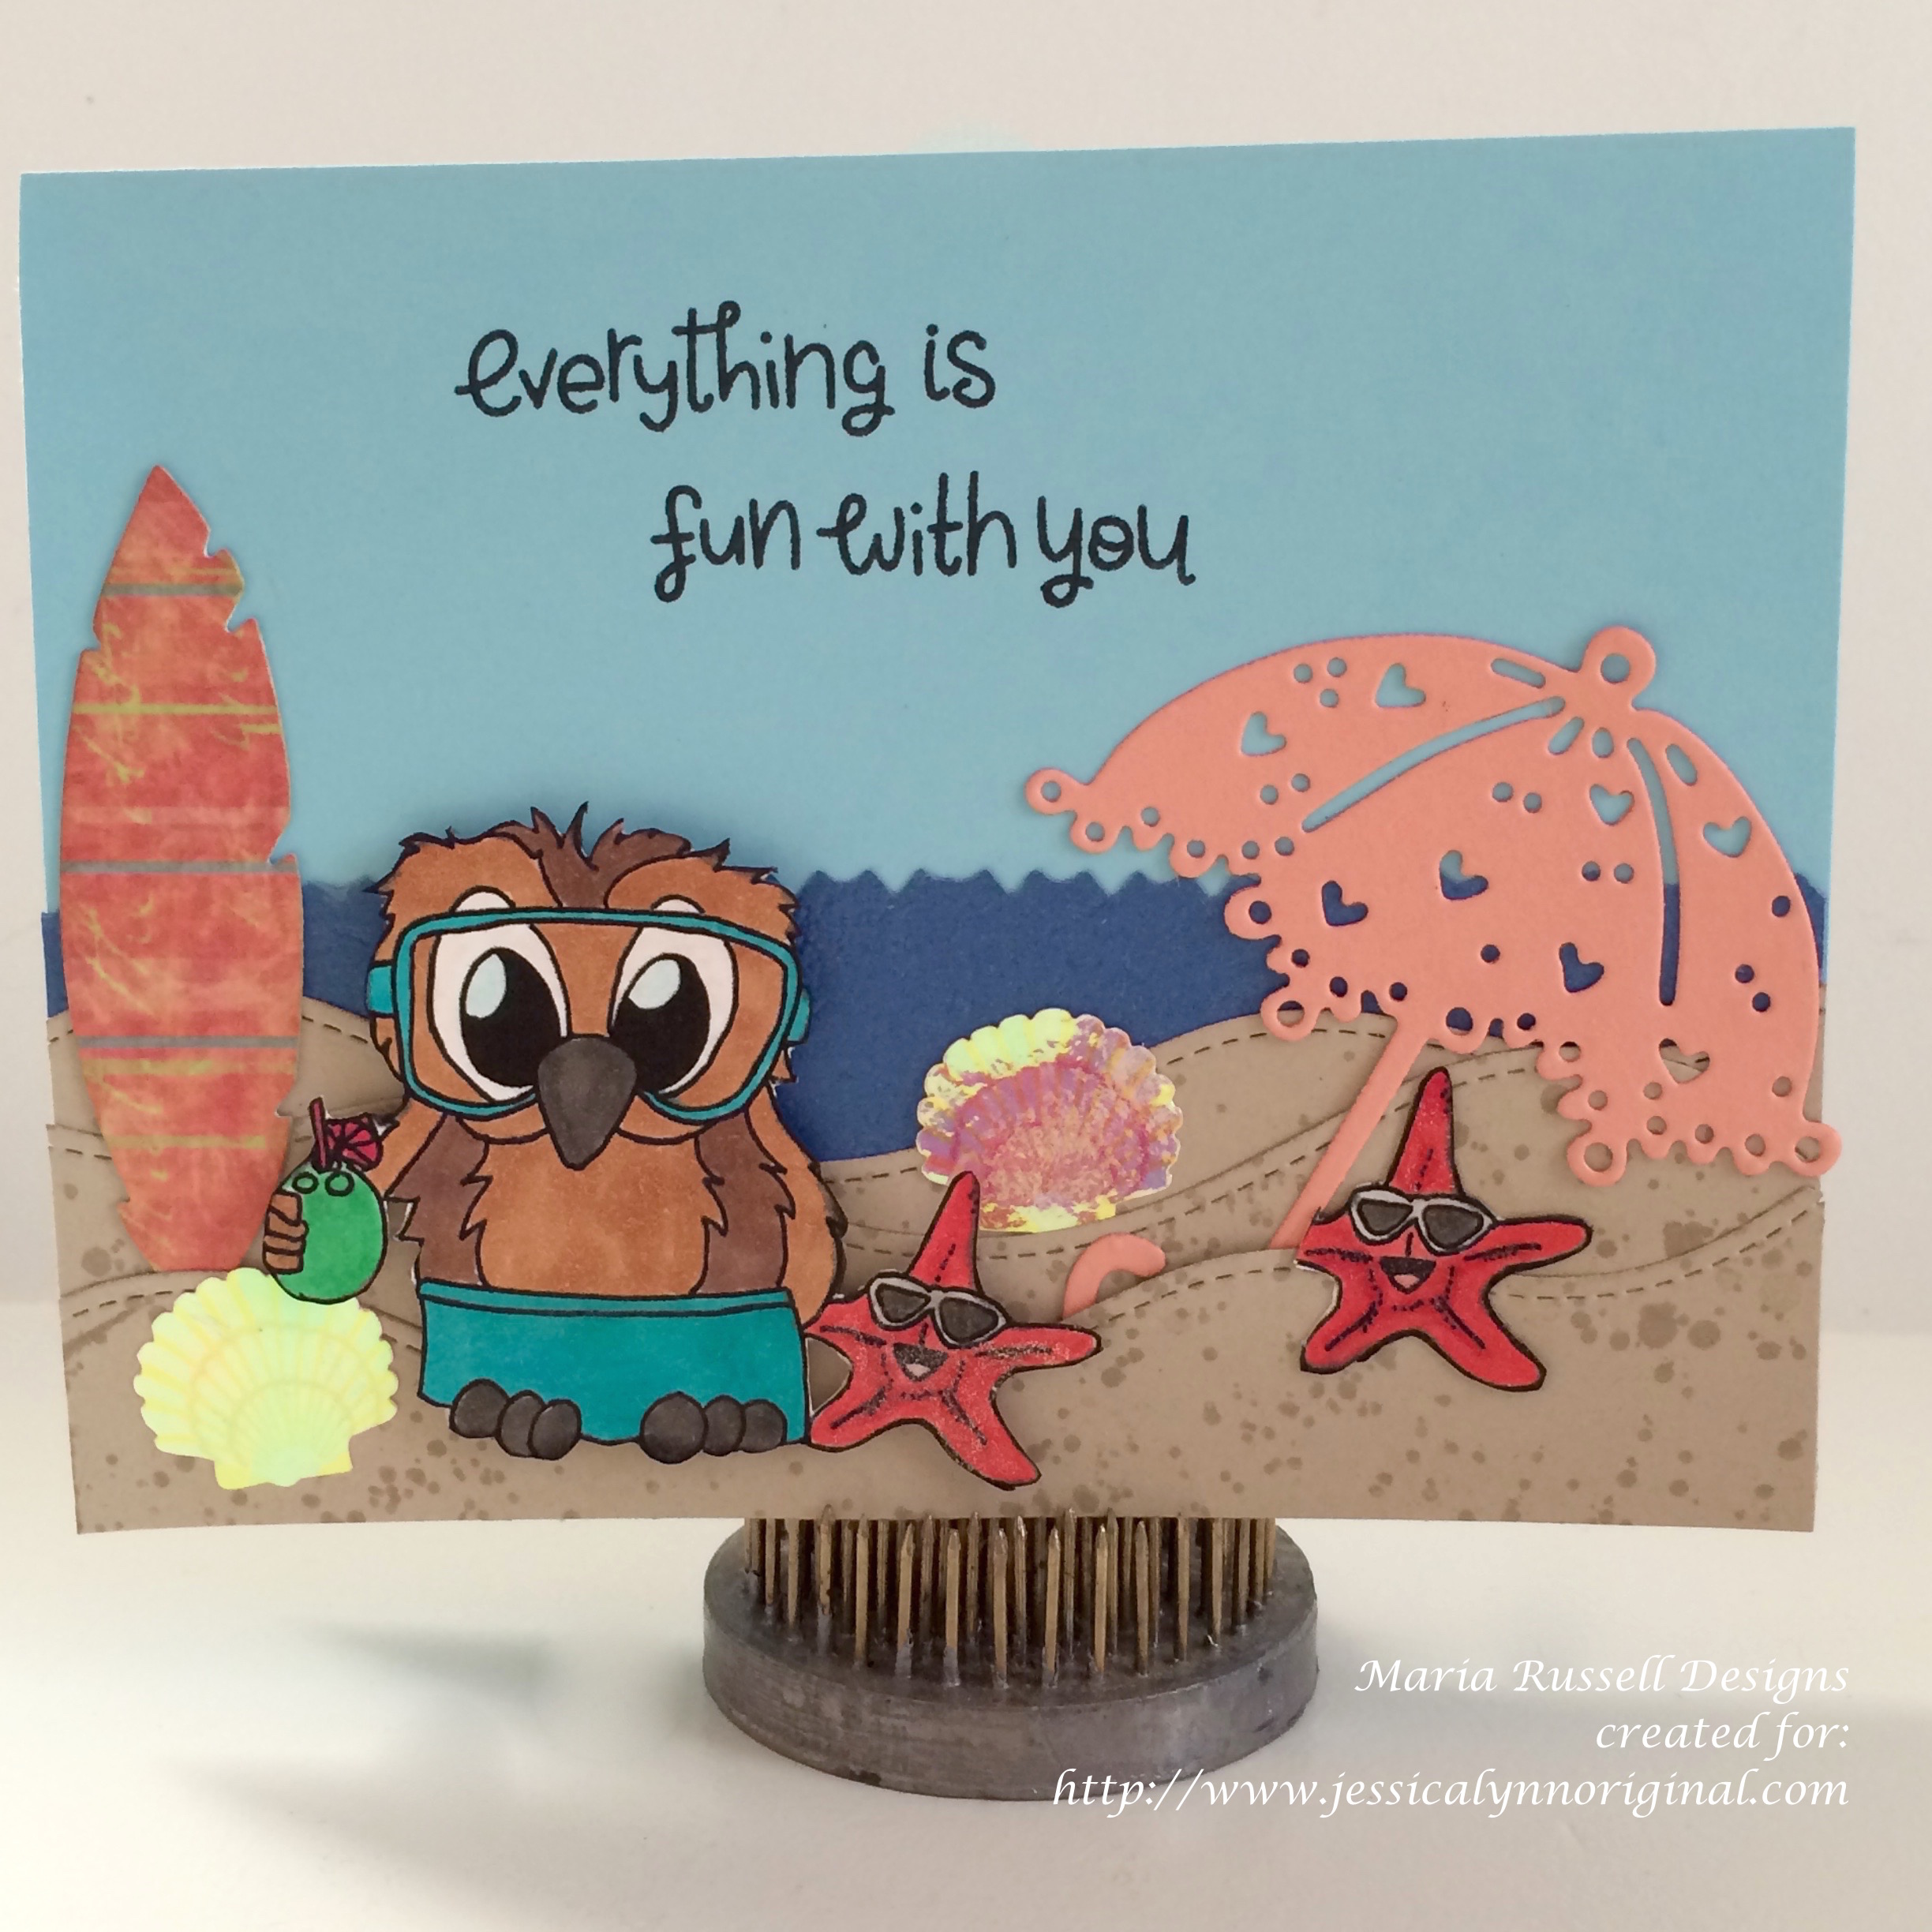
Hello and Welcome to the Start of the Summer Design Team Showcase Blog Hop created by the JessicaLynnOriginal June 2015 – January 2016 Design Team! I am pleased to announce that I am one of the designers for JessicaLynnOriginal.Com.
Today we are featuring projects using the Brentwood at the Beach Digi Stamp that really showcase and introduce our talented design team members! This fun stamp captures that summer vacation and can be used in many ways. This card kind of reminds me of my son when we were on a holiday in The Maldives. He loves surfing and scuba diving but most importantly, he loves to just hang out by the shore, collect shells and play with hermit crabs. Put your feet up and grab a cool drink to sip as you travel along the hop, getting inspired by the different takes from each of our designers. If you are coming from Jessica’s blog, then you’re in the right place.
Here is the card:
If you’d like to see a video on how I created this card please watch it here:
Brentwood at the Beach Digital Stamp
Card base – Light Blue Card Stock (8 1/2 by 5 1/2, scored at 4 1/4)
Dark Blue Card Stock – 4 1/4 by 5 1/2 to create the water background
Tan Colored Card Stock – Used to die-cut and create the “Sand”
Designer Series Paper – Used to cut the Surf Board
Orange Card Stock – used to die-cut the umbrella
Dies – Umbrella Die, Stitched hillside border die, feather framelits
Copic Markers Used for the Owl ~ E25 and E35 blended with Dark Chocolate Brown Alcohol Marker (main body). I also used R000 and B00 for the eyes.
The shorts were colored using Coastal Cabana Alcohol Markers.
Copic Markers Used for the Starfish – R24 and R29
Copic Marker Used for the Coconut – G05
Hologram Shell Stickers
Win a prize! Please let me know what you think in the comments below. Comment on each of the blogs in the hop and you will be eligible to win a $25 gift certificate towards anything at JessicaLynnOriginal.com! After the hop, Jessica will randomly select a winner and announce the lucky person on her blog on Sunday, May 24th. Here is the link to Jessica’s Blog ~ http://jessicalynnoriginalstamps.blogspot.com.
I have created this card for Mother’s Day. Unfortunately, I was not able to post it here on my Blog because my hubby and I traveled back home to Orlando to see our family, and move our daughter out of her dorm. It has been a busy month of May so far for me. I apologize for neglecting this Blog but I promise to post more regularly from now on.
This card is perfect not only for Mother’s Day but for any occasion. I hope that you will give it a try. I would love to hear from you if you did.
This is a very easy tutorial to follow to create 2 box cards out of one 8 ½ x 11 card stock:
Materials Used:
One cardstock (8 ½ x 11) cut in half measuring 5 ½ x 8 1/2
2 pieces – Designer Series paper – cut at 1 ¾ X 5 ¼
6 pieces – Designer Series paper – cut at 1 ¾ X 2 ½
3 pieces – card stock cut at 3 X 1 ¼ (these pieces will go in the middle of your box card to hold the embellishments
Optional ~ 3 pieces of card stock cut at 2 inches wide using a decorative die or deco punch
Acetate sheets
Stickers and other ephemeras to decorate your box card
Double-sided tape or Tombow Glue
Mini Glue Dots
I am so happy to be chosen as one of the many talented monthly contributors for Diecut Crazy Magazine and this screen panel card below, is my first project submission. Our theme for the month of July is “Summer”. I have to admit that I was just a bit perplexed. I didn’t have any stamp sets with a summer theme. The majority of my dies are for Halloween, fall, Christmas and spring. I had to look back at some of my past projects and for some reason I couldn’t find any inspiration that would perfectly describe summer.
In my opinion, summer is all about spending quality time with my husband and kids, traveling around, barbecues, loving the longer daylight, playing with pinwheels, kites, picking flowers, bird-watching and just generally enjoying the great outdoors! So I decided to capture these moments and showcase it through this Screen/Panel Card. The sentiment that I used for this card is exactly what summer is all about ~ it doesn’t have to be perfect to be WONDERFUL!
Supplies and Tools I used:
Screen/Panel Card – 6 x 12 Card Stock (on the 12-inch side, score at 3 inches, 6 and 9). This will create the screen.
All Four Panels (Card Stock)
Bottom Layer: 2 3/4″ x 4 1/2″
Middle Layer: 2 1/2″ x 4 1/4″
Top Layer: 2 1/4″ x 4″
Stamp Sets – Perfect Pennants Stamp set, For the Birds Stamp set, Sweetie Pie Stamp set
Pinwheel sizzlit die
Decorative Punch (I used this punch to create the “legs” of the screen)
Petite petals punch
Banner Punch
Spellbinders Cherry Blossom Die
Fanciful Wings embosslits
Banners Framelits Dies
Grass Die (taken from the Garden Bench Pop it Ups Die)
Rhinestones
Brown Embossing Powder
Copic Markers
Bahama Breeze Memento Ink
Victorian Velvet Distress Ink
Xyron Sticker Maker (I used this to adhere the branch and grass die cuts to my project ~ it makes my life a lot easier!)
Glue dots and stampin dimensionals
Spring is already in full bloom where I am and in fact, it is already getting hot over here. I know some of you are still experiencing snow and hoping that it’ll be over soon. Maybe crafting is the best way to deal with snow days. So here is a little cute project that I hope will cheer you all up.
I don’t have the mini milk carton die from Stampin Up. I saw this tutorial by Sam of PootlesPapercraft and I was just so thrilled since I didn’t have to purchase the die to make these boxes. She made hers as a treat holder but I wanted mine to look like a bird house and make it as a home decor. So I added the roof, and the tea light. Thank you Sam for this inspiration and for giving us the measurements. I tried to make this video as short as possible so some of the boring scenes have been fast-forwarded for your benefit.
Mini Milk Carton:
Baked Brown Sugar Cardstock – 8 1/4 x 5 1/2″
Score on the 8 ¼ side at 1 7/8, 3 3/4, 5 5/8, 7 1/2″
Score on the 5 1/2 side at 1 7/8, 3 3/4, 5″
Roof:
Chocolate Chip Cardstock – 1 7/8 by 5 (embossed using the textured arrow embossing folder)
This project was inspired by a fellow Demonstrator, France Martin. In this video, I will also show you an alternative way if you don’t have the Adorning Accents edgelits to create the “crack” on the egg.
Materials used:
Whisper White Card Stock — Item No. 100730
Sweet Sorbet Designer Series Paper (free from sale-a-bration)
Oval Framelits Die — Item No. 129381
Adorning Accents Edgelits — Item No. 125595
Bird Builder Punch — Item No. 117191
Word Window punch — Item No. 119857
Modern Label Punch — item no. 119849
Pansy Punch and Flower Shop Stamp Set — you can get this in a bundle for 15% off — item no. 132726
Petite Petals Punch and Stamp set — Item No. 133322
Mini Brad — Item No. 122941
Mini Glue Dots — Item No. 103683
Tombox multi-purpose glue — Item No. 110755
Dimensionals – Item No. 104430
Blue rhinestones (non-Stampin Up product)
Express Yourself — Hostess Stamp Set — Item No. 130339
Scissors
Paper Trimmer
I hope you enjoyed this video. If you have any questions, please feel free to send me a message.. Craft with your loved ones and create some memories.