2018 Stamping for Autism Awareness Blog Hop

Autism Awareness Blog Hop Image

Today the Newton’s Nook Designs Team is proud to be hopping along for the 2018 Stamping for Autism Awareness Blog hop!

We are joining Veronica Zalis and tons of other amazing stampers to help raise autism awareness!  We hope you will help us spread the word and follow along with us.  There are going to be TONS of fun prizes too – including a $25 store credit from Newton’s Nook Designs!  To learn more about this hop and see a complete list of sponsors and prizes, please visit this blog post by Veronica Zalis here.

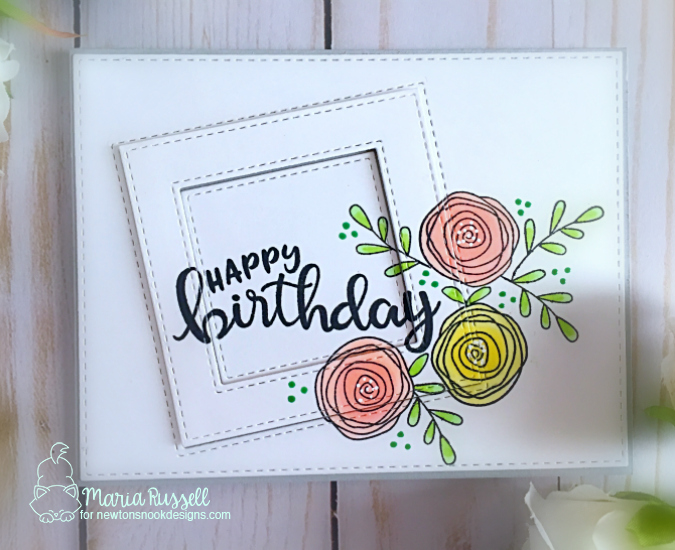
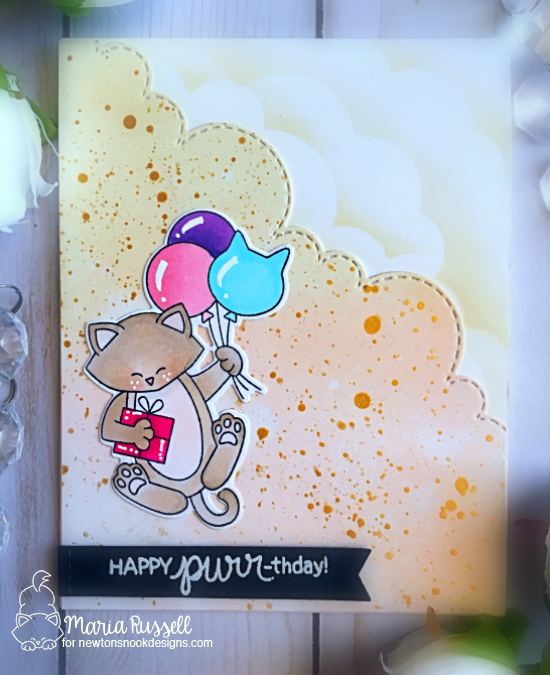
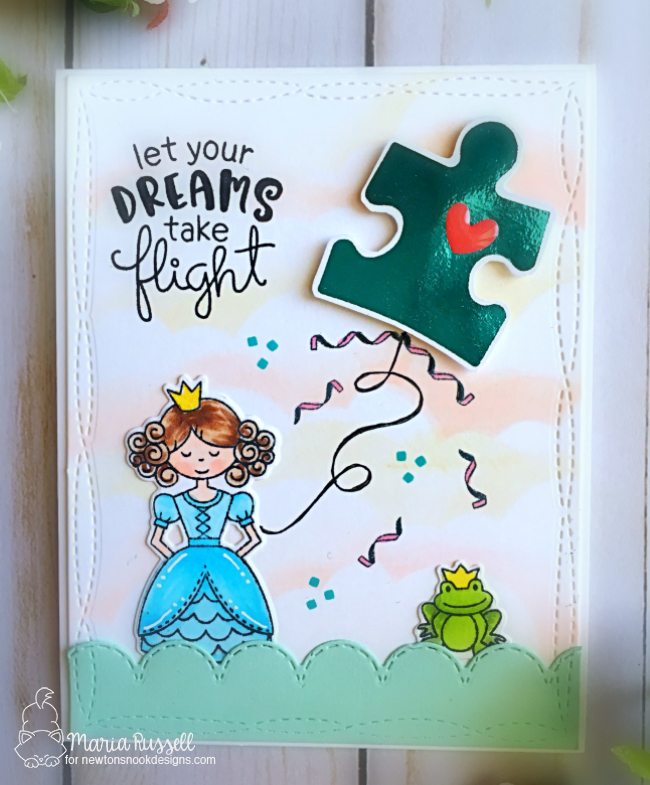
For my project below, I am showcasing the Once Upon a Princess stamp set with the Uplifting Wishes stamp set.   I also used the blue foil by Therm-O-Web.

I started out by searching Autism awareness images on google.  I found the one that looked like a puzzle piece in black.  I saved the image in my computer and printed it out on Neenah 80 lb. card stock using my laser printer.   Since blue is the color for Autism Awareness, I wanted to foil this piece and make it look like a balloon.  I run it through my laminating machine with the foil.


I stamped my Princess and the little frog prince with Memento Tuxedo black ink and colored them in with my Copic markers. I die-cut the images using the coordinating dies.

I cut a 4 1/4 X 5 1/2 piece of Bristol smooth white card stock and used my handmade stencil using the Sky border dies to create my sky.  Since I am already using too much blue in this card, I wanted the sky to look different and sort of ethereal.  I used my Antique Linen and Tattered Rose distress Oxides for the sky.  I die-cut a piece of mint green card stock for the grass using the sky border dies as well.  I drew the balloon and confetti strings with my Micron Pens.  I finished the design by adding a heart enamel sticker on the puzzle and stamped my sentiment.

NNDAutism1

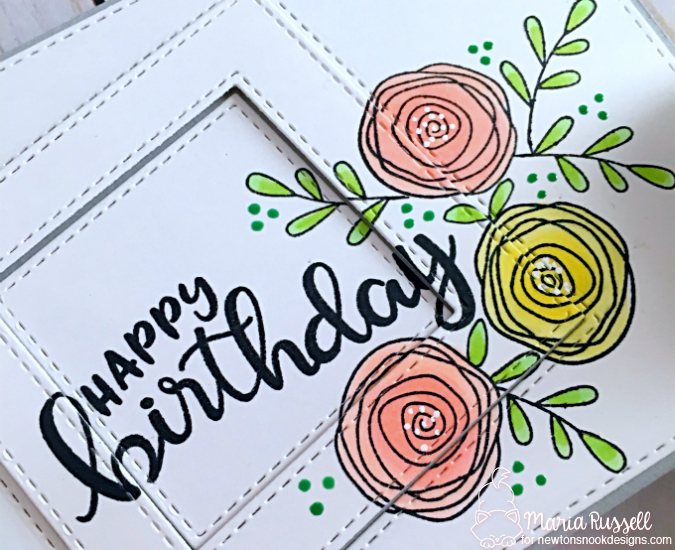
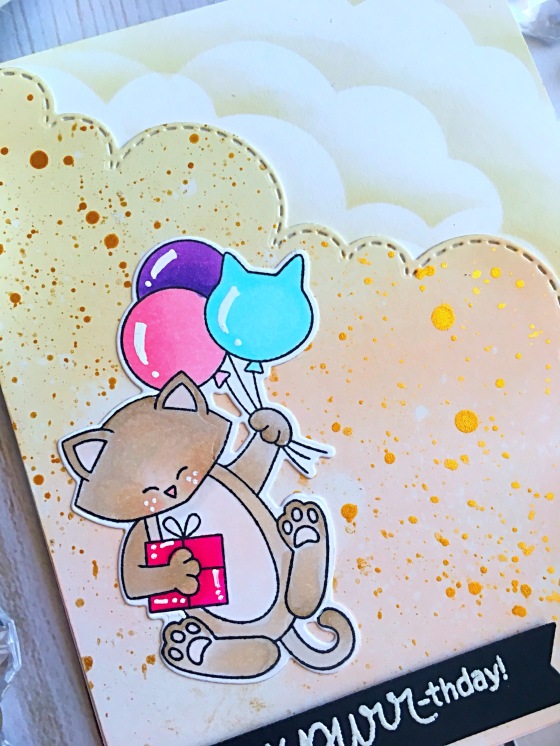
Here’s a little close-up:

NNDAutism1A

I just love the simplicity of this card!  I hope you got inspired today.  I have also listed and linked the supplies I used below.

Would you like to win a $25 store credit to Newton’s Nook Designs Online Shop?

Here’s how to win: To win this bonus prize, comment on the NND blog and Design Team blogs (see list below)!  The winner will be chosen at random from the posts linked below.  Make sure to check out each of their blogs and comment for your chance to win.  You will not know which blog has been chosen so the more you comment on the better your chances are of winning!  You have until Sunday April 8th at 11:55 pm EST to comment  —  winners will be announced on the blog post on Tuesday April 10th. 


—————-SUPPLIES—————


Colorful Shaker Cards with Paper House Productions & Spiegelmom Scraps

Hello my crafty friends.  I hope you are all having a great day!  I am super excited because this week, the Paper House Productions design team is teaming up with Spiegelmom Scraps.  We have received some colorful sequin mixes from Spiegelmom Scraps and I thought I would make two shaker cards, showcasing the sequin mixes and some beautiful faux Enamel and Puffy Stickers from the Paper House Productions.

I have a YouTube process video for you guys today so please click on the link below if you’d like to see it.

For my first card, I used the Party Puffy stickers, the Puffy Numbered Candles stickers and the Rainbow Bright sequin mix, with some items that I already have from my collection.

PHPSMSCard1

Here’s a close-up:

PHPSMSCard1A

For my second card, I wanted to create an underwater scene with the Mystical Mermaid Faux Enamel stickers and of course the colorful sequin mix from Spiegelmom Scraps.  If you watch my YouTube process video, you will be able to see how I created this scene.

PHPSMSCard2

PHPSMSCard2A

Please click on the link below to see my process video.  I hope you will also consider subscribing to my YouTube channel if you haven’t done so yet.  Which one is your favorite?   I hope you got inspired today.  I have listed and linked the supplies I used below.  Have a wonderful day!

————–Supplies———-

I Put My Faith To You O’Lord

Hello my crafty friends! I hope you all had an amazing weekend!  I’m back today with a very special card. It is the start of the Holy Week and this is the perfect time to reflect.   Don’t get me wrong; this isn’t the only time to show our faith. I think everyday we open our eyes, we should start thanking the Lord for all the blessings that we have in our lives. I’ve always been religious in my own way. However, I am not going to go into all the details of what I do to show my faith.

Today’s card features a stamp set that is very new to me. I was searching for a stained glass stamp set because I have this design that I’ve had in my head for a card. I found the perfect stamp set through YouTube. This stamp set is called Layered Stained Glass by Maymay Made It.

I started out by stamping the image on Neenah solar white card stock with Memento Tuxedo Black Ink. Then I stamped the layers using Ballet Slippers, Minty Fresh and Fresh Lavender inks by Lawn Fawn with my Tim Holtz stamp platform.

I used a die from my stash to create the mantelpiece and also used a leaf punch to cut the greenery. To finish my design, I used my “Faith” die from Simon Says Stamp and also stamped the sentiment “Therefore, do not worry about tomorrow, for tomorrow will worry about itself”. Here’s the card:


IMG_7614


I absolutely love this scripture!   Here’s a little close-up below!  Can you see the details on the mantelpiece?  I embossed it with my embossing folder to make it look like concrete.  I have visited a LOT of churches in Europe and it is spot on!

FaithCard1A


I wanted to add glossy accents to make it look like real glass so I’ll probably add it later on.  For now, here’s the card:

FaithCard

I hope you got inspired today.  I have listed and linked the supplies I used below.  Have a great holy week!

—————SUPPLIES—————


Clean and Simple Cards with Punny Snacks Stamp Set

Last week, I talked to a crafty friend and she told me that she was so sad because the card she gave to a co-worker was thrown out.  She said that she has put so much work and effort on making the card and she was expecting the co-worker to appreciate it and at least keep it!  I know how she feels!  Which is why sometimes, you just need to work on clean and simple cards to give out to other people.  I only really give my “special cards”  to friends and family who I know will appreciate them a lot.


For todays card, I am showcasing the Punny Snacks stamp set, with Wonky Wavy Stitched Rectangle Dies and a bunch of other supplies available at the shop.


The Punny Snacks stamp set is perfect to create some clean and simple cards.  Don’t get me wrong, I also used this stamp set to make some very elaborate (special) cards but these images are so cute and simple and you can even create just a one-layer card.  It’s good to have a bunch of these cards in your stash for “just-because” kind of days.


I have a process video for you below.  I hope this inspired you to create some clean and simple cards!   I also listed and linked the supplies I used below.  Have a wonderful day!


Here’s the process video:

Here are the cards:

KatScrapPunny5

KatScrapPunny6

KatScrapPunny7

——————-SUPPLIES—————–


Big Wishes Because You’re Worth It!

Hello Newton’s Nook fans!  I don’t know about you but I seem to be always running out of birthday cards!  If you haven’t seen all of the new stamps and dies from last week’s March release, I think you should head on over to the Newton’s Nook online store to check out all of the amazing birthday-themed stamps, coordinating dies and stencils.

For my project today, I am showcasing the Newton’s Birthday Balloons stamp set and coordinating dies the Holding Happiness stamp set,  the Sky Borders die,  the Pines and Holly die set and the Newton Dreams of Paris stamp set.

I started out by stamping my image on Neenah solar white and colored it with my Copic markers.  I die-cut the image with the coordinating die.

I used my handmade Sky Borders stencil and my distress oxide inks to color a piece of Bristol smooth card stock to create my pastel clouds background.  This is a really simple card but I love how it turned out.

IMG_7534

I finished my design by stamping the sentiment with Versafine Black Onyx ink and added the white bow from the Pines and Holly die set.   I also added the hearts from the Newton Dreams of Paris stamp set.

Here’s my card:

NNDNewton'sBdayBalloons2

A little closeup:

NNDNewtonsBdayBalloons2A

Don’t you just love this stamp set?  I love that I can mix and match my stamps to create my scene for my cards.  I hope you like it and got inspired today.  I have listed and linked the supplies I used below.  Have a great week!

—————SUPPLIES————–


NND March Release – Birthday Essentials Stamp Set

NNDReleaseIconMarch18

I’m kind of a bit bummed because it is the last day of the March reveals by Newton’s Nook Designs.  Today is also your last opportunity to leave comments on the DT’s blogs for a chance to win each stamp set during release week.  Please check out the details I have indicated at the end of this blog post.  [Just a little important note:  I know some of you had difficulties finding the comments section.  If you would like to leave a comment to participate in the giveaway, the “comments section” will only be ever visible when a single post on WordPress is being viewed. Please click on this particular blog post and you will be able to leave a comment below.  Thank you!]  


For my cards today, I am showcasing the Birthday Essentials stamp set, Newton’s Sweetheart stamp set and coordinating dies with the Bubbly stencil and the Lovely Blooms stamp set.  Here’s what the Birthday Essentials stamp set looks like and the Bubbly stencil.

For my first project, I wanted to make a first wedding anniversary card for a friend of mine.  She and her husband are cat-lovers as well so I thought the Newton’s Sweetheart stamp set would be perfect for this.  I started by coloring the images with my Copic markers and used the coordinating die to die-cut the piece.


On a 4 1/4 x 5 1/2 piece of smooth white card stock, I used the Bubbly stencil to add some color to my background, with some distress oxide inks and my sponge dauber.  I also hit embossed the sentiment on black card stock with white embossing powder.  I finished the design by adding glossy accents to the bubbles.  Here’s my first card:

NNDBdayEssentials1


For my second card, I wanted to do a simple Happy Birthday card.  I stamped my images onto Neenah solar white card stock and colored them in with my Copic markers.  I also stamped my sentiment with my Versafine Black Onyx ink.  I used a Double-stitched Square rectangle die by Kat Scrappiness to die cut a portion of my card front.  I adhered it back with foam adhesive to give it some dimension.  To finish my design, I added some green and white dots.  Here’s my second card:


NNDBdayEssentials2


Here’s a close-up:

NNDBdayEssentials2A


Did you get inspired this week by all of the amazing projects by the design team?  I did!  I am so honored to be working with these beautiful and very talented ladies!


Would you like to win the “Birthday Essentials” Stamp Set?  This stamp set will be given away to ONE lucky winner!


Here’s how to win:


Comment on the NND blog and Design Team blogs (see list below)!  The winner will be chosen at random from the collective reveal posts.  Make sure to check out each of their blogs and comment for your chance to win.  You will not know which blog has been chosen so the more you comment on the better your chances are of winning! You have until Thursday, March 15th, at 9pm EST to comment  — winners will be announced on the blog post on Friday, March 16th.


Check out all the awesome Design Team Blogs below to enter:

Newton’s Nook Designs

Amanda Bodine

Holly Endress

Ellen Haxelmans

Larissa Heskett

Samantha Mann

Juliana Michaels

Naki Rager

Maria Russell

Jennifer Timko

Tatiana Trafimovich

———-SUPPLIES———-


Easter Peeps with Kat Scrappiness

Hello my crafty peeps! (pun intended! haha!)  I am back today to share with you some fun Easter cards, showcasing the Stitched Easter Bunny outline dies, the Never-ending Circle dies, Brush Script Happy Easter die, Fancy Scalloped Stitched Border dies, and a bunch of other supplies available at the shop.

I started out by die-cutting my bunnies with different colored card stocks.  For one of the bunnies, I adhered some googly-eyes and drew the mouth with my black Copic multi-liner pen.  I colored the cheeks and the ears with my R00 Copic marker.

I die-cut a piece of Bristol smooth white card stock and inked the background with Tattered Rose and Worn Lipstick distress oxide, using my mini-ink blending tool.  I sprayed the background with water to give it a distress look.  I used the Fancy Scalloped Stitched Border dies to give my card stock a decorative edge.  I die-cut another piece in light blue to layer it together.  I adhered this piece onto my card base.

IMG_7487

I die-cut another piece of white card stock using my Rectangle Stick Frame by Your Next stamp, also available at the shop, and adhered this piece on my foreground.    My stamped my sentiment using my Tim Holtz Stamping Platform.

IMG_7486

Using a mini action wobbler,  I adhered the bunny in the center of the frame.

IMG_7485

Here’s my first card:

KatScrapEasterBunny1

For my second card, I colored another piece of Bristol smooth card stock with my Broken China, Worn Lipstick and Wild Honey distress oxides.  I used the Never-Ending circle dies to cut some circles on my foreground.  I adhered this piece to my colored background with my foam tape to give it some dimension.  I adhered the cute peeps on each circle.

I finished my design by adhering some white pompoms on the bunnies, and added the script sentiment “Happy” from the Brush Script Happy Easter die and stamped the sentiment “EASTER”.  I also used my white gel pen to add some details to the script sentiment.  Here’s my second card:

KatScrapEasterBunny2

Aren’t these cards so much fun?  I love how they turned out.  I hope you got inspired today.  I have also listed and linked the supplies I used below.  Have an amazing day and happy crafting!

————SUPPLIES————-


NND March Release – Birthday Essentials Stamp Set

NNDReleaseIconMarch18

Are you loving the release so far?  It is now the 3rd day of the March reveals by Newton’s Nook Designs.  You also have a chance to win each stamp set during release week so check out the details I have indicated at the end of this blog post.  [Just a little important note:  I know some of you had difficulties finding the comments section.  If you would like to leave a comment to participate in the giveaway, the “comments section” will only be ever visible when a single post on WordPress is being viewed. Please click on this particular blog post and you will be able to leave a comment below.  Thank you!]  


For my project today, the design team is showcasing the Newton’s Birthday Balloons and the Newton’s Birthday Balloons coordinating dies.

NNDMarch18NewtonsBirthdayBalloon

As soon as I saw this stamp set, I immediately thought of creating a scene where Newton is floating up in the air with his balloons BUT I wanted the sky to look unique, than your regular blue and white!  I also pictured glitter dust, everywhere!


I started with die-cutting my 4 1/4 x 5 1/2 piece of Bristol smooth white card stock, using the Sky Borders die set.  I inked it up with Tattered Rose and Antique Linen distress oxide inks, with my mini ink blending tools.


To add the glitter dust on my background, I used my Perfect Pearls Pigment Powder in Perfect Gold and added it on a clear acrylic block with some water.  I used my watercolor brush to sprinkle the color onto the card stock.  This created some cute glittery-gold sparkle dust on my colored background.


To finish my design, I used my Clouds stencil that I created using the Sky Borders Die, and colored my card base using the Antique Linen distress oxide with my ink blending tool.  I also heat-embossed the sentiment on black card stock and added some details to the balloons with my Sharpie White paint pen.  Here’s my card:


NNDNewtonsBdayBalloons

Here’s another photo to show you the gold glitter dust:

IMG_7344


Would you like to win the “Newton’s Birthday Balloons” Stamp Set?  This stamp set will be given away to ONE lucky winner!

Here’s how to win:

Comment on the NND blog and Design Team blogs (see list below)!  The winner will be chosen at random from the collective reveal posts.  Make sure to check out each of their blogs and comment for your chance to win.  You will not know which blog has been chosen so the more you comment on the better your chances are of winning! You have until Thursday, March 15th, at 9pm EST to comment  — winners will be announced on the blog post on Friday, March 16th.

Check out all the awesome Design Team Blogs below to enter:

Newton’s Nook Designs

Amanda Bodine

Holly Endress

Ellen Haxelmans

Larissa Heskett

Samantha Mann

Juliana Michaels

Naki Rager

Maria Russell

Jennifer Timko

Tatiana Trafimovich

———-SUPPLIES———-


Super Easy Cards with Faux Enamel Stickers by Paper House

I was approached by a friend of mine the other day and she asked me if I ever made cards using stickers and I answered, “Of course! But I haven’t made one for awhile!”.  This really made me think of my early paper crafting days when I had limited supplies and didn’t really have a lot of stamps.  Since I have just received some AMAZING faux enamel stickers, I thought I’d make some easy cards.

For my project today, I am showcasing the Brunch Faux enamel sticker, the Cocktails with foil accents faux enamel sticker and the Llamas with foil accents faux enamel sticker.  I also used the marble pattern paper from the Marbleous 12×12 paper pad.

I have a process video for you today and it is linked at the end of this blog post.  Here are the cards:

PHPEnamel2

PHPEnamel3

PHPEnamel1

Here’s my process video:

Didn’t they turn out so cute?  They are so easy to make.  I really love those stickers!  I hope you got inspired today to get your creative juices flowing, even with limited supplies.  Happy crafting!

———–SUPPLIES———-