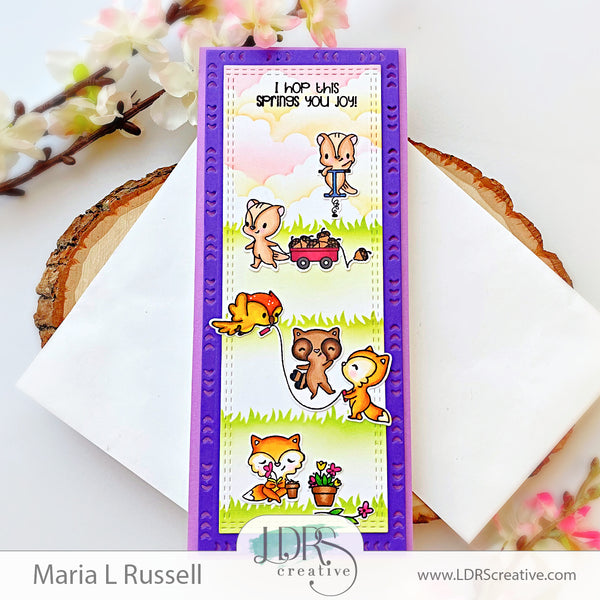
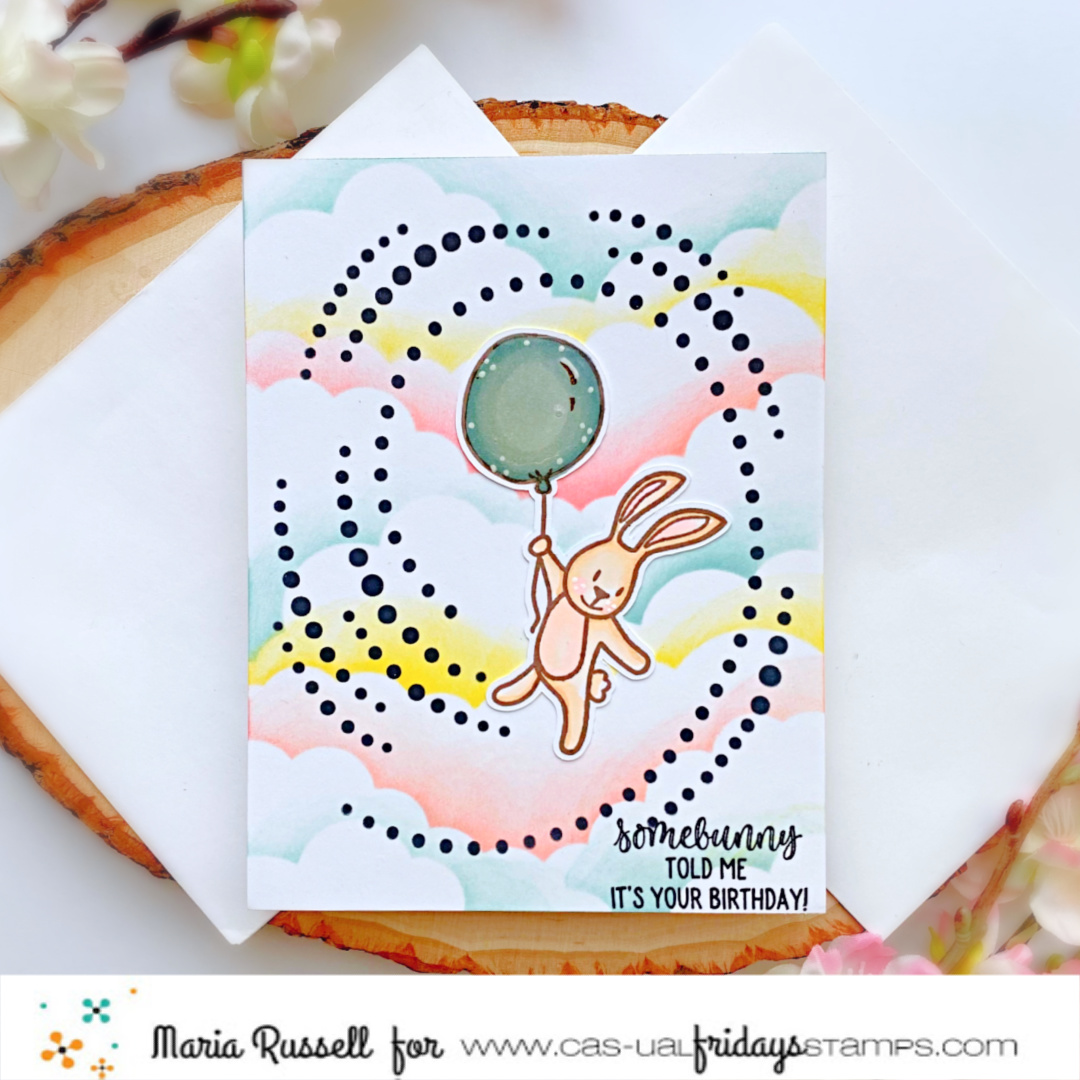
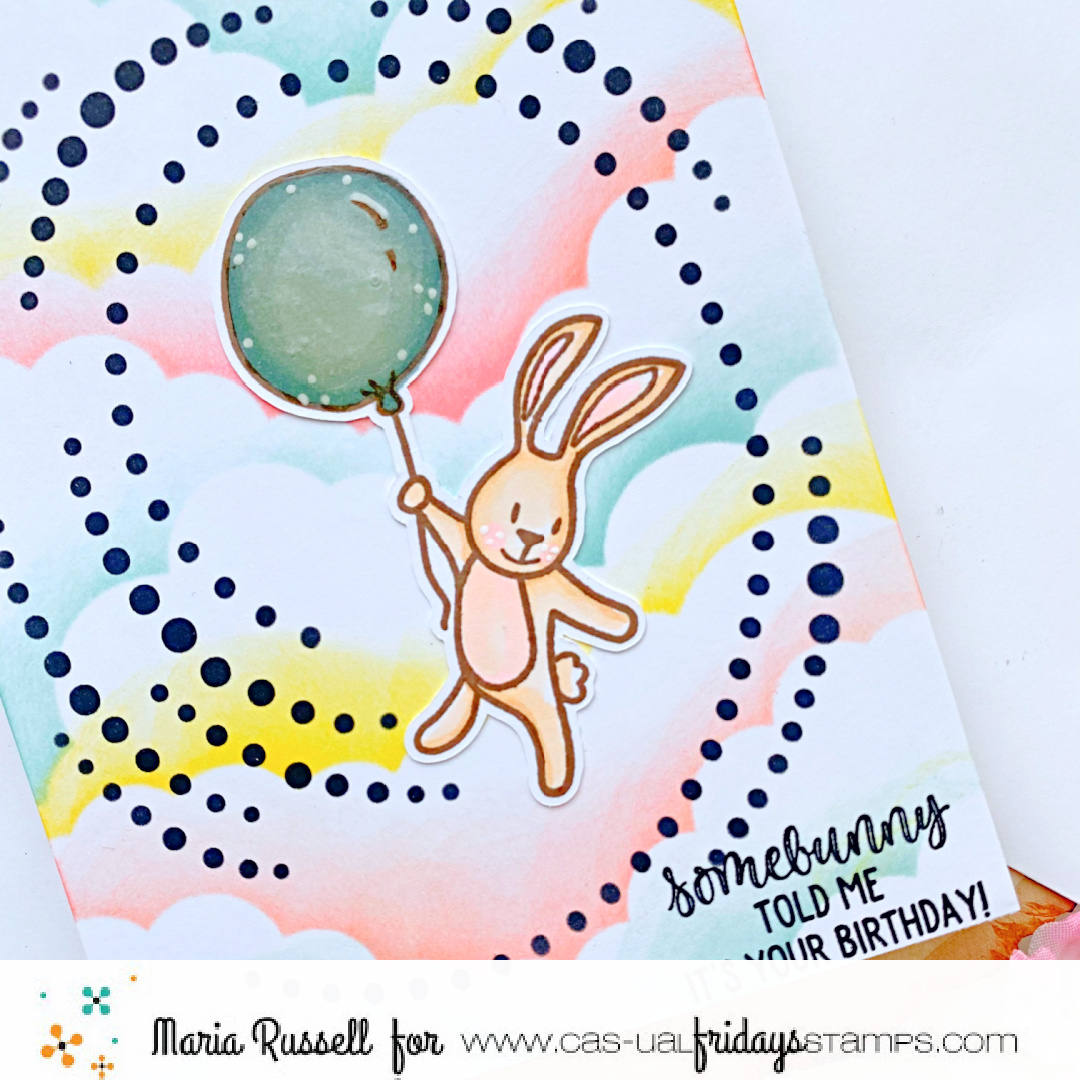
Once Upon A Time with Fairy Hugs Stamps

Hello my crafty friends! I am super excited to share my first post as a design team member of Fairy Hugs Stamper. For my card below, I am showcasing the Azalea Fairy stamp set along with the Toadstool, Fairy Branches, Moon Light 6×6 paper pad, and Once Upon stamp sets.

I started by stamping the toadstool on some Neenah solar white card stock. I also stamped the same image on some masking paper and covered the image so that I can stamp the fairy on top of the toadstool. I colored the images with my Spectrum Noir alcohol markers. I used my precision snips to fussy-cut the images.

Next, I stamped the Fairy Branches on the Moon Light 6×6 paper with Memento Tuxedo black ink. Having the paper inside my Misti stamping tool made it easier for me to stamp the images a few times. I die-cut this piece using a stitched rectangle die from my collection. I also die-cut the grass panel with some black card stock.

I adhered the focal image on the background panel with liquid glue and added the grass.

I matted the focal panel with some purple card stock and adhered this piece on some A2-size black note card.

Next, I stamped the sentiment using the Once Upon stamp set on the foreground with Versafine Onyx black ink and sprinkled some clear embossing powder. I heat-set the sentiment with my heating tool for added texture.

I finished my design by adding some white dots on the leaves using my White Gelli-roll pen and added some bokeh flat sequins for added interest. Here’s another look:

The Moon Light 6×6 paper I used was perfect for this scene! This card is so easy to put together and I really love how it turned out. I hope you like it too! Thanks for stopping by today, and Happy Easter!

———–SUPPLIES———

Just Because Floral Card with CAS-ual Fridays Stamps

Hey CAS-ual Fridays fans!  It’s finally spring, yay!  I went to the grocery store today and saw a plethora of flowers ranging from baby’s breath to tulips!  This is my inspiration for today’s card.
I started by stenciling the flower images on some Neenah Solar White Card Stock using the Terrific Flowers Stencil, with some quick dry dye inks using my mini sponge daubers.
Next, I stamped the Terrific Flowers Stamp on some iridescent Vellum Paper with Versamark ink.  I sprinkled some white embossing powder on top, then heat-set with my heating tool.  I used my precision snips to fussy-cut the image.  I adhered the vellum onto my card using some Art Glitter Glue, for added texture and interest.
I finished my design by stamping the sentiment with Versafine Onyx Black ink and added the Bokeh sequins with liquid glue.  Here’s another look:
Even though this card is very simple, I really LOVE how this turned out.  The vellum added some whimsical touch to the overall card design.
Here are the supplies:
I hope I have given you some inspiration today.  Please don’t forget to use my coupon code below for 15% off your order at the shop.

Welcome Spring Slimline Card with Newton’s Nook

Spring has sprung and I have a beautiful slimline card to share with you today, showcasing the Easter Lily stamp set and coordinating dies, along with the Slimline Frames & Portholes die set, Basket Weave stencil, Spring Roundabout stamp set, Banner Trio die set and Flower Trio die set by Newton’s Nook Designs.

To make the card, I started by stamping my images three times on some Neenah solar white card stock using Memento Rich Cocoa ink.  I colored the images in with my alcohol markers and die-cut using the coordinating dies.

Next, the scallop background was made by die-cutting the scallop card stock using the Slimline Frames & Portholes die set.  I used the Basket Weave stencil with Speckled Egg Distress Oxide ink to create a subtle pattern for my flowers for added texture.  I adhered this piece onto some pink card stock, then added to a slimline card base.

I layered the flowers and adhered them onto the card with foam and liquid adhesive for added dimension.  I also die-cut a few leaves from the Flower Trio die set and sponged some Mowed Lawn Distress Ink for added texture and detail.

I die-cut some black card stock using the Banner Trio die set.   I stamped the sentiment from the Spring Roundabout stamp set with some Versamark ink.  I sprinkled some white embossing powder then heat-set with my heating tool.  I finished my design by adding a few Clear Enamel dots for added texture.   Here’s another look:

I hope I have given you some great inspiration today to create something beautiful.  The supplies I use are listed and linked below.  Thanks for stopping by and Happy Spring!

————-SUPPLIES————-

Cas-ual Fridays March Release Day 4 – Swirls Stencil

Hello Cas-ual Fridays fans!  It’s the last day of the March release and the design team is showcasing the Swirls Stencil.


To make my card, I used a clouds stencil from my collection to ink up some Bristol Smooth white card stock using Worn Lipstick,  Mustard Seed and Speckled Egg distress oxide inks.  I stamped my image from the Somebunny Stamp set and used my precision snips to fussy-cut the image.    I used glossy accents for added texture to the balloon.  I set this aside to dry for about half an hour.


Using the new Swirls Stencil and some Black Soot Distress Ink, I used my ink blending tool to add the black dots to frame my image.  I LOVE this new stencil so much because it is so versatile and can be used in so many different ways to add details to your paper crafting projects.


Next, I adhered the image on the colored panel with liquid glue.


I finished my card design by stamping the sentiment with some Versafine Onyx black ink.  Here’s another look:


I hope you all enjoyed the new release and got inspired by the entire design team.  CAS-ual Fridays is giving away a prize bundle.  Don’t forget to leave a comment on the CAS-ual Fridays release blog post.   Winner will be announced on Saturday, March 13, 2021.


The entire release is available for purchase at the shop.  Use my coupon code below for 15% off your order.


The supplies I use are listed and linked below.  Thanks for stopping by and happy stamping!


——-SUPPLIES——-


Cas-ual Fridays March Release Day 3 – Re-release of Love Notes Stamps & Heart Notes Die Bundle

Hello Cas-ual Fridays fans!  It’s the third day of the March release and the design team is showcasing the “re-release” of the Love Notes Stamps, along with the Heart Note dies.  Here’s what they look like:


For my first card, I started by dry-embossing some Neenah solar white card stock using an embossing folder from my collection.  I die-cut the Treble Clef and Single Note using the Heart Note dies.  I adhered them on my embossed panel with some liquid glue.


The sentiment was stamped on some black card stock with Versamark ink.  I sprinkled some white embossing powder, then heat-set with my heating tool.  I added this on my card.  I finished my design by adding some confetti dots for added texture.


The second card is fairly simple.  I stamped the music note from the Love Notes Stamps on some watercolor paper with Versafine Onyx Black ink.  I sprinkled some clear embossing powder and heat-set with my heating tool.  I used my Prima Watercolor to add the colors int he background for some emboss-resist technique.


I finished my design by stamping the sentiment and adding the Cinnamon Red-Hots on the focal panel.


CAS-ual Fridays is giving away a prize bundle.  Keep checking the inspiration every day this week to qualify and leave a comment on the CAS-ual Fridays blog post for more details.   Winner will be announced on Saturday, March 13, 2021.


Also, you’ll be happy to know that the entire release is now available for purchase at the shop so you don’t have to wait to get your favorites.  Use my coupon code below for 15% off your order.


The supplies I use are listed and linked below.  Thanks for stopping by and happy stamping!


——-SUPPLIES——-


Cas-ual Fridays March Release Day 2 – Sassy Smiles Duo & Flower Burst Stencil

Hello Cas-ual Fridays fans!  It’s the second day of the March release and the design team is showcasing the Sassy Smiles Duo along with the Flowerburst Stencil.   Here’s what they look like:


To make my card, I started by die-cutting some Bristol smooth white card stock using the biggest die from the Pinked Slimline Die Set.  I inked this panel with some distress oxide inks in rainbow colors then used the Flowerburst Stencil to add more details to the background.


I added some texture to the colored panel by using the Flowerburst Stencil and some texture paste.  I set this panel aside to dry for about half an hour, and adhered on an A2-size black notecard.


Next, I stamped the sentiment on some black card stock using Versamark ink and sprinkled some white embossing powder.  I heat-set the sentiment with my heating tool and used my precision snips to cut it out and adhered on my focal panel with liquid glue.

I finished my design by die-cutting the word “Smile” using the Sassy Smiles Duo.  For added texture, I used my white gel pen to add some lines and dots on the black notecard.  Here’s another look:


CAS-ual Fridays is giving away a prize bundle.  Keep checking the inspiration every day this week to qualify and leave a comment on the CAS-ual Fridays blog post for more details.   Winner will be announced on Saturday, March 13, 2021.


You’ll be happy to know that the entire release is now available for purchase at the shop so you don’t have to wait to get your favorites.  Use my coupon code below for 15% off your order.


The supplies I use are listed and linked below.  Thanks for stopping by and happy stamping!


——-SUPPLIES——-


Cas-ual Fridays March Release Day 1 – Raindrops Duo and Scattered Showers Stencil

Hello Cas-ual Fridays fans!  It’s the first day of the March release and the design team is showcasing the Raindrops Duo stamp & die set, along with the Scattered Showers Stencil.  Here’s what they look like:

To make my card, I started by inking up the background using the  Scattered Showers Stencil on some Bristol Smooth White Card Stock with Speckled Egg and Peacock Feathers distress Oxide inks.  I adhered the panel on some A2-size note card.


The smaller clouds and lightning die-cuts were cut using the dies from the Raindrops Duo stamp & die set.   I also die-cut the bigger clouds and rainbows using dies from my collection and adhered on the focal panel with liquid and foam adhesives.


I finished my design by stamping the sentiment and colored using my alcohol markers.


CAS-ual Fridays is giving away a prize bundle.  Keep checking the inspiration every day this week to qualify and leave a comment on the CAS-ual Fridays blog post for more details.   Winner will be announced on Saturday, March 13, 2021.


Also, you’ll be happy to know that the entire release is now available for purchase at the shop so you don’t have to wait to get your favorites.  Use my coupon code below for 15% off your order.


The supplies I use are listed and linked below.  Thanks for stopping by and happy stamping!


——-SUPPLIES——-


2 Welcome Baby Cards with LDRS Creative

Hello LDRS fans! I am back on the blog with you today to share two Welcome Baby cards, showcasing the Hoppy Egg Hunt stamp set and coordinating dies, along with the Sophie Uppercase Die SetSophie Lowercase Die SetA2 Stitched Layered Card Toppers DieSlim Line Pocket Basket Weave Pocket Die SetPastel Dreams 6×6 Paper Pack, and Farmer’s Market 6×6 paper pack.  Here’s what they look like:
I started by stamping my images on some Neenah Solar White card stock with Raven Hybrid Ink.   I colored them in with alcohol markers.  I used the coordinating dies to die-cut the images.  Next, I die-cut two patterned papers from the 6×6 Pastel Dreams and 6×6 Farmer’s Market Paper Packs using the biggest die from the A2 Stitched Layered Card Toppers Die.  Both patterned papers kind of matched the alcohol markers that I used to color my focal images. I adhered both patterned papers to an A2 size notecard.
I used the scallop die from the Slim Line Pocket Basket Weave Pocket Die Set to die-cut two pieces and used the inner die with my embossing mat to emboss the middle.  I wanted to have more texture to this background without overwhelming the whole card design.  I adhered both pieces to my card using my ATG Tape Runner.  I also adhered the images on both cards.
I die-cut the word “Baby” twice using the Sophie Uppercase Die Set and Sophie Lowercase Die Set.  I used the same markers to color the die-cuts to match the little basket.  I also used a darker marker to highlight the bottom of the letters for added texture.  I adhered the letters on the card with liquid glue.
I finished my design by stamping the sentiment with Watermark Ink on some black card stock.  I sprinkled some White Embossing Powder on this and used my heating tool to heat-set the sentiment.  I fussy-cut the sentiment using my precision snips and adhered to the card using my ATG Tape Runner.  Here’s another look at both baby cards:
I hope you like my cards today.  The supplies I use are listed and linked below.  Thanks for stopping by today and happy crafting!
———-SUPPLIES———-


Happy Easter Card with Newton’s Nook Designs

Hello my crafty friends!  The weather has been so unpredictable lately and I know some of you are having some major snow storm.  I hope my colorful card today will cheer you up a little.  For today’s project, I am showcasing the Bunny Tails Stencil, Hop Into Spring Stamp Set and coordinating dies along with the Circle Frames die set, Land Border die set and Clouds Stencil.

I stamped the image on Neenah solar white card stock using Memento Rich Cocoa ink and colored the images in with alcohol markers.  I used the coordinating die to die-cut the image.

I cut another panel of Neenah solar white card stock measuring 4 1/4 x 5 1/2.  I sprayed my Bunny Stencil (#1) with Pixie Spray.  I waited for the stencil to dry a little and placed it on top of my card stock.  The pixie spray gave it some light tack so that it didn’t shift while blending the colors.  I used some low tack tape to mask-off the the lower portion of the stencil so that the colors don’t contaminate each other.  I used my blending brushes to add pink, then peach, yellow, blue and purple.  The bunny tails were added using stencil #2 with some textured paste and my palette knife for added texture and dimension.  I set this aside for about half an hour to let it dry and added foam tape at the back of the panel.

I used the “positive” die-cut to pencil the lines on my notecard.  I then used my clouds stencil and some dye ink to create the clouds.  The grass panel was die-cut using the same circle die that I used to create the window and the land border die.  I foam-mounted the focal panel onto the notecard.  I also added the grass and the bunny with some glue.  I finished my design by stamping the sentiment on some black card stock.  I sprinkled some white embossing powder and heat-set with my heating tool.  I fussy-cut the sentiment with my precision snips and adhered to the card with glue.  Here’s another look:

I hope you like my card today.  The supplies I use are listed and linked below.  Thanks for stopping by!

———–SUPPLIES———