Holiday Coffee Lovers Blog Hop ~ Barista Brentwood Owl

Who doesn’t love coffee, right?  At least I have never met anyone who doesn’t.  Jessica Lynn Original Stamps is the sponsor for the Holiday Coffee Lovers Blog Hop and since I love coffee, I decided to participate!


I am also a member of JLO’s Design Team and I am so excited to use this adorable new stamp called “Barista Brentwood Owl”.  If you love this image, you have two ways to get it.  First, you can click on this link to download your free image (only available for this blog hop) http://www.jessicalynnoriginal.com/jessicalynnoriginal-coms-barista-brentwood-owl-digital-rubber-stamp/.   Second option, this stamp is also available for purchase at www.jessicalynnoriginal.com if you prefer to have your own photopolymer stamp.


For this blog hop, Jessica is also giving away an electronic $20 gift certificate at her website.  This certificate is valid for a year from the date of issue.  The blog hop owners will choose a random winner so please click on the link below to find out more information and to see all the amazing cards created by the participants on this hop: http://coffeelovingcardmakers.com


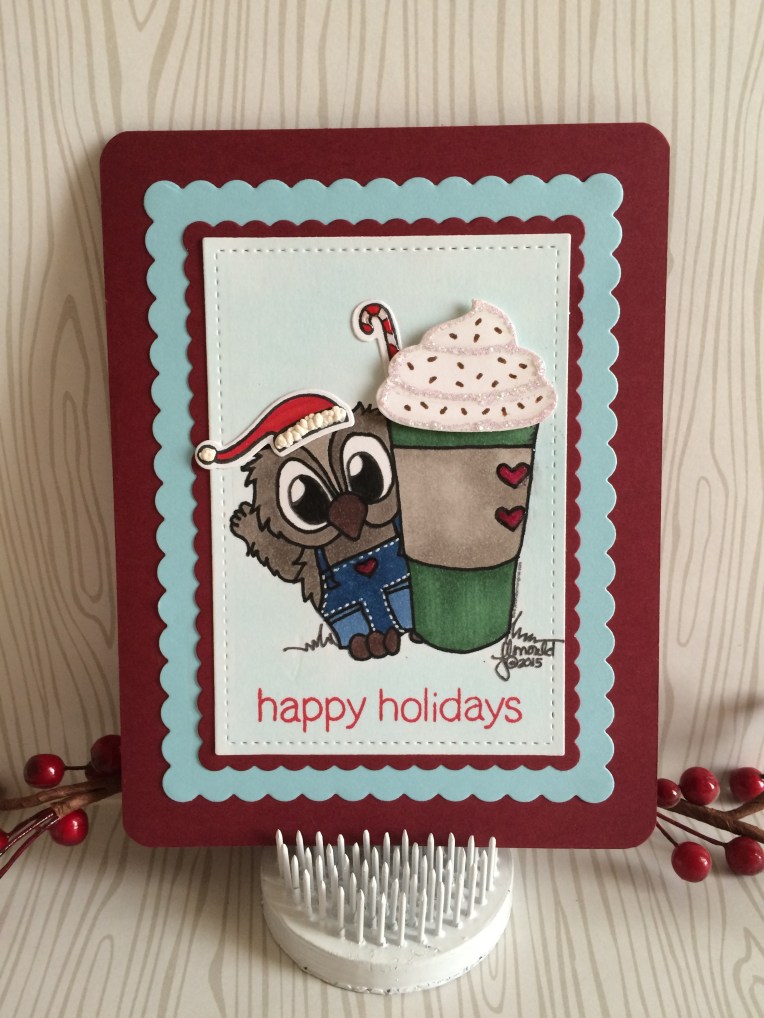
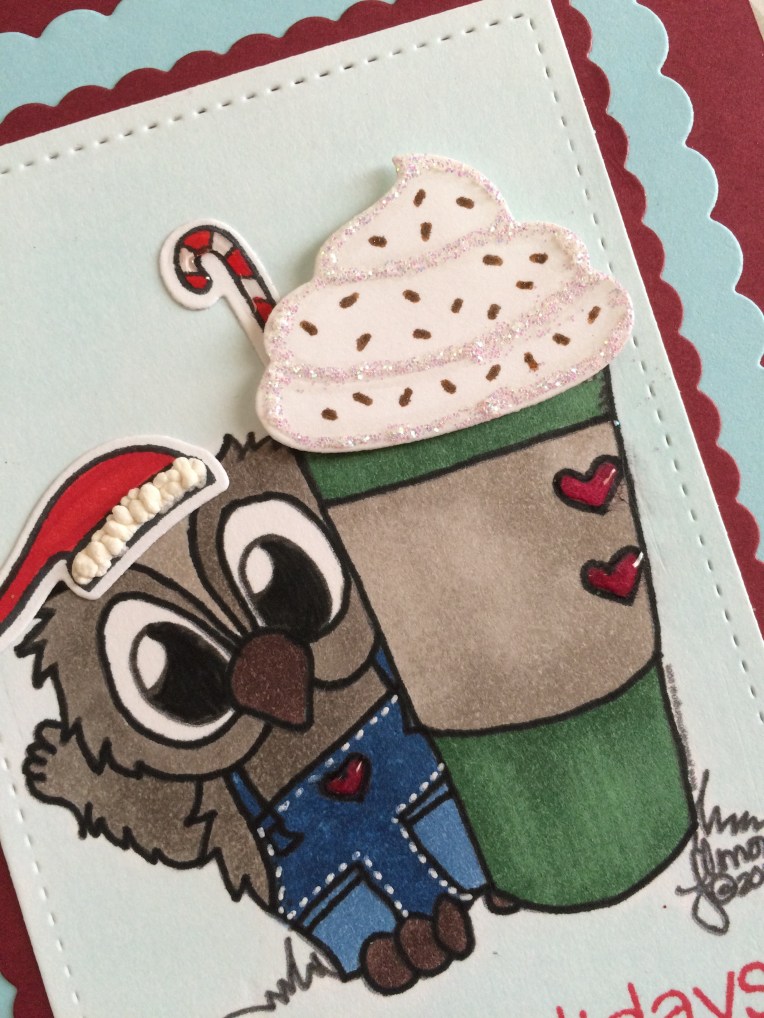
For my card, I used the digital version of this stamp.  I colored this cute image using my Copic markers, and dressed up Barista Brentwood with a Santa hat to make him festive!  I also decided to use one of my dies to create the whip cream on top, highlighted it with Crystal stickles and I used my Wink of Stella Brown Glitter Dust Pen to create the chocolate shavings for the cream.   I also used liquid appliqué to dress up the Santa hat and glossy accents for the candy cane and hearts.  Here are the photos:

IMG_9236
Created by Maria Russell for http://www.jessicalynnoriginal.com
IMG_9237
Created by Maria Russell for http://www.jessicalynnoriginal.com

Thank you so much for checking out my Blog and I hope you all have an amazing day! Happy holidays!


Handmade Holiday Series ~ #1

I wanted to do a December Daily but due to travel commitments and my children arriving for the holidays, I decided to create this series.  I will be posting videos on my You Tube channel with handmade projects that you can create, whether it is card making related or DIY projects that you can give as gifts this holiday season.  Here are the photos and I have also linked my youtube video below.

Happy crafting!

IMG_9205
Bird House Tea Light holder or Christmas Ornament by Maria Russell

IMG_9199IMG_9200IMG_9198

Birthday Party Favor Boxes & Invitation with Tombow USA

I am fortunate enough to be one of the finalist for Tombow USA Design Team for 2016.  We were asked to create a project that is not holiday specific using a bright color palette.  I immediately thought of this project that I have been meaning to do since I got my stamps and dies last summer.  I decided to create a birthday party-themed project.  Here are the materials that I have used:

Materials:

Birthday party favor kit from Stampin Up to create the faux cake boxes (or Card stock and sweetie pie framelits from Stampin up). Note: You have a choice between using the project kit or use the dies to create the boxes. I opted to use the kit to have a two-layer faux cake.

Paper straws (to use for the diecut candle pieces)

Tombow Mono Dual brush pens

Tombow mono liquid glue

Tombow Foam adhesive

A2 size card stock

Party invitation stamp

Balloon framelits

Step by step instruction for the birthday party kit and birthday invitation:

Instructions for the party favor boxes:

  1. Die-cut the pieces using the sweetie pie framelits or purchase the birthday party kit from Stampin Up, with the coordinating stamps.
  2. Stamp the coordinating boxes using the stamps.
  3. Assemble the boxes. For 3D projects, especially boxes, use Tombow mono-liquid glue. It is the best glue to give you time to work on your project before it bonds permanently.
  4. Use tombow dual brush pens to color the back of the boxes to make it look like icing. Set the boxes aside.
  5. Either die-cut the candle using the framelits or use the candle pieces from the kit.
  6. Cut the paper straws to fit the die-cut candle pieces.
  7. Use the tombow glue to adhere the candle pieces on top of the boxes.
  8. Assemble the cake stand using some hot glue.
  9. Arrange the boxes on top of the cake stand.

Party invitation:

  1. Stamp the images on an A2 size card stock to create the party invitation.
  2. Die cut the balloons using your framelits.
  3. Using the Tombow dual brush pens, color the balloon strings and adhere the die-cut piece inside the party invitation using Tombow foam adhesive.


Here are the photos:

IMG_9103
Created by Maria Russell
IMG_9101
Created by Maria Russell
DSC03312
Party Invitation (Outside)
DSC03313
Party Invitation (Inside)

If you like watching videos, I have posted this project as well on my YouTube channel.  Here is the link below:

Hope you all had a great Thanksgiving and I am looking forward to creating more Christmas projects in the next few days. Happy crafting!


Black Friday Weekend~Herding Dog Stamps

I am still away as I write this Blog post but I am so excited to share the cards I created for this Blog hop. I am a dog lover. I also grew up with German Shepherds; they hold a special place in my heart. They are the most loving, protective, faithful companions in the whole world.


This first card reminded me of my childhood dog named Snooky. I kept this card simple.

jlodog1

The second card is a bit funny! I wanted to create simple cards and just highlight the dog images on this stamp set. They are just beautiful.

jlodog3

The third card is my favorite. It is a Christmas shaker card. It is finally officially appropriate to decorate for Christmas after Thanksgiving so I can’t wait to get back home and start decorating my home.

jlodog2

This is a blog hop and Jessica Lynn Original is having a HUGE Black Friday sale, specials on Brentwood packs. Please do not forget to check out www.jessicalynnoriginal.com to avail the sales. I am the last person on the hop but if you guys haven’t checked out the other post from our wonderful design team, this is the order of the hop:

Jessica – http://jessicalynnoriginalstamps.blogspot.com/

Sharon – http://sharonshowcase.blogspot.com/

Jeanette – http://creativeplayischeaperthantherapy.blogspot.com/
Vickie – http://stuffbyvickie.blogspot.com/

Jennifer – http://glitterinmyhair.blogspot.com/…/11/JLOblackfriday.html
Amanda – http://wombatleu.blogspot.com/

Maria – https://mariarusselldesigns.wordpress.com/ (you are here)


Celebrate your family. Celebrate life and health. I am thankful for my family and friends, and each and every one of you. Happy thanksgiving!


DIY ~ Waterless Snow Globes Using Empty Candle Jars

Christmas is fast approaching and since I’m not allowed to decorate for Christmas yet until after Thanksgiving, I figured I might as well start some Christmas projects early this year.

I’ve always been a huge fan of recycling, repurposing containers. Since I hoard candles, I have a lot of empty candle jars. I wanted to use them to make some DIY Christmas gifts for my siblings this year. These are very inexpensive to make and people just love them. You can pretty much find everything at Michael’s or Hobby Lobby for your snow globes.  The possibilities are endless.  I just need to figure out how to put lights inside and it will be perfect. For now, I came up with 3 styles.

Here are the things that you’ll need:

Empty Candle Jar with a flat lid (mine is from Bath and Body Works)

House Die (or get the tiny little houses at a craft store)

Card Stock to create the tiny house

Tombow Mono Multi Liquid Adhesive (very important if you’re making 3D projects)

Punches

Small Bottle Brush Trees (green or white)

Bows

Stickers

Decorative Buttons

Tiny plastic light bulbs

Small Deer and Gingerbread Men (you can find them at Michael’s, Hobby Lobby or AC Moore)

Fake Snow

Hot glue

Here are the photos of the finished projects. I am also including my YouTube video on this post if you guys would like to see how I put it together.

IMG_9034
Created by Maria Russell – http://www.youtube.com/rprmlr772
IMG_9035
Created by Maria Russell – http://www.youtube.com/rprmlr772
IMG_9036
Created by Maria Russell – http://www.youtube.com/rprmlr772

I hope I have inspired you today to start your Christmas crafts!

Lawn Fawn Baaah Humbug – Lawnscaping Challenge No. 117

Another challenge has been posted by the Lawnscaping Team called Thinking of you; this is challenge number 117. I decided to create a very sweet Christmas card using Lawn Fawn’s Baaah Hambug stamp set. I think this set is so adorable! This is my entry for the current challenge.

I first colored the images with my Copics and decided to also use the Snowy Backdrop, Sweater Weather tree die, as well as the Stitched Border dies to create my winter scene. Here is my card:

IMG_8979

Thank you all for visiting my Blog and have an amazing day!

Rock Lobster Stamp Set by JessicaLynnOriginal

I am thrilled to finally be able to post photos of this new stamp set by Jessica Lynn Original called Rock Lobster. I love Brentwood, but don’t you just love that little smiley fish? It’s so adorable! Jessica is such a talented artist and a wonderful person; I am so proud to be a member of her design team.

Below you will find a photo of the stamp set. I think this will be a great addition to your collection. Just like the rest of Jessica’s stamps, this is made of high quality photo polymer material. You don’t have to be a skilled stamper to use this set.

IMG_8927

Since today is Halloween, I wanted to create a Halloween card. I have always believed that you can use any stamp set for any occasion, with just a little imagination. I always liked stretching my stamps and dies. Since Brentwood is already dressed up as a lobster for Halloween, I figured he needed some confetti to go along and celebrate my favorite holiday! I also used my We Are Memory Keepers Fuse tool for the first time to create a flat shaker. Note to self: next time, do not touch the fuse tool with your fingers to check it it’s hot enough! Ouch!

IMG_8899

The next card is one of my all time favorites! I think everything just worked and blended together beautifully. I love the colors on this card. I used my Avery Elle Wonky Stitched rectangle die to create the frame for my shaker card. I used a combination of blue, iridescent and white sequins and seed beads for my shaker elements. A video tutorial will be posted soon on my YouTube channel so please stay tuned for that.

IMG_8889

I hope you like what I’ve created. Please don’t forget to go to www.jessicalynnoriginal.com to grab this stamp set.  Happy Halloween!

3 Halloween Projects Using Tombow Mono Liquid Glue

As most of you probably already know, I love creating cute projects and I love entertaining!   I also like spending time creating my own treat bags for kids. Mine are both grown now but I still make them treat bags every holiday. The only difference is, the treat bags and cards I make for them are more catered to adults.

Where my hubby and I live, we don’t get a lot of trick-or-treaters in the neighborhood. I’m lucky if I get 6 kids on Halloween. I always make a ton of treat bags just in case I get more. This year, I decided to spoil the ones that do come. Here are 3 projects that my regular trick-or-treaters will get this year!

First, cute little treat bags! Gathering my supplies, I die-cut my paper/card stock using my treat bag die – as well as stamp and die-cut the pieces that I will use to decorate my bags. When I assemble boxes, treat bags, cards or any 3D projects, I like to use my favorite liquid glue (Tombow Mono). The liquid glue gives you more time to maneuver your project and it is critical to use this glue for bags and boxes. As you can see on the photo below, I only use a little because this glue goes a long way.

IMG_0002

IMG_0003

After assembling the treat bag, I use my tombow liquid glue again to adhere the rest of the die-cut and colored images to decorate my bags. You can skip this step if you would like to use readymade bags and certainly if you have 10 or more kids, it will get tedious to decorate each bag.

IMG_0004

To spoil my trick-or-treaters a little more, I decided to create some cute little paper wands. I love seeing their facial expressions when they see what they’ll get when hubby and I open the door. These are so easy to make. I use paper straws that I get inexpensively from the dollar store or craft stores. I decorate them using cute stickers and die-cut pieces. They are so cute, aren’t they?!

IMG_0006

Last but not the least, I make the “older” kids cute Halloween cards with their treat bags. They are the ones that appreciate it the most and I include little stickers inside the card . I always use my favorite stamps and this year, it goes to JessicaLynnOriginal Brentwood Owl stamp. I have created this card awhile back for a blog hop for Scrapbooking magazine. I love it so much that I will be making 10 more to give to my trick-or-treaters this year. It is a fun shaker card. I used Impression Obsession shaker card kits to make it easier for me, and adhered them to the card stock and designer series paper using my favorite Tombow Liquid glue.

Here are all three projects. I hope you like them.

IMG_0005

Happy Halloween!