I’m Under Your Spell with MFT Stamps

Hello MFT fans! I am super excited to share with you my entry for the MFT Stamps 2021 Card Design Superstar. This card is for the Coloring Virtuoso category.

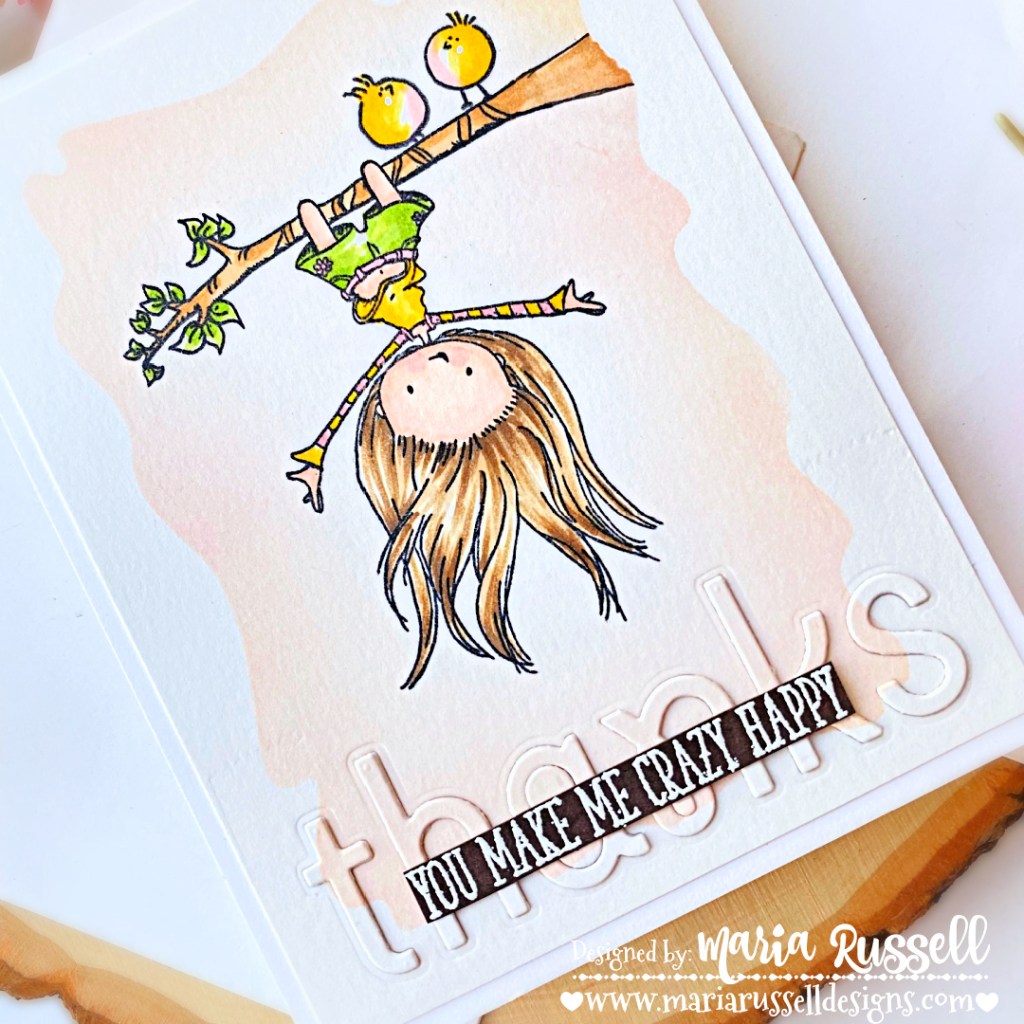
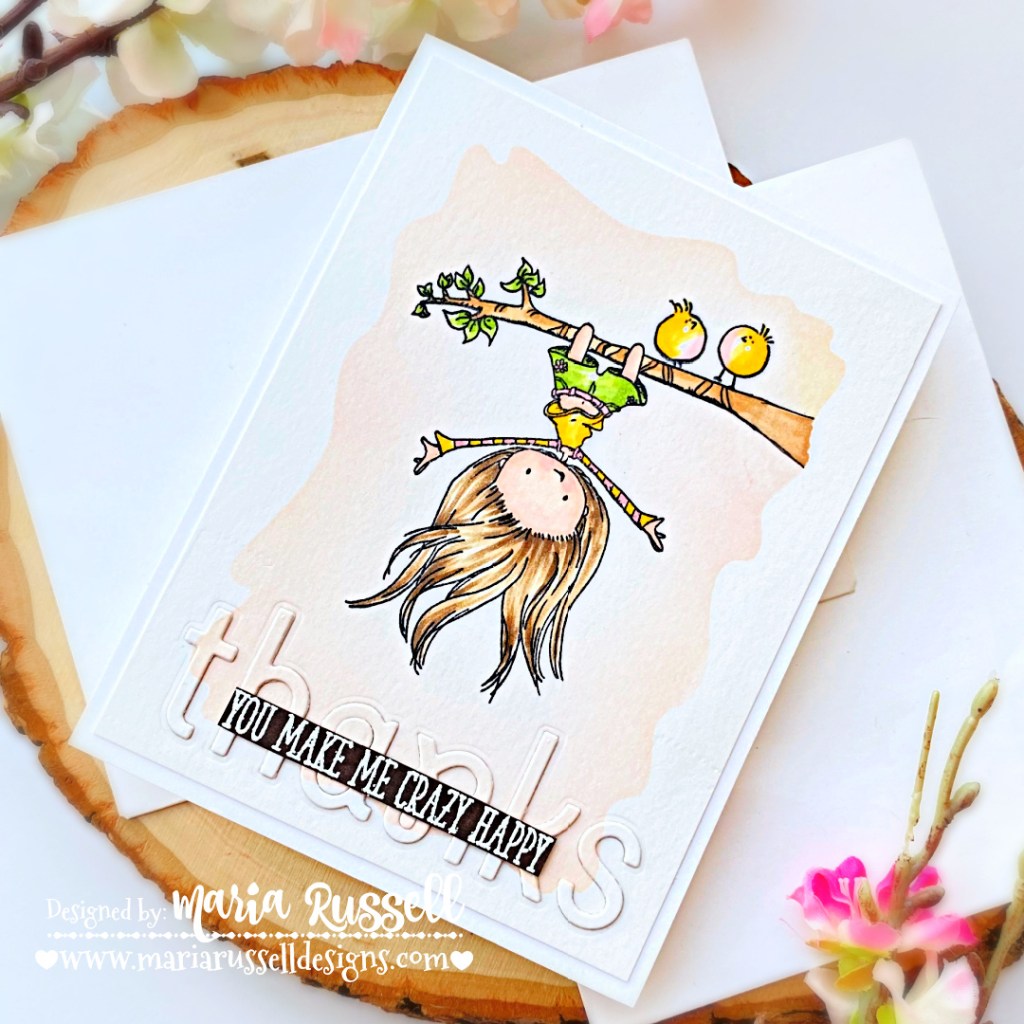
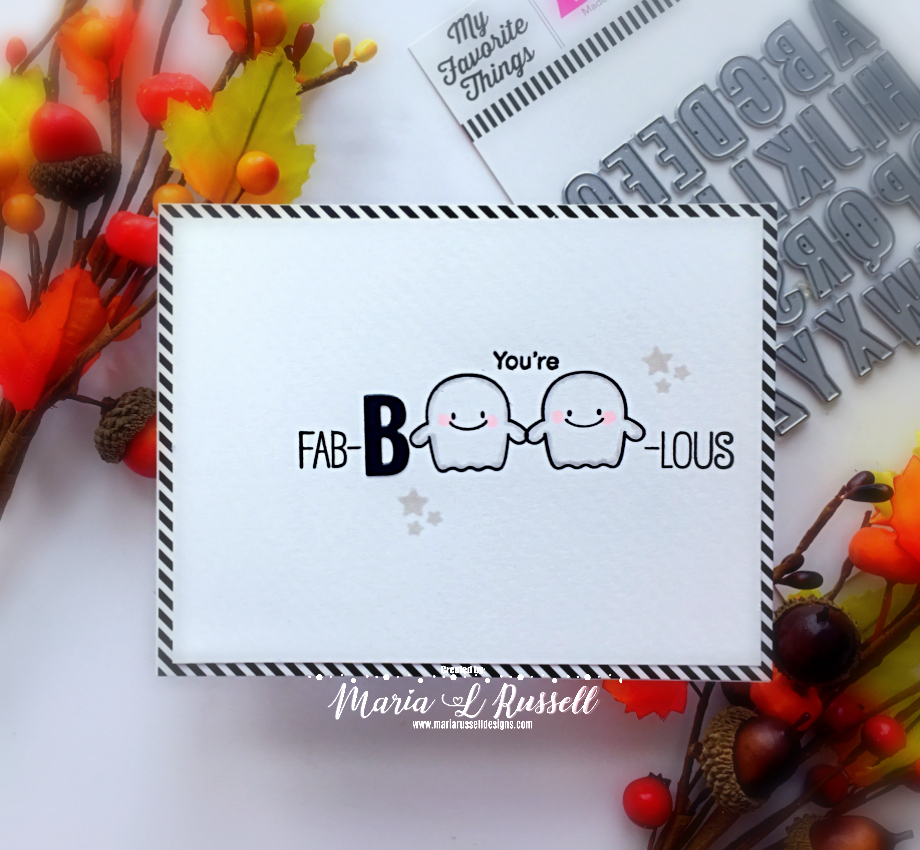
I started by stamping the images from the Witch Way Is The Candy stamp set with Memento Tuxedo black ink on some Neenah solar white card stock. I colored the images in with my alcohol markers. Even though I have the “older” coordinating dies for this stamp set, I fussy-cut the images with my precision snips. I didn’t want the white border around the images because of the black background.

Next, I die-cut some black card stock, as well as some Bristol smooth white card stock using the Outside The Box Level Up Die-namics. Using the Bristol smooth die-cuts, I ink-blended them all with Seedless Preserves, Carved Pumpkin and Wilted Violet distress oxide inks. I sprayed the pieces with water using distress sprayer and picked up the excess with paper towel. I then assembled the main box card with liquid glue then added the colored panel using my tape runner.

Next was to create my Halloween scene. I die-cut the grass panels using the Outside The Box Grassy Hills Die-namics with some black licorice card stock. I cut the flaps and adhered on the box card with liquid glue.

Now that I have everything colored and assembled, I am ready to put my scene together. I adhered my focal image (being the star of the show) to the foreground. I added the frog and pumpkins with liquid glue.

Next, I have to decorate the background to finish my scene. I die-cut the tree using a retired Trio of Trees Die-namics from MFT with the Sweet Celebration 6×6 Patterned Paper (also retired). I adhered it on the background with liquid glue.

The moon was die-cut using the older Witch Way Is the Candy Die-namics on some Bristol smooth white card stock and inked up with Mustard Seed and Carved Pumpkin distress oxide inks.

To finish my spooky scene, I die-cut the black clouds using the Cloud Cover Die-namics on some black card stock. The first piece was adhered with liquid glue on top of the moon. The other cloud was adhered on acetate sheet and added on the card behind the witch for added dimension. Take a quick look here:

I hope you like my spooky scene. Some of the retired items are of course no longer available. Therefore, I have linked the current supplies that are similar to the retired products I used for my card. Thanks for stopping by today and happy stamping!

——–SUPPLIES———

You Make Me Crazy Happy with MFT Stamps

Hello MFT fans! I am super excited to share with you my entry for the MFT Stamps 2021 Card Design Superstar. This card is for the Clean and Simple Genius category.

I started by stamping the image from the Let Your Hair Down stamp set with Memento Tuxedo black ink on some Bristol smooth white card stock. Without removing the stamp set from my stamping tool, I also stamped the image on some masking paper.

Next, I colored the images in with my Copic markers. I fussy-cut the mask and covered the images so that I can work on my simple background.

I sprayed my Watercolor Wash Rectangle 6×6 Stencil with some Pixie Spray, and placed it on my colored image. I used some Pink and Yellow Quick Dry Dye inks with my blending brushes to add the soft color to the background. Once I was happy with the color intensity, I removed the stencil.

I used the Thanks Die-namics (retired) to die-cut the word on the foreground. I die-cut the word two more times and adhered them together with liquid glue for added dimension. I added the foreground with the “thanks” die-cut letters on some A2-size notecard.

To finish my design, I stamped the sentiment on some Milk Chocolate card stock with Versamark ink and sprinkled some white embossing powder. I heat-set the sentiment with my heating tool and used my precision snips to cut it out, then adhered on my card with liquid glue. Here’s another look at the card:

Clean and simple, don’t you agree? I love how this card turned out! I hope I win this year so please wish me luck!

The supplies I used are listed and linked below. Thanks for stopping by today and happy stamping!

——–SUPPLIES———

2019 Card Design Superstar with MFT Stamps – Clean & Simple


I hope you are all having a fabulous day.  This is my second post for today for the MFT Stamps 2019 Card Design Superstar contest!   This post is to enter the Clean & Simple category.


For my card below, I am showcasing the Birdie Brown Fab-BOO-lous Friends stamp set with the LLD Little Letters Die-namics.


I started by masking the sentiment and stamping it on some A2-size Neenah 80 lb. solar white card stock.  I also stamped the two ghosts from the BB Fab-BOO-lous stamp set and colored them in with some T1 and T0 copic markers.  I used my R00 to add some pink color to their cheeks.


I die-cut the letter “B” on some black card stock using the LLD Little Letters Die-namics. and adhered it right next to the ghost.  I stamped the remaining sentiment with Versafine Onyx black ink and also stamped the stars using some light gray ink.


I adhered my foreground on some MFT Just Delightful patterned paper and added this piece on some A2-size card base.  Here’s my card:


If you guys have been following me for awhile, you know that clean & simple is not my strongest point.  This category was quite the challenge for me!  I think having this contest is amazing because it challenges us (card-makers), to go beyond our comfort zone and try something new.  Here’s a closer look:


I hope you like my card today and got inspired.  If you would like to enter the contest, please click on this link: 2019 Card Design Superstar.   The supplies I used are listed and linked below.  Have a great day and happy stamping!


———-SUPPLIES———-


2019 Card Design Superstar with MFT Stamps – Coloring Virtuoso


It is that time of the year when most card-makers get nervous trying to come up with unique designs to join the MFT Stamps 2019 Card Design Superstar contest!  I have entered the last two years but never won.  There are so many amazing card-makers out there and the competition gets tougher every year.    However, I think this is a great way to interact with a lot of people and I adore MFT Stamps for giving us a chance to show off our skills.  For this post, I am entering the “Coloring Virtuoso” category.


For my project today, I am showcasing the Spooktacular Friends stamp set, the Tucked-In Turf die-namics and the Grassy Hills die-namics.


To begin, I die-cut a piece of masking paper using a circle die and masked some A2-size Bristol smooth white card stock.  I inked up this piece using some water-reactive inks.  I used my distress sprayer to spray some water on my colored background and dabbed it dry with my paper towel.


I stamped the images from the Spooktacular Friends stamp set and colored them in with my alcohol markers.  Since I didn’t have the coordinating dies for this, I used my cutter-bee scissors to fussy-cut the images.  I also colored the border on the images with some T7 Copic marker.  Since I have a night scene, I didn’t want the edges of the images to have some white border.


I die-cut some black card stock using the Tucked-In Turf and Grassy Hills Die-namics.  I used my blending brush and some Sweet Tooth Pigment Ink by MFT Stamps to add some texture on the grass.  Since I have a ginormous moon, I needed to make the grass look more realistic by having some light shadows.


I adhered my colored background on an A2 size card base.  I foam mounted some of the grassy hills and started assembling my card.  I stamped the tree image directly onto the foreground with some Versafine Onyx black ink.  I then used my white gel pen to add some color to the ghost.  Lastly, I stamped the sentiment on the card with some Versamark ink.  I sprinkled some white embossing powder and heat-set this with my Wagner Heating tool.  Here’s my card:


I don’t know about you but I think one of the most difficult part about creating a night scene is to make sure that the images pop against the dark background.  This is the reason why I colored the edges with some dark marker.  I wanted them to pop against the dark background but I didn’t want the white edges to stand out either.  Here’s a closer look:


I hope you like my card today.   If you would like to participate and have some fun, please visit their blog post here:  2019 Card Design Superstar Contest.   The supplies I used are listed and linked below.  Have an amazing day and Happy stamping!


———-SUPPLIES———-


Take Life One Sip at a Time

Hello The Rabbit Hole Designs fans!  Maria here with you and it’s my day to take over the TRHD blog.   For today’s project, I am showcasing the Caffeinated Rabbit and the Perfectly Blended stamp set.

I have a cute and simple card for you today with one of my favorite caffeinated creature.

Here’s how I made the card:

  • stamp the rabbit image on smooth white card stock and color the images in with alcohol markers (or any medium of your choice).
  • die-cut the image with an electronic die-cutting machine or fussy cut with scissors.  I used my Brother Scan N Cut 2.
  • cut an A2 size piece of smooth white card stock and use the solar burst stencil and a blending brush with Tattered Rose distress oxide ink and antique linen to add color to the background.
  • use the “hello” die to die-cut the word from the background.
  • adhere some fun foam to the back of the card stock and adhere this piece onto a chocolate brown card base.
  • line up the negative pieces of the die-cut and adhere using liquid glue.
  • adhere the bunny on top of the “hello” using liquid glue.
  • finish the design by adding the sentiment from the Perfectly Blended stamp set.

Here’s a closer look:

Another simple card but I really love how it turned out.  If you are looking for further details about my project including supplies used, I would be so grateful if you can stop by my blog today at:

I hope you like my card and got inspired.  Have an amazing day and happy crafting!

For more inspiration, updates, and news make sure to check out these places.


————SUPPLIES————–

Buzzed with The Rabbit Hole Designs

Hello The Rabbit Hole Designs fans!  The Rabbit Hole Designs is one of the super sponsors for the Spring/Summer Coffee Lovers Blog hop, so you will be seeing A LOT of coffee-themed cards from the design team this week.

For my project today, I am showcasing the Caffeinated Bee stamp set.

TRHDCaffeinatedBee2A

Card recipe:

  • stamp the bee image on some Neenah classic crest solar white 110 lb card stock and color him in with alcohol markers (or any medium of your choice).
  • I used my Brother Scan N Cut 2 Machine to die-cut the image.
  • I used my Medallion Coverplate die to die-cut an A2 size panel with some white card stock.
  • I used a circle die to die-cut the middle piece of this panel and I inked up this small circle with some distress oxide inks and my hexagon stencil.  I adhered this piece on the card stock.
  • I used an alphabet die from my stash to die-cut the words #BUZZED on some black card stock.
  • I adhered the pieces on the card.
  • I used another branch die from my stash to die-cut the branch and leaves, coloring them with my alcohol markers.  I adhered the pieces on my card.
  • Lastly, I used foam adhesive to adhere my Caffeinated Bee.

Here’s a little close-up:

Since I have a white-on-white background, I used my Dandelion Yellow Nuvo Crystal Drops to add some pop of color to my card.  I hope you like my project today.  The Supplies I used are listed and linked below.

For more inspiration, updates, and news make sure to check out these places.

—————SUPPLIES————-


Birthday Fishes – Underwater Scene with Copic Markers

Print


Hello MFT fans!  I am back today with this underwater scene card using stamps by My Favorite Things for the 2018 Card Design Superstar contest.  I finally summoned up some courage to “freehand” my background and I thought I was going to hurl!  Haha!   I am so very thankful to MFT for this contest because they encourage us all to join and get out of our comfort zone, whether you are a beginner or an expert!  I am certainly a beginner when it comes to drawing/coloring my own scene.  I had second thoughts about joining since this is a tough competition.  Just looking at all the other entries make me nervous but I thought I’d go ahead and try anyway.


I only have a few MFT dies and stamps with me to get by since I have just packed up my entire studio and shipped it back to my home in Orlando, FL about a month ago.  However, that will not stop me from joining the contest!   This card entry is for the Coloring Virtuoso category.


I envisioned a design in my head and started drawing my background with different Copic markers on some Neenah 110 lb. white card stock.  I layered different colors of blue, blue green and lilac Copics to create my water scene.  I also drew some seaweeds with different green and yellow Copic markers and mixed it up a little with brown.  To draw the sand, I used Earth tones – E40, E41, E43, E44.


I stamped my images with MFT Black Licorice Hybrid ink using the BB Gill Friends stamp set and Beach Buds stamp set.  I colored them in with Copic markers and fussy-cut them with my precision scissors.  I adhered them onto my card base with liquid adhesive.


To finish my design, I used my Colorless blender to create bubbles on the water and stamped my sentiment with Versafine Onyx black ink.  I also used my Sakura white gel pen to add more details to the fishes.


MFTDesignSuperstarColor1A


I was so nervous creating this background but I absolutely LOVE how this card turned out!  The images on both stamp sets can be mixed and matched to create a wonderful scene.   Here’s another look:


MFTDesignSuperstarColor1B


Doesn’t this card make you want to go snorkeling in the Maldives?  That crab wearing the sunglasses is just adorable!


MFTDesignSuperstarColor1C


I hope you like my card today!  I’d like to take this moment to THANK MFT Stamps for this great opportunity and for keeping us motivated to get out of our comfort zone!  Good luck to everyone playing along!  The supplies I used are listed and linked below.  Happy crafting!


MFT Supplies Used:


A Happy Hello – CAS card with MFT Stamps

Print


It is that time of the year again where all card designers get pumped and excited for the 2018 Card Design Superstar contest by MFT Stamps.   I am completely bummed since I have just packed up my entire studio and shipped it back to my home in Orlando, FL about a month ago.  I kept a few dies and stamps with me to get by, until I get my shipment.  Needless to say, most of my MFT stamps are in the shipping container and I am left with 3 stamp sets and a few sentiments.  However, that will not stop me from joining the contest!   This card entry is for the Clean and Simple Genius category.


I started by stamping my image on some Neenah solar white card stock using MFT Stamps Black Licorice hybrid ink and colored him in with my Copic markers.  I fussy-cut this image using my precision-cut scissors.


IMG_9669


I die-cut the word “hello” a couple of times with some  white card stock using the  Hello There Die-namics by MFT stamps.  I cut another piece of some white card stock  with the Stitched Scallop Basic Edges Die-namics and adhered this piece onto my card base.  I also adhered the Hello die-cuts onto my card panel, as well as my colored image.


MFTDesignSuper2018CAS1A


To finish my design, I stamped the sentiment “A Happy Hello”.  Here’s a little close-up:


MFTDesignSuper2018CAS1B


I love creating Clean and Simple cards!  Sometimes less is really more!  I love how this card turned out!  Here’s one last look:


MFTDesignSuper2018CAS1C


I hope you like my card today!  THANK YOU SO MUCH MFT Stamps for this great opportunity!  Good luck to everyone playing along!  The supplies I used are listed and linked below.  Happy crafting!


MFT Supplies Used:

  •     A Happy Hello stamp set
  •     Black Licorice Hybrid Ink
  •     Hello There Die-namics
  •     Stitched Scallop Basic Edges Die-namics


I Put My Faith To You O’Lord

Hello my crafty friends! I hope you all had an amazing weekend!  I’m back today with a very special card. It is the start of the Holy Week and this is the perfect time to reflect.   Don’t get me wrong; this isn’t the only time to show our faith. I think everyday we open our eyes, we should start thanking the Lord for all the blessings that we have in our lives. I’ve always been religious in my own way. However, I am not going to go into all the details of what I do to show my faith.

Today’s card features a stamp set that is very new to me. I was searching for a stained glass stamp set because I have this design that I’ve had in my head for a card. I found the perfect stamp set through YouTube. This stamp set is called Layered Stained Glass by Maymay Made It.

I started out by stamping the image on Neenah solar white card stock with Memento Tuxedo Black Ink. Then I stamped the layers using Ballet Slippers, Minty Fresh and Fresh Lavender inks by Lawn Fawn with my Tim Holtz stamp platform.

I used a die from my stash to create the mantelpiece and also used a leaf punch to cut the greenery. To finish my design, I used my “Faith” die from Simon Says Stamp and also stamped the sentiment “Therefore, do not worry about tomorrow, for tomorrow will worry about itself”. Here’s the card:


IMG_7614


I absolutely love this scripture!   Here’s a little close-up below!  Can you see the details on the mantelpiece?  I embossed it with my embossing folder to make it look like concrete.  I have visited a LOT of churches in Europe and it is spot on!

FaithCard1A


I wanted to add glossy accents to make it look like real glass so I’ll probably add it later on.  For now, here’s the card:

FaithCard

I hope you got inspired today.  I have listed and linked the supplies I used below.  Have a great holy week!

—————SUPPLIES—————