Kat Scrappiness January Release – Day 2

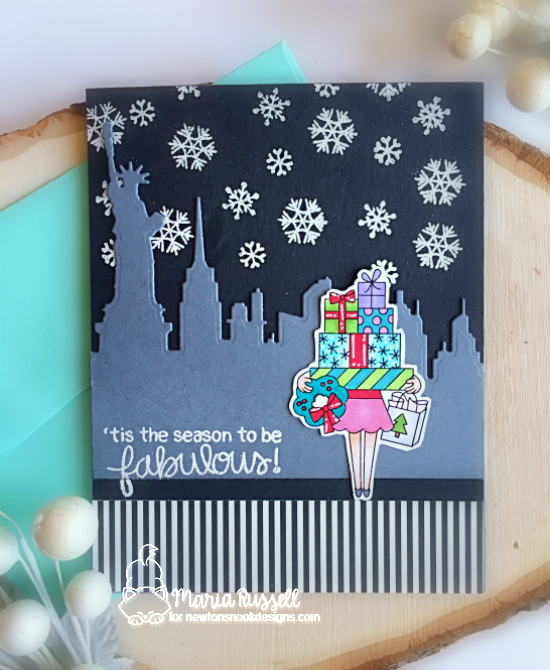
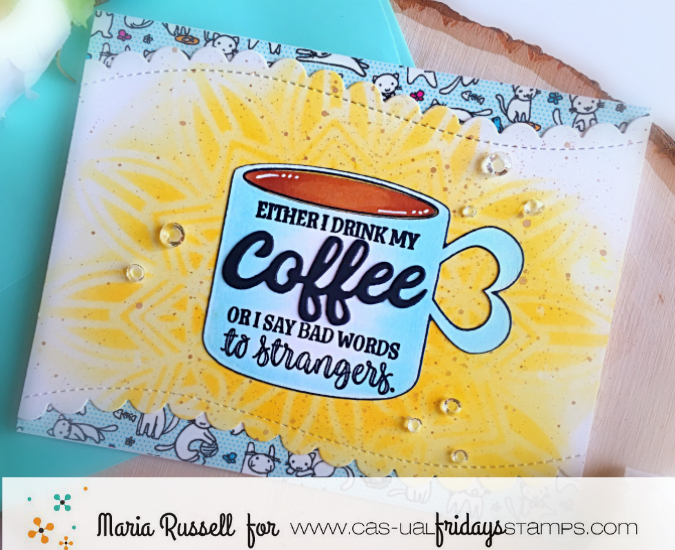
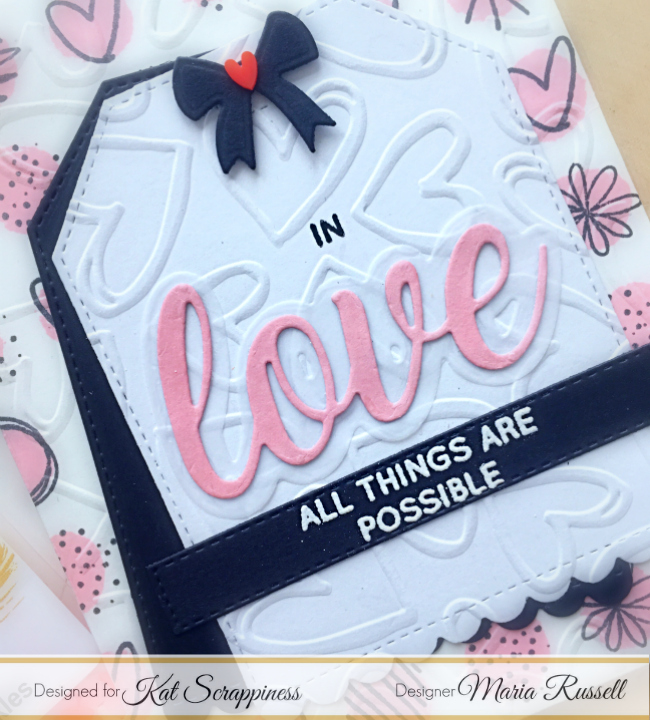
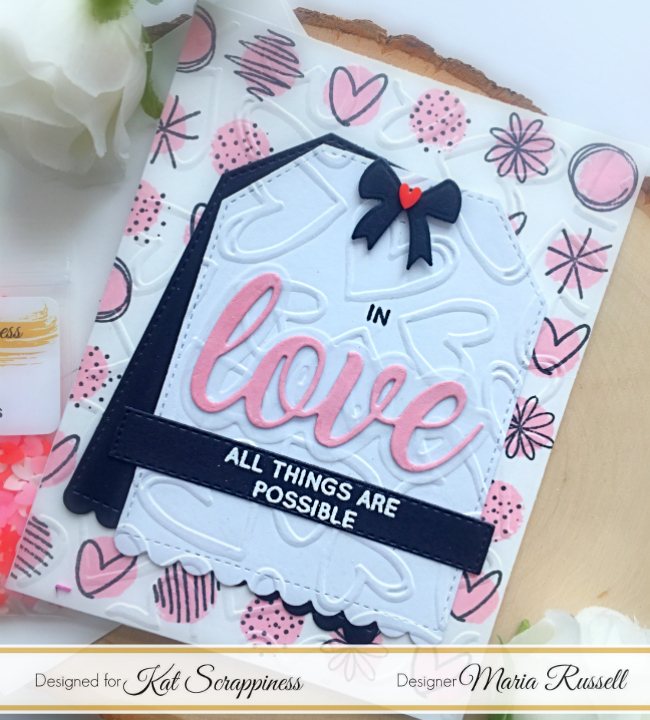
Hello my crafty peeps!  It is day 2 of the January release by Kat Scrappiness and the design team is showcasing the new “I Love You” shadow dies.   We also have a giveaway every day during release week.  We are picking one winner for each release day so a total of three winners!  Please head on over the the Kat Scrappiness blog post to leave a comment.  Here’s the link:  http://katscrappinessblog.com/january-release-day-2-i-love-you-shadow-dies/

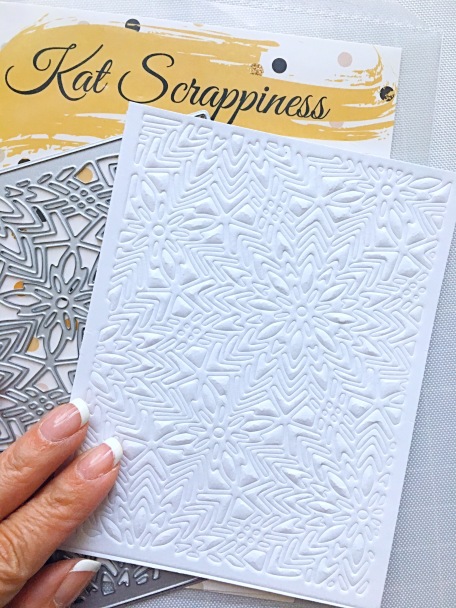
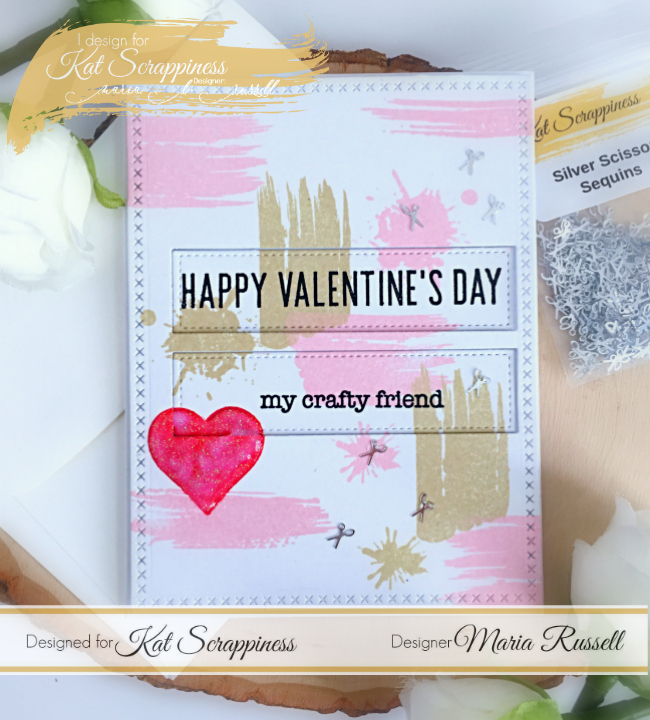
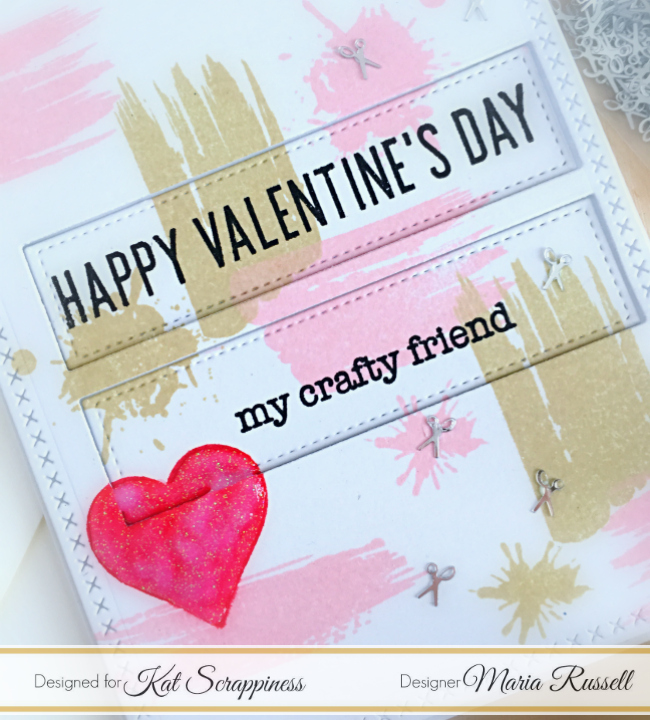
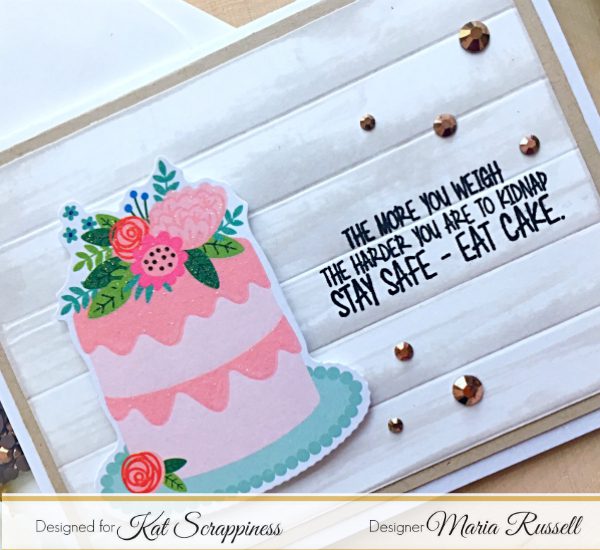
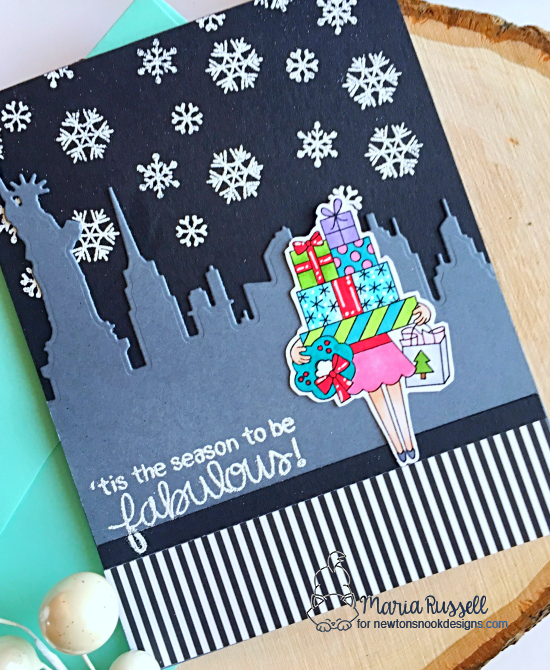
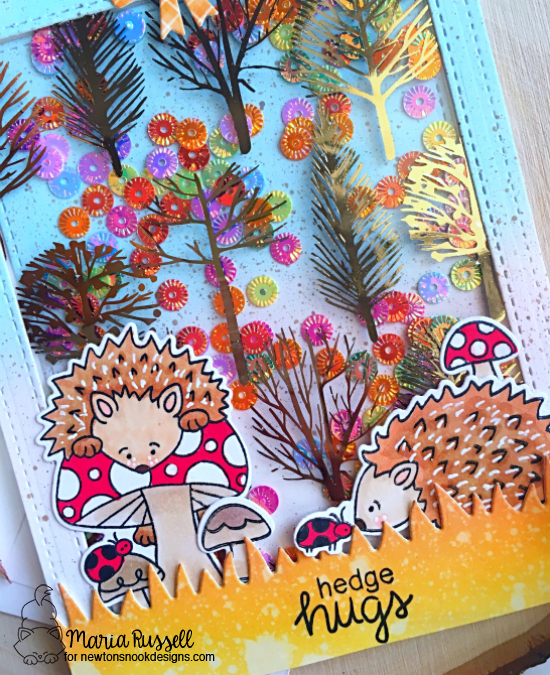
I started out by stamping the images on some 110 lb card stock.  I used the stamp set from Altenew called Watercolor dots.  I embossed this piece using a hearts embossing folder that I purchased from Hobby Lobby.  I also die-cut two tags using the Stitched Scalloped Nesting dies.

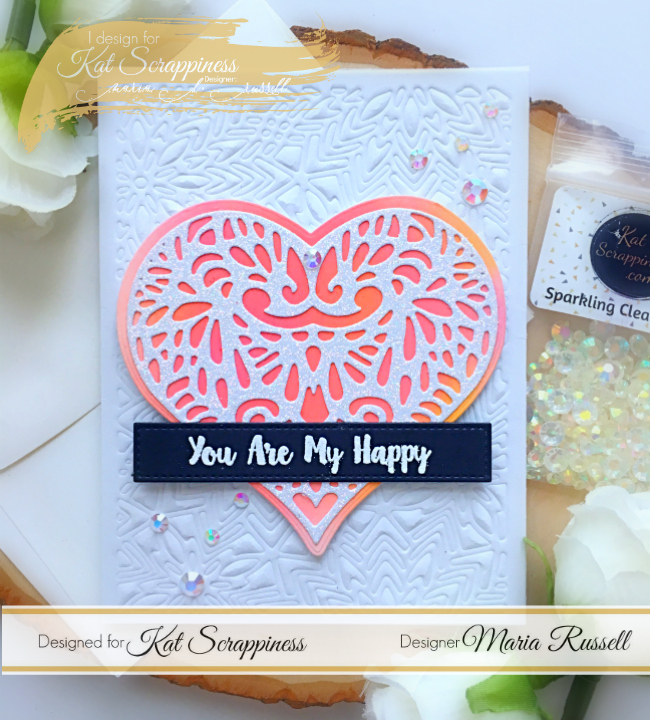
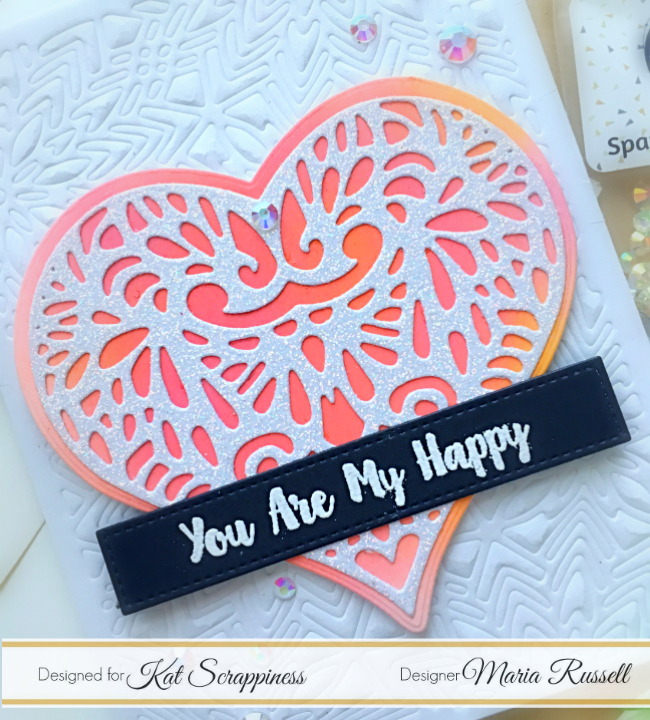
I die-cut the word “love” from the new I Love You shadow dies on pink, and die-cut the shadow with some vellum.  I used my hearts embossing folder to emboss the white tag and adhered this piece on the black tag to layer it.  I adhered the “love” sentiment.  I stamped the sentiment on black card stock with versamark and heat-set this with my heating tool.

katscrapiloveyoudie1a

To finish my design, I die-cut the bow from my stash and adhered the red heart from the heart sprinkles embellishment mix.   Here’s a closer look:

katscrapiloveyoudie1b

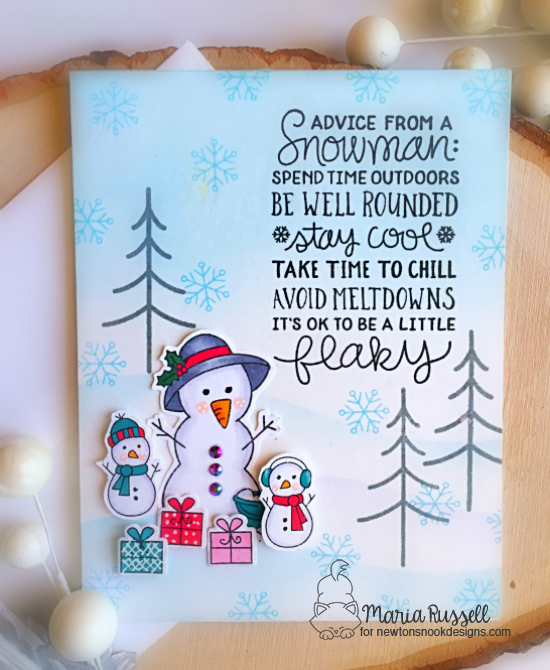
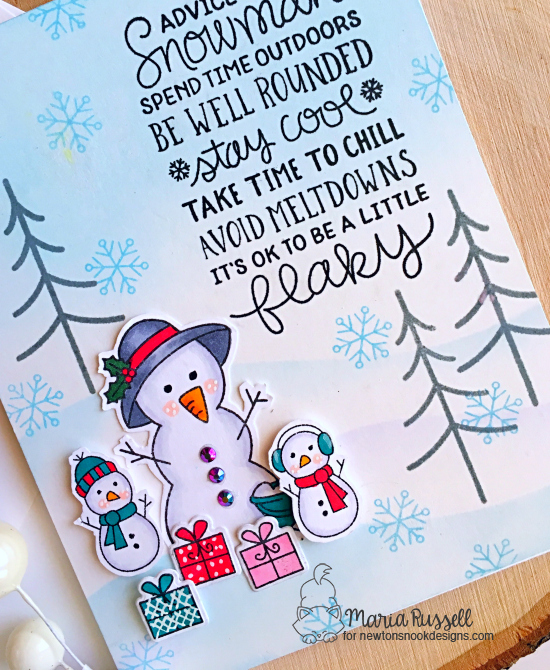
I really love how this card turned out.  Even though the background is busy, the design kind of worked, don’t you think?

katscrapiloveyoudie1c

I hope you like my project today.  Don’t forget to check out the blog post on Kat Scrappiness to leave a comment.  Tomorrow is the last day so head on over there!  I hope you guys win.  The supplies I used are listed and linked below. Have an amazing day!

—————SUPPLIES————


Kat Scrappiness January Release – Day 1

Hello my crafty friends.  I’m super excited to share my first post for January 2019 and it is the January release by Kat Scrappiness.   For Day 1, we are showcasing the Lacy Layered Heart dies and the Stitched Sentiment Strip dies.  They go perfectly well together or on their own.

For my first card, I inked up some Bristol smooth white card stock with my distress oxide inks and die-cut the piece with the outer layer of the die.  I also die-cut some Lawn Fawn glittered card stock using the lacy heart die.  I adhered this piece onto my colored heart with some Nuvo liquid glue.

On another piece of some heavy-duty card stock, I used the Fancy Floral Coverplate die with an embossing mat to dry-emboss the details on the card stock.  I think this turned out so beautifully.  I love the impression it makes on the card stock.

img_0433

I adhered the heart on this embossed piece with some foam tape.  I also adhered this piece onto an A2 size card base.  Here’s what it looks like:

katscraplacyheart1a

I stamped my sentiment on some black card stock with versamark ink and heat and sprinkled some white embossing powder.  I used my Wagner heating tool to heat-emboss the sentiment, and cut this piece using the new Stitched Strip Sentiment dies.  I finished the design by adding some Sparkling clear jewels.  Here’s a closer look:

katscraplacyheart1b

I love how this card turned out!  I know this is a simple card but that glitter heart in the middle compliments the colored background.  Here’s another look:

katscraplacyheart1c

For my second project, I used the Everyday Brush Strokes stamp set and stamped the image with Ballet Slippers and Pizza Crust inks by Lawn Fawn.  I used the Stitched Sentiment Strip die to die cut the middle piece.   I used foam adhesive to adhered my foreground on an A2 size card base.  I stamped the sentiment on the strips and adhered the pieces using Nuvo liquid glue.

katscrapstitchedsentiment1a

To finish my design, I added the Silver Scissor Sequins mix.   Since this is going to a crafty friend, I know she will appreciate those cute little touches that I added on this card.  Here’s a closer look:

katscrapstitchedsentiment1b

I added some Nuvo glitter drops on the heart to give it some dimension and shine.  I also love how this card turned out.

katscrapstitchedsentiment1c

I hope you like my projects today.  These dies are now available at the shop.  The supplies I used are listed and linked below.  Don’t forget to use my coupon code “MARIA10” for 10% off your order at the shop.  Happy crafting!

————SUPPLIES————-


Funny Cards with Cheat Day Stamp Set

Hello Kat Scrappiness fans! Maria here on the blog with you. Are you all excited to drink eggnog, eat some baked ham and candied yams?  I certainly am! I am back today to share with you two funny cards showcasing the Cheat Day stamp set, Punny Snacks stamp set, Brown Jewels, and the Double-Stiched Rectangle dies.

For my first card below, I scored some A2-sized cream card stock using my Scor-Pal Scoring Board and inked the lines with some Fog ink.  I learned this technique from Dawn of W Plus 9 where she showed it on her YouTube video (thank you, Dawn!)  I adhered this piece onto my card base and stamped the sentiment with Versafine Onyx Black ink.

I used the cake from the Loves Me Ephemera Cardstock die-cuts by Pebbles and adhered it onto my card with some foam tape.   I finished my design by adorning the card with some Brown Jewels.  This card is really simple but I love how it turned out.  Here’s a little close-up:

Those brown jewels are so pretty.  I also love the ephemera packs that I purchased from the shop.  Here’s another look:

For my second card, I scored another piece of A2-sized cream card stock and inked the lines again with some fog card stock.  I cut another piece of black card stock and die-cut the same using the double-stitched rectangle frames to create a frame.  I wanted this card to look like one of those Letterboards we all love.  I adhered this piece on the card with some foam tape.  I stamped my sentiment using some Versafine Onyx Black ink and adhered my colored images from the Punny Snacks stamp set.  Here’s my second card:

I think the Cheat Day stamp set is hilarious and certainly a must-have to add to your stamp collection.   Here’s a little close-up:

During the holidays, I don’t really watch what I eat and the sentiment on this card is exactly how I feel!    What about you guys?  Here’s another look:

I hope you like my cards today.  Which one is your favorite?  The supplies I used are listed and linked below.  Before I go I just wanted to let you know that the Christmas and Hanukkah items in the shop are currently on sale.  Use coupon code “STUFFMYSTOCKING” FOR 20% off in this category.

Thank you so much for stopping by.  I wish you all a very Merry Christmas and a Happy New Year!

————SUPPLIES————


Newton’s Nook Designs November Release – Day 3

NNDReleaseIcon_Nov18


It is the last day of the November reveals by Newton’s Nook Designs.   Were you able to check out the last two days of the reveal?   Which one is your favorite so far?  You have a chance to win each stamp set during release week so check out the details I have indicated at the end of this blog post.  [Just a little important note:  I know some of you had difficulties finding the comments section.  If you would like to leave a comment to participate in the giveaway, the “comments section” will only be ever visible when a single post on Word Press is being viewed. Please click on this particular blog post and you will be able to leave a comment below.  Thank you!]  


For the last day of the November reveals, the design team is showcasing the Newton Celebrates stamp set and the Newton’s New Year stamp set, with their coordinating dies. Here’s what they look like:


NNDNOV18_NewtonCelebrates


NNDNOV18_NewtonsNewYear


I don’t know about you but that cat in the martini glass is the BOMB!  I just love, love, love that image.


NEWTON CELEBRATES:


NNDNewtonCelebrates1A


I don’t know if you can tell but I put glossy accents on the martini glass and the olive.  To finish my design, I added some champagne jewels by Kat Scrappiness.  Here’s a little close-up:


NNDNewtonCelebrates1C


NEWTON’S NEW YEAR:

For my last card, I wanted to create a shaker card to celebrate the occasion.  I created my own stencil using my circle dies and colored my Bristol smooth white card stock with different distress oxide inks.  I also used my rectangle dies to create my border with the Sky Borders die.


Here’s my card:


NNDNewton'sNewYear1A


I added glossy accents to the champagne glasses and the bubbles!  I really LOVE how this card turned out.  Here’s another look:


NNDNewton'sNewYear1B


I hope you like my cards today.  Which one is your favorite?  Would you like to win a $25 store credit to Newton’s Nook Designs?  ONE lucky comment will be chosen from each reveal day to win!

Here’s how to win:

Comment on the NND blog and Design Team blogs (see list below)! The winner will be chosen at random from the collective reveal posts. Make sure to check out each of their blogs and comment for your chance to win. You will not know which blog will be randomly chosen so the more you comment on the better your chances are of winning! You have until Wednesday November 21st at 9pm EST to comment  — winners will be announced on the blog post on Friday, November 23rd.

Check out all the awesome Design Team Blogs below to enter:

Newton’s Nook Designs

Amanda Bodine

Holly Endress

Ellen Haxelmans

Larissa Heskett

Samantha Mann

Juliana Michaels

Zsofia Molnar

Naki Rager

Maria Russell

Tatiana Trafimovich


Newton’s Nook Designs November Release – Day 2

NNDReleaseIcon_Nov18


It is the second day of the November reveals by Newton’s Nook Designs.   I hope you were able to check out yesterday’s reveal.  You also have a chance to win each stamp set during release week so check out the details I have indicated at the end of this blog post.  [Just a little important note:  I know some of you had difficulties finding the comments section.  If you would like to leave a comment to participate in the giveaway, the “comments section” will only be ever visible when a single post on Word Press is being viewed. Please click on this particular blog post and you will be able to leave a comment below.  Thank you!]  


For our projects today, the design team is showcasing the  Poinsettia Blooms and Winter Birds stamp set plus the coordinating dies.  Here’s what they look like:


NNDNOV18_PoinsettiaBlooms

NNDNOV18_WinterBirds

Just like I said yesterday since we are featuring a couple of products each day,  I will not have any tutorials.  If you have any questions or would like to see how I made it, please leave me a message below.


POINSETTIA BLOOMS:


NNDPointsettiaBlooms1A


At first, I colored the poinsettia images in pink but I didn’t like how it turned out so I used my red Copic markers to layer on top of the pink.  For this card, I also used my all-time favorite Pines & Holly die set and added the berries from the Winter Birds stamp set.  For my sentiment I used the Ornamental Wishes stamp set, released last month.  Here’s a little close-up:


NNDPointsettiaBlooms1B


WINTER BIRDS:


NNDWinterBirds1A


Jennifer was just so kind because she sent us this PDF document that identifies the birds and what they look like in real life.

IMG_2127

Here’s how I colored mine:

IMG_0027


I just LOVE cardinals!  They are so pretty and in my opinion, they are a symbol of the holidays!  For my card, I used the Pines & Holly die set once again to decorate my branch and the Festive Forest stamp set for the trees.  Here’s a little close-up:


NNDWinterBirds1B


Would you like to win a $25 store credit to Newton’s Nook Designs?  ONE lucky comment will be chosen from each reveal day to win!

Here’s how to win:

Comment on the NND blog and Design Team blogs (see list below)! The winner will be chosen at random from the collective reveal posts. Make sure to check out each of their blogs and comment for your chance to win. You will not know which blog will be randomly chosen so the more you comment on the better your chances are of winning! You have until Wednesday November 21st at 9pm EST to comment  — winners will be announced on the blog post on Friday, November 23rd.

Check out all the awesome Design Team Blogs below to enter:

Newton’s Nook Designs

Amanda Bodine

Holly Endress

Ellen Haxelmans

Larissa Heskett

Samantha Mann

Juliana Michaels

Zsofia Molnar

Naki Rager

Maria Russell

Tatiana Trafimovich


25 Days of Christmas Tags with CAS-ual Fridays

2018_25daysofchristmastagsNND


Today the CAS-ual Fridays Ink Squad is joining Tracey McNeely of  www.inmycreativeopinion.blogspot.ca for the 25 Days of Christmas Tags.  


For my tag below, I am showcasing the Somebunny stamp set, the Naughty-isms stamp set and the Scallop Tags Fri-Dies.   


somebunny stamp set


Naughtyisms stamp set


I stamped my image on Neenah solar white card stock and colored him in with my Copic marker.  I fussy-cut the image and adhered it on my tag.  


CFS25DaysofXmasTags1A


To finish my design I stamped the sentiment from the Naughtyisms stamp set and added the pine boughs with the red jewel.  Here’s a little close-up:


CFS25DaysofXmasTags1B 


I hope you like my Christmas tag!  Before I end this post, I just wanted to let you all know that CAS-ual Friday is having a Black Friday sale.   We are also launching this mini-stamp set called “Most wonderful”.  If you placed an order of $50, you will get this stamp set for FREE.  In addition, all of the Retiring sets are marked 40% off and all of the Christmas and Hanukkah sets will be marked 15% off from today, November 20 to November 26th.  


46514134_2113085452048927_1963802357904965632_o


Thanks so much for joining me.  Don’t forget to use my coupon code below when you place an order at the shop.  Happy Thanksgiving!


CFScouponcode


Newton’s Nook Designs November Release – Day 1

NNDReleaseIcon_Nov18


It is that time of the month where the entire design team get so excited to show off  the new stamps, dies and stencils by Newton’s Nook Designs.   You also have a chance to win a stamp set for each reveal day so please read through til the end of the blog post to find out more info.  [Just a little important note:  I know some of you had difficulties finding the comments section.  If you would like to leave a comment to participate in the giveaway, the “comments section” will only be ever visible when a single post on Word Press is being viewed. Please click on this particular blog post and you will be able to leave a comment below.  Thank you!]  


For the first day of the reveals, we are showcasing the Christmas Haul and Moose Mountain with their coordinating dies, with the Snowman Advice stamp set and two new layering stencils called Plaid stencil set and Argyle stencil set.   Heres what they look like:

NNDNOV18_ChristmasHaul

NNDNOV18_MooseMountain

NNDNOV18_SnowmanAdvice

NNDNOV18_Stencils_ALL


Since we are featuring a lot of products today, I will keep this blog post short and will jump right in showing you what I made.  If you have any questions or would like to see a step-by-step tutorial, please leave me a comment below and I will either post a YouTube video tutorial or a step-by-step blog post.


CHRISTMAS HAUL:


NNDChristmasHaul1A


My sassy girl is shopping in the big city and she is definitely looking fabulous, don’t you agree?  Here’s a little close-up:


NNDNewtonCelebrates1B


MOOSE MOUNTAIN:

My little guy is enjoying skiing in the mountains and is excited for the holidays!


NNDMoose1A


I also used the Forest Scene Builder dies and the Snow Globe Scenes stamp set and Snow Globe Scenes die set with the Holiday Greetings die set.  Here’s a little close-up:


NNDMoose1B


SNOWMAN ADVICE:


NNDSnowmanAdvice1A


I also used the “snowman” from the Sun-Soaked Christmas stamp set and the Festive Forest stamp set.   To finish my design, I added the Black AB (Rainbow) Jewels by Kat Scrappiness for the buttons.  I think it turned out so cute.  Here’s a little close-up:


NNDSnowmanAdvice1B


Would you like to win a $25 store credit to Newton’s Nook Designs?  ONE lucky comment will be chosen from each reveal day to win!

Here’s how to win:

Comment on the NND blog and Design Team blogs (see list below)! The winner will be chosen at random from the collective reveal posts. Make sure to check out each of their blogs and comment for your chance to win. You will not know which blog will be randomly chosen so the more you comment on the better your chances are of winning! You have until Wednesday November 21st at 9pm EST to comment  — winners will be announced on the blog post on Friday, November 23rd.

Check out all the awesome Design Team Blogs below to enter:

Newton’s Nook Designs

Amanda Bodine

Holly Endress

Ellen Haxelmans

Larissa Heskett

Samantha Mann

Juliana Michaels

Zsofia Molnar

Naki Rager

Maria Russell

Tatiana Trafimovich

Newton’s Nook and Therm-O-Web Inspiration Week

NNDTOW_Nov18_Holiday

This week Newton’s Nook Designs and Therm O Web are partnering for a fabulous inspiration week!  All week long both design teams will be sharing ways to add fun foils and more to your cards using Therm O Web products with Newton’s Nook Designs stamps! There are prizes too!  Read all the way to the end of this post to find out how you can win!  I would like to take this opportunity to thank Therm O Web for sending us some amazing products!

For my project below, I am showcasing the Deco Foil Rose Gold Transfer Sheet, the Wilderness Clear Designer Toner Sheet, the Hedgehog Hollow Stamp Set and Hedgehog Hollow die set, with some Merry-Go-Round sequin mix by Kat Scrappiness.  The supplies I used will be listed and linked below.

I started by stamping my hedgehog with some Memento Tuxedo black ink and colored them in with my Copic markers.  I die-cut the images with the coordinating dies.  I cut another piece of Bristol Smooth white card stock and inked up my background with distress oxide inks.

I used my Deco Foil Rose Gold Transfer Sheet and my laminator to foil the Wilderness Clear Designer Toner Sheet.

IMG_9936

Here’s what it looks like when it’s completely foiled.  They are amazing!

IMG_9923

Since the background is already busy, I wanted to create a more “clean” look so I die-cut my inked background with some dies and adhered the foiled sheet to create my window panel.

IMG_9935

I added the Merry-Go-Round sequin mix by Kat Scrappiness.  They kind of look like fall leaves, don’t they?

IMG_9934

I used the Land Border dies for my grass and inked it up with distress oxide inks.

IMG_9937

Here’s my shaker card:

NNDThermoCollab20181A

To finish my design, I added some white lines to the hedgehogs and die-cut the orange bow from the Pines & Holly die set.   Here’s a little close-up:

NNDThermoCollab20181B

I just absolutely LOVE the Thermo O Web products I got to play with.   The foil is so pretty and I couldn’t throw it away so I created another card with the negative piece.

NNDThermoWebCollab20182A

Here’s a little close-up:

NNDThermoWebCollab20182B

There are more amazing projects today over on the Therm O Web blog so pop over there for more inspiration!

Would you like to win a prize pack including a $25 store credit to Therm O Web AND a $25 store credit to Newton’s Nook Designs?

Here’s how to win: Leave comments on the NND & Design Team blog posts using Therm O Web products all week (November 5-9) to enter. One winner will be randomly chosen from blog posts throughout the week so the more posts you leave comments on the better your chances are of winning! You have until Friday November 9th at midnight CST to comment. The winner will be announced on the NND blog post on Monday, November 12th.
Want another chance to win?  Therm O Web will also be giving away a prize pack! Visit the Therm O Web blog each day this week for more inspiration and leave comments there for another chance to win!  Today is the last day of the collaboration so make sure you leave a comment.

———SUPPLIES———–


Coffee Loving Cardmakers Blog Hop with CAS-ual Fridays

CFSCLCBloghopLogo

Hello coffee lovers and CAS-ual Fridays fans!  I am so excited because today, the CFS Ink Squad is collaborating with the Coffee Loving Cardmakers group.  There will be tons of inspiration during this hop and if you leave comments, you will have the chance to win 1 of 3 $25 Gift Certificates.

For my project, I am showcasing the Coffee Cup Fri-Dies, Coffee Talk Stamp Set and the Hot Coffee stamp set.

I started by stamping my image on some smooth white card stock.  I die-cut the image using the Coffee Cup Fri-Dies.  I colored the image with my Copic markers.

I die-cut a piece of some Bristol Smooth white card stock and used a stencil from my stash to color my background.  I used Carved Pumpkin and Wild Honey distress oxide inks.  I smooshed my Vintage Photo distress oxide onto an acrylic block and added water, then used my watercolor brush to splatter some colors on my background.  I adhered the coffee cup onto my card.

CFSCFCBloghop1A

The stamp sets that I used for this card are definitely must-haves for any coffee lovers!  I think the sentiments are so funny!  Here’s a little close-up:

CFSCFCBloghop1B

I finished my card design by adding some Sparkling Clear Jewels.  Don’t you think the little color splotches look like coffee?  I love how this card turned out.

CFSCFCBloghop1C


Please don’t forget to use my coupon code below if you’d like to order the stamps and dies I used today.  Hop along with us by clicking on the link below to see more inspiration from the Coffee Loving Cardmakers DT and CAS-ual Fridays Ink Squad.  Don’t forget to leave a comment for a chance to win 1 of 3 $25 Gift Certificates.   I hope you like my card and got inspired.  Happy crafting!


b04db-cfs2bdt2bcode

————SUPPLIES—————