Hello Autumn with Miss Ink Stamps

Hello Miss Ink fans!  I am super excited to share my very first blog post as the new DT member for Miss Ink Stamps.  Autumn is my favorite season and when I saw this Pumpkin Spice Latte stamp set, I knew I just had to have it.  I’m also showcasing the Perfectly Plaid 6×6 Stencil.

To make the card, I started by stamping the image on some Neenah solar white card stock and colored the images in with Spectrum Noir alcohol markers.  I used my precision snips to fussy-cut the image.

Since the focal image is really colorful, I decided that the neutral background is the way to go.  I created the background panel by using the Perfectly Plaid 6×6 Stencil and some light gray dye ink.  I adhered this panel on some A2-size notecard.

I created my simple autumn scene by adhering some additional die-cuts that I have from my collection with liquid glue, then foam-mounted the focal image for added dimension.  I finished my card design by stamping the sentiment with some quick dry dye inks and added some Jasper Stone Pearl Mix for more texture.

I hope you like my card today and got inspired.  Thanks for stopping by!

——SUPPLIES——-

Harvest Wishes with Newton’s Nook Designs

Hello my crafty friends! I am so glad to be featured on the Newton’s Nook Blog today with this Clean & Simple card to share with you. For this project, I am showcasing the Heartfelt Gourds Stamp Set.

I know I’ve said this before but I’ll say it again! When the stamp set is so pretty, you don’t really have to add anything else. It basically stands out on its own, don’t you agree?!

I stamped the images on some Neenah solar white card stock with Spectrum Noir Finesse Quick Dry Ink in Black. I colored the images in with my Spectrum Noir TriBlend markers. They really are my “go-to” markers. I went for a non-traditional fall color palette using red, brown oranges, yellow and turquoise green.

I know you can barely see it but I did highlight the images with my Spectrum Noir Classique marker in BGR05. This is the reason why those images just popped against that white background.

I finished my design by stamping the sentiment and colored the letters with the same markers I used for the gourds. I added some autumnal sequins and the card is done! Easy peasy! Here’s another look:

I hope I have given you some inspiration today. The supplies I used are listed and linked below. Thanks for stopping by and happy stamping!

———SUPPLIES———

I love Fall with Newton’s Nook Designs

It’s time for some fall inspiration on my blog today. Sometimes when the stamp set is so pretty, you don’t really need to add anything else, don’t you agree?

For my card today, I am showcasing the Fall Friends stamp set with its coordinating dies along with the Sunscape 6×6 Stencil by Newton’s Nook.

I started by stamping the images on some Neenah solar white card stock with Memento Rich Cocoa ink. I colored the images in with alcohol markers. I also stamped the image on some masking paper and fussy-cut with my precision snips. I covered the colored image with the masking paper.

Next, I used the Sunscape Stencil with some Light Blue Quick Dry Dye ink to add some texture to the background. I removed the stencil and adhered the foreground to an A2-size black notecard.

I finished my design by die-cutting the “I love fall” on some white card stock. I adhered the letters on black card stock and fussy cut to create a black shadow for added dimension. I adhered the sentiment on the card with liquid glue. I also added some glossy accents to the heart to make it stand out. Here’s another look:

This card makes me want to snuggle up with my little kitty and drink some hot cocoa! I hope you love this card as much as I do! The supplies I used are listed and linked below. Thanks for joining me today!

——-SUPPLIES——–

Grateful to Count You Among My Blessings

Hello Cas-ual Fridays fans!  I’m back today to share a super simple card that you can easily mass-produce, showcasing the Wheat Wreath stamp set.  If you didn’t know, this stamp set is currently on clearance so grab it while you can before it sells out!  


I started by inking up my background using a circle stencil from my collection with some quick dry dye inks (bubblegum, butter and peach fuzz) using my blending brushes.
I stamped the wheat wreath and the sentiment with some Versamark ink and sprinkled some Wow! gold embossing powder.  I heat-set this with my heating tool.


I finished my design by adding the gold bow, from the Pear Tree Dies (that is also on the clearance section).  I adhered this on an A2-size card base.  Here’s another look:


This card is really simple but I love how it turned out.  This card can be easily mass-produce to give out to family and friends during Thanksgiving!
Y’all need to grab these supplies before they sell out.


On top of the clearance price, you can even use my discount code below to get an additional 15% off!
I hope you like my card today and happy stamping!

———–SUPPLIES———–


Savor Life’s Small Moments with Newton’s Nook

Hello my crafty friends!  I’m back today with Newton’s Nook with an Autumn-themed card, showcasing the Autumn Mice stamp set & coordinating dies.  

To begin, I stamped my images on some Neenah solar white card stock.  I colored the images in with my alcohol markers and used the coordinating dies to cut them out.

The background sky was created by inking up a panel of Bristol smooth white card stock with the Clouds stencil and Peacock Feathers distress oxide ink.   Next, I adhered some gray patterned paper on Neenah solar white and used an oval die from my collection to cut the window.  I foam-mounted this on the colored panel to create some dimension.

I used the same oval die to die-cut some green card stock, then used the Land Border Die Set to die-cut the grass.  I adhered this onto the foreground with liquid glue.  I also adhered my focal image with more leaves to create my scene.

I finished my design by adding the sentiment created using the smallest die from the Framework die set.  Here’s another look:

Stay tuned next week for the October release by Newton’s Nook.  It is going to be epic!  

I hope you like my card today.  The supplies I use are listed and linked below.  Thanks for stopping by!


———–SUPPLIES————

Shades of Autumn with Newton’s Nook Designs

Hello my crafty friends! It is officially fall and I am celebrating by sharing this card with you today, showcasing the Shades of Autumn stamp, along with the Fall-ing For You stamp set.   This card was inspired by Angelica Conrad from The Greetery.  The color combination that she used in her card was stunning and I knew I just had to try it.


To begin, I stamped the sentiment from the Fall-Ing For You stamp set with Spectrum Noir Finesse Alcohol-Proof Ink in Rustic Brown on an A2-size card panel.  Next, I stamped the leaves randomly with Worn Lipstick and Aged Mahogany, Scattered Straw and Fossilized Amber, with Crushed Olive and Forest Moss.  I used my mini sponge daubers to intensify the colors and create deeper shadows.


I pressed my Aged Mahogany ink pad onto an acrylic block and added some water, then used my watercolor brush to mix it well and flicked it onto my card panel for added texture.


To finish my design, I adhered the Gold Rhinestone jewels with liquid glue for added dimension.  This card is very simple and can be easily mass-produced.  Here’s another look:


I hope you like my card today.  The supplies I use are listed and linked below.  Thank you so much for stopping by and happy fall season everyone!


———–SUPPLIES————


Clean & Simple Card with MFT Stamps


Hello my crafty friends! I am back today with another card for the 2020 Card Design Superstar!   This is my entry for the Clean & Simple category.  I don’t always make clean and simple cards but I really LOVE how this one turned out.


For my project, I am showcasing the Hanging with my Gnomies stamp set, along with the Circle Shaker Window & Frame die-namics, Rolling Clouds stencil and Congratulations Circle Frame Die-namics.


To begin, I stamped the Gnome on some Neenah solar white card stock and colored the image in with my alcohol markers.  Since I didn’t have the coordinating die, I fussy-cut the image using my precision snips.  


Next, I die-cut a circle using the Circle Shaker Window & Frame die-namics on some masking paper and use the negative to mask off the space.  I positioned the Rolling Clouds Stencil and used my mini ink-blending tool to create the clouds for added texture.   This made my focal image to stand out.


I die-cut the “congratulations” using the Congratulations Circle Frame die-namics three times and adhered with liquid glue for added dimension.  I adhered this piece onto an A2-size card base. 


I finished my design by foam-mounting the gnome onto the card.  Here’s another look:


I hope you like my card today.  Please wish me luck that I get picked this year!  The supplies I use are listed and linked below.  Thanks for stopping by and happy stamping!


———–SUPPLES———-

Fill the Season with Warm Memories with MFT Stamps


It is that time of the year where card-makers all over the world get together and join this amazing opportunity offered by My Favorite Things.  It is the 2020 Card Design Superstar and I am super excited to participate again this year.  This is my entry for the Coloring Virtuoso category.


For my project, I am showcasing the Birdie Brown Fall Friends stamp set and coordinating dies, along with the Stacey Yacula’s Scene Builder stamp set and Tucked-In Turf Horizontal Die-namics.


To begin, I stamped the Trees and hills on a panel of Bristol smooth white card stock.  I also stamped the same image on masking paper and used my precision snips to fussy-cut my mask and adhered it on my panel.  I ink-blended the background with Spun Sugar and Tumbled glass distress oxide inks. 


I smooshed Aged Mahogany on an acrylic block and added water, then use my watercolor brush to add texture to my background.  I picked up the excess with some paper towel.  I gently removed the mask so I can ink-blend the grassy hills with Antique Linen and Scattered Straw.  I colored the trees with Spectrum Noir Alcohol markers.  Next, I stamped my focal images on some Neenah solar white card stock using Rustic Brown alcohol-proof ink and colored them in with Spectrum Noir alcohol markers.  I used the coordinating dies to die-cut them out.


To create my scene, I die-cut the grass panel using the Tucked-In Turf Horizontal Die-namics and ink-blended this piece with Crushed Olive and Forest Moss distress oxide inks.  These colors blend really well together!  I adhered the grass panel on my ink-blended background and added the images.  Here’s a closer look:


I finished my design by using my white gel pen to add more texture to the girl’s scarf and stamped the sentiment with Versafine Onyx Black ink.  I really LOVE Autumn and this stamp set is one of my favorites from MFT Stamps.  Here’s another look:


I hope you like my card today.  Please wish me luck that I get picked this year!  The supplies I use are listed and linked below.  Thanks for stopping by and happy stamping!


———–SUPPLES———-

Pumpkin Kisses & Harvest Wishes Blog Hop with Kat Scrappiness & Not2Shabby Shop


Welcome to the “Sending you Pumpkin Kisses & Harvest Wishes from Not 2 Shabby & Kat Scrappiness!” We are thrilled you could join us on this blog & Instagram hop celebration! Kat Scrappiness has some of the best stamps, dies, and embellishments around and Not 2 Shabby is very excited to carry their products!  The blog & Instagram hops and giveaways will start today, September 10 and will end on Tuesday, September 15th. We will have 4 x $15 winners!! 2x pulled from blog comments and 2x pulled from the Instagram comments.Come hop with us and see what all the excitement is about!  To find out how you can win, the giveaway info is listed at the end of this blog post, including order of the hop.


For this event, we are showcasing the Double Stitched Nesting, Wonky Stitched Nesting and Tri-Frame slimline dies from Kat Scrappiness and theHappy Fall” Stamp set from Not 2 Shabby.


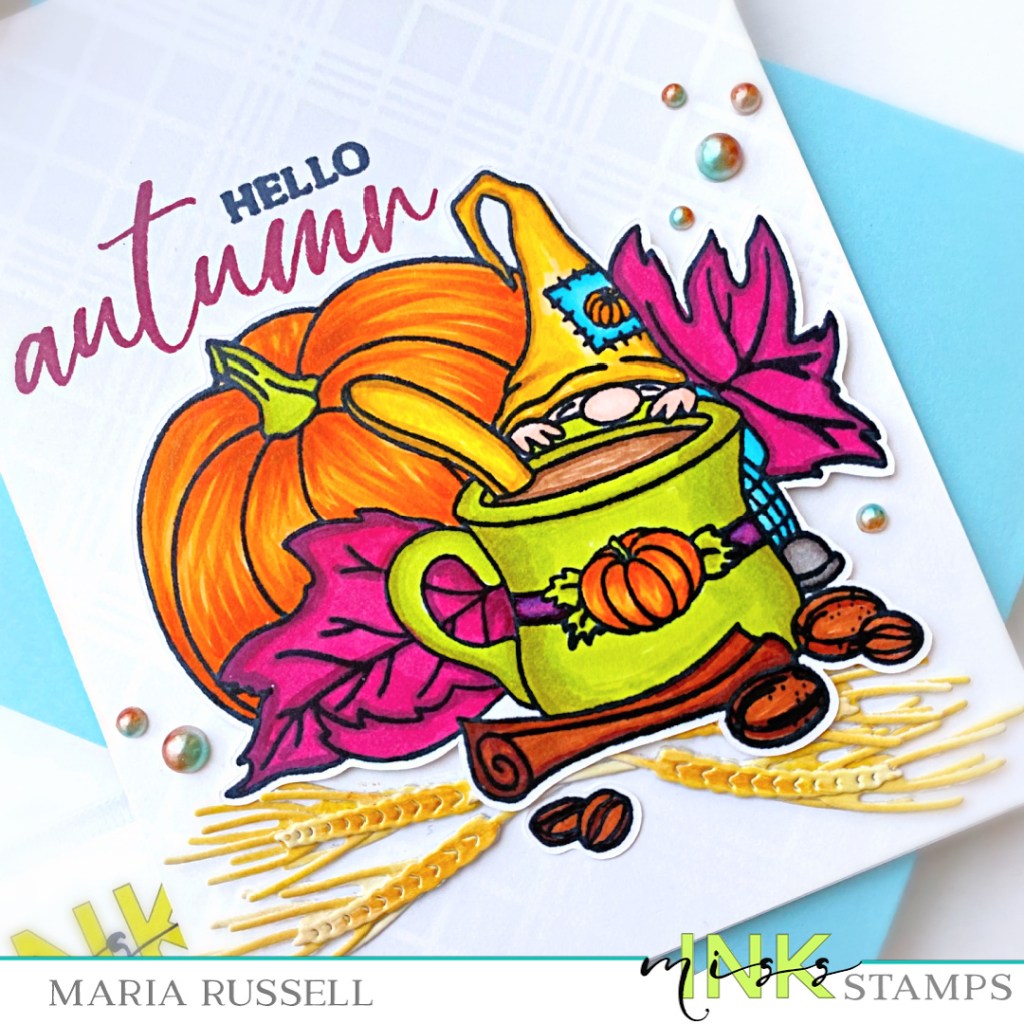
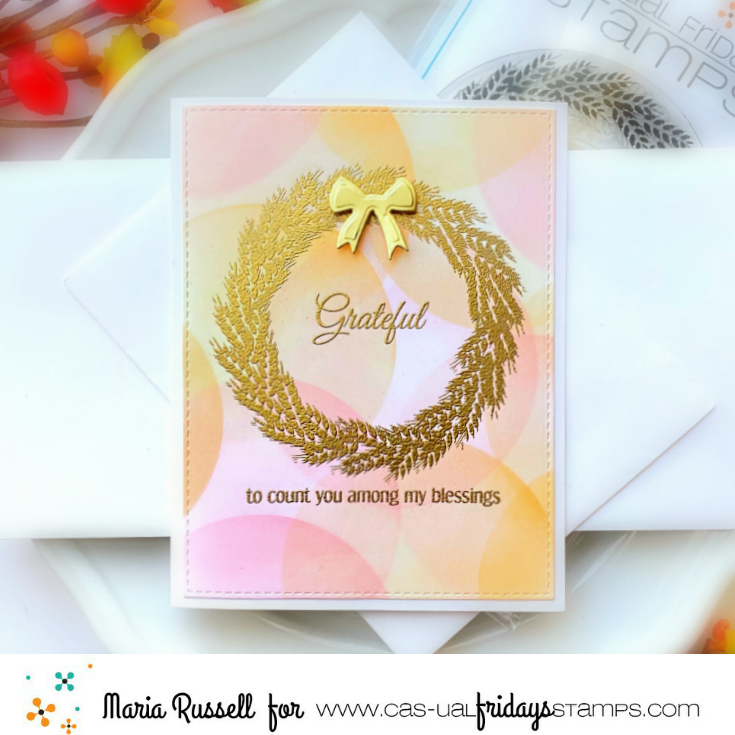
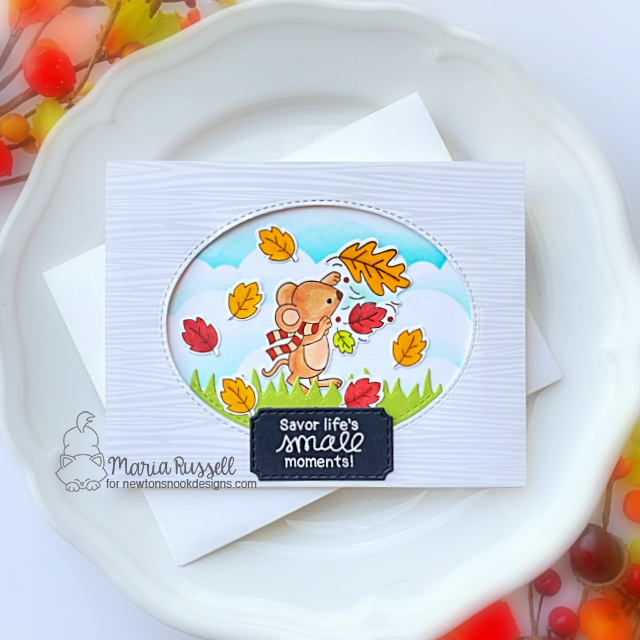
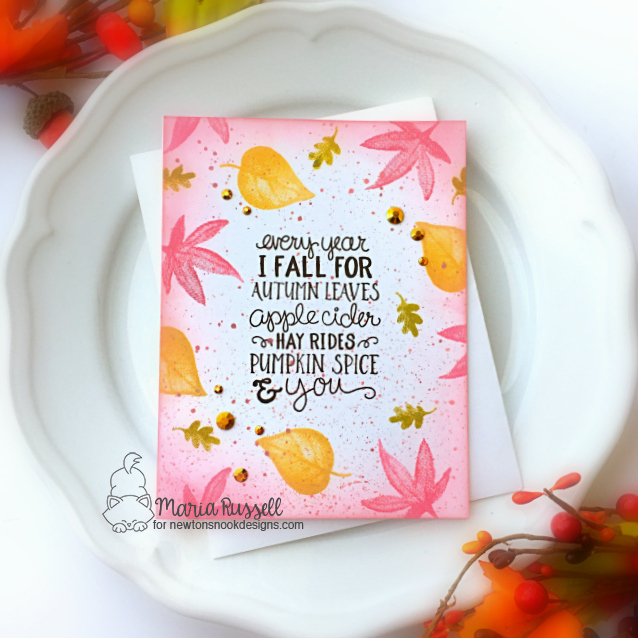
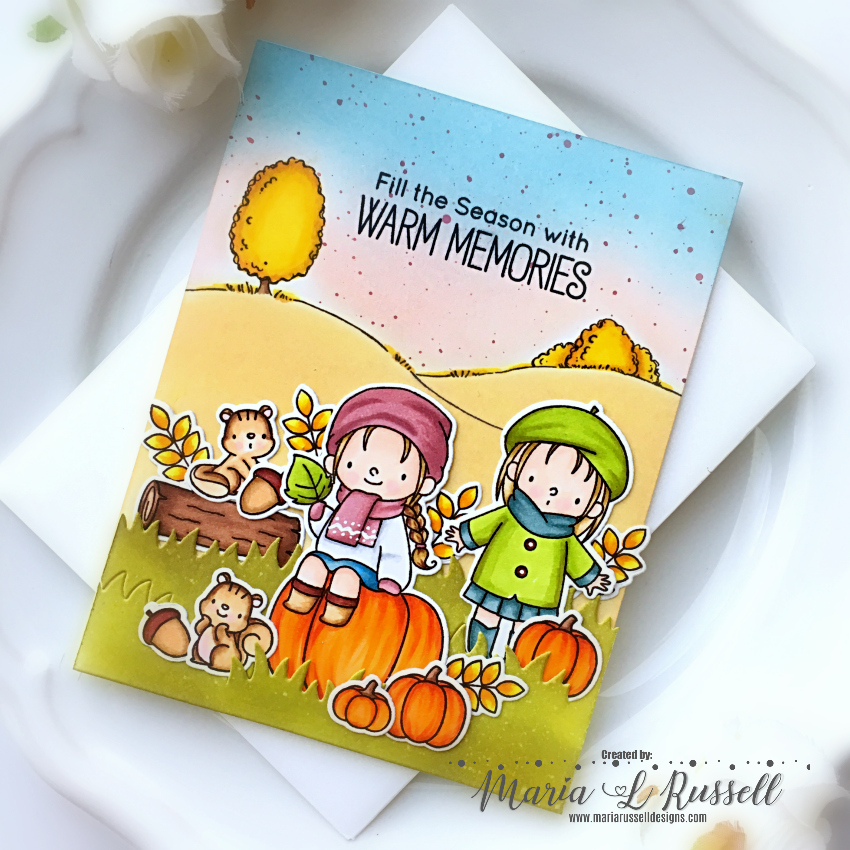
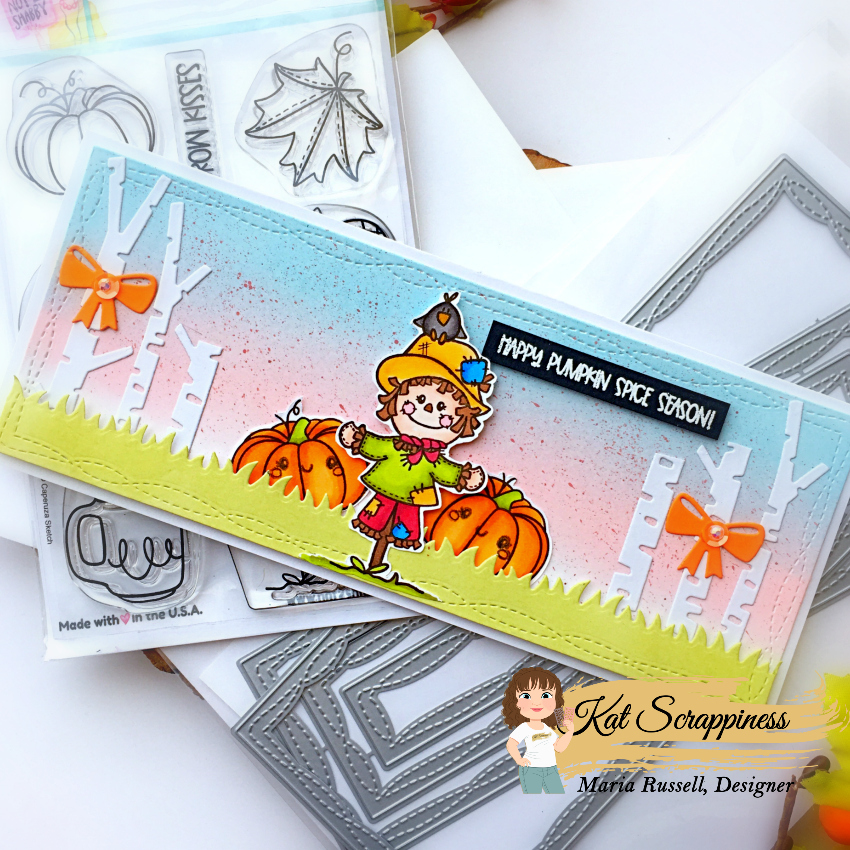
Here’s the first card that I made:


I went for a clean and simple design for my first card.  The background was die-cut using the Wonky Stitched Nesting Slimline die on a panel of Bristol smooth white card stock and ink-blended with distress oxide inks.  I wanted the colors to be very subtle to create an early morning autumn sky.  I splattered some color on the background using aged mahogany distress oxide ink, mixed with water for added texture and dimension.  I also die-cut the rest of the elements that I needed to create my scene.


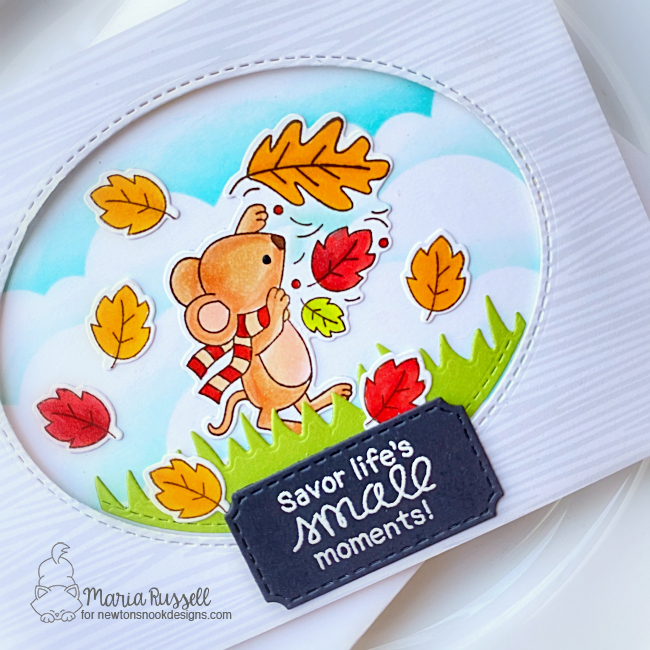
The images were stamped and colored with Spectrum Noir TriBlend markers and fussy-cut using precision snips.  I adhered the images onto the background using liquid glue.  I foam-mounted the scarecrow for added dimension.   Here’s a closer look:


The sentiment was stamped on black card stock with Versamark ink and heat-set with my heating tool.   I love the simplicity of this card and the colors of the images just really popped against the subtle background!


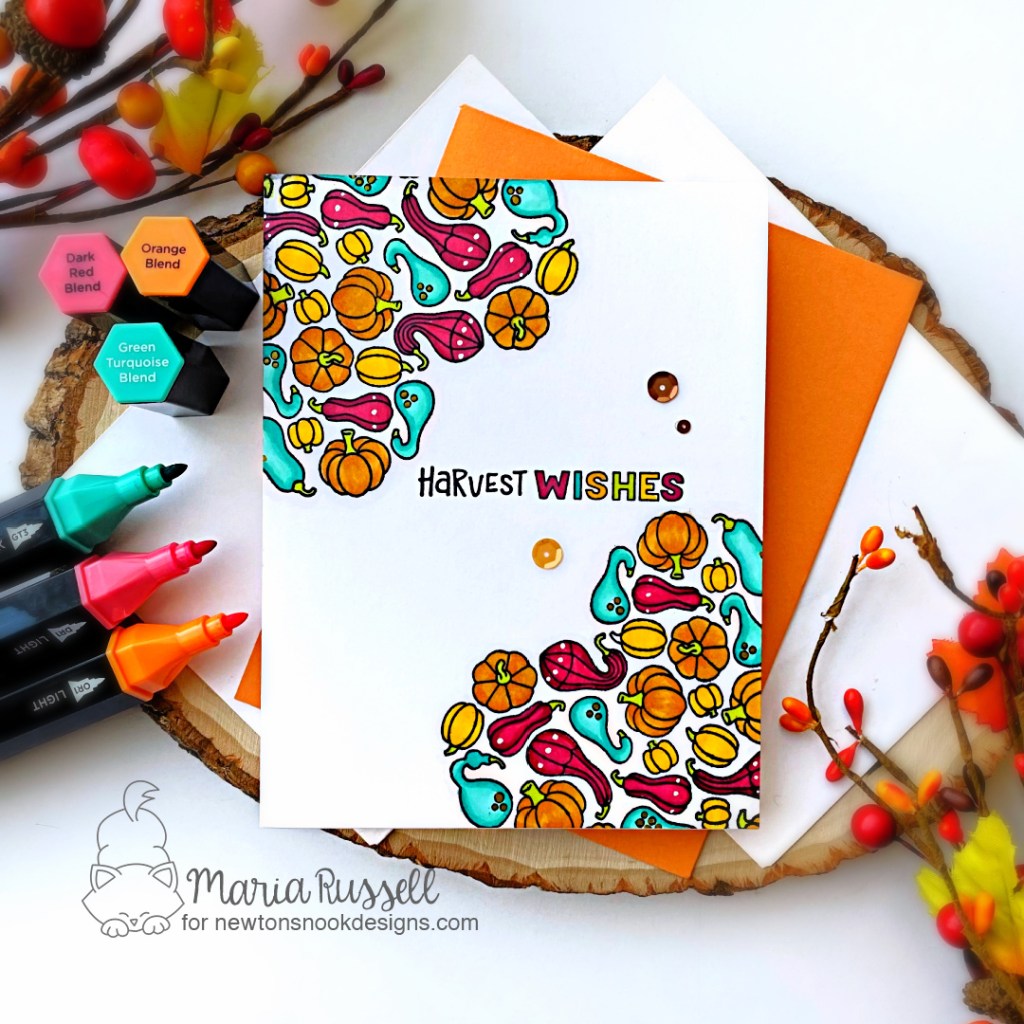
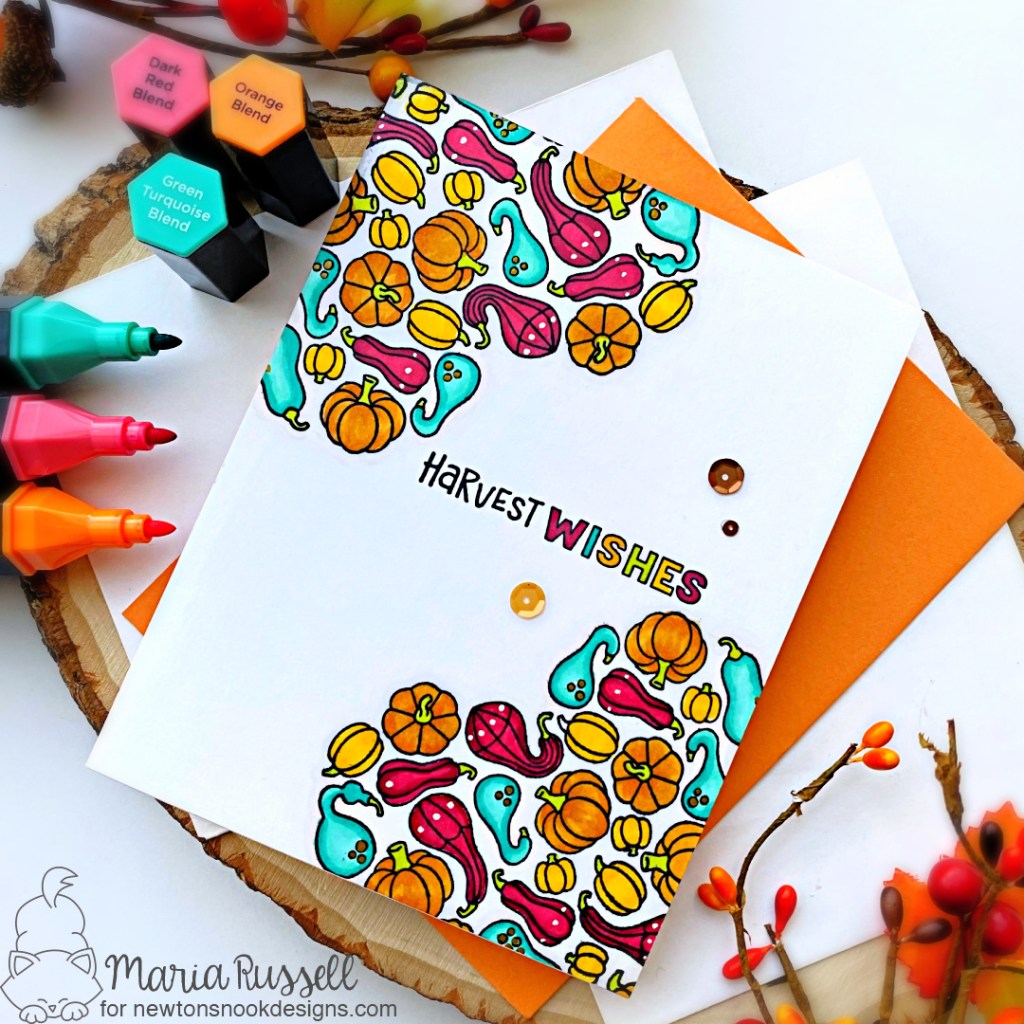
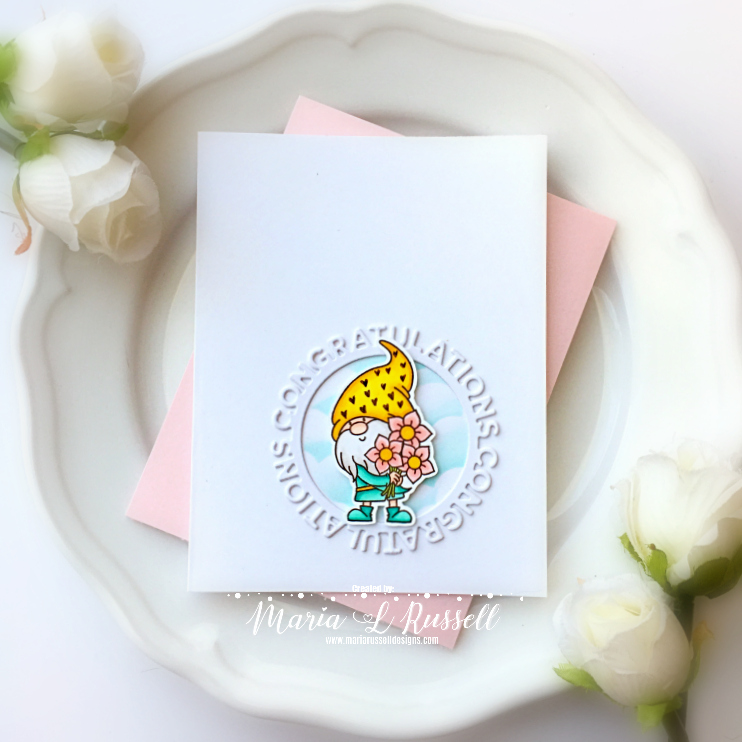
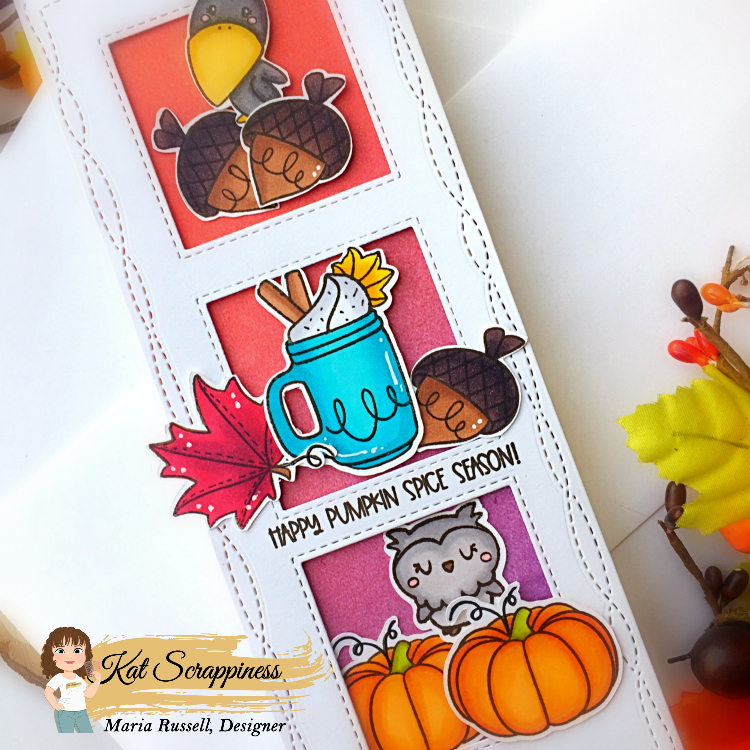
Since I colored a lot of images, I decided to make a second card.  


I really love this Happy Fall stamp set by Not2Shabby.  Here’s a little close-up:


To participate in the hop giveaway, simply leave a comment on each blog post, follow each DT member on Instagram, comment and tag your friends. The more you comment the more chances of winning. Bonus entries for following our stores on all our social media below:


Not 2 Shabby Facebook Page: https://www.facebook.com/not2shabbyshop

Not 2 Shabby Card Group: https://www.facebook.com/groups/103832353026882

Not 2 Shabby YouTube: https://www.youtube.com/scrappinstampers

Not 2 Shabby Instagram: https://www.instagram.com/jamie_scrappinstampers/

Kat Scrappiness Insiders group: https://www.facebook.com/groups/KatScrappiness/

Kat Scrappiness Business Page: https://www.facebook.com/KatScrappiness/

Kat Scrappiness YouTube: https://www.youtube.com/user/thekatsmeow1969

Kat Scrappiness Instagram: https://www.instagram.com/katscrappiness/

The winners will be announced on the Not 2 Shabby and Kat Scrappiness blog on September 18th.  You will need to contact us to claim your prize. You can subscribe to our blogs for a notification email on any new blog posts. You will have 7 days to claim your prize.

Thank you for hopping with us and supporting our small businesses!

Hop Order:

Kat Scrappiness @katscrappiness

Ana Stacksofcards @anaa975 

Cathy Arenzana @catarenz    

Jackie Pasko @jackiescrafttable 

Carrie Rhoades  @carrierhoades 

Meghan Kennihan @MadeByMeghanK

Maria Russell  @rprmlr77  (you are here)

Kathy Schweinfurth @stampinkathy4

Jo Thompson @thompson_jo

Priscilla Joseph @nubblelightdesigns 

Not 2 Shabby @jamie_scrappinstampers