Holiday Spirits Christmas Card

Hello everyone! It’s Maria here with you today and I will be showcasing a lot of items from Kat Scrappiness. For my card, I have used the Avery Elle Holiday Spirits stamp set and Holiday Spirits Dies, with DCAM 8×8 Bricked Wall Stencil and Deck the Halls sequin Mix.

Here is the card:

img_2935

The process video below will not show any Copic coloring because I wanted to keep the video as short as possible. You will, however, see how I stenciled the background and assembled the card.


I hope you found the video helpful and got inspired today. The supplies I have used are listed and linked below. Happy holidays!

—–SUPPLIES—–

The Greeting Farm – Let’s Mingle

I am super excited to finally be able to share my projects! I am guest designing again for The Greeting Farm.  I have shared these two adorable Christmas cards with a process video below, showcasing Let’s Mingle stamp set and dies by The Greeting Farm.  I love these little mice!   Aren’t they adorable?


Here are the cards:


img_2645


Here’s the process video:


I hope you got inspired today! Have an absolutely, amazing day!


We Go Together Like Cocoa & Marshmallows

We go together like cocoa and marshmallows! Need I say more? I am back to share with you two projects that I have finished today for my entry to the Coffee Lovers Blog Hop (link here: http://coffeelovingcardmakers.com/2016/12/2017-winter-coffee-lovers-blog-hop/). I used this adorable free digital stamp that JessicaLynnOriginal had provided for those who would like to participate in this hop. Click here to get yours (https://www.jessicalynnoriginal.com/instant-stamp-download-jessicalynnoriginal-coms-merry-christmas-snowman-marshmallow-relaxing-digital-rubber-stamp/).


Here is a cute Christmas tag that I have made to go with my hot cocoa mix stocking stuffer:


img_2794-1


Here’s the card below.  Isn’t he adorable?  In case you were wondering, I used the new KatScrappiness Jingle All the Way script die.


img_2795-1

I hope you all got inspired today to join this fun hop. Thank you again, Amy Tsuruta and her team for putting together this amazing hop! You guys are amazing!

“Beary” Christmas ~ CDD Monthly Challenge

Happy Monday everyone! I hope you are all having a great day so far. I am back today to share with you two Christmas projects that I have made to get you in the mood for the holidays.


The December monthly challenge at Craftin’ Desert Divas (#CDDMonthly) is all about Christmas and I got inspired by the amazing mood board that Tara (the owner) has put together. For people joining the challenge, Tara is also giving away a free digi-stamp called “Beary Christmas”. Thank you Tara for this amazing digi!  If you would like to join the challenge and get the free digi-stamp, please join the CDD Gallery Facebook Group here:


This is the mood board for this month’s challenge. Isn’t it beautiful?

2016_12-monthly-challenge


And here are the two projects that I made. Are you inspired yet?

img_2810


img_2806

Thank you so much for stopping by and have an amazing week!

Beast Friends Christmas Tags & Cards

I’m sharing my design team projects today for Not2ShabbyShop showcasing MFT Stamps Beast Friends stamp set and beast friends die-namics.  I am going to keep this blog post short because I have a process video below if you would like to see it.

Here is the photo:


beastfriends1


Here is the process video for one of the cards and tag:


——SUPPLIES——


MFT Color Challenge #57 – Beast Friends

I just absolutely adore MFT Stamps!  There is a new color challenge # 57 at the Blog and everyone should use: Smooth White, Chili Powder, Cement Gray, and Gravel Gray. I love this color combination and I knew I just had to participate.

mft_colorchallenge_paintbook_57

One of my favorite stamps right now is the Beast Friends stamp set by MFT. This adorable Yeti is so cute and perfect for winter-themed cards and scrapbook layouts. Combining my love for this stamp set and the color challenge, here is my card:

img_2632

Isn’t he adorable?  I will have a process video for this card in a few days. I hope you like it and have an amazing day!

——–SUPPLIES———

Once Upon A Fairy Tale Brentwood and Operation Snowball Brentwood

This is my second blog post for today and I apologize for that. It just so happens that today, we are launching two new beautiful stamp sets by www.jessicalynnoriginal.com, called “Operation Snowball Brentwood” and “Once Upon a Fairy Tale Brentwood”. These two new stamp sets are probably my favorite drawings by Jessica, thus far. I have created two samples for each stamp set.

Once Upon a Fairy Tale Brentwood:

Processed with MOLDIV

img_2434

Operation Snowball Brentwood:

img_2626

img_2624

The supplies are listed and linked below. Have a great weekend!

Autumn Splendor – Sunny Studio Stamps

I am back today to share with you my design team projects for Not2ShabbyShop showcasing the Autumn Splendor stamp set and dies, and fishtail banner II dies by Sunny Studio stamps. I LOVE this stamp set! It is so easy to stamp and layer, they are amazing!

Here are the cards and tags.  I have also shared a process video if you’d like to see how I made them.

img_2582

img_2583

Here’s the process video:

Angel Inspirational Card

I finally had the chance to sit down, turn on my music, light some candles and start creating a card that is just simply for a friend, and not design-team related.

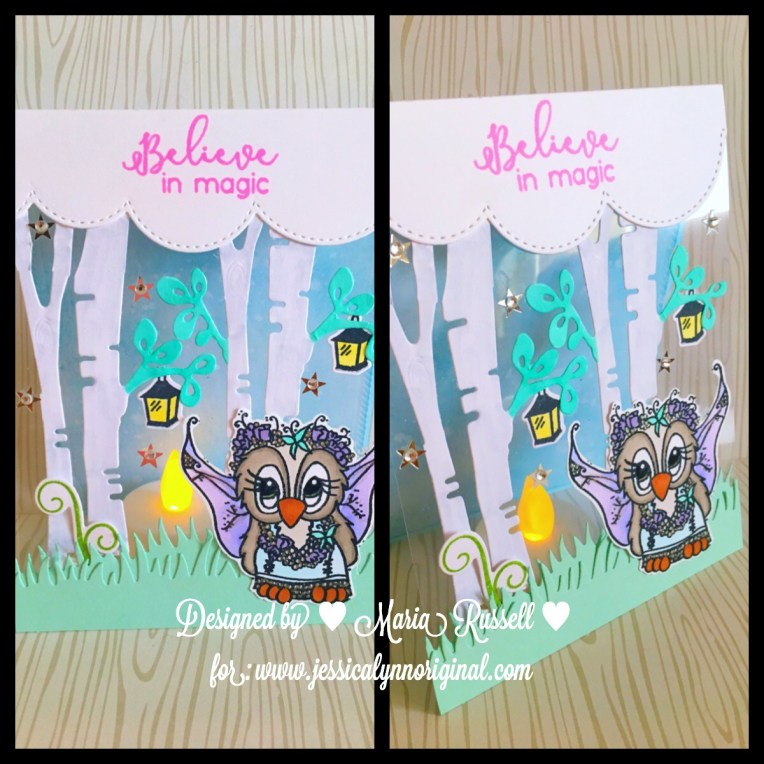
I recently ordered these cute Angel stamp set by Sunny Studio and I couldn’t wait to play with them. I had this design idea in my head for quite sometime now and decided to create a see-through card.  Here’s a step-by-step instruction below. It seems like a lot of work but I promise you, it’s really easy!

  1. Cut the white card-base at 4 ¼ by 11 and score at 5 ½.
  2. Trim the front panel at 4 ½, leaving the front of the card with an inch.
  3. Cut an acetate sheet measuring to 4 ¼ by 5 ½
  4. Adhere the acetate sheet behind the 1-inch flap. This will create the window part of the card.
  5. Using the leftover card stock that I just trimmed from the front card-panel, I used my Clouds border die to cut 3 different clouds pieces to create my “clouds”.
  6. Using my sponge, I distressed the clouds with Tim Holtz Spun Sugar and Shaded Lilac distressed inks. I wanted the card to have a unique pink and purple color.
  7. I then adhered the clouds on the front panel of the card. One cloud on top, and two at the bottom.
  8. I cut another white card stock measuring 4 1/8 by 5 3/8. Using my sponge again, I distressed the card stock with the same colors that I used for my clouds.
  9. I adhered this card stock on the inside of my card (I wanted to use the same colors that I used for my clouds for the inside of the card).
  10. Using my Memento Tuxedo Black Ink, I stamped the angels, cloud and lantern images on Neenah solar white card stock.
  11. I used my Copic markers to color the images.
  12. img_2551
  13. Using the coordinating dies for the angels, I die-cut the images with my big shot machine.
  14. I used my ATG tape runner to adhere the Angels on the front panel.
  15. I used my mini-glue dots to adhere the lantern on the Angels’ hands.
  16. Using my Ranger Multi-Medium Matte adhesive, I adhered the little purple star sequins by Kat Scrappiness to decorate my card further.
  17. I stamped the sentiment inside the card, using my Lawn Fawn Hippo Ink.


Here are the photos of the finished card. I inserted an LED tea light so that my friend can also use this to display in her craft room.


img_2556

img_2557

img_2558


I really love how this card turned out. Would you give it a try? I would love to see your version of my design.

The supplies I have used are listed and linked below. Thanks so much for stopping by and have an amazing day!

SUPPLIES: